本文主要介绍利用CoreGraphics和CADisplayLink来实现一个注水动画。来一个效果图先:
在介绍注水动画前,先介绍利用CoreGraphics实现进度条的绘制。
一、扇形进度绘制
效果: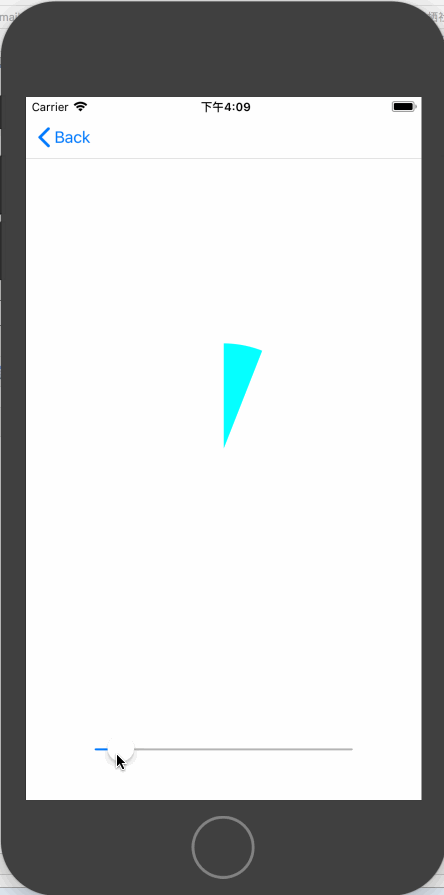
代码如下:
- (instancetype)initWithCoder:(NSCoder *)coder
{
    self = [super initWithCoder:coder];
    if (self) {
        self.arcColor = [UIColor cyanColor];
    }
    return self;
}

- (void)drawRect:(CGRect)rect {
    [super drawRect:rect];

    CGContextRef context = UIGraphicsGetCurrentContext();

    [self.arcColor setFill];

    CGFloat startAngle = -M_PI_2;
    CGFloat endAngle  = self.progress * M_PI * 2 + startAngle;

    CGPoint center = CGPointMake(rect.size.width / 2, rect.size.height / 2);

    UIBezierPath *path = [UIBezierPath bezierPathWithArcCenter:center radius:rect.size.width / 2 startAngle:startAngle endAngle:endAngle clockwise:YES];

    CGContextAddPath(context, path.CGPath);
    CGContextAddLineToPoint(context, center.x, center.y);

    CGContextDrawPath(context, kCGPathFill);
}

- (void)setProgress:(CGFloat)progress
{
    NSLog(@"%g", progress);
    if (progress > 1) {
        progress = 1;
    }else if (progress < 0){
        progress = 0;
    }
    _progress = progress;
    dispatch_async(dispatch_get_main_queue(), ^{
        [self setNeedsDisplay];
    });
}
原理就是根据不同的进度值不停的重新绘制扇形。
二、绘制带边缘的扇形进度图
代码如下:
@implementation ArcWithTrackProgressView

- (instancetype)initWithCoder:(NSCoder *)coder
{
    self = [super initWithCoder:coder];
    if (self) {
        self.backgroundColor = [UIColor clearColor];
        self.trackColor = [UIColor cyanColor];
        self.progressColor = [UIColor cyanColor];
    }
    return self;
}

- (void)drawRect:(CGRect)rect
{
    //绘制圈
    UIBezierPath *trackPath = [UIBezierPath bezierPathWithOvalInRect:CGRectInset(rect, 2, 2)];
    CGContextRef context = UIGraphicsGetCurrentContext();
    CGContextSetLineWidth(context, 0.5);
    CGContextAddPath(context, trackPath.CGPath);

    [self.trackColor setStroke];
    CGContextDrawPath(context, kCGPathStroke);//绘制进度
    [self.progressColor setFill];
    CGFloat startAngle = - M_PI_2;
    CGFloat endAngle = self.progress * 2 * M_PI + startAngle;
    CGPoint center = CGPointMake(CGRectGetWidth(rect) / 2, CGRectGetHeight(rect) / 2);
    CGFloat radius = CGRectGetHeight(rect) / 2 - 6;//设置半径
    UIBezierPath *progressPath = [UIBezierPath bezierPathWithArcCenter:center radius:radius startAngle:startAngle endAngle:endAngle clockwise:YES];

    CGContextAddPath(context, progressPath.CGPath);
    CGContextAddLineToPoint(context, center.x, center.y);
    CGContextDrawPath(context, kCGPathFill);
}

- (void)setProgress:(CGFloat)progress
{
    NSLog(@"%g", progress);
    if (progress > 1) {
        progress = 1;
    }else if (progress < 0){
        progress = 0;
    }
    _progress = progress;
    dispatch_async(dispatch_get_main_queue(), ^{
        [self setNeedsDisplay];
    });
}

@end
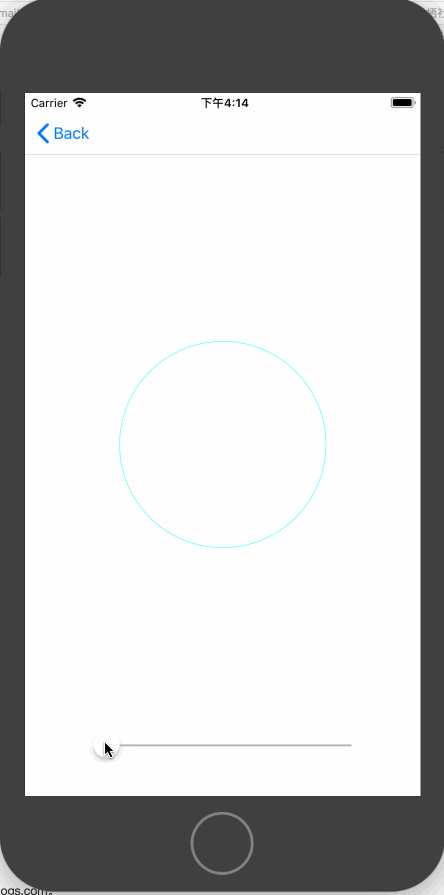
三、绘制一个圆环进度
效果图如下:
此效果分为两步实现,一部分是绘制圆环,一部分是绘制勾。我在这里使用的CoreGraphics来绘制环,勾的话是利用CAShapeLayer来实现的。代码如下:
@implementation AnnularProgressView

- (instancetype)initWithFrame:(CGRect)frame
{
    self = [super initWithFrame:frame];
    if (self) {
        [self commonSetup];
    }
    return self;
}

- (instancetype)initWithCoder:(NSCoder *)coder
{
    self = [super initWithCoder:coder];
    if (self) {
        [self commonSetup];
    }
    return self;
}

- (void)commonSetup
{
    self.arcColor = [UIColor cyanColor];
    self.lineWidth = 5.f;

    //设置shapeLayer
    CAShapeLayer *tick = [[CAShapeLayer alloc] init];
    tick.bounds = self.bounds;
    tick.position = CGPointMake(CGRectGetWidth(self.bounds) / 2, CGRectGetHeight(self.bounds) / 2);
    CGFloat width = CGRectGetWidth(self.bounds);
    CGFloat height = CGRectGetHeight(self.bounds);
    UIBezierPath *bezierPath = [[UIBezierPath alloc] init];
    [bezierPath moveToPoint:CGPointMake(width * 0.25, height * 0.46)];
    [bezierPath addLineToPoint:CGPointMake(width * 0.45, height * 0.71)];
    [bezierPath addLineToPoint:CGPointMake(width * 0.78, height * 0.29)];
    tick.path = bezierPath.CGPath;
    tick.fillColor = [UIColor clearColor].CGColor;
    tick.strokeColor = [UIColor cyanColor].CGColor;
    tick.strokeStart = 0;
    tick.strokeEnd = 0;
    tick.lineWidth = self.lineWidth;
    tick.lineCap = kCALineJoinRound;

    [self.layer addSublayer:tick];

    self.tick = tick;
}

- (void)drawRect:(CGRect)rect {
    CGContextRef context = UIGraphicsGetCurrentContext();
    CGContextSetLineCap(context, kCGLineCapRound);
    CGContextSetLineWidth(context, self.lineWidth);

    [self.arcColor setStroke];

    //绘制圆环
    CGFloat startAngle = -M_PI_2;
    CGFloat endAngle  = self.progress * M_PI * 2 + startAngle;
    CGPoint center = CGPointMake(rect.size.width / 2, rect.size.height / 2);
    UIBezierPath *path = [UIBezierPath bezierPathWithArcCenter:center radius:rect.size.width / 2 - self.lineWidth startAngle:startAngle endAngle:endAngle clockwise:YES];
    CGContextAddPath(context, path.CGPath);
    CGContextDrawPath(context, kCGPathStroke);

    self.tick.strokeEnd = self.progress;//设置勾的进度

}

- (void)setProgress:(CGFloat)progress
{
    NSLog(@"%g", progress);
    if (progress > 1) {
        progress = 1;
    }else if (progress < 0){
        progress = 0;
    }
    _progress = progress;
    dispatch_async(dispatch_get_main_queue(), ^{
        [self setNeedsDisplay];
    });
}
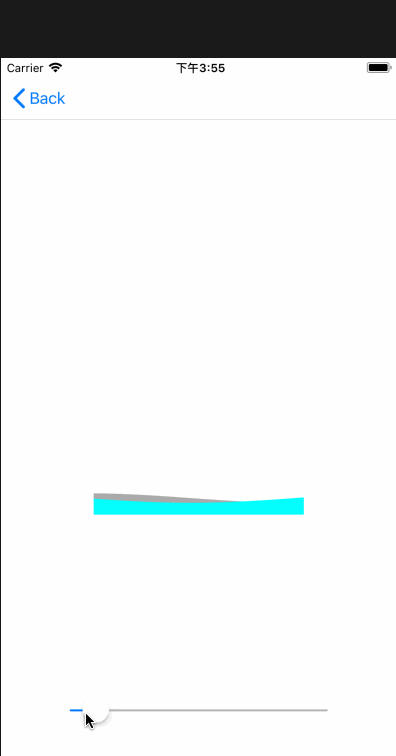
四、注水动画
效果:

注水动画的实现主要是通过正余弦函数绘制来实现的。正余弦曲线公式如下:
正弦函数
y=Asin(ωx+φ)+k //正弦函数
y=Acos(ωx+φ)+k //余弦函数
其中
A——振幅,当物体作轨迹符合正弦曲线的直线往复运动时,其值为行程的1/2。
(ωx+φ)——相位,反映变量y所处的状态。
φ——初相,x=0时的相位;反映在坐标系上则为图像的左右移动。
k——偏距,反映在坐标系上则为图像的上移或下移。
ω——角速度, 控制正弦周期(单位角度内震动的次数)。
介绍完公式,接下来直接上代码:
@interface WaveProgressView ()

@property (nonatomic, assign) CGFloat initialPhase;//初相
@property (nonatomic, strong) CADisplayLink *timer;

@end


//y=Asin(ωx+φ)+k
@implementation WaveProgressView

- (instancetype)initWithCoder:(NSCoder *)coder
{
    self = [super initWithCoder:coder];
    if (self) {
        [self commonSetup];
    }
    return self;
}

- (instancetype)initWithFrame:(CGRect)frame
{
    self = [super initWithFrame:frame];
    if (self) {
       [self commonSetup];
    }
    return self;
}

- (void)commonSetup
{
    CADisplayLink *timer = [CADisplayLink displayLinkWithTarget:self selector:@selector(moveWave:)];
    [timer addToRunLoop:[NSRunLoop mainRunLoop] forMode:NSRunLoopCommonModes];

    self.backgroundColor = [UIColor clearColor];
}

- (void)drawRect:(CGRect)rect
{
    CGContextRef context = UIGraphicsGetCurrentContext();

    UIBezierPath *sinPath = [UIBezierPath bezierPath];
    UIBezierPath *cosPath = [UIBezierPath bezierPath];
    CGFloat y;
    CGFloat amplitude = 5;//振幅
    CGFloat palstance = M_PI / self.bounds.size.width;//角速度

    CGPoint startPoint = CGPointMake(0, CGRectGetHeight(rect));
    [sinPath moveToPoint:startPoint];
    [cosPath moveToPoint:startPoint];
    //正弦曲线
    for (CGFloat x = 0.0 ; x <= rect.size.width; x++) {
        y = amplitude * sin(palstance * x + self.initialPhase);
        CGPoint point = CGPointMake(x, y + CGRectGetHeight(rect) * (1 - self.progress) - amplitude);

        [sinPath addLineToPoint:point];
    }

    //余弦曲线
    for (int x = 0 ; x <= rect.size.width; x++) {
        y = amplitude * cos(palstance * x + self.initialPhase);
        CGPoint point = CGPointMake(x, y + CGRectGetHeight(rect) * (1 - self.progress) - amplitude);

        [cosPath addLineToPoint:point];
    }


    CGPoint endPoint = CGPointMake(CGRectGetWidth(rect), CGRectGetHeight(rect));
    [sinPath addLineToPoint:endPoint];
    [cosPath addLineToPoint:endPoint];
    [[UIColor lightGrayColor] setFill];

    CGContextAddPath(context, sinPath.CGPath);
    CGContextDrawPath(context, kCGPathFill);

    [[UIColor cyanColor] setFill];
    CGContextAddPath(context, cosPath.CGPath);
    CGContextDrawPath(context, kCGPathFill);
}

- (void)moveWave:(CADisplayLink *)timer
{
    self.initialPhase += 0.1;

    dispatch_async(dispatch_get_main_queue(), ^{
        [self setNeedsDisplay];
    });

}

- (void)setProgress:(CGFloat)progress
{
    NSLog(@"%g", progress);
    if (progress > 1) {
        progress = 1;
    }else if (progress < 0){
        progress = 0;
    }
    _progress = progress;
}


- (void)dealloc
{
    [self.timer invalidate];
}
实现原理:设定好曲线的振幅、角速度,然后根据progress来设置正余弦曲线的绘制路径。利用CADisplayLink来不断的改变曲线的初相来达到曲线移动的效果。
你可以从这里下载demo