支持定制化 SQL、存储过程以及高级映射的优秀的数据库框架。
一、使用前准备
1.加入相关的jar包。这里使用mybatis-3.2.2.jar包,数据库使用mysql 5.5版本
2.创建mybatis的配置文件
这里创建一个demo,数据库名huayu,表有student,class,adviser,course,sc,teacher其结构分别为
SET FOREIGN_KEY_CHECKS=0;

-- ----------------------------
-- Table structure for adviser
-- ----------------------------
DROP TABLE IF EXISTS `adviser`;
CREATE TABLE `adviser` (
  `aid` int(11) NOT NULL,
  `adviserName` varchar(10) DEFAULT NULL,
  PRIMARY KEY (`aid`)
) ENGINE=InnoDB DEFAULT CHARSET=utf8;

-- ----------------------------
-- Table structure for class
-- ----------------------------
DROP TABLE IF EXISTS `class`;
CREATE TABLE `class` (
  `cid` int(11) NOT NULL,
  `method` varchar(20) DEFAULT NULL,
  `aid` int(11) DEFAULT NULL,
  PRIMARY KEY (`cid`),
  KEY `c_aid` (`aid`),
  CONSTRAINT `c_aid` FOREIGN KEY (`aid`) REFERENCES `adviser` (`aid`)
) ENGINE=InnoDB DEFAULT CHARSET=utf8;

-- ----------------------------
-- Table structure for course
-- ----------------------------
DROP TABLE IF EXISTS `course`;
CREATE TABLE `course` (
  `cid` varchar(10) NOT NULL DEFAULT '',
  `cname` varchar(40) DEFAULT NULL,
  `coursehour` int(11) DEFAULT NULL,
  PRIMARY KEY (`cid`)
) ENGINE=InnoDB DEFAULT CHARSET=utf8;

-- ----------------------------
-- Table structure for sc
-- ----------------------------
DROP TABLE IF EXISTS `sc`;
CREATE TABLE `sc` (
  `sid` int(11) NOT NULL DEFAULT '0',
  `cid` varchar(10) NOT NULL DEFAULT '',
  `score` int(11) DEFAULT NULL,
  `tid` int(11) DEFAULT NULL,
  PRIMARY KEY (`sid`,`cid`),
  KEY `t_tid` (`tid`),
  KEY `c_cid` (`cid`),
  CONSTRAINT `c_cid` FOREIGN KEY (`cid`) REFERENCES `course` (`cid`),
  CONSTRAINT `s_sid` FOREIGN KEY (`sid`) REFERENCES `student` (`sid`),
  CONSTRAINT `t_tid` FOREIGN KEY (`tid`) REFERENCES `teacher` (`tid`)
) ENGINE=InnoDB DEFAULT CHARSET=utf8;

-- ----------------------------
-- Table structure for student
-- ----------------------------
DROP TABLE IF EXISTS `student`;
CREATE TABLE `student` (
  `sid` int(11) NOT NULL,
  `sname` varchar(10) DEFAULT NULL,
  `age` int(11) DEFAULT NULL,
  `qualification` varchar(10) DEFAULT NULL,
  `cid` int(11) DEFAULT NULL,
  PRIMARY KEY (`sid`),
  KEY `s_cid` (`cid`),
  CONSTRAINT `s_cid` FOREIGN KEY (`cid`) REFERENCES `class` (`cid`)
) ENGINE=InnoDB DEFAULT CHARSET=utf8;

-- ----------------------------
-- Table structure for teacher
-- ----------------------------
DROP TABLE IF EXISTS `teacher`;
CREATE TABLE `teacher` (
  `tid` int(11) NOT NULL,
  `tname` varchar(10) DEFAULT NULL,
  PRIMARY KEY (`tid`)
) ENGINE=InnoDB DEFAULT CHARSET=utf8;
结构模型图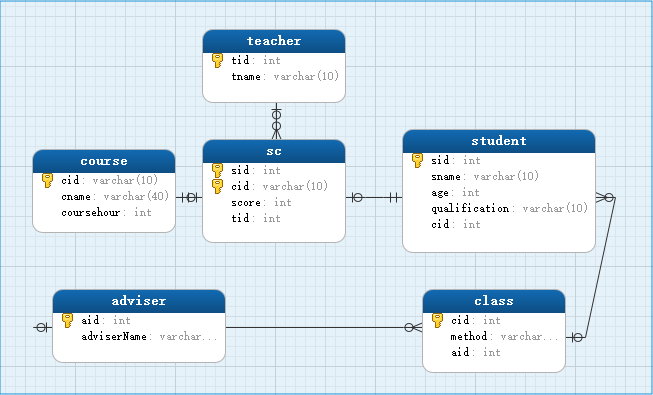
配置文件,Mybatis优化:使用属性文件;
driver=com.mysql.jdbc.Driver
url=jdbc:mysql://localhost:3306/huayu
username=root
password=root
<?xml version="1.0" encoding="UTF-8"?>
<!DOCTYPE configuration PUBLIC "-//mybatis.org//DTD Config 3.0//EN"
"http://mybatis.org/dtd/mybatis-3-config.dtd">
<configuration>
    <properties resource="db.properties" />
  <!--此处为配置分页查询PageHelper的代码 -->

    <plugins>
        <plugin interceptor="com.github.pagehelper.PageInterceptor">
            <!-- config params as the following -->
            <property name="param1" value="value1" />
        </plugin>
    </plugins>
    <environments default="development">
        <environment id="development">
            <transactionManager type="JDBC" />
            <dataSource type="POOLED">
                <property name="driver" value="${driver}" />
                <property name="url" value="${url}" />
                <property name="username" value="${username}" />
                <property name="password" value="${password}" />
            </dataSource>
        </environment>
    </environments>
    <mappers>

    </mappers>
</configuration>
3.创建映射文件,映射文件相当于dao接口的实现类,首先创建StudentMapper,写一个方法queryByCidAndQua,根据班级号和学历查询
<?xml version="1.0" encoding="UTF-8"?>
<!DOCTYPE mapper PUBLIC "-//mybatis.org//DTD Mapper 3.0//EN" "http://mybatis.org/dtd/mybatis-3-mapper.dtd">
<mapper namespace="com.zhiyou100.cyf.dao.StudentMapper">
    <sql id="all_cols">
        sid,sname,age,qualification,cid
    </sql>
    <select id="queryByCidAndQua" resultType="com.zhiyou100.cyf.bean.Student">
        select <include refid="all_cols"></include> from student
        where cid=#{cid} and qualification=#{qua}
    </select>
</mapper>
优化:要传递的参数为两个以上时,框架会默认将其放进一个map内,key值分别为0,1或param1,param2,value为参数值,在接口的方法设置注解改变默认key
List<Student> queryByCidAndQua(@Param("qua")String qua,@Param("cid")String cid);
4.映射文件要引入到配置文件内
在configuration标签内添加
<mappers>
    <mapper resource="com/zhiyou100/cyf/mapper/StudentMapper.xml" />
</mappers>
5.加入日志:引入log4j-1.2.17.jar包,创建日志文件log4j.properties
log4j.properties,
log4j.rootLogger=DEBUG, Console
#Console
log4j.appender.Console=org.apache.log4j.ConsoleAppender
log4j.appender.Console.layout=org.apache.log4j.PatternLayout
log4j.appender.Console.layout.ConversionPattern=%d [%t] %-5p [%c] - %m%n
log4j.logger.java.sql.ResultSet=INFO
log4j.logger.org.apache=INFO
log4j.logger.java.sql.Connection=DEBUG
log4j.logger.java.sql.Statement=DEBUG
log4j.logger.java.sql.PreparedStatement=DEBUG
二、创建关系表和对应的实体类、操作接口和实现的映射文件
1.dao接口结合对应的映射文件
映射文件的namespace属性应为该接口的位置,接口的方法名与映射文件中相应的id属性值相同,再建一个ClassMapper映射,将列名改动一下method -> c_method,在问题sql字段与java属性不匹配里解决。
List<Class> selectAll();//接口中暂加一个方法
三、测试
class StudentMapperTest {

    static SqlSession session=null;
    static StudentMapper sm=null;
    @BeforeAll
    static void setUpBeforeClass() throws Exception {
        Reader reader=Resources.getResourceAsReader("conf.xml");
        SqlSessionFactory sessionFactory=new SqlSessionFactoryBuilder().build(reader);
        session=sessionFactory.openSession();
        sm=session.getMapper(StudentMapper.class);
    }

    @AfterAll
    static void tearDownAfterClass() throws Exception {
        session.commit();
    }

    @Test
    void testQueryByCidAndQua() {
        List<Student> list=sm.queryByCidAndQua("本科", "20100101");//两个参数。可以用map传,不过这样写框架会默认创建map
        System.out.println(list);
    }

}
四、一些问题
1.sql字段与java属性不匹配
一种方案是给查询字段起别名,使其与java属性一致
另一种是使用resultMap标签来定义实体类与字段之间的对应关系
<mapper namespace="com.zhiyou100.cyf.dao.ClassMapper">
    <sql id="all_cols">
        cid,c_method,aid
    </sql>
    <select id="selectAll" resultMap="classMap">
        select <include refid="all_cols"/> from class
    </select>
    <resultMap type="com.zhiyou100.cyf.bean.Class" id="classMap">
        <result column="c_method" property="method"/>
    </resultMap>
</mapper>
2.连表查询
1)多对一:连表查询
有多个学生在一个班,根据学生查询所关联的班级信息,多个班由同一个班主任管理(这里添加了adviser表),在student实体类中添加class和adviser属性
<select id="selectById" resultMap="studentMap">
        select sid,sname,age,student.cid cid,qualification,c_method,adviser.aid aid,adviserName from student
        join class on student.cid=class.cid join adviser on class.aid=adviser.aid
        where sid=#{sid}
    </select>
    <resultMap type="com.zhiyou100.cyf.bean.Student" id="studentMap">
        <id column="sid" property="sid"/>
        <result column="sname" property="sname"/>
        <result column="age" property="age"/>
        <result column="qualification" property="qualification"/>
        <result column="cid" property="cid"/>
        <association property="c" javaType="com.zhiyou100.cyf.bean.Class">
            <id column="cid" property="cid"/>
            <result column="c_method" property="method"/>
            <result column="aid" property="aid"/>
        </association>
        <association property="adviser" javaType="com.zhiyou100.cyf.bean.Adviser">
            <id column="aid" property="aid"/>
            <result column="advisername" property="adviserName"/>
        </association>
    </resultMap>
注意:student中即使字段与实体类相同也要写id和result标签,class和adviser中主键字段即使与实体类名字相同也要写id标签,不然值为空,不过不影响连接查询
2).嵌套查询。多表连接比较麻烦
<!-- 三表嵌套查询 -->
    <select id="selectById2" resultMap="studentMap2">
        select <include refid="all_cols"/> from student
        where sid=#{sid}
    </select>
    <resultMap type="com.zhiyou100.cyf.bean.Student" id="studentMap2">
        <result column="cid" property="cid"/>
        <association property="c" column="cid" select="com.zhiyou100.cyf.dao.ClassMapper.selectById">
        </association>
    </resultMap>
这里只有一个associtation,因为另一个连表条件(正确的说是嵌套查询条件)与该表无关,所以adviser属性没用。接下来必须在ClassMapper添加嵌套查询,在Class类中国添加一个adviser属性
<select id="selectById" resultMap="classMap2">
        select <include refid="all_cols"/> from class where cid=#{cid}
    </select>
    <resultMap type="com.zhiyou100.cyf.bean.Class" id="classMap2">
        <result column="c_method" property="method"/>
        <result column="aid" property="aid"/>
        <association property="adviser" column="aid" select="com.zhiyou100.cyf.dao.AdviserMapper.selectById"/>
    </resultMap>
而在AdviserMapper中
<select id="selectById" resultType="com.zhiyou100.cyf.bean.Adviser">
        select aid,adviserName from adviser where aid=#{aid}
    </select>
注意:student表和class的外键列即使字段与实体类相同也要写result标签,不然为空值,不过不影响嵌套查询。必须在class中创建adviser属性,因为StudentMapper中无法获取该属性。
一对多:如查询在一个班的所有学生
在班级类内创建students属性,类型为List<Student>,在resultMap中添加collection标签,mybatis会自动给若干个student装进一个集合
<select id="selectStudentsOfClass" resultMap="students">
        select class.cid,c_method,aid,sid,sname,age,qualification from class
        join student on class.cid=student.cid
        where class.cid=#{cid}
    </select>
    <resultMap type="com.zhiyou100.cyf.bean.Class" id="students">
        <id column="cid" property="cid"/>
        <result column="c_method" property="method"/>
        <result column="aid" property="aid"/>
        <collection property="students" ofType="com.zhiyou100.cyf.bean.Student">
            <id column="sid" property="sid"/>
            <result column="sname" property="sname"/>
            <result column="age" property="age"/>
            <result column="qualification" property="qualification"/>
        </collection>
    </resultMap>
注意:student和class字段即使和实体类名称相同也要写id和result标签,不然为空值,且连表查询失败
如果用嵌套查询,要在StudentMapper中创建并实现返回list的selectByCId方法
<select id="selectStudentsOfClass2" resultMap="students2">
        select <include refid="all_cols"/> from class where cid=#{cid}
    </select>
    <resultMap type="com.zhiyou100.cyf.bean.Class" id="students2">
        <id column="cid" property="cid"/>
        <result column="c_method" property="method"/>
        <collection property="students" ofType="com.zhiyou100.cyf.bean.Student"
        column="cid" select="com.zhiyou100.cyf.dao.StudentMapper.selectByCid">
        </collection>
    </resultMap>
<select id="selectByCid" resultType="com.zhiyou100.cyf.bean.Student">
        select <include refid="all_cols"/> from student
        where cid=#{cid}
    </select>
注意:class中的作为查询条件的cid字段即使与实体类名称相同也要添加id标签,不然为空,不过不影响嵌套查询
 3.sql语句中$与#区别:
   $: 解析时不会为内容添加””,他是sql语句的拼接存在sql注入的危害。传入的为表结构,order by排序等不需要字符串的情况下使用它。
#: 解析时会为内容添加””,它的sql时采用占位符,防止sql注入,尽量使用。
4.添加对象时如何获取添加成功后的主键值
由于以上表的id均不是自增的,故假设一个带有自增主键的user表
<insert parameterType="com.zhiyou100.cyf.bean.User" userGenerateKeys="true" keyProperty="id">insert user(name,age) values(#{name},#{age})</insert>
传递的参数为id属性为空的user对象,userGenerateKeys,keyProperty两个属性必须同时使用,前者表示使用生成的主键,后者表示主键返回到调用者的参数user对象的id属性上
  5.测试类中update类操作的事务性
 @AfterAll
    static void tearDownAfterClass() throws Exception {
        session.commit();//在代码执行完后,才使数据库执行增删改操作
    }
为了保证安全和严谨,此处模拟了事务操作,一系列操作要么都执行,要么都不执行
五、动态sql语句
一般分页列表上方会有导航栏,任意选择部分条件可查询到对应的信息。使用的表为user(id,username,sex,birthday,address) .Mybatis处理这类动态语句的方法如下。
if标签与jstl相似,可以根据传过来的值判断该值是否要加入查询条件中。
需要注意的是:1.属性自动解析,不用#{}格式,2.逻辑与运算用and代替,逻辑或用or 或者|
where标签:用于处理动态查询,它的作用是判断标签内的语句是否以 and 为前缀,如果有则删掉,然后补充前缀 where。根据用户名或性别查询
<select id="queryByWhere2" resultType="com.zhiyou100.cyf.bean.User">
        select * from user
        <where>
            <if test="username!=null and username!=''">
                username=#{username}
            </if>
            <if test="sex!=null and sex!=''">
                and sex=#{sex}
            </if>
        </where>
    </select>
set标签:用于动态更新,当图片等元素不修改上传空值时可以用此标签。它的作用是判断标签内的语句是否以 , 为后缀,如果有则删掉,然后补充前缀 set。根据id更新用户名或性别或地址
<update id="updateUser">
        update user
        <set>
            <if test="username!=null and username!=''">
                username=#{username},
            </if>
            <if test="sex!=null and sex!=''">
                sex=#{sex},
            </if>
            <if test="address!=null and address!=''">
                address=#{address}
            </if>
            where id=#{id}
        </set>
    </update>
choose标签:类似于switch语句。trim标签:更加灵活,属性prefixOverrides和suffixOverrides分别表示语句前缀和后缀删除相符的字符串,prefix和suffix表示再添加前缀和后缀为该字符串。根据要么id要么用户名要么性别查询用户
<select id="queryByChoose" resultType="com.zhiyou100.cyf.bean.User">
        select <include refid="cols" /> from user
        <trim prefix="where" prefixOverrides="and">
            <choose>
                <when test="id!=0">
                    id=#{id}
                </when>
                <when test="username!=null and username!=''">
                    and username=#{username}
                </when>
                <otherwise>
                    and sex=#{sex}
                </otherwise>
            </choose>
        </trim>
    </select>
forEach标签:可用于动态的批量删除,collection属性值为传过来的list集合(名字默认为list),
如果传入的直接为一个List,那么collection值就为list,如果直接传入的为一个array不可变数组,那么collection值就为array,如果传入的为一个dto,比如dto里面的array变量名为idLists,那么collection的值就为idLists
open循环体前缀,close循环体后缀,separator循环间插入的字符串,item表示每个
集合内元素。下面语句当集合为空时出错。删除若干user记录
<delete id="deleteByIds" parameterType="list">
        delete from user
        <where>
        <foreach collection="ids" open="id in(" close=")" separator="," item="id">
            #{id}
        </foreach>
        </where>
    </delete>
六、逆向工程(generator )
见官网 http://www.mybatis.org/generator/index.html
1.一般在根目录或源文件夹下创建generator.xml,内容见官网
<?xml version="1.0" encoding="UTF-8"?>
<!DOCTYPE generatorConfiguration
  PUBLIC "-//mybatis.org//DTD MyBatis Generator Configuration 1.0//EN"
  "http://mybatis.org/dtd/mybatis-generator-config_1_0.dtd">
<generatorConfiguration>
    <properties resource="db.properties" />

    <!-- 数据库的jar包位置 -->
    <classPathEntry
        location="./lib/mysql-connector-java-5.1.47.jar" />
    <!-- 配置连接数据库信息 -->
    <context id="DB2Tables" targetRuntime="MyBatis3">
        <!-- 禁止所有注释 -->
        <commentGenerator>
            <property name="suppressAllComments" value="true"/>
        </commentGenerator>
        <jdbcConnection driverClass="${driver}"
            connectionURL="${url}" userId="${username}" password="${password}">
        </jdbcConnection>

        <javaTypeResolver>
            <property name="forceBigDecimals" value="false" />
        </javaTypeResolver>
        <!-- 实体类所在包位置 -->
        <javaModelGenerator
            targetPackage="com.zhiyou100.cyf.bean" targetProject="./src">
            <property name="enableSubPackages" value="true" />
            <property name="trimStrings" value="true" />
        </javaModelGenerator>
        <!-- 映射文件所在包位置 -->
        <sqlMapGenerator
            targetPackage="com.zhiyou100.cyf.mapper" targetProject="./resources">
            <property name="enableSubPackages" value="true" />
        </sqlMapGenerator>
        <!-- 接口所在包位置 -->
        <javaClientGenerator type="XMLMAPPER"
            targetPackage="com.zhiyou100.cyf.dao" targetProject="./src">
            <property name="enableSubPackages" value="true" />
        </javaClientGenerator>
        <!-- schema:数据库名 tableName:表名 domainObjectName:实体类名 可以将提供的example 设置为false
            多个表建立多个table标签 -->
        <table schema="huayu" tableName="course" domainObjectName="Course"
            enableCountByExample="false" enableDeleteByExample="false"
            enableSelectByExample="fales" enableUpdateByExample="false">
            <property name="useActualColumnNames" value="true" />
            <generatedKey column="ID" sqlStatement="DB2"
                identity="true" />
            <columnOverride column="DATE_FIELD"
                property="startDate" />
            <ignoreColumn column="FRED" />
            <columnOverride column="LONG_VARCHAR_FIELD"
                jdbcType="VARCHAR" />
            <!-- 实体类名更改 -->
            <columnOverride column="coursehour" property="hours" />
        </table>
        <table schema="huayu" tableName="teacher" domainObjectName="Teacher"
            enableCountByExample="false" enableDeleteByExample="false"
            enableSelectByExample="fales" enableUpdateByExample="false">
            <property name="useActualColumnNames" value="true" />
            <generatedKey column="ID" sqlStatement="DB2"
                identity="true" />
            <columnOverride column="DATE_FIELD"
                property="startDate" />
            <ignoreColumn column="FRED" />
            <columnOverride column="LONG_VARCHAR_FIELD"
                jdbcType="VARCHAR" />
        </table>
        <table schema="huayu" tableName="sc" domainObjectName="Sc"
            enableCountByExample="false" enableDeleteByExample="false"
            enableSelectByExample="fales" enableUpdateByExample="false">
            <property name="useActualColumnNames" value="true" />
            <generatedKey column="ID" sqlStatement="DB2"
                identity="true" />
            <columnOverride column="DATE_FIELD"
                property="startDate" />
            <ignoreColumn column="FRED" />
            <columnOverride column="LONG_VARCHAR_FIELD"
                jdbcType="VARCHAR" />
        </table>
    </context>
</generatorConfiguration>
2.导入jar包 mybatis-generator-core-1.3.5.jar
3.创建一个测试类,主方法运行以下代码,导入上面包中的类
List<String> warnings = new ArrayList<String>();
           boolean overwrite = true;
           File configFile = new File("resources/generator.xml");
           ConfigurationParser cp = new ConfigurationParser(warnings);
           Configuration config = cp.parseConfiguration(configFile);
           DefaultShellCallback callback = new DefaultShellCallback(overwrite);
           MyBatisGenerator myBatisGenerator = new MyBatisGenerator(config, callback, warnings);
           myBatisGenerator.generate(null);
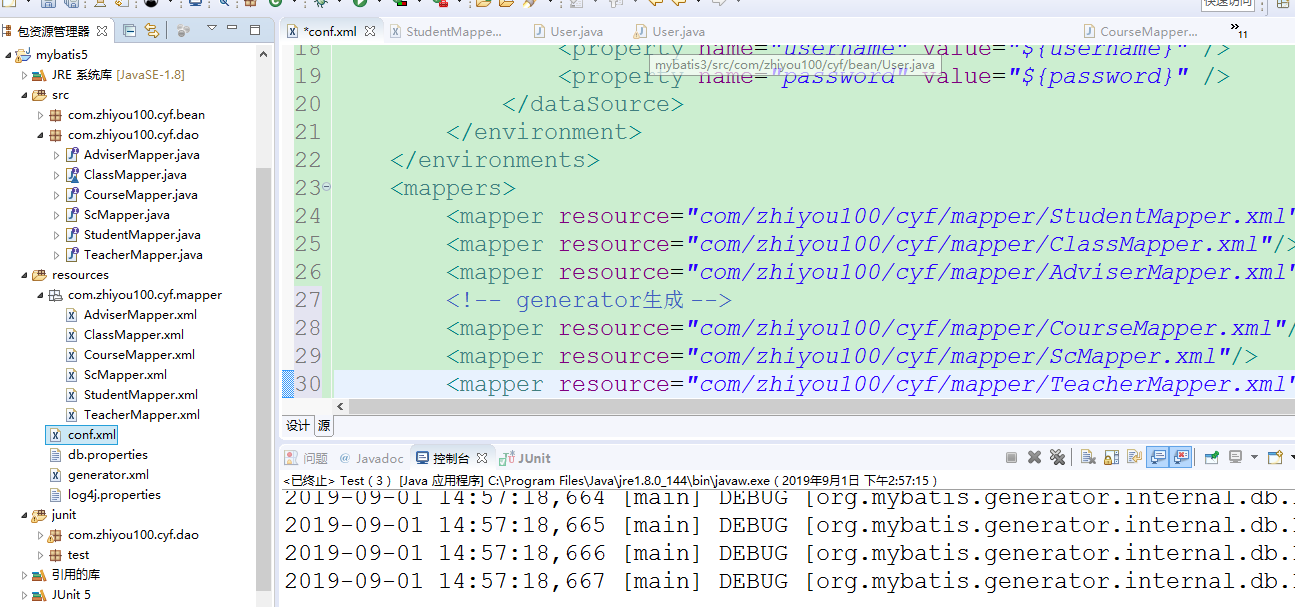
在配置文件加入映射文件路径,基本告成。文档结构图如下
七、分页助手 PageHelper
参考官网https://github.com/pagehelper/Mybatis-PageHelper
1.导入jar包 pagehelper-x.y.z.jar and jsqlparser-x.y.z.jar 注意很可能出现不兼容问题。这里使用 pagehelper-5.1.10.jar 和 jsqlparser-2.0.jar
2.在mybatis配置文件中配置PageHelper(conf.xml)
<properties resource="db.properties" /><!--注意plugins标签的位置 -->
    <plugins>
        <plugin interceptor="com.github.pagehelper.PageInterceptor">
            <!-- config params as the following -->
            <property name="param1" value="value1" />
        </plugin>
    </plugins>
    <environments default="development">
3.使用,这里使用PageInfo用法
在student映射文件和dao中创建查询所有信息的方法,然后在测试类中
int pageNum=2;
        int pageSize=3;
        PageHelper.startPage(pageNum, pageSize);
        List<Student> list=sm.selectAll();
        PageInfo<Student> page=new PageInfo<>(list);
        System.out.println(page);
        System.out.println("=====");
        List<Student> students=page.getList();
        for(Student s:students) {
            System.out.println(s);
        }
        System.out.println("上一页"+page.getPrePage()+"	第"+page.getPageNum()+"页	下一页"+page.getNextPage());
        System.out.println("本页条数"+page.getSize());
        int[] nav=page.getNavigatepageNums();//导航页数组
        for(int a:nav) {
            System.out.print(a+"   ");
        }
这里一个page对象的具体显示内容如下(数据为user表中的)
PageInfo{pageNum=3,
pageSize=3, //每页记录数
size=2,    //该页实际记录数
 startRow=7, //sql起始行
 endRow=8,//sql结束行
 total=8, //总记录数
pages=3,   //总页数
list=Page{count=true, pageNum=3, pageSize=3, startRow=6, endRow=9, total=8, pages=3, reasonable=false, pageSizeZero=false}//起始行和结束行数据暂不清楚
[User [id=7, username=付栓, sex=男, birthday=Tue Aug 06 00:00:00 CST 2019, address=的无缝无法], User [id=8, username=建国, sex=男, birthday=Thu Aug 29 00:00:00 CST 2019, address=非法围绕]],
 prePage=2, //上一页页码
 nextPage=0, //下一页页码
isFirstPage=false, //是否为第一页
isLastPage=true, //是否为末页
hasPreviousPage=true, //是否有上一页
 hasNextPage=false,//是否有下一页
 navigatePages=8, //该页的导航页码个数
navigateFirstPage=1,//导航页码首页码
navigateLastPage=3, //导航页码末页码
navigatepageNums=[1, 2, 3]}//该页所有导航页码的数组
想要获取结果集合调用page.getList()方法,page中包含了获取上述属性的方法,设置导航页码个数用set方法无效,需要在构造函数中设置
PageInfo<User> page=new PageInfo<>(list,10);//设置导航页码个数为10