前言
Content Provider——Android四大组件之一。
本文要点
1.Content Provider简介
2.URI简介
3.如何访问Content Provider中数据
一、Content Provider简介
Content Provider,Android四大组件之一。它是Android系统提供的在多个应用之间共享数据的一种机制。一个Content Provider类实现了一组标准的方法接口,从而能够让其他的应用保存或读取此Content Provider的各种数据类型。有几点说明:
(1)每个ContentProvider都会对外提供一个公共的URI(包装成Uri对象),如果应用程序有数据需要共享,就需要使用ContentProvider为这些数据定义一个URI,然后其他应用程序就可以通过ContentProvider传入这个URI来对数据进行操作。
(2)我们的APP可以通过实现一个Content Provider的抽象接口将自己的数据暴露出去,也可以通过ContentResolver接口访问Content Provider提供的数据;
(3)ContentResolver支持CRUD(create, retrieve, update, and delete)操作;
(4)Android系统提供了诸如:音频、视频、图片、通讯录等主要数据类型的Content Provider。我们也可以创建自己的Content Provider。
二、URI简介
URI唯一标识了Provider中的数据,当应用程序访问Content Provider中的数据时,URI将会是其中一个重要参数。URI包含了两部分内容:(1)要操作的Content Provider对象(2)要操作的Content Provider中数据的类型。
URI由以下几个部分组成:
(1)Scheme:在Android中URI的Scheme是不变的,即:Content://
(2)Authority:用于标识ContentProvider(API原文:A string that identifies the entire content provider.);
(3)Path:用来标识我们要操作的数据。零个或多个段,用正斜杠(/)分割;
(4)ID:指定ID后,将操作指定ID的数据(ID也可以看成是path的一部分),ID在URI中是可选的(API原文:A unique numeric identifier for a single row in the subset of data identified by the preceding path part.)。
URI示例:
(1)content://media/internal/images 返回设备上存储的所有图片;
(2)content://media/internal/images /10 返回设备上存储的ID为10的图片
操作URI经常会使用到UriMatcher和ContentUris两个类。
UriMatcher:用于匹配Uri;
ContentUris:用于操作Uri路径后面的ID部分,如提供了方法withAppendedId()向URI中追加ID。
三、访问Content Provider中数据
应用程序访问Content Provider的内容需要用到ContentResolver对象,这里以操作Android通讯录提供的Content Provider为例来说明如何访问Content Provider中的数据。
1.创建一个project:HelloContentProvider,MainActivity的Layout文件命名为main.xml;
2.在文件:AndroidManifest.xml中添加Contact的读写权限;
1     <uses-permission android:name="android.permission.READ_CONTACTS" />
2     <uses-permission android:name="android.permission.WRITE_CONTACTS" />
3.在main.xml中添加几个button:Insert,Query,Update,Delete,并绑定onClick事件:
//main.xml代码
 View Code
 1 <LinearLayout xmlns:android="http://schemas.android.com/apk/res/android"
 2               android:layout_width="fill_parent"
 3               android:layout_height="fill_parent"
 4               android:orientation="vertical" >
 5     <TextView android:id="@+id/text"
 6               android:layout_width="wrap_content"
 7               android:layout_height="wrap_content"
 8               android:text="Hello Content Provider" />
 9     <Button android:id="@+id/btnInsert"
10             android:layout_width="wrap_content"
11             android:layout_height="wrap_content"
12             android:width="100dp"
13             android:text="Insert"
14             android:onClick="insertContact"/>
15     <Button android:id="@+id/btnQuery"
16             android:layout_width="wrap_content"
17             android:layout_height="wrap_content"
18             android:width="100dp"
19             android:text="Query"
20             android:onClick="queryContacts"/>
21
22     <Button android:id="@+id/btnUpdate"
23             android:layout_width="wrap_content"
24             android:layout_height="wrap_content"
25             android:width="100dp"
26             android:text="Update"
27             android:onClick="updateContact"/>
28        <Button android:id="@+id/btnDelete"
29             android:layout_width="wrap_content"
30             android:layout_height="wrap_content"
31             android:width="100dp"
32             android:text="Delete"
33             android:onClick="deleteContact"/>
34 </LinearLayout>
4.在MainActivity.java中实现对通讯录联系人的增。删。改。查操作;
//Insert,这里将要创建的联系人(wZhang,15899998888)直接写在代码里了(偷点懒☺)
 1
 2     //Insert Contact
 3     public void insertContact(View view){
 4         //获取ContentResolver
 5         ContentResolver resolver = this.getContentResolver();
 6         //创建ContentValues的实例
 7         ContentValues values = new ContentValues();
 8
 9         //将联系人姓名Insert到ContentResolver中
10         values.put(Contacts.People.NAME,"wZhang");
11         Uri newPersonUri = getContentResolver().insert(People.CONTENT_URI, values);
12
13         //Insert联系人电话
14         Uri uri = null;
15         ContentValues numValues = new ContentValues();
16         String tel = "15899998888";
17         if (tel!="") {
18             numValues.clear();
19             uri = Uri.withAppendedPath(newPersonUri, Contacts.People.Phones.CONTENT_DIRECTORY);
20             numValues.put(Contacts.Phones.TYPE, Contacts.Phones.TYPE_MOBILE);
21             numValues.put(Contacts.Phones.NUMBER, tel);
22             getContentResolver().insert(uri, numValues);
23             }
24
25         Toast.makeText(MainActivity.this, "Intert Contact:联系人wZhang,电话"+tel,Toast.LENGTH_LONG).show();
26     }
//Query
 View Code
 1
 2     //Query Contacts
 3     public void queryContacts(View view){
 4         ContentResolver resolver = this.getContentResolver();
 5         //查询所有的联系人
 6         Cursor cursor = resolver.query(ContactsContract.Contacts.CONTENT_URI, null, null, null, null);
 7         if (cursor.moveToFirst()) {
 8             int idColumn = cursor.getColumnIndex(ContactsContract.Contacts._ID);
 9             int displayNameColumn = cursor.getColumnIndex(ContactsContract.Contacts.DISPLAY_NAME);
10             do {
11                 //获取联系人ID
12                 String contactId = cursor.getString(idColumn);
13                 //获取联系人姓名
14                 String disPlayName = cursor.getString(displayNameColumn);
15                 Toast.makeText(MainActivity.this, "联系人姓名:"+disPlayName,Toast.LENGTH_LONG).show();
16                 int phoneCount = cursor.getInt(cursor.getColumnIndex(ContactsContract.Contacts.HAS_PHONE_NUMBER));
17                  if (phoneCount > 0) {
18                      Cursor phonesCursor = getContentResolver().query(ContactsContract.CommonDataKinds.Phone.CONTENT_URI,null,
19                              ContactsContract.CommonDataKinds.Phone.CONTACT_ID+ " = " + contactId, null, null);
20                      if (phonesCursor.moveToFirst()) {
21                          do {
22                              String phoneNumber = phonesCursor.getString(phonesCursor.getColumnIndex(ContactsContract.CommonDataKinds.Phone.NUMBER));
23                              Toast.makeText(MainActivity.this, "联系人电话:"+phoneNumber,Toast.LENGTH_LONG).show();
24                          }
25                          while (phonesCursor.moveToNext());
26                      }
27                  }
28             }
29             while (cursor.moveToNext());
30         }
31     }
//Update,更新联系人这里没有实现
//Delete
 View Code
 1     //Delete
 2     public void deleteContact(View view){
 3         ContentResolver resolver = this.getContentResolver();
 4         Cursor cursor = resolver.query(Data.CONTENT_URI,new String[] { Data.RAW_CONTACT_ID },
 5                 ContactsContract.Contacts.DISPLAY_NAME + "=?",new String[] { "wZhang" }, null);
 6         ArrayList<ContentProviderOperation> ops = new ArrayList<ContentProviderOperation>();
 7         if (cursor.moveToFirst()) {
 8             do {
 9                 long Id = cursor.getLong(cursor.getColumnIndex(Data.RAW_CONTACT_ID));
10                 ops.add(ContentProviderOperation.newDelete(ContentUris.withAppendedId(RawContacts.CONTENT_URI,Id)).build());
11                 try {
12                     getContentResolver().applyBatch(ContactsContract.AUTHORITY, ops);
13                     }
14                 catch (Exception e){}
15                 }
16             while (cursor.moveToNext());
17             cursor.close();
18         Toast.makeText(MainActivity.this, "删除联系人wZhang成功",Toast.LENGTH_LONG).show();
19         }
20     }
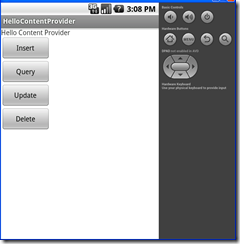
5.启动虚拟机(启动前,在Contact中手动添加一个联系人TEST),界面如下:
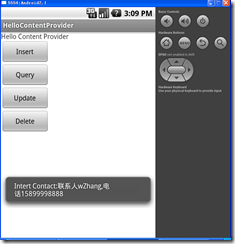
(1)点击Insert将预先定义的wZhang,15899998888信息插入到Contact中:
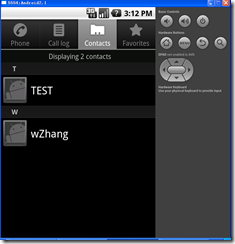
(2)点击Query查询,或者打开Contact查看刚刚添加的联系人(如下图);
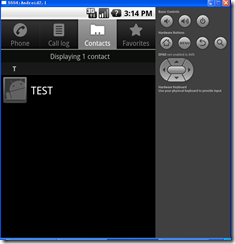
(3)点击Delete,然后再查看结果 (如下图),可见确实删除成功了。
从上面的实例我们可以得到以下几点:
(1)访问Content Provider需要一定的操作权限;
(2)访问Content Prvider需要使用到ContentResolver对象;
(3)ContentResolver支持query,insert,delete,update操作;
(4)由URI确定Content Provider中要操作的具体数据;
(5)insert时,要添加的数据可以使用ContentValues封装。
本文简单的通过一个实例介绍了Content Provider。在Andriod中我们也可以创建自己的Content Provider,有时间把这部分内容补上。


