前言
在前面介绍过Activity,Service时,我们已经涉及到了Intent,这里做一点补充介绍。
本文要点:
1.Intent简介
2.Intent Filter简介
一、Intent简介
1.Intent是什么
一个Android应用中,主要是由四种组件组成的。这四种组件本身是相互独立的,那么我们就需要一种机制让这些组件可以相互通讯,相互调用。Intent正好就充当了这么一个角色。Intent在这里起着一个媒体中介的作用,专门提供组件互相调用的相关信息,实现调用者与被调用者之间的解耦。
2.Intent属性
Intent对象,属性包括了Action,Data,Category,Extras,Type等。结合一个例子,我们来介绍下Intent的相关属性。
一个简单拨号程序:
main.xml
<LinearLayout xmlns:android="http://schemas.android.com/apk/res/android"
              android:layout_width="fill_parent"
              android:layout_height="fill_parent"
              android:orientation="vertical" >
         <EditText android:id="@+id/txtPhoneNumber"
             android:hint="Enter number"
             android:layout_width="wrap_content"
             android:layout_height="wrap_content"/>
           <Button android:id="@+id/btnCall"
            android:layout_width="wrap_content"
            android:layout_height="wrap_content"
            android:width="100dp"
            android:text="Call"
            android:onClick="callPhoneNumber"/>
</LinearLayout>
MainActivity.java(注意方法callPhoneNumber(view)。)
 1 package com.wzhang.hellointent;
 2
 3 import android.net.Uri;
 4 import android.os.Bundle;
 5 import android.app.Activity;
 6 import android.content.Intent;
 7 import android.view.Menu;
 8 import android.view.View;
 9 import android.widget.Button;
10 import android.widget.EditText;
11
12 public class MainActivity extends Activity {
13
14     @Override
15     protected void onCreate(Bundle savedInstanceState) {
16         super.onCreate(savedInstanceState);
17         setContentView(R.layout.main);
18     }
19
20     @Override
21     public boolean onCreateOptionsMenu(Menu menu) {
22         // Inflate the menu; this adds items to the action bar if it is present.
23         getMenuInflater().inflate(R.menu.main, menu);
24         return true;
25     }
26
27     //通过Intent来调用那些能够处理拨号行为的Activity
28     public void callPhoneNumber(View view){
29         EditText txtPhoneNumber = (EditText) findViewById(R.id.txtPhoneNumber);
30         String phoneNumber = txtPhoneNumber.getText().toString();
31
32         //new Intent(action,data);
33         Intent intent = new Intent(Intent.ACTION_DIAL,Uri.parse("tel://"+phoneNumber));
34         //调用可拨号的那些Activity
35         startActivity(intent);
36     }
37 }
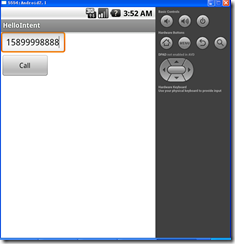
运行效果:
点击按钮:
结合给定的实例,我们了解一些Intent属性:
Action:字符串,是对所将执行的动作的描述,在Intent类中定义了一些字符串常量作为标准动作。如:例子中的Intent.ACTION_DIAL,我们也可以自定义Action,并定义相应的Activity来处理我们自定义的行为;常用的Action有如 ACTION_VIEW, ACTION_EDIT等。
Data:是对执行动作所要操作的数据的描述,Android中采用URI来表示数据,如:”tel://15899998888”。
在官网API上,结合Action和Data给了一些例子:
ACTION_VIEWcontent://contacts/people/1 -- Display information about the person whose identifier is "1".ACTION_DIALcontent://contacts/people/1 -- Display the phone dialer with the person filled in.ACTION_VIEWtel:123 -- Display the phone dialer with the given number filled in. Note how the VIEW action does what what is considered the most reasonable thing for a particular URI.ACTION_DIALtel:123 -- Display the phone dialer with the given number filled in.
Category:类别,是被请求组件的额外描述信息,Intent类中也定义了一组字符串常量表示Intent不同的类别,同样官网API上也有几个例子:
CATEGORY_LAUNCHERmeans it should appear in the Launcher as a top-level application,whileCATEGORY_ALTERNATIVEmeans it should be included in a list of alternative actions the user can perform on a piece of data.
Extras:附加信息,extra属性使用Bundle类型进行数据传递,附加数据可以通过 intent.putExtras() 和 intent.getExtras() 进行传入和读取。如:
 1 //这两段代码来自前面HelloActivity中的示例代码
 2
 3 //MainActivity中的发送消息代码
 4     public void sendMessage(View view){
 5         Intent intent = new Intent(this, DisplayMessageActivity.class);
 6         EditText editText = (EditText) findViewById(R.id.txtMsg);
 7         String message = editText.getText().toString();
 8         intent.putExtra(EXTRA_MESSAGE, message);
 9         startActivity(intent);
10     }
11
12 //DisplayMessageActivity中的接收消息代码
13     @Override
14     protected void onCreate(Bundle savedInstanceState) {
15         super.onCreate(savedInstanceState);
16
17         Intent intent = getIntent();
18         String message = intent.getStringExtra(MainActivity.EXTRA_MESSAGE);
19         // Create the text view
20         TextView textView = new TextView(this);
21         textView.setTextSize(40);
22         textView.setText(message);
23
24         setContentView(textView);
25         Log.i("DisplayMessageActivity", "onCreate()");
26     }
type:数据类型,显式指定Intent的数据类型。
这里还有一点要说明:Intent有两种:显示Intent和隐式Intent。
显式Intent:使用名字来指定目标组件,由于组件名称一般不会被其它开发者所熟知, 这种intent一般用于应用程序内部消息-- 例如MainActivity启动DisplayMessageActivity。
隐式Intent:不指定目标的名称. 一般用于启动其它应用程序的组件。隐式Intent一般会和IntentFilter配合使用。
二、Intent Filter简介
前面介绍AndroidManifest.xml和Activity的时候,有这么一段AndroidManifest.xml中有这么一段代码:
1         <activity
2             android:name="com.wzhang.helloactivity.MainActivity"
3             android:label="@string/app_name" >
4             <intent-filter>
5                 <action android:name="android.intent.action.MAIN" />
6
7                 <category android:name="android.intent.category.LAUNCHER" />
8             </intent-filter>
9         </activity>
当Intent在组件之间传递时,组件如果想告知Android系统自己能够响应和处理哪些Intent,那么就需要用到IntentFilter对象。
对IntentFilter的几点说明:
(1)IntentFilter实行“白名单”管理,即只列出组件可接受的Intent;
(2)除了用于过滤广播的IntentFilter可以在代码中创建外,其他的IntentFilter必须在AndroidManifest.xml文件中进行声明;
(3)显式Intent会直接传送到目标组件,隐式Intent想要被组件处理,必须通过 action, data, category这三个属性的检查;
(4)如果一个组件没有配置IntentFilter,它只能接收显示Intent;
(5)一个IntentFilter中的action,data,category均可配置多个。
本文简单的介绍了Intent和IntentFilter更多内容可参考:http://developer.android.com/guide/components/intents-filters.html
实例源码:HelloIntent.rar

