1.谈一谈[Gathering Facts]:使用setup模块查看
当我们运行一个playbook时,默认都会运行一个名为“[Gathering Facts]”的任务,前文中已经大致的介绍过这个默认的任务,ansible通过“[Gathering Facts]”这个默认任务收集远程主机的相关信息(例如远程主机的IP地址,主机名,系统版本,硬件配置等信息),其实,这些被收集到的远程主机信息会保存在对应的变量中,当我们想要使用这些信息时,我们可以获取对应的变量,从而使用这些信息。
如果想要查看"[Gathering Facts]"任务收集的信息内容,我们可以借助一个模块:setup模块
当执行playbook时,playbook其实就是自动调用了setup模块从而执行了“[Gathering Facts]”任务,所以我们可以通过手动执行setup模块查看“[Gathering Facts]”任务收集到的信息,示例如下:(内容很多,这里截取部分展示)
[root@ansible-control playbook]# ansible 192.168.10.2 -m setup
192.168.10.2 | SUCCESS => {
    "ansible_facts": {
        "ansible_all_ipv4_addresses": [
            "192.168.10.2",
            "192.168.122.1"
        ],
        "ansible_all_ipv6_addresses": [
            "fe80::1f2f:cc8b:e62b:863b"
        ],
        "ansible_apparmor": {
            "status": "disabled"
        },
        "ansible_architecture": "x86_64",
        "ansible_bios_date": "05/19/2017",
        "ansible_bios_version": "6.00",
        "ansible_cmdline": {
            "BOOT_IMAGE": "/vmlinuz-3.10.0-957.27.2.el7.x86_64",
            "LANG": "zh_CN.UTF-8",
            "crashkernel": "auto",
            "quiet": true,
            "rd.lvm.lv": "centos/swap",
            "rhgb": true,
            "ro": true,
            "root": "/dev/mapper/centos-root"
        },
        "ansible_date_time": {
            "date": "2019-09-09",
            "day": "09",
            "epoch": "1568017172",
            "hour": "16",
            "iso8601": "2019-09-09T08:19:32Z",
            "iso8601_basic": "20190909T161932543308",
            "iso8601_basic_short": "20190909T161932",
            "iso8601_micro": "2019-09-09T08:19:32.543402Z",
            "minute": "19",
            "month": "09",
            "second": "32",
            "time": "16:19:32",
            "tz": "CST",
            "tz_offset": "+0800",
            "weekday": "星期一",
            "weekday_number": "1",
            "weeknumber": "36",
            "year": "2019"
        },
        "ansible_default_ipv4": {
            "address": "192.168.10.2",
            "alias": "ens33",
            "broadcast": "192.168.10.255",
            "gateway": "192.168.10.254",
            "interface": "ens33",
            "macaddress": "00:0c:29:44:4f:0f",
            "mtu": 1500,
            "netmask": "255.255.255.0",
            "network": "192.168.10.0",
            "type": "ether"
        },
        "ansible_default_ipv6": {},
        "ansible_device_links": {
            "ids": {
                "dm-0": [
                    "dm-name-centos-root",
                    "dm-uuid-LVM-ZZUQOeHWfHVeQ2mGcQ3nlWQW0bSGeph90XISTL67goS7QJc7HNMRWJSiyZ1eStbc"
                ],
                "dm-1": [
                    "dm-name-centos-swap",
                    "dm-uuid-LVM-ZZUQOeHWfHVeQ2mGcQ3nlWQW0bSGeph9o1kIqoT46pX9qBAei9Wy2CuSksEUNavQ"
                ],
                "sda2": [
                    "lvm-pv-uuid-FDvIE2-eNkn-Y7Kd-vv1N-TMkm-mfO7-453LJ2"
                ],
                "sr0": [
                    "ata-VMware_Virtual_IDE_CDROM_Drive_10000000000000000001"
                ]
            },
            "labels": {
                "sr0": [
                    "CentOS\x207\x20x86_64"
                ]
            },
返回信息如上,是一个json格式的字符串,为了方便你阅读,ansible已经将格式化后的json信息返回到了控制台中,返回的信息很全面,比如:
ansible_all_ipv4_addresses:表示远程主机中的所有ipv4地址,从其对应的值可以看出,test70主机上一共有4个ipv4地址。
ansible_distribution:表示远程主机的系统发行版,从其对应的值可以看出test70主机的系统发行版为centos
ansible_distribution_version:表示远程主机的系统版本号,从其对应的值与“ansible_distribution” 的值可以看出test70主机的系统版本为centos7.4
ansible_ens35:表示远程主机ens35网卡的相关信息,细心如你一定也发现了,我还有两个名为ens33和ens34的网卡,只不过为了方便示例,这两个网卡的信息被我省略了。
ansible_memory_mb:表示远程主机的内存配置信息。
2.选择性查看[Gathering Facts]信息:使用filter参数
只是查看远程主机的内存信息,示例如下:
[root@ansible-control playbook]# ansible 192.168.10.2 -m setup -a 'filter=ansible_memory_mb'
192.168.10.2 | SUCCESS => {
    "ansible_facts": {
        "ansible_memory_mb": {
            "nocache": {
                "free": 339,
                "used": 633
            },
            "real": {
                "free": 74,
                "total": 972,
                "used": 898
            },
            "swap": {
                "cached": 0,
                "free": 2041,
                "total": 2047,
                "used": 6
            }
        },
        "discovered_interpreter_python": "/usr/bin/python"
    },
    "changed": false
}
记不住关键词,所以可以使用通配符*,示例如下
[root@ansible-control playbook]# ansible 192.168.10.2 -m setup -a 'filter=*mb*'
192.168.10.2 | SUCCESS => {
    "ansible_facts": {
        "ansible_memfree_mb": 75,
        "ansible_memory_mb": {
            "nocache": {
                "free": 340,
                "used": 632
            },
            "real": {
                "free": 75,
                "total": 972,
                "used": 897
            },
            "swap": {
                "cached": 0,
                "free": 2041,
                "total": 2047,
                "used": 6
            }
        },
        "ansible_memtotal_mb": 972,
        "ansible_swapfree_mb": 2041,
        "ansible_swaptotal_mb": 2047,
        "discovered_interpreter_python": "/usr/bin/python"
    },
    "changed": false
}
3.写入自定义信息
ansible默认会去目标主机的/etc/ansible/facts.d目录下查找主机中的自定义信息,并且规定,自定义信息需要写在以 .fact 为后缀的文件中,同时,这些以 .fact 为后缀的文件中的内容需要是INI格式或者是json格式的。
那么,我们来创建一个测试文件,测试文件路径为远程主机的/etc/ansible/facts.d/testinfo.fact,在文件中写入如下INI格式的信息。
[testmsg]
msg1=This is the first custom test message
msg2=This is the second custom test message
通过上述方式,我们可以在目标主机的本地自定义信息,这些在远程主机本地自定义的信息被称为local facts,当我们运行setup模块时,远程主机的ocal facts信息也会被收集,我们可以通过ansible_local关键字过滤远程主机的local facts信息,示例命令如下:
[root@ansible-control facts.d]# ansible 192.168.10.2 -m setup -a 'filter=ansible_local'
192.168.10.2 | SUCCESS => {
    "ansible_facts": {
        "ansible_local": {
            "testinfo": {
                "testmsg": {
                    "msg1": "This is the first custom test message",
                    "msg2": "This is the second custom test message"
                }
            }
        },
        "discovered_interpreter_python": "/usr/bin/python"
    },
    "changed": false
}
使用fact_path自定义路径:之前说过,当setup收集远程主机的 local facts 时,默认会查找远程主机的/etc/ansible/facts.d目录,如果你把 local facts 信息文件放在了其他自定义路径,在使用setup模块时,需要使用 fact_path 参数指定对应的路径,假设,我把 .fact 文件放在了目标主机的 /testdir 目录下,示例命令如下:
ansible test70 -m setup -a 'fact_path=/testdir'
4.使用debug把信息输出到ansible控制台:
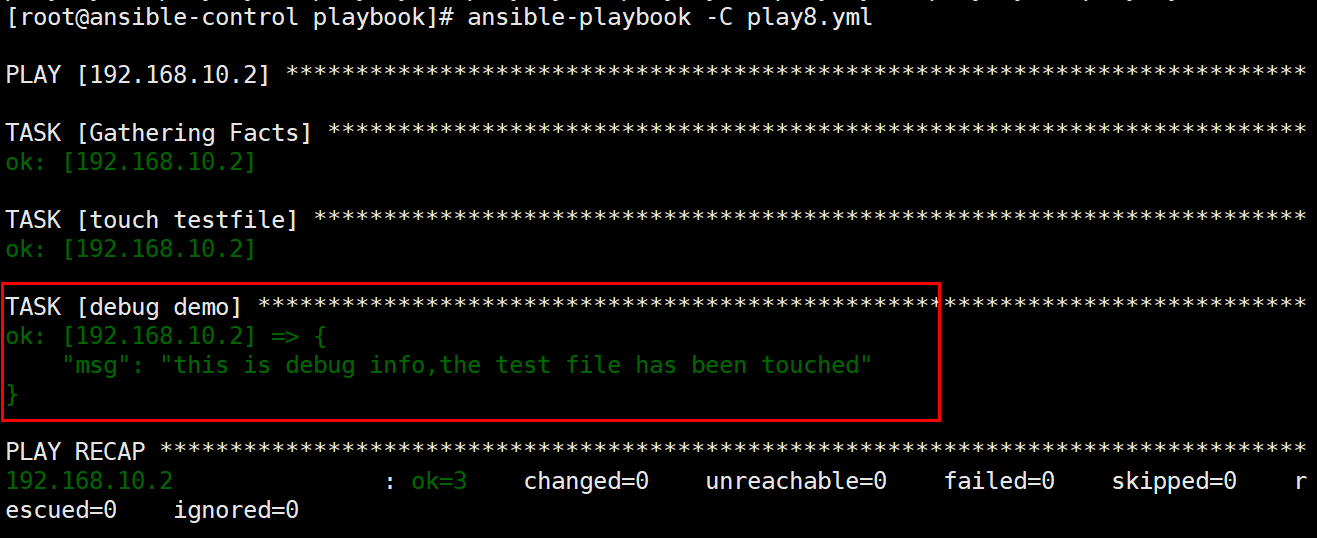
先看一个debug模块的示例,如下:
---
  - hosts: 192.168.10.2
    remote_user: root
    tasks:
    - name: touch testfile
      file:
        path: /test/testfile
        state: touch
    - name: debug demo
      debug:
        msg: this is debug info,the test file has been touched
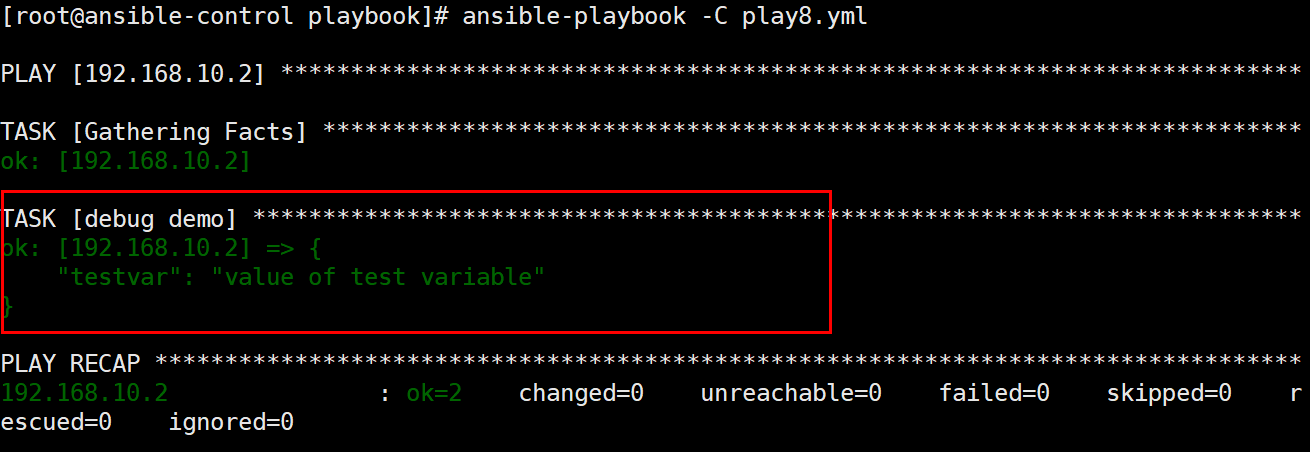
debug模块除了能够使用msg参数输出自定义的信息,还能够直接输出变量中的信息,通过debug模块直接输出变量信息需要使用var参数,示例如下:
---
  - hosts: 192.168.10.2
    remote_user: root
    vars:
      testvar: value of test variable
    tasks:
    - name: debug demo
      debug:
        var: testvar
【重点】
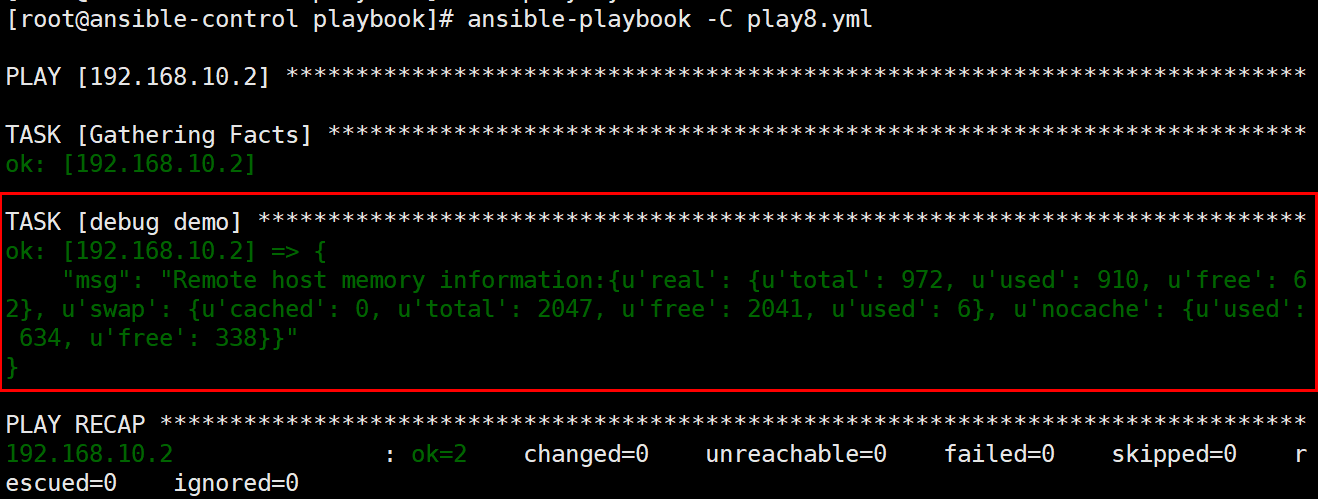
setup模块与debug模块了解完了,现在绕回一开始的话题,playbook在运行时默认都会运行“[Gathering Facts]”任务,“[Gathering Facts]”任务会收集远程主机的相关信息,这些信息会保存在对应的变量中,我们在playbook中可以使用这些变量,从而利用这些信息,那么我们怎样在playbook获取到这些变量的值呢?在setup模块的示例中,我们可以通过“ansible_memory_mb”关键字获取远程主机的内存信息,其实,“ansible_memory_mb”就是一个变量名,换句话说就是,我们可以在playbook中直接引用名为“ansible_memory_mb”的变量,从而获取到远程主机的内存信息,示例如下:
---
  - hosts: 192.168.10.2
    remote_user: root
    tasks:
    - name: debug demo
      debug:
        msg: "Remote host memory information:{{ansible_memory_mb}}"