在进行实战项目之前,我们先来学习一个知识点:连通域的外界矩形
寻找外接矩形有两种策略:
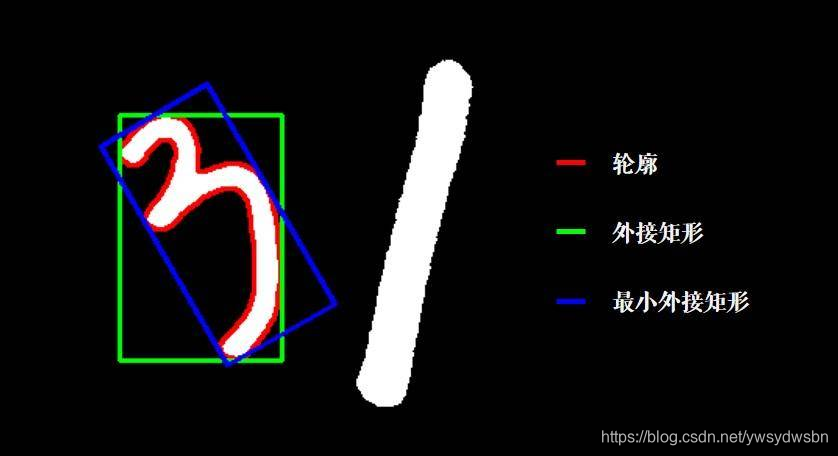
- 一种是寻找轮廓边缘的部分, 找到最外面的那个外接矩形, 为了区分, 我们称之为正外接矩形 boundingRect, 如下图绿色矩形部分.
- 另外一种策略是矩形可以旋转, 找到面积最小的矩形, 刚刚好可以把轮廓套在里面,我们称之为
*最小外接矩形 * minAreaRect, 如下图蓝色矩形部分.
正外接矩形 boudningRect
函数比较简单, 传入唯一的参数是轮廓点集(单个) Points.
rect = cv2.boundingRect(cnt)
(x, y, w, h) = rect
复制代码
返回值 rect , 数据结构是tuple, 分别为矩形左上角坐标(x, y), 与矩形的宽度w 高度h
我们依次打印矩形区域的信息.
for cidx,cnt in enumerate(contours):
    (x, y, w, h) = cv2.boundingRect(cnt)
    print('RECT: x={}, y={}, w={}, h={}'.format(x, y, w, h))
复制代码
输出结果:
RECT: x=92, y=378, w=94, h=64
RECT: x=381, y=328, w=69, h=102
RECT: x=234, y=265, w=86, h=70
RECT: x=53, y=260, w=61, h=95
RECT: x=420, y=184, w=49, h=66
RECT: x=65, y=124, w=48, h=83
RECT: x=281, y=71, w=70, h=108
复制代码
绘制在画布上比较直观,具体代码如下:
import numpy as np
import cv2
# 读入黑背景下的彩色手写数字
img = cv2.imread("color_number_handwriting.png")
# 转换为gray灰度图
gray = cv2.cvtColor(img, cv2.COLOR_BGR2GRAY)
# 寻找轮廓
contours, hier = cv2.findContours(gray, cv2.RETR_EXTERNAL, cv2.CHAIN_APPROX_SIMPLE)
# 声明画布 拷贝自img
canvas = np.copy(img)
for cidx,cnt in enumerate(contours):
(x, y, w, h) = cv2.boundingRect(cnt)
print('RECT: x={}, y={}, w={}, h={}'.format(x, y, w, h))
# 原图绘制圆形
cv2.rectangle(canvas, pt1=(x, y), pt2=(x+w, y+h),color=(255, 255, 255), thickness=3)
# 截取ROI图像
cv2.imwrite("number_boudingrect_cidx_{}.png".format(cidx), img[y:y+h, x:x+w])
cv2.imwrite("number_boundingrect_canvas.png", canvas)
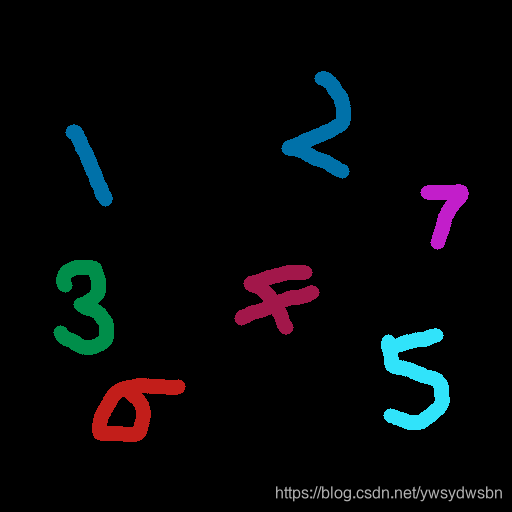
复制代码原始图像:
绘制结果:

截取ROI图片的操作比较简单img[y:y+h, x:x+w]:
# 截取ROI图像
cv2.imwrite("number_boudingrect_cidx_{}.png".format(cidx), img[y:y+h, x:x+w])
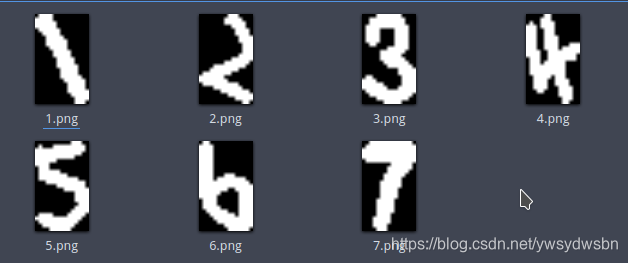
复制代码这样我们就截取到了独立的单个数字的图片:

最小外接矩形 minAreaRect
minAreaRect 函数用于获取最小面积的矩形。
minAreaRect = cv2.minAreaRect(cnt)
复制代码
我们打印一下minAreaRect 查看其返回的数据结构:
((133.10528564453125, 404.7727966308594), (100.10702514648438, 57.51853942871094), -49.184913635253906)
复制代码
数据结构解析
((cx, cy), (width, height), theta)
复制代码cx矩形中心点x坐标 center xcy矩形中心点y坐标 center ywidth矩形宽度height矩形高度theta旋转角度,角度(不是弧度)
注意: 上述值均为小数, 不可以直接用于图片索引,或者矩形绘制.
详情见图
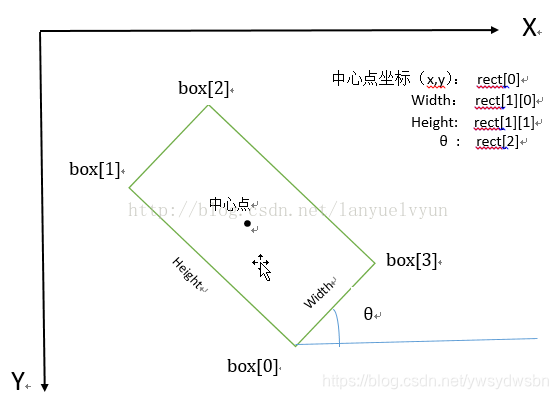
图片来源 python opencv minAreaRect 生成最小外接矩形
注意:旋转角度θ是水平轴(x轴)逆时针旋转,与碰到的矩形的第一条边的夹角。并且这个边的边长是width,另一条边边长是height。也就是说,在这里,width与height不是按照长短来定义的。
在opencv中,坐标系原点在左上角,相对于x轴,逆时针旋转角度为负,顺时针旋转角度为正。
为了直观起见, 我们可以直接这样赋值
((cx, cy), (width, height), theta) = cv2.minAreaRect(cnt)
1
复制代码
完整一些的演示样例:
for cidx,cnt in enumerate(contours):
    ((cx, cy), (width, height), theta) = cv2.minAreaRect(cnt)
    print('center: cx=%.3f, cy=%.3f, width=%.3f, height=%.3f, roate_angle=%.3f'%(cx, cy, width, height, theta))
复制代码
输出结果:
center: cx=133.105, cy=404.773, width=100.107, height=57.519, roate_angle=-49.185
center: cx=415.190, cy=378.853, width=66.508, height=100.537, roate_angle=-1.710
center: cx=278.323, cy=296.089, width=71.608, height=78.065, roate_angle=-78.440
center: cx=83.000, cy=307.000, width=60.000, height=94.000, roate_angle=0.000
center: cx=448.346, cy=213.731, width=47.068, height=64.718, roate_angle=-11.310
center: cx=89.642, cy=164.695, width=17.204, height=88.566, roate_angle=-25.427
center: cx=330.578, cy=123.387, width=92.325, height=72.089, roate_angle=-66.666
复制代码
完整代码展示:
import numpy as np
import cv2

# 读入黑背景下的彩色手写数字
img = cv2.imread("color_number_handwriting.png")
# 转换为gray灰度图
gray = cv2.cvtColor(img, cv2.COLOR_BGR2GRAY)
# 寻找轮廓
contours, hier = cv2.findContours(gray, cv2.RETR_EXTERNAL, cv2.CHAIN_APPROX_SIMPLE)

# 声明画布 拷贝自img
canvas = np.copy(img)

for cidx,cnt in enumerate(contours):
    minAreaRect = cv2.minAreaRect(cnt)
    # 转换为整数点集坐标
    rectCnt = np.int64(cv2.boxPoints(minAreaRect))
    # 绘制多边形
    cv2.polylines(img=canvas, pts=[rectCnt], isClosed=True, color=(0,0,255), thickness=3)

cv2.imwrite("number_minarearect_canvas.png", canvas)
复制代码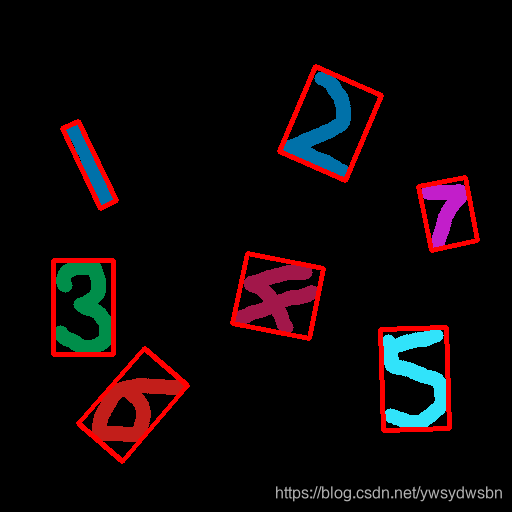
提取最小外接矩形区域
我们可以根据minAreaRect 函数返回的数据结构, 以矩形中心(cx, cy)作为对原来图像旋转的中心点,旋转角度设定为theta:
# 声明旋转矩阵
rotateMatrix = cv2.getRotationMatrix2D((cx, cy), theta, 1.0)
# 获取旋转后的图像
rotatedImg = cv2.warpAffine(img, rotateMatrix, (img.shape[1], img.shape[0]))
复制代码
具体代码如下:
'''
    利用minAreaRect绘制最小面积矩形并绘制
'''
import numpy as np
import cv2

# 读入黑背景下的彩色手写数字
img = cv2.imread("color_number_handwriting.png")
# 转换为gray灰度图
gray = cv2.cvtColor(img, cv2.COLOR_BGR2GRAY)
# 寻找轮廓
contours, hier = cv2.findContours(gray, cv2.RETR_EXTERNAL, cv2.CHAIN_APPROX_SIMPLE)

for cidx,cnt in enumerate(contours):
    minAreaRect = cv2.minAreaRect(cnt)
    # 转换为整数点集坐标
    # rectCnt = np.int64(cv2.boxPoints(minAreaRect))
    ((cx, cy), (w, h), theta) = minAreaRect

    cx = int(cx)
    cy = int(cy)
    w = int(w)
    h = int(h)
    # 获取旋转矩阵
    rotateMatrix = cv2.getRotationMatrix2D((cx, cy), theta, 1.0)
    rotatedImg = cv2.warpAffine(img, rotateMatrix, (img.shape[1], img.shape[0]))
    pt1 = (int(cx - w/2), int(cy - h/2))
    pt2 = (int(cx + w/2), int(cy + h/2))
    # 原图绘制矩形区域
    cv2.rectangle(rotatedImg, pt1=pt1, pt2=pt2,color=(255, 255, 255), thickness=3)
    # 绘制中心点
    cv2.circle(rotatedImg, (cx, cy), 5, color=(255, 0, 0), thickness=-1)
    cv2.imwrite("minarearect_cidx_{}.png".format(cidx), rotatedImg)
复制代码
数字样本图像转换为统一尺寸
我们截取了包含数字的外接矩形, 他们形状各异。(可能需要手动旋转)

如果是制作神经网络所需要的样本图片的话, 我们就需要将其放缩到统一大小。
接下来我们将图片统一变换到 15*25 并转换为二值化图像。
具体代码如下:
import numpy as np
import cv2
from glob import glob

img_paths = glob('./数字图像处理/*.png')

# 新的维度为10×20
new_dimension = (15, 25)

for img_path in img_paths:
    # 读入灰度图
    img = cv2.imread(img_path,cv2.IMREAD_GRAYSCALE)
    img_name = img_path.split('/')[-1]
    # 缩放
    resized = cv2.resize(img, new_dimension)
    # 二值化图片
    ret,thresh = cv2.threshold(resized,10,255,0)

    cv2.imwrite('./number/'+img_name,thresh)