1、封装
在js文件中封装,
常用的有
import {
  get as getToken
} from './token'

//这个是简化日常使用的path请求路径,比如说完整的路径是http://localhost:8080/api/aaa/bbb/ccc/,日常使用只需要/aaa/bbb/ccc/就可以了,VUE_APP_BASE_API根据自己需要配置
export const backend = (u) => `${process.env.VUE_APP_BASE_API}${u}`

//设置请求头和token
export const options = (method) => {
  return {
    credentials: 'include',
    headers: {
      'Authorization': `Bearer ${getToken()}`,
      'Content-Type': 'application/json; charset=utf-8'
    },
    method
  }
}


export const get = (path) => fetch(backend(path), options('GET')).then((res) => res.status === 200
  ? res.json()
  : res.json().then(err => {
    throw err
  }))


export const delete_ = (path) => fetch(backend(path), options('DELETE')).then((res) => res.status === 200
  ? res.json()
  : res.json().then(err => {
    throw err
  }))


export const post = (path, body) => {
  const data = options('POST')
  data.body = JSON.stringify(body)
  return fetch(backend(path), data).then((res) => res.status === 200
    ? res.json()
    : res.json().then(err => {
      throw err
    }))
}


export const patch = (path, body) => {
  const data = options('PATCH')
  data.body = JSON.stringify(body)
  return fetch(backend(path), data).then((res) => res.status === 200
    ? res.json()
    : res.json().then(err => {
      throw err
    }))
}


export const put = (path, body) => {
  const data = options('PUT')
  data.body = JSON.stringify(body)
  return fetch(backend(path), data).then((res) => res.status === 200
    ? res.json()
    : res.json().then(err => {
      throw err
    }))
}
2、使用
- 一般而言post/put/patch/delete都不需要url传query,如需传参数,可以通过path、body来传参数,在path里面拼参数不会有url注入,因为有匹配;
比如:
import {delete_ as httpDelete} from "@/xxxxx/request";
...
httpDelete(`/iron/cfwz/${this.selectllist[0].id}`)
          .then(() => {
            this.$message.success("操作成功");
            this.items = this.items.filter(
              (x) => x.id !== this.selectllist[0].id
            );
            this.onCurrentChange(1, this.ztId);
          })
          .catch((e) => this.$message.error(e.message));
参数多的时候,可以把参数放在body里面;delete方法条件多时,可用post方法来处理。
- 只有get才需要传query
(1)对于不需要传参数到后端的,可使用request.js的get方式
import {get as httpGet} from "@/xxxxx/request";
...
httpGet(`/aaa/bbb/ccc/`)
.then((rst) => {
this.cjbms = rst;
})
.catch((e) => this.$message.error(e.message));
(2)对于参数少的,可以在path放参数
import {get as httpGet} from "@/xxxxx/request";
...
httpGet(`/aaa/bbb/ccc/${this.id}/`)
.then((rst) => {
this.obj = rst;
})
.catch((e) => this.$message.error(e.message));
(3)如果需要传query,即在路径后端拼接参数比如https://www.example.dev/?city=Rome&price=200,最好不要直接拼接到链接,要不然会有url注入。最好像下面这样
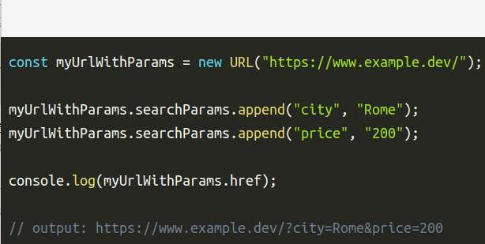
为此,get请求再封装一个
export const backend_url = (p) => new URL(`${process.env.VUE_APP_BASE_API}${p}`, window.location.href)

export const get_by_url = (u) => fetch(u, options('GET')).then((res) => res.status === 200
  ? res.json()
  : res.json().then(err => {
    throw err
  }))
使用
import {backend_url,get_by_url} from "@/xxxxx/request";
...
const u = backend_url("/aaa/bbb/ccc/");
u.searchParams.append("ztId", this.ztId);
get_by_url(u)
.then((rst) => {
this.cjbms = rst;
})
.catch((e) => this.$message.error(e.message));
3、不同传参方式,后端接收注解不一样
(1)path中传参数
`/aaa/bbb/ccc/${this.id}`
@DeleteMapping("/aaa/bbb/ccc/{id}")
 public Ok destroy(@Valid @PathVariable("id") int id) {
        dwhzfaService.delete(id);
        return new Ok();
    }
(2)path后端拼接参数
`/aaa/bbb/ccc/?code=${this.code}`
@GetMapping("/aaa/bbb/ccc")
public int checkCode(@RequestParam(value = "code") String code) {
   return dwhzfaRepository.countByCode(code);
}
(3)body传参
  httpPost(`/aaa/bbb/`, {
                    ztId: this.form.ztId,
                    year: this.form.yearAndMonth.getFullYear(),
                    month: this.form.yearAndMonth.getMonth() + 1,
                  })
                    .then(() => {
                      this.$message.success("操作成功");
                      this.$router.push({
                        name: "xxx.xx.x.index",
                        params: { ztId: this.form.ztId},
                      });
                    })
                    .catch((e) => this.$message.error(e.message));
                })
                .catch(() => {});
后端
@PostMapping("/")
 public Ok create(@Valid @RequestBody CreateDwhzfa form) {
//CreateDwhzfa 是一个类,包含签到body传来的想要接收的属性字段
        dwhzfaService.add(form);
        return new Ok();
 }
4、上传、下载
export const upload = () => {
  return {
    'Authorization': `Bearer ${getToken()}`
  }
}


export const download = (path, name) => {
  const data = options('GET')
  fetch(backend(path), data)
    .then(response => response.blob())
    .then(blob => {
      var url = window.URL.createObjectURL(blob)
      var a = document.createElement('a')
      a.href = url
      a.download = name
      document.body.appendChild(a) // for firefox
      a.click()
      a.remove()
    })
}
import {
  upload as uploadHeaders,
  download as httpDownload
} from "@/xxxx/request";
  computed: {
    uploadHeaders,
  },
methods: {
   exportExcel() {
     httpDownload(
          `/xxx/xx/exportExcel/?year=${parseInt(this.year)}&ztId=11`,
          "导出模板.xls"
        );
    },
successUploadFile() {
this.$message.success("导入成功");
this.excelFileList = [];
},
}
<el-upload
          style="float: left; margin-left: 10px"
          class="upload-demo"
          action="/api/xxx/xx/upload"
          :data="{}"
          :headers="uploadHeaders"
          :limit="1"
          :file-list="excelFileList"
          :on-success="successUploadFile"
          accept="application/vnd.openxmlformats-officedocument.spreadsheetml.sheet, application/vnd.ms-excel"
        >
          <el-button size="small" type="primary">导入</el-button>
        </el-upload>
data(){
return{
excelFileList: [],
}
}