注:本文使用的IntelliJ IDEA版本为2019.3.3,Spring版本为5.0.2.RELEASE,操作系统为Win10。
工程目录结构:
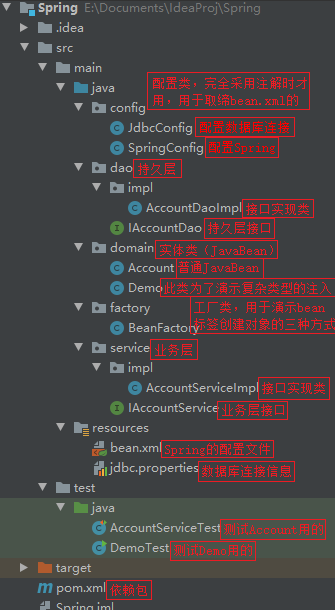
各文件内容:
- pox.xml


<?xml version="1.0" encoding="UTF-8"?>
<project xmlns="http://maven.apache.org/POM/4.0.0"
         xmlns:xsi="http://www.w3.org/2001/XMLSchema-instance"
         xsi:schemaLocation="http://maven.apache.org/POM/4.0.0
         http://maven.apache.org/xsd/maven-4.0.0.xsd">
    <modelVersion>4.0.0</modelVersion>

    <groupId>org.example</groupId>
    <artifactId>Spring</artifactId>
    <version>1.0-SNAPSHOT</version>
    <packaging>jar</packaging>

    <dependencies>
        <dependency>
            <groupId>mysql</groupId>  <!-- MySQL连接驱动 -->
            <artifactId>mysql-connector-java</artifactId>
            <version>8.0.18</version>
        </dependency>
        <dependency>
            <groupId>org.springframework</groupId>
            <artifactId>spring-context</artifactId>
            <version>5.0.2.RELEASE</version>
        </dependency>
        <dependency>
            <groupId>javax.annotation</groupId>  <!-- Java中的注解 -->
            <artifactId>javax.annotation-api</artifactId>
            <version>1.3.1</version>
        </dependency>
        <dependency>
            <groupId>commons-dbutils</groupId>  <!-- 持久层操作,QueryRunner支持 -->
            <artifactId>commons-dbutils</artifactId>
            <version>1.4</version>
        </dependency>
        <dependency>
            <groupId>c3p0</groupId>  <!-- 数据库连接池 -->
            <artifactId>c3p0</artifactId>
            <version>0.9.1.2</version>
        </dependency>
        <dependency>
            <groupId>junit</groupId>
            <artifactId>junit</artifactId>
            <version>4.12</version>
            <scope>test</scope>
        </dependency>
        <dependency>  <!-- Spring整合Junit -->
            <groupId>org.springframework</groupId>
            <artifactId>spring-test</artifactId>
            <version>5.0.2.RELEASE</version>
        </dependency>
    </dependencies>
    <properties>
        <!-- 指定编译的JDK版本-->
        <maven.compiler.source>11</maven.compiler.source>
        <maven.compiler.target>11</maven.compiler.target>
        <!-- 指定编码格式 -->
        <project.build.sourceEncoding>UTF-8</project.build.sourceEncoding>
    </properties>
</project>
基于XML的IOC配置
Spring的配置文件
用于让 spring 来创建配置对象的。 默认情况下它调用的是类中的无参构造函数。如果没有无参构造函数则不能创建成功。
属性:
id:给对象在容器中提供一个唯一标识。用于获取对象。
class:指定类的全限定类名。用于反射创建对象。默认情况下调用无参构造函数。
scope:指定对象的作用范围。
* singleton: 单例的. 默认值.
* prototype: 多例的.
* request: WEB项目中,Spring 创建一个 Bean 的对象,将对象存入到 request 域中.
* session: WEB项目中,Spring 创建一个 Bean 的对象,将对象存入到 session 域中.
* global session: WEB项目中,Portle环境. 若无Portlet环境,则 globalSession 相当于 session.
init-method:指定类中的初始化方法名称。
destroy-method:指定类中销毁方法名称。
生命周期:
单例对象: scope="singleton"
一个应用只有一个对象的实例。它的作用范围就是整个应用。
生命周期:
对象出生:当应用加载,创建容器时,对象就被创建了。
对象活着:只要容器在,对象一直活着。
对象死亡:当应用卸载,销毁容器时,对象就被销毁了。
多例对象: scope="prototype"
每次访问对象时,都会重新创建对象实例。
生命周期:
对象出生:当使用对象时,创建新的对象实例。
对象活着:只要对象在使用中,就一直活着。
对象死亡:当对象长时间不用时,被 java 的垃圾回收器回收了。
- bean.xml
<?xml version="1.0" encoding="UTF-8"?>
<beans xmlns="http://www.springframework.org/schema/beans"
       xmlns:context="http://www.springframework.org/schema/context"
       xmlns:c="http://www.springframework.org/schema/c"
       xmlns:p="http://www.springframework.org/schema/p"
       xmlns:xsi="http://www.w3.org/2001/XMLSchema-instance"
       xmlns:util="http://www.springframework.org/schema/util"
       xsi:schemaLocation="http://www.springframework.org/schema/beans
        http://www.springframework.org/schema/beans/spring-beans.xsd
        http://www.springframework.org/schema/context
        http://www.springframework.org/schema/context/spring-context.xsd
        http://www.springframework.org/schema/util
        http://www.springframework.org/schema/util/spring-util.xsd
        ">
    <!-- Ioc: 控制反转,把对象的创建交给spring来管理 -->

    <!-- 配置accountDao -->
    <!-- bean标签实例化对象方式一:使用构造函数 -->
    <bean id="accountDao" class="dao.impl.AccountDaoImpl" >
        <property name="runner" ref="runner"/>
    </bean>
    <!-- bean标签实例化对象方式二:spring 管理静态工厂-使用静态工厂的方法创建对象
    <bean id="accountDao" class="factory.BeanFactory" factory-method="createAccountDaoImpl">
        <property name="runner" ref="runner"/>
    </bean>
    -->
    <!-- bean标签实例化对象方式三:spring 管理实例工厂-使用实例工厂的方法创建对象
    <bean id="beanFactory" class="factory.BeanFactory"/>
    <bean id="accountDao" factory-bean="beanFactory" factory-method="getAccountDaoImpl">
        <property name="runner" ref="runner"/>
    </bean>
    -->
    <bean id="runner" class="org.apache.commons.dbutils.QueryRunner" scope="prototype">
        <constructor-arg name="ds" ref="dataSource"/>
    </bean>
    <bean id="dataSource" class="com.mchange.v2.c3p0.ComboPooledDataSource">
        <property name="driverClass" value="com.mysql.cj.jdbc.Driver"/>
        <property name="jdbcUrl" value="jdbc:mysql:///数据库?serverTimezone=Asia/Shanghai"/>
        <property name="user" value="用户名"/>
        <property name="password" value="密码"/>
    </bean>


    <!-- 配置accountService -->
    <!-- 依赖注入: 使用构造函数注入 -->
    <!--
    <bean id="accountService" class="service.impl.AccountServiceImpl">
        <constructor-arg name="accountDao" ref="accountDao"/>
    </bean>
    -->
    <!-- 依赖注入: 使用set方法注入 -->
    <bean id="accountService" class="service.impl.AccountServiceImpl">
        <property name="accountDao" ref="accountDao"/>
    </bean>
    <!-- 依赖注入: 使用c名字空间注入, 本质是构造函数注入 -->
    <!-- 需添加 xmlns:c="http://www.springframework.org/schema/c" 约束
    <bean id="accountService" class="service.impl.AccountServiceImpl"
          c:accountDao-ref="accountDao"/>
    -->
    <!-- 依赖注入: 使用p名字空间注入, 本质是set方法注入 -->
    <!-- 需添加 xmlns:p="http://www.springframework.org/schema/p" 约束
    <bean id="accountService" class="service.impl.AccountServiceImpl"
          p:accountDao-ref="accountDao"/>
    -->


    <!-- 告知 spring 创建容器时要扫描的包,使用@Component等用于取代bean标签的注解时才需此项 -->
    <!-- <context:component-scan base-package="dao"/>-->
    <!-- <context:component-scan base-package="service"/>-->
实体类(JavaBean)
- Account.java
public class Account implements Serializable {
    private Integer id;
    private Integer uid;
    private Double money;

    ...  // 省略Getter、Setter和toString方法
}
持久层
- IAccountDao.java
public interface IAccountDao {
    List<Account> findAllAccount();
    int saveAccount(Account account);
    void updateAccount(Account account);
    void deleteAccountById(Integer id);
    Account findAccountById(Integer id);
}
- AccountDaoImpl.java
public class AccountDaoImpl implements IAccountDao {
    private QueryRunner runner;

    @Override
    public List<Account> findAllAccount() {
        try{
            return runner.query("select * from account",new BeanListHandler<Account>(Account.class));
        }catch (Exception e) {
            throw new RuntimeException(e);
        }
    }

    @Override
    public int saveAccount(Account account) {
        try {
            Connection conn = runner.getDataSource().getConnection();  // 获取连接对象
            runner.update(conn,"insert account (uid,money) values (?,?)",account.getUid(),account.getMoney());
            return runner.query(conn, "select last_insert_id()", rs -> rs.next()?rs.getInt(1):0);  // 获得插入的id
        } catch (SQLException e) {
            throw new RuntimeException(e);
        }
    }

    @Override
    public void updateAccount(Account account) {
        try {
            runner.update("update account set uid=?,money=? where id=?",
            account.getUid(),account.getMoney(),account.getId());
        } catch (SQLException e) {
            throw new RuntimeException(e);
        }
    }

    @Override
    public void deleteAccountById(Integer id) {
        try {
            runner.update("delete from account where id=?",id);
        } catch (SQLException e) {
            throw new RuntimeException(e);
        }
    }

    @Override
    public Account findAccountById(Integer id) {
        try {
            return runner.query("select * from account where id=?",new BeanHandler<>(Account.class),id);
        } catch (SQLException e) {
            throw new RuntimeException(e);
        }
    }

    public void setRunner(QueryRunner runner) {
        this.runner = runner;
    }
}
业务层
- IAccountService.java
public interface IAccountService {
    List<Account> findAllAccount();
    int saveAccount(Account account);
    void updateAccount(Account account);
    void deleteAccountById(Integer id);
    Account findAccountById(Integer id);
}
- AccountServiceImpl.java
public class AccountServiceImpl implements IAccountService {
    private IAccountDao accountDao;  // 持久层对象

    @Override
    public List<Account> findAllAccount(){
        return accountDao.findAllAccount();
    }

    @Override
    public int saveAccount(Account account) {
        return accountDao.saveAccount(account);
    }

    @Override
    public void updateAccount(Account account) {
        accountDao.updateAccount(account);
    }

    @Override
    public void deleteAccountById(Integer id) {
        accountDao.deleteAccountById(id);
    }

    @Override
    public Account findAccountById(Integer id) {
        return accountDao.findAccountById(id);
    }

    public AccountServiceImpl(){
        System.out.println("无参构造函数...");
    }

    public AccountServiceImpl(IAccountDao accountDao) {
        this.accountDao = accountDao;
        System.out.println("有参构造函数...");
    }

    public IAccountDao getAccountDao() {
        return accountDao;
    }

    public void setAccountDao(IAccountDao accountDao) {
        this.accountDao = accountDao;
    }
}
测试类
- AccountServiceTest.java
public class AccountServiceTest {
    private IAccountService as;
    private int curAccountId = 15;

    @Before
    public void init() {
        ApplicationContext ac = new ClassPathXmlApplicationContext("bean.xml");
        as  = (IAccountService) ac.getBean("accountService");
    }

    @Test
    public void testFindAllAccount() {
        List<Account> accounts = as.findAllAccount();
        for (Account account : accounts) {
            System.out.println(account);
        }
    }

    @Test
    public void testSaveAccount() {
        Account account = new Account();
        account.setUid(42);
        account.setMoney(1000d);
        curAccountId = as.saveAccount(account);
        System.out.println(curAccountId);
    }

    @Test
    public void testUpdateAccount() {
        Account account = as.findAccountById(curAccountId);
        account.setMoney(3000d);
        as.updateAccount(account);
    }

    @Test
    public void testDeleteAccountById() {
        as.deleteAccountById(curAccountId);
    }

    @Test
    public void testFindAccountById() {
        Account account = as.findAccountById(curAccountId);
        System.out.println(account);
    }
}
演示类
注:演示类不是Sping项目中的结构,而是为了演示某些知识点所建的类
演示XML文件中<bean>标签实例化对象的三种方式
- BeanFactory.java
注:XML文件配置请查看上文中的<!-- 配置accountDao -->部分
/**
 * 用于演示bean标签实例化对象的三种方式
 */
public class BeanFactory {
    // bean标签实例化对象方式一:使用构造函数
    public BeanFactory() {}

    // bean标签实例化对象方式二:spring 管理静态工厂-使用静态工厂的方法创建对象
    public static AccountDaoImpl createAccountDaoImpl() {
        return new AccountDaoImpl();
    }

    // bean标签实例化对象方式三:spring 管理实例工厂-使用实例工厂的方法创建对象
    public AccountDaoImpl getAccountDaoImpl() {
        return new AccountDaoImpl();
    }
}
演示基于XML的数组、集合等复杂结构的依赖注入
- bean.xml
<?xml version="1.0" encoding="UTF-8"?>
<beans xmlns="http://www.springframework.org/schema/beans"
       xmlns:context="http://www.springframework.org/schema/context"
       xmlns:xsi="http://www.w3.org/2001/XMLSchema-instance"
       xsi:schemaLocation="http://www.springframework.org/schema/beans
        http://www.springframework.org/schema/beans/spring-beans.xsd
        http://www.springframework.org/schema/context
        http://www.springframework.org/schema/context/spring-context.xsd
        ">
    <!-- 告知 spring 创建容器时要扫描的包 -->
    <context:component-scan base-package="domain"/>

    <bean id="demo" class="domain.Demo">
        <property name="name" value="张三"/>
        <property name="age" value="20"/>
        <property name="birthday" ref="now"/>
        <property name="pets">
            <array>
                <value>汤姆猫</value>
                <value>杰瑞鼠</value>
            </array>
        </property>
        <property name="friends">
            <list>
                <value>王五</value>
                <value>赵六</value>
            </list>
        </property>
        <property name="wives">
            <list>
                <value>田甜</value>
                <value>甄妮</value>
            </list>
        </property>
        <property name="contacts">
            <map>
                <entry key="田甜" value="013"/>
                <entry key="甄妮">
                    <value>017</value>
                </entry>
            </map>
        </property>
        <property name="characters">
            <props>
                <prop key="田甜">温柔</prop>
                <prop key="甄妮">美丽</prop>
            </props>
        </property>
    </bean>

    <!-- 配置一个日期对象 -->
    <bean id="now" class="java.util.Date"/>
</bean>
- Demo.java
/**
 * 用于演示依赖注入复杂结构(数组、List、Set、Map、Properties)
 */
public class Demo implements Serializable {
    private String name;
    private Integer age;
    private Date birthday;

    private String[] pets;

    private List<String> friends;

    private Set<String> wives;

    private Map<String, String> contacts;

    private Properties characters;

    ...  // 省略Getter、Setter和toString方法
}
- DemoTest.java
/**
 * ApplicationContext的三个常用实现类:
 *      ClassPathXmlApplicationContext:它可以加载类路径下的配置文件。要求配置文件必须在类路径下,否则无法加载。(常用)
 *      FileSystemXmlApplicationContext:它可以加载磁盘任意路径下的配置文件(必须有访问权限)
 *      AnnotationConfigApplicationContext:当我们使用注解配置容器对象时,需要使用此类来创建spring容器,用来读取注解。
 *
 * 核心容器的两个接口引发出的问题:
 *  ApplicationContext:     单例对象适用
 *      创建核心容器对象时采取的策略是立即加载的方式。即只要一读取完配置文件就马上创建配置文件中配置的所有Bean对象。
 *  BeanFactory:            多例对象使用
 *      创建核心容器对象时采取的策略是延迟加载的方式。即什么时候需要Bean对象了,才会根据id去创建并获取对象。
 */
public class DemoTest {
    public static void main(String[] args) {
        /* 使用ApplicationContext方式获取核心容器 */
        // 1.获取核心容器对象
        ApplicationContext ac = new ClassPathXmlApplicationContext("bean.xml");
        // ApplicationContext ac = new FileSystemXmlApplicationContext("E:/Documents/IdeaProj/Spring/bean.xml");

        // 2.根据id获取Bean对象
        Demo demo = ac.getBean(Demo.class);  // 此方式自动转类型(根据class自动转)
        // Demo demo = (Demo) ac.getBean("demo");  // 此方式手动转类型

        System.out.println(demo);


        /* 使用BeanFactory方式获取核心容器 */
        /*
        Resource resource = new ClassPathResource("bean.xml");
        BeanFactory factory = new XmlBeanFactory(resource);

        Demo demo = ac.getBean(Demo.class);
         */
    }
}
基于注解的IOC配置
用于对象实例化:
@Component: 让 spring 来管理资源。相当于XML文件的 bean 标签。
@Controller: 衍生注解, 与Component等价。一般用于表现层的注解。
@Service: 衍生注解, 与Component等价。一般用于业务层的注解。
@Repository: 衍生注解, 与Component等价。一般用于持久层的注解。
用于注入数据:
@Autowired: 自动按照类型注入。当使用该注解时可省略set方法。若有多个类型相匹配时,可使用对象变量名作为 bean 的 id 在 Spring 容器查找,找到了也可注入成功。它只能注入其它 bean 类型。
@Qualifier: 在自动按照类型注入的基础之上,再按照 bean 的 id 注入。它在给字段注入时必须与 Autowire 注解一起使用;但在给方法参数注入时,可以独立使用。
@Resource: 直接按照 bean 的 id 注入。它也只能注入其它 bean 类型。(需要javax.annotation-api.jar支持)
@Value: 注入基本数据类型和 String 类型的。以解决@Autowired、@Resource只能注入其它 bean 类型的问题。
用于改变作用范围:
@Scope: 指定 bean 的作用范围。相当于XML文件 bean 标签中的 scope 属性。
* 取值: singleton prototype request session globalsession
用于设置生命周期:
@PostConstruct: 用于指定初始化方法。相当于XML文件 bean 标签中的 init-method 属性。
@PreDestroy: 用于指定销毁方法。相当于XML文件 bean 标签中的 destroy-method 属性。
使用XML和注解配置Bean的对比:
| 基于XML配置 | 基于注解配置 | |
|---|---|---|
| Bean定义 | <bean id="..." class="..."/> | @Componnent, 衍生类: @Repository @Service @Controller |
| Bean名称 | 通过id或name指定 | @Component("name") |
| Bean注入 | <constructor-arg> <property>或c p名字空间 | @Autowried @Qualifier |
| 生命周期 | init-method属性 destroy-method属性 | @PostConstruct @PreDestroy |
| 作用范围 | scope属性 | @Scope |
| 适合场景 | Bean来自第三方 | Bean实现类由自己开发 |
取代XML文件的注解:
@Configuration: 用于指定当前类是一个 spring 配置类,当创建容器时会从该类上加载注解。
// 注:获取容器时使用: AnnotationApplicationContext(有@Configuration注解的类.class)
// 例如:
ApplicationContext ac = new AnnotationApplicationContext(SpringConfig.class);
@ComponentScan: 用于指定 spring 在初始化容器时要扫描的包。相当于XML文件 context:component-scan 标签。
@Bean: 该注解只能写在方法上,表明使用此方法创建一个对象,并且放入 spring 容器。
@PropertySource: 用于加载 .properties 文件中的配置。例如使用此注解指定连接数据库信息的 properties 配置文件的位置。
* value[]: 用于指定 properties 文件位置。如果是在类路径下,需要写上 classpath: 。
@Import: 用于导入其它配置类。在引入其它配置类时,可以不用再写 @Configuration 注解。
- SpringConfig.java
/**
* 定义Spring配置类
*/
@Configuration
@ComponentScan("com.example")
@Import(JdbcConfig.class)
public class SpringConfig {/*Spring配置类的内容*/}


- JdbcConfig.java
@Configuration
@PropertySource("classpath:jdbc.properties")
public class JdbcConfig {
    @Value("${jdbc.driver}")
    private String driver;
    @Value("${jdbc.url}")
    private String url;
    @Value("${jdbc.username}")
    private String username;
    @Value("${jdbc.password}")
    private String password;

    /**
    * 创建一个数据源,并存入 spring 容器中
    */
    @Bean(name="dataSource")
    public DataSource createDataSource() {
        try {
            ComboPooledDataSource ds = new ComboPooledDataSource();
            ds.setDriverClass(driver);
            ds.setJdbcUrl(url);
            ds.setUser(username);
            ds.setPassword(password);
            return ds;
        } catch (Exception e) {
            throw new RuntimeException(e);
        }
    }
}


- jdbc.properties
jdbc.driver=com.mysql.cj.jdbc.Driver
jdbc.url=jdbc:mysql:///数据库?serverTimezone=Asia/Shanghai
jdbc.username=用户名
jdbc.password=密码
初步改造:Bean实例化改为注解方式,但Spring配置依然使用xml配置
- bean.xml
<?xml version="1.0" encoding="UTF-8"?>
<beans xmlns="http://www.springframework.org/schema/beans"
       xmlns:context="http://www.springframework.org/schema/context"
       xmlns:xsi="http://www.w3.org/2001/XMLSchema-instance"
       xmlns:util="http://www.springframework.org/schema/util"
       xsi:schemaLocation="http://www.springframework.org/schema/beans
        http://www.springframework.org/schema/beans/spring-beans.xsd
        http://www.springframework.org/schema/context
        http://www.springframework.org/schema/context/spring-context.xsd
        http://www.springframework.org/schema/util
        http://www.springframework.org/schema/util/spring-util.xsd
        ">
    <!-- 告知 spring 创建容器时要扫描的包 -->
    <context:component-scan base-package="domain"/>

    <!-- 配置一个日期对象 -->
    <bean id="now" class="java.util.Date"/>

    <util:list id="friends">
        <value>王五</value>
        <value>赵六</value>
    </util:list>
    <util:set id="wives">
        <value>田甜</value>
        <value>甄妮</value>
    </util:set>
    <util:map id="contacts">
        <entry key="田甜" value="013"/>
        <entry key="甄妮">
            <value>017</value>
        </entry>
    </util:map>
    <util:properties id="characters">
        <prop key="田甜">温柔</prop>
        <prop key="甄妮">美丽</prop>
    </util:properties>

</beans>
- Demo.java
/**
 * 用于演示依赖注入复杂结构(数组、List、Set、Map、Properties)
 */
@Component("demo")
public class Demo implements Serializable {
    @Value("李四")
    private String name;
    @Value("21")
    private Integer age;

    @Autowired
    @Qualifier("now")
    private Date birthday;

    @Value("汤姆猫")
    private String[] pets;

    @Resource(name="friends")
    private List<String> friends;

    @Resource(name="wives")
    private Set<String> wives;

    @Resource(name="contacts")
    private Map<String, String> contacts;

    @Resource(name="characters")
    private Properties characters;

    ...  // 省略Getter、toString方法,采用注解方式无需Setter方法
}
注:DemoTest.java无更改,此时的Demo类的创建和依赖注入已不使用<bean>了。
完全改造:Bean实例化和Spring配置均改为注解方式(即完全去除bean.xml)
- AccountDaoImpl.java
@Repository("accountDao")  // 增加Repository注解
public class AccountDaoImpl implements IAccountDao {
    @Autowired  // 增加Autowired注解
    private QueryRunner runner;

    ... // 其余部分无改动
}
- AccountServiceImpl.java
@Service("accountService")  // 增加Service注解
public class AccountServiceImpl implements IAccountService {
    @Autowired  // 增加Autowired注解
    private IAccountDao accountDao;

    ... // 其余部分无改动
}
注:IAccountDao.java和IAccountService.java均无改动。至此,<bean>的所有功能已完全被注解取代,接下来将建立Spring配置类利用注解完全取代bean.xml。
- 新建 jdbc.properties,配置数据库连接信息。
jdbc.driver=com.mysql.cj.jdbc.Driver
jdbc.url=jdbc:mysql:///数据库?serverTimezone=Asia/Shanghai
jdbc.username=用户名
jdbc.password=密码
- 新建 JdbcConfig.java,以建立数据库连接。
@Configuration  // 指定当前类是一个 spring 配置类
@PropertySource("classpath:jdbc.properties")  // 引入jdbc.properties文件
public class JdbcConfig {
    @Value("${jdbc.driver}")
    private String driver;
    @Value("${jdbc.url}")
    private String url;
    @Value("${jdbc.username}")
    private String username;
    @Value("${jdbc.password}")
    private String password;

    /**
     * 创建一个数据源,并存入 spring 容器中
     */
    @Bean(name="dataSource")  // 使用此方法创建一个对象,并且放入 spring 容器,相当于XML文件的 bean 标签
    public DataSource createDataSource() {
        try {
            ComboPooledDataSource ds = new ComboPooledDataSource();
            ds.setDriverClass(driver);
            ds.setJdbcUrl(url);
            ds.setUser(username);
            ds.setPassword(password);
            return ds;
        } catch (Exception e) {
            throw new RuntimeException(e);
        }
    }

    @Bean("runner")  // 创建QueryRunner,以便Spring注入
    @Scope("prototype")  // 使用多例对象,以免多个Dao同时执行时互相干扰。
    public QueryRunner createQueryRunner(DataSource ds) {
        return new QueryRunner(ds);
    }
}
- 新建 SpringConfig.java
@Configuration  // 指定当前类是一个 spring 配置类
@ComponentScan({"dao","service"})  // 告知Spring扫描的包,相当于XML文件 context:component-scan 标签
@Import(JdbcConfig.class)  // 引入JdbcConfig类中的配置
public class SpringConfig {

}
- AccountServiceTest.java
public class AccountServiceTest {
    private IAccountService as;
    private int curAccountId = 19;

    @Before
    public void init() {
        ApplicationContext ac = new AnnotationConfigApplicationContext(SpringConfig.class);  // 改为注解获取的方式
        as  = (IAccountService) ac.getBean("accountService");
    }

    ... // 其余部分无改动
}
注:至此bean.xml(可删除)已被JdbcConfig类和SpringConfig类完全取缔,执行AccountServiceTest类中的测试方法,效果与使用基于XML配置时的执行效果相同。
拓展:Spring整合Junit
- AccountServiceTest.java
@RunWith(SpringJUnit4ClassRunner.class)  // 需要spring-test.jar支持
@ContextConfiguration(classes=SpringConfig.class)
public class AccountServiceTest {
    @Autowired  // 增加Autowired注解
    private IAccountService as;
    private int curAccountId = 19;

    /* 此部分功能已由ContextConfiguration注解完成
    @Before
    public void init() {
        ApplicationContext ac = new AnnotationConfigApplicationContext(SpringConfig.class);
        as  = (IAccountService) ac.getBean("accountService");
    }
    */

    ... // 其余部分无改动
}