一.什么是WSGI
WSGI全称Web Server Gateway Interface, 即web服务器网关接口.
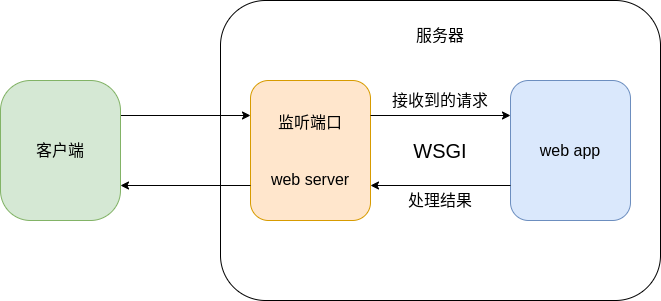
如图所示的http服务器, web服务器负责面向客户端接受请求和返回响应, web应用负责处理请求, 因此二者需要进行交互, web服务器将请求数据传给web应用, web应用执行完业务逻辑后将处理结果返回给web服务器. WSGI就是通过标准接口的方式, 定义了web服务器和python web应用之间的交互规范. 对于一个python web应用, 只要它遵循WSGI规范, 理论上就可以在任何写入这个规范的服务器上运行, 这样就提高了程序的可移植性.
WSGI的接口定义很简单, 对于web应用端, 只需要定义一个类似如下的可调用对象:
from typing import List, Callable


def my_application(environ: dict, start_response: Callable) -> List[bytes]:
    # do something
    status = '200 OK'
    headers = [('Content-Type', 'text/html')]
    start_response(status, headers)
    return [b'<h1>hello wsgi</h1>']
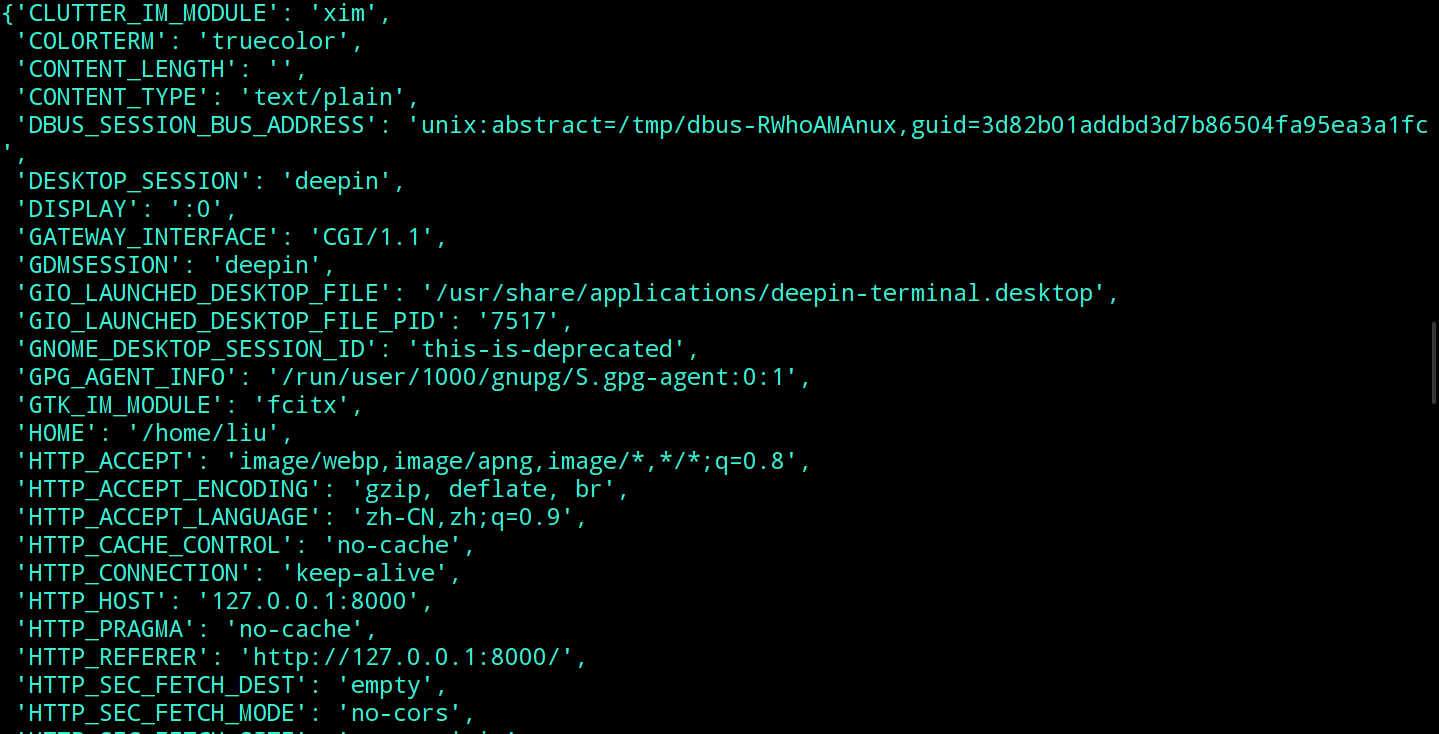
这个可调用对象要接收两个参数. 第一个参数environ是一个字典, 内容是客户端的请求信息, 像是下面这样:
第二个参数start_response则是一个函数, 它接收status和headers两个参数, 当后端业务逻辑执行完毕之后, 调用它就可以设置响应状态和响应头.
最后, web应用需要将响应体以字节的形式放在一个可迭代对象中返回.
这样, WSGI就定义了一个web应用的行为模式: 首先解析environ提取需要的数据, 进行各种操作后, 调用start_response函数设置响应状态和消息报头, 最后将响应正文放在可迭代对象中返回.
对于web服务器端,使用如下方式就能启动服务并调用刚才写的web应用:
from wsgiref.simple_server import make_server
from app import my_application #这里的app表示web应用所在的地方, 根据自己的代码自行修改

httpd = make_server('127.0.0.1', 8000, my_application)
httpd.serve_forever()
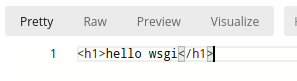
这样, 一个最简单的http服务端就写好了. 访问127.0.0.1:8000, 得到结果如下:
二.web框架的架构
借用Django中MTV的那一套, 一个web框架主要包含路由, 控制器View, 模板层Template和模型层Model. web服务器将数据传给路由, 路由再将数据分发给对应的控制器去处理. 控制器与模型层交互得到数据库数据, 与模板层交互得到前端网页文件后, 将处理结果返回给web服务器.

基于上面的一套流程, 本文要实现的web框架需要实现下面的一些功能:
- Request和Response类:
分别作为environ参数和响应参数的封装, 这样可以让代码更加清晰和整洁.
- Route类:
负责路由的分发.
- Application类:
一方面作为WSGI的调用入口, 一方面进行整体的调度.
- Template:
渲染html文本, 生成动态页面
- Model:
这个不写了,因为我对数据库的了解还不够.
三.Request和Response类
Request类的代码如下:
from urllib.parse import parse_qs
from typing import List


class Request:

    def __init__(self, environ: dict) -> None:
        self.environ = environ
        self.method = environ['REQUEST_METHOD']
        self.path = environ['PATH_INFO']
        # 首先获取url中携带的参数
        self.arguments = parse_qs(environ['QUERY_STRING'])
        # 然后读取form表单参数
        try:
            request_body_size = int(environ['CONTENT_LENGTH'])
        except (ValueError, KeyError):
            request_body_size = 0
        request_body = environ['wsgi.input'].read(request_body_size).decode()
        # 最后将二者整合,表单数据中相同key的参数会把url的覆盖
        self.arguments.update(parse_qs(request_body))

    def __str__(self) -> str:
        items = (
            'arguments',
            'path',
            'method',
        )
        info = {item: getattr(self, item) for item in items}
        return str(info)

    def get_argument(self, key: str, default: str = '') -> str:
        values = self.arguments.get(key, None)
        if not values:
            return default
        return values[0]

    def get_arguments(self, key: str) -> List[str]:
        values = self.arguments.get(key, None)
        if values is None:
            return []
        return values
Request类作为environ的封装. 这里只提取最常用的几个信息: 请求类型, 请求路径和url以及form表单的参数, 其他信息本文用不上, 就不提取了.
Response类的代码如下:
import http.client
from wsgiref.headers import Headers
from typing import Iterable, List, Tuple


class Response:

    def __init__(self, body: Iterable[str] = None, status_code: int = 200, content_type: str = 'text/html',
                 charset: str = 'utf-8') -> None:
        if body is None:
            self.body = []
        elif isinstance(body, str):
            self.body = [body]
        else:
            self.body = body
        self.status_code = status_code
        self._headers = Headers()
        self._headers.add_header('content-type', f'{content_type}; charset={charset}')
        self.charset = charset

    def __iter__(self) -> Iterable[bytes]:
        for val in self.body:yield val.encode(self.charset)

    @property
    def status(self) -> str:
        status_string = http.client.responses.get(self.status_code, 'UNKNOWN')
        return f'{self.status_code} {status_string}'

    @property
    def headers(self) -> List[Tuple[str, str]]:
        return self._headers.items()
Response类和Request类类似, 封装一些响应的基本的信息. 由于WSGI定义的接口要求返回一个可迭代对象, 因此这里定义response的__iter__方法, 将响应数据转码后返回.
通过如下方式使用上面定义的两个类:
from typing import Callable, Iterable


def application(environ: dict, start_response: Callable) -> Iterable[bytes]:
    request = Request(environ)
    print(request)
    response = Response(['<h1>hello wsgi</h1>'])
    start_response(response.status, response.headers)
    return response
四.路由分发
路由的写法参照了flask, 通过装饰器的形式来指定路由分发. 代码如下:
import re
from typing import (
    Callable,
    Sequence,
    Tuple,
)


class Route:

    def __init__(self) -> None:
        self.handlers = []
        for pattern in (r'/(favicon.ico)', r'/(robots.txt)',):
            self.handlers.append((re.compile(pattern), static_handler))

    def __call__(self, pattern: str) -> Callable:
        if not pattern.endswith('$'):
            pattern += '$'

        def wrapper(handler: Callable) -> None:
            self.handlers.append((re.compile(pattern), handler))

        return wrapper

    def match(self, path: str) -> Tuple[Callable, Sequence]:
        for pattern, handler in self.handlers:
            args = re.match(pattern, path)
            if args:
                return handler, args.groups()
        raise HttpError(404)
路由需要保存不同的url和对应的handler, 因此这里使用类而不是函数来作为装饰器, 使用handlers这个属性来保存url和对应的handler函数. 当接收到客户端的请求时, 调用路由对象的match方法就能得到对应的处理函数和url中的匹配数据. 如果无法匹配, 则通过HttpError类来引发404错误. HttpError类的代码如下:
import http.client


class HttpError(Exception):
    def __init__(self, status_code: int = 500, message: str = '') -> None:
        self.status_code = status_code
        self.message = message

    def __str__(self) -> str:
        error = f'HTTP {self.status_code}: {http.client.responses.get(self.status_code, "Unknown")}'
        if self.message:
            return error + f'({self.message})'
        else:
            return error
HttpError的本质就是一个包含了状态码和错误信息的Exception, 实现这个类的好处是, 当某个流程无法继续的时候, 可以不用传参数, 而是直接将这个异常抛给上层.
另外, Route类在初始化的时候, 在路由列表中加了r'/(favicon.ico)'和r'/(robots.txt)'两项, 这两分别是网站的图标和爬虫协议, 因此交由static_handler函数处理:
def static_handler(request: Request, file_name: str) -> None:
    # 本文用不上,直接404得了
    raise HttpError(404)
最后, 通过下面的代码测试刚才写的路由:
route = Route()


@route(r'/')
def index(request: Request) -> str:
    return 'hello wsgi'


@route(r'/(.*)')
def hello(request: Request, username: str) -> str:
    return f'hello {username}'


def application(environ: dict, start_response: Callable) -> Iterable[bytes]:
    request = Request(environ)
    try:
        handler, args = route.match(request.path)
        response = Response(handler(request, *args))
    except HttpError as e:
        response = Response(status_code=e.status_code)
    start_response(response.status, response.headers)
    return response
五.Application
application的本质就是WSGI的web应用端入口. 为了方便扩展, 这里把它写成类的形式, 然后定义__call__方法;
from wsgiref.simple_server import make_server
from typing import Callable, Iterable


class Application:

    def __init__(self) -> None:
        self.route = Route()

    def __call__(self, environ: dict, start_response: Callable) -> Iterable[bytes]:
        request = Request(environ)
        try:
            handler, args = self.route.match(request.path)
            response = Response(handler(request, *args))
        except HttpError as e:
            response = Response(status_code=e.status_code)
        start_response(response.status, response.headers)
        return response

    def run(self, host: str = '127.0.0.1', port: int = 8000) -> None:
        httpd = make_server(host, port, self)
        httpd.serve_forever()
没什么好说的, 和之前的代码是一样的.
这样一来, 一个web框架就差不多成型了, 用下面的代码进行测试:
app = Application()


@app.route(r'/')
def index(request: Request) -> str:
    return 'hello wsgi'


@app.route(r'/(.*)')
def hello(request: Request, username: str) -> str:
    return f'hello {username}'


if __name__ == '__main__':
    app.run()
六.模板层
关于如何实现模板层, 我单独写了一篇博客, 在这里.
七.模型层
能力不够, 先不讲了.
八.结束
把上面的代码整合起来, 我们就得到了一个web框架, 用起来像是这样:
from framework import Application, Request, render

app = Application()


@app.route(r'/(.*)')
def hello(request: Request, username: str) -> str:
    return render('<h1>hello {{username}}</h1>', {'username': username})
调用app.run, 就可以运行hello应用了. 此外, 也可以使用其他支持WSGI的web服务器来启动服务, 比如gunicorn:
