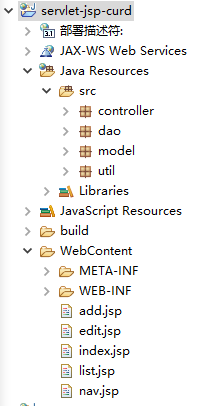
第一步创建一个表
 1 create database liyongzhendb default character set utf8 collate utf8_bin;
 2
 3 CREATE TABLE IF NOT EXISTS student (
 4     id INT AUTO_INCREMENT,
 5     name VARCHAR(255) NOT NULL,
 6     password VARCHAR(255) NOT NULL,
 7     date_of_birth DATE,
 8     description TEXT,
 9     PRIMARY KEY (id)
10 )ENGINE=InnoDB
第二步创建一个Web工程,工程名叫servlet-jsp-curd

第三步创建一个POJO
 1 package model;
 2
 3 import java.util.Date;
 4
 5 public class Student {
 6
 7     private int id;
 8     private String name;
 9     private String password;
10     private Date dateOfBirth;
11     private String description;
12
13     public Student() {
14     }
15
16     public int getId() {
17         return id;
18     }
19
20     public void setId(int id) {
21         this.id = id;
22     }
23
24     public String getName() {
25         return name;
26     }
27
28     public void setName(String name) {
29         this.name = name;
30     }
31
32     public String getPassword() {
33         return password;
34     }
35
36     public void setPassword(String password) {
37         this.password = password;
38     }
39
40     public Date getDateOfBirth() {
41         return dateOfBirth;
42     }
43
44     public void setDateOfBirth(Date dateOfBirth) {
45         this.dateOfBirth = dateOfBirth;
46     }
47
48     public String getDescription() {
49         return description;
50     }
51
52     public void setDescription(String description) {
53         this.description = description;
54     }
55
56 }
add.jsp类
 1 <%@ page language="java" contentType="text/html; charset=UTF-8"
 2     pageEncoding="UTF-8"%>
 3 <!DOCTYPE html>
 4 <html>
 5 <head>
 6 <meta http-equiv="Content-Type" content="text/html; charset=UTF-8">
 7 <title>添加学生</title>
 8 <link rel="stylesheet"
 9     href="https://maxcdn.bootstrapcdn.com/bootstrap/3.3.7/css/bootstrap.min.css">
10 <style type="text/css">
11 body {
12     padding-top: 50px;
13 }
14
15 form {
16     padding: 40px 15px;
17      600px;
18     margin: 0 auto;
19 }
20
21 .group {
22     margin: 10px;
23     padding-bottom: 10px;
24     max- 600px;
25 }
26
27 input {
28      400px;
29 }
30
31 .submit {
32     text-align: right;
33 }
34 </style>
35 </head>
36 <body>
37     <jsp:include page="nav.jsp"/>
38     <div class="container">
39         <form action="save.do" method="post">
40             <div class="group">
41                 <label for="name" class="title">姓名:</label> <input type="text"
42                     id="name" name="name" />
43             </div>
44             <div class="group">
45                 <label for="password" class="title">密码:</label> <input
46                     type="password" id="password" name="password" />
47             </div>
48             <div class="group">
49                 <label for="description" class="description">说明:</label> <input
50                     id="description" name="description" />
51             </div>
52             <div class="submit">
53                 <button type="submit" value="提交" id="submit">保存</button>
54             </div>
55         </form>
56     </div>
57 </body>
58 </html>
nav.jsp类实现添加功能
 1 <%@ page language="java" contentType="text/html; charset=UTF-8"
 2     pageEncoding="UTF-8"%>
 3     <nav class="navbar navbar-inverse navbar-fixed-top">
 4         <div class="container">
 5             <div class="navbar-header">
 6                 <button type="button" class="navbar-toggle collapsed"
 7                     data-toggle="collapse" data-target="#navbar" aria-expanded="false"
 8                     aria-controls="navbar">
 9                     <span class="sr-only">Toggle navigation</span> <span
10                         class="icon-bar"></span> <span class="icon-bar"></span> <span
11                         class="icon-bar"></span>
12                 </button>
13                 <a class="navbar-brand" href="#">JSP增删改查示例</a>
14             </div>
15             <div id="navbar" class="collapse navbar-collapse">
16                 <ul class="nav navbar-nav">
17                     <li class="active"><a href="students.jsp">列表</a></li>
18                     <li><a href="add.jsp">添加</a></li>
19                 </ul>
20             </div>
21         </div>
22     </nav>
list.jsp类是查询所有的
 1 <%@ page language="java" contentType="text/html; charset=UTF-8"
 2     pageEncoding="UTF-8"%><%@ taglib prefix="c"
 3     uri="http://java.sun.com/jsp/jstl/core"%>
 4 <!DOCTYPE html>
 5 <html>
 6 <head>
 7 <meta http-equiv="Content-Type" content="text/html; charset=UTF-8">
 8 <title>学生列表</title>
 9 <link rel="stylesheet"
10     href="https://maxcdn.bootstrapcdn.com/bootstrap/3.3.7/css/bootstrap.min.css">
11 <style type="text/css">
12 table {
13     margin-top: 80px;
14 }
15 </style>
16 </head>
17 <body>
18     <jsp:include page="nav.jsp" />
19     <div class="container">
20         <table class="table">
21             <tr>
22                 <th>ID</th>
23                 <th>姓名</th>
24                 <th>密码</th>
25                 <th>说明</th>
26                 <th>操作</th>
27             </tr>
28             <c:forEach var="student" items="${students}">
29                 <tr>
30                     <td>${student.id}</td>
31                     <td>${student.name}</td>
32                     <td>${student.password}</td>
33                     <td>${student.description}</td>
34                     <td><a href="edit.do?id=${student.id}">修改</a> | <a
35                         href="delete.do?id=${student.id}">删除</a></td>
36                 </tr>
37             </c:forEach>
38         </table>
39     </div>
40 </body>
41 </html>
创建一个edit.jsp类实现编辑功能,编辑功能分两部分,一部分将数据查询出来,放到表单里。另一部分是将表单的数据更新到数据库。
 1 <%@ page language="java" contentType="text/html; charset=UTF-8"
 2     pageEncoding="UTF-8"%>
 3 <!DOCTYPE html>
 4 <html>
 5 <head>
 6 <meta http-equiv="Content-Type" content="text/html; charset=UTF-8">
 7 <title>修改学生</title>
 8 <link rel="stylesheet"
 9     href="https://maxcdn.bootstrapcdn.com/bootstrap/3.3.7/css/bootstrap.min.css">
10 <style type="text/css">
11 body {
12     padding-top: 50px;
13 }
14
15 form {
16     padding: 40px 15px;
17      600px;
18     margin: 0 auto;
19 }
20
21 .group {
22     margin: 10px;
23     padding-bottom: 10px;
24     max- 600px;
25 }
26
27 input {
28      400px;
29 }
30
31 .submit {
32     text-align: right;
33 }
34 </style>
35 </head>
36 <body>
37     <jsp:include page="nav.jsp"/>
38     <div class="container">
39         <form action="update.do" method="post">
40             <input type="hidden"  name="id" value="${student.id}">
41
42             <div class="group">
43                 <label for="name" class="title">姓名:</label> <input type="text"
44                     id="name" name="name"  value="${student.name}" />
45             </div>
46             <div class="group">
47                 <label for="password" class="title">密码:</label> <input
48                     type="password" id="password" name="password" value="${student.password}" />
49             </div>
50             <div class="group">
51                 <label for="description" class="description">说明:</label> <input
52                     id="description" name="description" value="${student.description}"  />
53             </div>
54             <div class="submit">
55                 <button type="submit" value="提交" id="submit">保存</button>
56             </div>
57         </form>
58     </div>
59 </body>
60 </html>
这样一个增删改查的工程就做好了