一、环境准备
1. 软件:GNS3
2. 路由:c7200
二、实验操作
实验要求:
1、 掌握路由器的基本配置,几种工作模式的进入退出方法。
2、 掌握静态路由的作用和配置方法。
3、 掌握浮动路由的配置方法。
4、 掌握配置静态负载均衡的方法。
5、 掌握路由器上配置远程登录的方法。
实验拓扑:

实验过程:
1、根据实验拓扑对路由器 R1、R2 和 R3 配置接口 IP 地址。
配置路由器 R1

Router(config)#hostname R1 R1(config)#interface f0/0

R1(config-if)#ip address 1.1.33.1 255.255.255.0 R1(config-if)#no shutdown R1(config)#interface s1/0

R1(config-if)#ip address 12.1.33.1 255.255.255.0

R1(config-if)#clock rate 64000

R1(config-if)#no shutdown

R1(config)#interface s1/1

R1(config-if)#ip address 13.1.33.1 255.255.255.0

R1(config-if)#clock rate 64000

R1(config-if)#no shutdown

配置路由器 R2

Router(config)#hostname R2 R2(config)#interface f0/0

R2(config-if)#ip address 2.1.33.1 255.255.255.0 R2(config-if)#no shutdown R2(config)#interface s1/0

R2(config-if)#ip address 12.1.33.2 255.255.255.0

R2(config-if)#no shutdown

R2(config)#interface s1/2

R2(config-if)#ip address 14.1.33.1 255.255.255.0

R2(config-if)#clock rate 64000

R2(config-if)#no shutdown

配置路由器 R3

Router(config)#hostname R3 R3(config)#interface f0/0

R3(config-if)#ip address 3.1.33.1 255.255.255.0 R3(config-if)#no shutdown R3(config)#interface s1/1

R3(config-if)#ip address 13.1.33.2 255.255.255.0

R3(config-if)#no shutdown

R3(config)#interface s1/2

R3(config-if)#ip address 14.1.33.2 255.255.255.0

R3(config-if)#no shutdown
2、给每个 PC 配置合适的 IP 地址和网关,注意和路由器的 IP 地址一致
配置PC1

Router(config)#hostname PC1

PC1(config)#no ip routing

PC1(config)#ip default-gateway 1.1.33.1

PC1(config)#interface f0/0

PC1(config-if)#ip address 1.1.33.2 255.255.255.0

PC1(config-if)#no shutdown

配置PC2

Router(config)#hostname PC2

PC2(config)#no ip routing

PC2(config)#ip default-gateway 2.1.33.1

PC2(config)#interface f0/0

PC2(config-if)#ip address 2.1.33.2 255.255.255.0

PC2(config-if)#no shutdown

配置PC3

Router(config)#hostname PC3

PC2(config)#no ip routing

PC2(config)#ip default-gateway 3.1.33.1

PC2(config)#interface f0/0

PC2(config-if)#ip address 3.1.33.2 255.255.255.0

PC2(config-if)#no shutdown
问题 1:配置后在 PC1 上 ping PC2 和 PC3,能不能 ping 通,为什么?
答:PC1不能ping通PC2和PC3,因为路由器R1没有到PC2和PC3网络的路由条目。
3、给每个路由器配置静态路由,使得每个主机之间都能通信。
配置R1

R1(config)#ip route 2.1.33.0 255.255.255.0 12.1.33.2

R1(config)#ip route 3.1.33.0 255.255.255.0 13.1.33.2

配置R2

R2(config)#ip route 1.1.33.0 255.255.255.0 12.1.33.1

R2(config)#ip route 3.1.33.0 255.255.255.0 14.1.33.2

配置R3

R3(config)#ip route 1.1.33.0 255.255.255.0 13.1.33.1

R3(config)#ip route 2.1.33.0 255.255.255.0 14.1.33.1
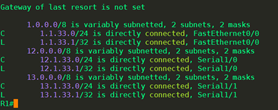
问题 2:配置后在路由器上查看路由表,看看和原来有什么不同?在 PC2 上能否 ping 通 PC1 和 PC3 呢?
答:在 PC2 上能 ping通 PC1 和 PC3
添加的静态路由条目

问题 3:此时在路由器 R1 上关闭接口 S1/0,在 PC2 上能否 ping 通 PC1 呢?能否 ping 通 PC3呢?
答:PC2不能ping通PC1,能ping通PC3
4、在路由器 R1 和 R2 上添加浮动路由,实现链路的备份。
配置R1

R1(config)#ip route 2.1.33.0 255.255.255.0 13.1.33.2 50    注:数字 50 为路由的管理距离

配置R2

R2(config)#ip route 1.1.33.0 255.255.255.0 14.1.33.2 50    注:数字 50 为路由的管理距离
注:路由器如果有多条路由到达同一个目的网络的话会查看它们的管理距离,首先选择管理距离小的,当管理距离小的路由断开时备份路由起作用,当管理距离相同是则同时添加的网络中。
问题 4:在路由器 R1 上查看路由表,看到的结果是什么?此时关闭路由器 R1 的 S1/0 接口, 再次查看路由器 R1 的路由表,有什么变化?
答:1.R1上到达 2.1.33.0网络的路由条目仅有一条 #未关闭 R1 的 S1/0 接口

2. R1上到达 2.1.33.0网络的路由条目仅有一条 (显示备份路由) #关闭 R1 的 S1/0 接口

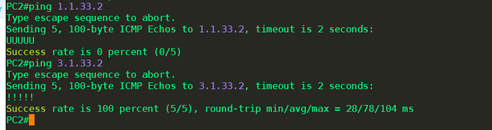
问题 5:此时在路由器 R1 上关闭接口 S1/0,在 PC2 上能否 ping 通 PC1 呢?能否 ping 通 PC3呢?
答:PC2能ping通PC1和PC3

5、在 R3 上配置静态路由实现负载均衡。
配置R3

R3(config)#ip route 1.1.33.0 255.255.255.0 14.1.33.1  注:注意和步骤 4 的不同

R3(config)#ip route 2.1.33.0 255.255.255.0 13.1.33.1  注:注意和步骤 4 的不同
注:添加的路由管理距离都是,默认值
问题6:配置后在 R3上查看路由表,和原来有什么不同?
答:R3上到达PC1和PC2的网络路由条目有两条

6、在路由器 R1 上配置远程登录。
R1(config)#username root secret root

R1 (config)#line vty 0 4

R1(config-line)#login local
问题 7:在 PC3 上尝试能否 telnet R3?如果可以,telnet 后能否进入特权模式?不能的话通
过什么配置可以进入特权模式?
答:设置R3 telnet登陆密码,telnet R3
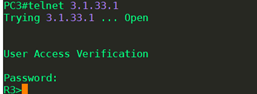
telnet之后进入的是用户模式,通过enable不能进入特权模式,需要设置登入特权模式的密码

设置特权模式的密码
R3 (config)#enable password *******
进入特权模式
