TestSuite处理测试用例有6个规约(否则会被拒绝执行测试)
A 测试用例必须是公有类(Public)
B 测试用例必须继承与TestCase类
C 测试用例的测试方法必须是公有的( Public )
D 测试用例的测试方法必须被声明为Void
E 测试用例中测试方法的前置名词必须是test
F 测试用例中测试方法误任何传递参数
执行TestNg有几种方式:命令行、Eclipse/IntelliJ、ant等.
第一种: 直接执行,右键要执行的方法,点Run As ->TestNG Test
第二种: 通过testng.xml文件来执行. 把要执行的case, 放入testng.xml文件中。 右键点击testng.xml, 点Run As->TestNG Suite testng.xml内容:
编译MessageUtil的测试用例类使用javac。
C:TestNG_WORKSPACE>javac MessageUtil.java IgnoreTest.java
现在,运行testng.xml,将无法运行testPrintMessage()定义的测试用例在测试案例类。
C:TestNG_WORKSPACE>java -cp "C:TestNG_WORKSPACE" org.testng.TestNG testng.xml
你在TestNG写好了一个测试方法,你只需要在这个方法的前面一行写上“@TEST”,
就相当于告诉TestNG, 这个是一个测试方法,只有添加了这个注册,才会被认为是一个测试用例,才会被执行。
只要@TEST不会显示红色字体,而且看到了上面添加了导入testng的相关包导入语句,说明TestNG在IDEA上可以正常工作。
通过上面图,你可以得到以下信息:
1)绿色的状态条,表示测试通过,失败应该是红色
2)显示执行了多少条用例,失败多少,跳过了多少,耗时多少
3)可以看到默认的Suite和执行测试类的名称。
4)导出TestNG测试报告
5)可以看到是调用哪个TestNG.xml文件去执行用例的
前面三点,截图上就可以直观看到效果,关于第4点,如何得到TestNG的测试结果报告。你可以点击下面图的导出按钮(红圈位置)。
Testng.xml文件介绍
TestNG就是运行这个文件来执行测试用例的。通过本篇,你可以进一步了解到:这个文件是配置测试用例,测试套件。
简单来说,利用这个文件,我们可以跑同一个类或者多个不同类里面的测试用例。
TestNG通过设置testng.xml文件能做以下事情
1)创建来源不同包、类、方法的测试套件
2)包括一些选项,例如失败的用例可以重跑。
3)支持使用正则表达式
4)运行把外部参数传入测试方法
5)支持配置多线程的执行环境
---------------------
注释语句写是这样写的“<!-- Java_Learn -->。我们可以看出来,suite管理多个test,而test管理多个class,最小单元是一个class文件
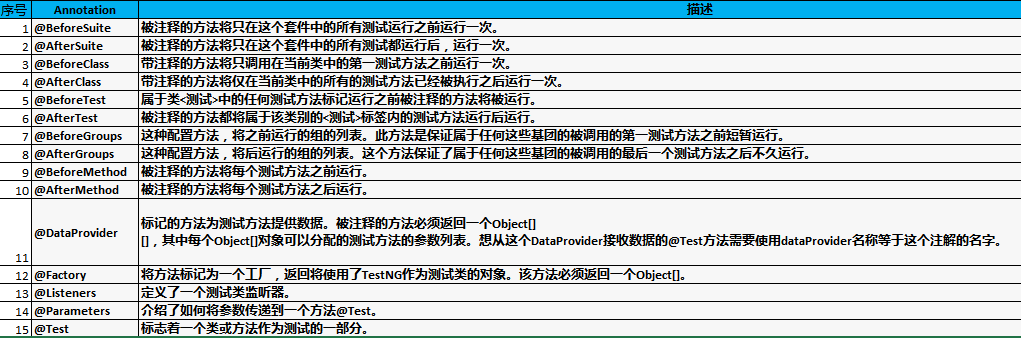
@Test注释下大部分的属性的功能和基本使用
1. @Before和@After 注释
这两个就比较多,一般用于在测试构件上。关于测试构件以后详细介绍,测试构件一般有测试之前的操作和测试运行之后的清除数据的操作。
Before分类有@BeforeSuite,@BeforeTest, @BeforeGroups,@BeforeClass,@BeforeMethod
After分类有@AfterSuite,@AfterTest, @AfterGroups,@AfterClass,@AfterMethod
1. @Test(timeOut = 3000)
总结:当某些测试用例需要测试运行时间(一般在接口测试中会遇到)的时候,利用@Test这个注释中的timeOut属性,可以帮你做到监控时间的功能。
2. 属性enabled
@Test(enabled=false) 就不会执行这个测试用例
@Test(enabled=ture) 会执行
@Test缺省enabled 会执行
3. 属性priority
有时候,我们更希望,一个类文件下的测试用例按照我们设想的顺序去执行,而不是默认按照方法名的字母排序去执行。
@Test注释中有一个属性,叫priority支持设置用例的优先级。
如果不带这个属性,默认priority是等于0,而且priority值越小,优先级越高。来看看下面的举例。
4.invocationCount和invocationTimeOut
invocationCount的字面意思就是调用的次数统计,这个属性是的英文解释是:
The number of times this method should be invoked.
原来就是这个测试用例被调用执行的次数。
说明这个属性可以设置一个用例可以重复跑多次,这样理解就好。
invocationTimeOut的字面意思是调用的超时,看看英文的解释:
The maximum number of milliseconds this test should take for thecumulated time of all the invocationcounts.
This attribute will be ignored if invocationCount is not specified.
这句话,说了两个意思,第一个是设置一个最大的毫秒数来计算执行多次后总共耗时多少,耗时值不能超过设置的最大毫秒数。
第二个意思是说,这个属性是和invocationCount结合使用才会工作。
这两个参数有什么作用呢?在接口测试中,或者性能测试。我们需要测试某一个功能的稳定性。
例如,一个支付接口,调用一次,能够在1秒完成。
那么如果调用100次,1万次,甚至更多次数。
我想,大家都知道,随着服务器压力增加,不可能每次接口执行都是1秒。
例如,我测试支付接口10次,总响应时间不能超过13秒。
如果测试超过13秒,说明这个接口性能角度,或者压力测试角度,稳定性角度是有缺陷的,需要开发去想办法优化。
5. dependsOnMethods
1-2-3-4-5
1的测试用例旁边加上@Test(dependsOnMethods={"test5"})
执行顺序将变成5-2-3-4-1
若在测试用例1上增加多个依赖关系@Test(dependsOnMethods={"test3","test4"})
执行顺序将变成3-4-5-2-1
若在1上增加了一个不存在的依赖,运行就会报异常
TestNG忽略测试
如果测试用例写入到测试方法/代码将无法运行,在这种情况下,@Test(enabled = false)有助于禁用此测试案例。
测试方法是标注了@Test(enabled = false),那么并不是已经准备好测试的测试用例是绕过。
TestNG依赖测试
有时候,你可能需要在一个特定的顺序调用方法在测试案例,或你想分享一些数据和方法之间的状态。TestNG支持这种依赖测试方法之间的显式依赖它支持声明。
TestNG允许指定依赖,无论与否:
使用属性dependsOnMethods在 @Test 注释OR
使用属性dependsOnGroups在@Test注解。
下面的例子是偶数EvenNumber的检查,方法如下
public class EvenNumberChecker {

    public Boolean validate(final Integer primeNumber) {

            if (primeNumber % 2 == 0) {
                return false;      }
                else
        return true;
    }
}
public class Test20181123 {

    private EvenNumberChecker evenNumberChecker;

    @BeforeMethod
    public void initialize() {
        evenNumberChecker = new EvenNumberChecker();
    }


    @DataProvider(name = "test1")
    public static Object[][] primeNumbers() {
        return new Object[][] { { 2, true }, { 3, true },{ 4, false } };
    }    // This test will run 4 times since we have 5 parameters defined


    @Test(dataProvider = "test1")
    public void testPrimeNumberChecker(Integer inputNumber,Boolean expectedResult) {
        System.out.println(inputNumber + " " + expectedResult);
        Boolean result =evenNumberChecker.validate(inputNumber);
        Assert.assertEquals(expectedResult,result);
    }
}
本篇来介绍Test Methods,Test classes ,Test groups的基本概念。了解这三个基本概念,有助于我们学习其他的功能。前面介绍了@Test下的before和after属性,其中就有beforeMethods和afterGroups等。
这三个都会在testng.xml文件中存在。
1.Test Methods(测试方法)
官方定义是,凡是方法(或者叫函数)前面添加了@Test注释,就叫测试方法。这个很好理解,我们实际测试中,写的测试用例,其实就是许多个添加@Test的方法。
2.Test Classes(测试类)
测试类,一般我们新建一个Java类文件,如果里面方法有@Test,那么就是一个测试类文件。上面是写的复数。这个在testng.xml文件里可以体现,classes下可以有一个或者多个测试类文件。Classes相当于就是一个装class的容器,而class又相当于一个装method的容器。
<classes>
<class name="com.java.learn.TestMethodDemo"/>
</classes>
3.Test Groups(测试组)
测试组,一个组可以包含多个methods。还是可以组嵌套,也是就是一个组可以属于是另外一个组管理。
下面我们来举例,两个不同组用例的管理,我们有两个组,接口测试和功能测试。其实接口测试是属于功能测试的子集。新建一个测试类,写一些方法,有些方法属于接口测试,也同时属于功能测试,有些只属于一个。
在@Test旁边,加上@Test(groups = {"API Test"}),在xml中
<?xml version="1.0" encoding="UTF-8"?>
<!DOCTYPE suite SYSTEM "http://testng.org/testng-1.0.dtd">
<suite name="TestGroupsDemo">
<test name="TestNG_learn">
<groups>
<run>
<include name="API Test"></include>
</run>
</groups>
<classes>
<class name="main.java.aTestDirectory.aaa.TestGroupsDemo"/>
</classes>
</test>
</suite>
则只会执行API Test
若在xml中添加多个组,则可以执行两个组
<run>
<include name="API Test"></include>
<include name="Fucntion Test"></include>
</run>
方法2:利用正则表达式,因为有时候Group的名称设置很长,记不住,这个时候建议采用正则匹配
<include name="API.*"></include>
<include name="Fucntion.*"></include>
方法3:执行xxx除外,用exclude标签来实现
TestNG参数化测试
场景:业务逻辑需要一个巨大的不同数量的测试。参数测试,允许开发人员运行同样的测试,一遍又一遍使用不同的值。
TestNG让你直接传递参数测试方法两种不同的方式:
使用testng.xml
数据提供程序
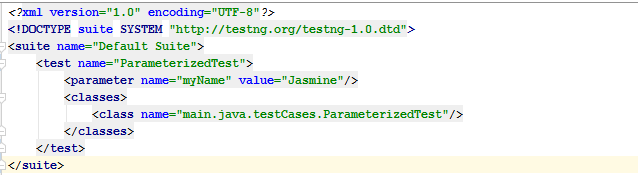
传递参数使用testng.xml
有了这种技术,在testng.xml文件中定义的简单参数,然后在源文件中引用这些参数。让我们看看下面的例子中如何使用这种技术来传递参数。
import com.beust.testng.annotations.*;
public class SimpleTest {
@Configuration(beforeTestClass = true)
public void setUp() {
// code that will be invoked when this test is instantiated
}
@Test(groups = { "functest" })
public void itWorks() {
// This method will be invoked if the current run
// includes the group "functest"
}
}
Some of the major changes since the previous versions include:
- XML. The property files were easy to work with in the beginning but it was quickly obvious that they wouldn’t scale. Now, the information for a suite run (which contains several tests, each test containing several classes) is conveniently located in one XML file.
- Dependent methods. With this feature, you can guarantee that certain groups of methods are always invoked before others. If the dependents didn’t run or fail, the method will be marked as a SKIP, which can be seen as less critical than a FAILURE since SKIPs will typically be automatically resolved when the FAILURE that caused them is fixed.
- Groups of groups. Once you have specified that your test methods belong in specific groups, you can specify bigger groups, giving you a lot of flexibility on exactly what tests are run each time.
- Better reporting. Not only does TestNG have its own HTML reporting, it is also compatible with JUnitReport. You can see an example here.
- Open API. TestNG exposes its engine with a convenient set of listeners which allow you to plug-in your own reporting mechanism or for any other purpose (as a matter of fact, the JUnitReport code is such a listener). It is also trivial to invoke TestNG programmatically, thus skipping the XML phase and providing TestNG with direct Java objects.
The XML is fully validate and has a public DTD, but here is a quick description. testng.xml lets you specify a test Suite, which contains parameters and tests. Tests contain three kinds of data:
- Parameters, which override the Suite parameters.
- Groups, made of two parts, definitions and runs.
- Classes, which define which classes are going to be part of this test run
In turn, groups are made of two parts:
- Definitions, when you want to create groups that contain other groups.
- Runs, which specify the groups to be run.
The TODO list for future versions is pretty long but this version should give you a good idea of the future directions.