0、主要思路:使用axis2发布webservice服务端,微信小程序作为客户端访问。步骤如下:
1、服务端:
首先微信小程序仅支持访问https的url,且必须是已备案域名。因此前期的服务器端工作需要先做好,本人是申请了个人域名(已备案),并使用阿里云服务器,然后申请免费SSL,通过配置tomcat完成支持https访问。此外,intellJ IDE的java编译器版本调整到8以上。
下面进入正题:
pom.xml添加:
     <!--Axis发布webservice-->
        <!--servlet依赖-->
        <dependency>
            <groupId>javax.servlet</groupId>
            <artifactId>javax.servlet-api</artifactId>
            <version>3.1.0</version>
        </dependency>
        <!--服务端-->
        <dependency>
            <groupId>org.apache.axis2</groupId>
            <artifactId>axis2</artifactId>
            <version>1.6.2</version>
        </dependency>
        <dependency>
            <groupId>org.apache.axis2</groupId>
            <artifactId>axis2-transport-http</artifactId>
            <version>1.6.2</version>
        </dependency>
        <dependency>
            <groupId>org.apache.axis2</groupId>
            <artifactId>axis2-transport-local</artifactId>
            <version>1.6.2</version>
        </dependency>
        <dependency>
            <groupId>org.apache.xmlbeans</groupId>
            <artifactId>xmlbeans</artifactId>
            <version>2.4.0</version>
        </dependency>
        <!--axis2 客户端-->
        <dependency>
            <groupId>org.apache.axis2</groupId>
            <artifactId>axis2-adb</artifactId>
            <version>1.6.2</version>
        </dependency>
        <dependency>
            <groupId>org.apache.axis2</groupId>
            <artifactId>axis2-kernel</artifactId>
            <version>1.6.2</version>
        </dependency>
在webapp下的WEB-INF下新建如下目录:
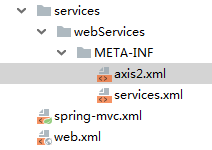
其中axis2.xml文件链接:https://files.cnblogs.com/files/qianyou304/axis2.xml
在里面添加,以支持https访问:
<transportReceiver name="https" class="org.apache.axis2.transport.http.AxisServletListener">
    <parameter name="port">443</parameter>
</transportReceiver>
services.xml代码:
<?xml version="1.0" encoding="UTF-8"?>
<serviceGroup>
    <!-- 指定服务名,随便定义 -->
    <service name="xxx" >
        <!-- 服务的作用说明,可写可不写 -->
        <description>webservice服务</description>
        <!-- 指定要发布的类路径  自定义name-->
        <parameter name="ServiceClass">com.cn.hnust.webservice.server.xxxx</parameter>
        <!-- 类里面的方法名 ,若有多个方法,可以新增operation标签 -->
        <operation name="xxxx">
            <messageReceiver class="org.apache.axis2.rpc.receivers.RPCMessageReceiver"/>
        </operation>
    </service>
</serviceGroup>
指定发布类,这里随便给一个名字:ILockService,随便取一个方法名:invoke
import com.cn.hnust.service.IUserRecordService;
import net.sf.json.JSONArray;
import net.sf.json.JSONObject;

import org.springframework.web.context.support.WebApplicationContextUtils;
/**
 *
 */
public class ILockService implements ServletContextListener{
    /**
    *  留作备用
   */
static IUserRecordService userRecordService;

    @Override
    public void contextInitialized(ServletContextEvent sce) {
        userRecordService = WebApplicationContextUtils.getWebApplicationContext(sce.getServletContext()).getBean(IUserRecordService.class);
    }

    @Override
    public void contextDestroyed(ServletContextEvent sce) {

    }

    public String invoke(String xmlData) {
        System.out.println("xml:  "+xmlData);
        String result = "";
        JSONObject jsonObject = new JSONObject();
        jsonObject = JSONObject.fromObject(xmlData);
        String name_method = jsonObject.getString("Name");
        JSONObject infoObj = jsonObject.getJSONObject("Info");
        System.out.println("name_method:  "+name_method);

        switch (name_method) {
        case "LOGIN"://注册
            result = login(infoObj);
            break;
        default:
            break;
        }
        return result;
    }

    /**
     *
     * @param infoObj
     * @return
     */
    private String login(JSONObject infoObj){
        String result = "";
        //解析信息字段
        String userName = infoObj.getString("userName");
        String password = infoObj.getString("password");
        String accessTime = infoObj.getString("accessTime");//Info
        JSONObject info = new JSONObject();
        info.put("result", "Succ");
        info.put("accessType", "3");
        info.put("operator", "0");
        //DeviceList
        JSONArray deviceIDList = new JSONArray();
        JSONObject Id1 = new JSONObject();
        Id1.put("ID","000001");
        JSONObject Id2 = new JSONObject();
        Id2.put("ID","000002");
        deviceIDList.add(Id1);
        deviceIDList.add(Id2);
        info.put("deviceIDList", deviceIDList);
        //合并
        JSONObject response = new JSONObject();
        response.put("Name","LOGIN_ACK");
        response.put("Info", info);
        JSONObject resultObj = new JSONObject();
        resultObj.put("Response", response);
        String jsonStr = resultObj.toString();
        //result = XmlJsonUtil.json2xml(jsonStr);
        result = jsonStr;
        System.out.print("result:  "+result);
        return result;
    }
}
好了,接下来是客户端:
在微信小程序的js中通过如下代码调用:
    var loginJsonStr = '';
    //method中设置你想调用的方法名
    var method = 'invoke';
    //wsdlurl中设置需要访问的webservice的url地址
    var wsdlurl = 'https://(域名)/(项目名)/services/ILockService?wsdl';
    var targetNamespace = '(命名空间,可以去网页输入wsdlurl中查找)';
    //datacopy中拼字符串,即http传输中的soap信息
    var datacopy = '<?xml version="1.0" encoding="utf-8"?>';
    datacopy += '<soapenv:Envelope xmlns:soapenv="http://schemas.xmlsoap.org/soap/envelope/" xmlns:ser="(命名空间)>';
    datacopy += '<soapenv:Header/>';
    datacopy += '<soapenv:Body>';
    //接着拼你要访问的方法名、参数名和你传递的实参值,比如我要访问的方法是invoke(String arg0)
    //而我的实际调用是invoke('libsys',2),所以拼字符串如下
    datacopy += '<ser:invoke>';
    datacopy += '<xmlData>' + loginJsonStr+'</xmlData>';
    datacopy += '</ser:invoke>';
    datacopy += '</soapenv:Body>';
    datacopy += '</soapenv:Envelope>';
    wx.request({
      url: wsdlurl,
      data: datacopy,
      method: 'POST', // OPTIONS, GET, HEAD, POST, PUT, DELETE, TRACE, CONNECT
      header: {
        'content-type': 'text/xml;',
        'SOAPAction': targetNamespace + method,
      },
      // 设置请求的 header
      success: function (res) {
        // success
        var resData = res.data;
        console.log("success:  "+resData);
      },
      fail: function (res) {
        console.log("fail:  " + res.data)
      }
    })