从UNIVERSAL IMAGE LOADER. PART 3(四个DisplayImage重载方法详解)中,我们学习了Android-Universal-Image-Loader(以下简称UIL)中四个DisplayImage重载方法的使用,如果你还没有学习,最好先返回去看看,不然可能不理解这篇文章。在这篇文章中我们将主要探讨Android-Universal-Image-Loader的主要流程和这些流程相关的类的分析。
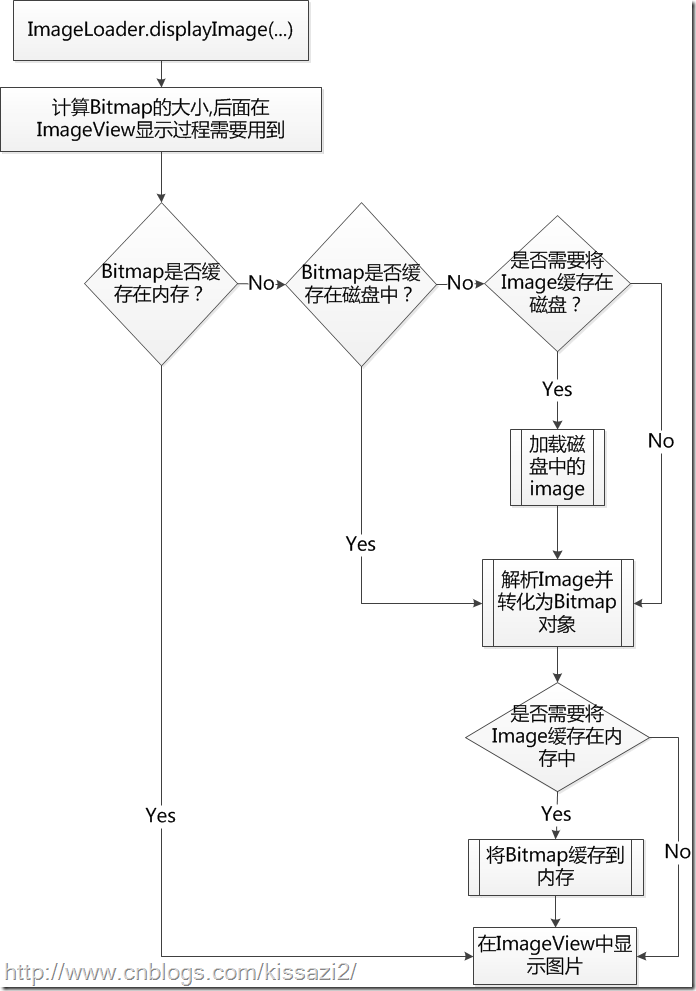
我们先了解一下UIL加载图片的流程(可以通过查看ImageLoader.displayImage(…)方法分析得出),如下图
从上图中,我们可以看出,UIL加载图片的一般流程是先判断内存中是否有对应的Bitmap,再判断磁盘(disk)中是否有,如果没有就从网络中加载。最后根据原先在UIL中的配置判断是否需要缓存Bitmap到内存或磁盘中。Bitmap加载完后,就对它进行解析,然后显示到特定的ImageView中。
有了对UIL对图片加载和处理流程的初步认识之后,我们就可以着手分析它的源代码了。先从ImageLoader.displayImage(...)入手,毕竟一切都因它而始。
 1     public void displayImage(String uri, ImageAware imageAware, DisplayImageOptions options,
 2             ImageLoadingListener listener, ImageLoadingProgressListener progressListener) {
 3         //检查UIL的配置是否被初始化
 4         checkConfiguration();
 5         if (imageAware == null) {
 6             throw new IllegalArgumentException(ERROR_WRONG_ARGUMENTS);
 7         }
 8         if (listener == null) {
 9             listener = emptyListener;
10         }
11         if (options == null) {
12             options = configuration.defaultDisplayImageOptions;
13         }
14
15         if (TextUtils.isEmpty(uri)) {
16             engine.cancelDisplayTaskFor(imageAware);
17             listener.onLoadingStarted(uri, imageAware.getWrappedView());
18             if (options.shouldShowImageForEmptyUri()) {
19                 imageAware.setImageDrawable(options.getImageForEmptyUri(configuration.resources));
20             } else {
21                 imageAware.setImageDrawable(null);
22             }
23             listener.onLoadingComplete(uri, imageAware.getWrappedView(), null);
24             return;
25         }
26         //计算Bitmap的大小,以便后面解析图片时用
27         ImageSize targetSize = ImageSizeUtils.defineTargetSizeForView(imageAware, configuration.getMaxImageSize());
28         String memoryCacheKey = MemoryCacheUtils.generateKey(uri, targetSize);
29         engine.prepareDisplayTaskFor(imageAware, memoryCacheKey);
30
31         listener.onLoadingStarted(uri, imageAware.getWrappedView());
32         //Bitmap是否缓存在内存?
33         Bitmap bmp = configuration.memoryCache.get(memoryCacheKey);
34         if (bmp != null && !bmp.isRecycled()) {
35             L.d(LOG_LOAD_IMAGE_FROM_MEMORY_CACHE, memoryCacheKey);
36
37             if (options.shouldPostProcess()) {
38                 ImageLoadingInfo imageLoadingInfo = new ImageLoadingInfo(uri, imageAware, targetSize, memoryCacheKey,
39                         options, listener, progressListener, engine.getLockForUri(uri));
40                 //处理并显示图片
41                 ProcessAndDisplayImageTask displayTask = new ProcessAndDisplayImageTask(engine, bmp, imageLoadingInfo,
42                         defineHandler(options));
43                 if (options.isSyncLoading()) {
44                     displayTask.run();
45                 } else {
46                     engine.submit(displayTask);
47                 }
48             } else {
49                 //显示图片
50                 options.getDisplayer().display(bmp, imageAware, LoadedFrom.MEMORY_CACHE);
51                 listener.onLoadingComplete(uri, imageAware.getWrappedView(), bmp);
52             }
53         } else {
54             if (options.shouldShowImageOnLoading()) {
55                 imageAware.setImageDrawable(options.getImageOnLoading(configuration.resources));
56             } else if (options.isResetViewBeforeLoading()) {
57                 imageAware.setImageDrawable(null);
58             }
59
60             ImageLoadingInfo imageLoadingInfo = new ImageLoadingInfo(uri, imageAware, targetSize, memoryCacheKey,
61                     options, listener, progressListener, engine.getLockForUri(uri));
62             //启动一个线程,加载并显示图片
63             LoadAndDisplayImageTask displayTask = new LoadAndDisplayImageTask(engine, imageLoadingInfo,
64                     defineHandler(options));
65             if (options.isSyncLoading()) {
66                 displayTask.run();
67             } else {
68                 engine.submit(displayTask);
69             }
70         }
71     }
代码有点多,但是有很多代码是进行异常判断处理和函数的回调,为了先把握整体的流程,我们先放弃细节方面的追踪。基本上重要的处理流程我都有用注释标出。不过,从这段代码中我们也可以看出这段代码的结构非常清晰。对图片的整个的加载流程都有对应的监听接口(ImageLoadingListener.onLoadingStarted,ImageLoadingListener.onLoadingComplete,ImageLoadingListener这个类就是用来监听图片的加载过程的),也就是说整个的图片加载过程程序员都可以进行相应的处理。我们先关注一下图片从无到有的加载过程,毕竟这部分是大家最为关心的。看到第63行中的LoadAndDisplayImageTask,跟进LoadAndDisplayImageTask.run()方法中。在这个run()方法中,除了 bmp = tryLoadBitmap();这一句是对图片进行加载,其他的函数都是对Bitmap进行处理或者显示。我们继续进入看看。
 1 private Bitmap tryLoadBitmap() throws TaskCancelledException {
 2         Bitmap bitmap = null;
 3         try {
 4             //尝试从磁盘缓存中读取Bitmap
 5             File imageFile = configuration.diskCache.get(uri);
 6             if (imageFile != null && imageFile.exists()) {
 7                 L.d(LOG_LOAD_IMAGE_FROM_DISK_CACHE, memoryCacheKey);
 8                 loadedFrom = LoadedFrom.DISC_CACHE;
 9
10                 checkTaskNotActual();
11                 bitmap = decodeImage(Scheme.FILE.wrap(imageFile.getAbsolutePath()));
12             }
13             //没有缓存在磁盘,从网络中下载图片
14             if (bitmap == null || bitmap.getWidth() <= 0 || bitmap.getHeight() <= 0) {
15                 L.d(LOG_LOAD_IMAGE_FROM_NETWORK, memoryCacheKey);
16                 loadedFrom = LoadedFrom.NETWORK;
17
18                 String imageUriForDecoding = uri;
19                 if (options.isCacheOnDisk() && tryCacheImageOnDisk()) {
20                     imageFile = configuration.diskCache.get(uri);
21                     if (imageFile != null) {
22                         imageUriForDecoding = Scheme.FILE.wrap(imageFile.getAbsolutePath());
23                     }
24                 }
25
26                 checkTaskNotActual();
27                 bitmap = decodeImage(imageUriForDecoding);
28
29                 if (bitmap == null || bitmap.getWidth() <= 0 || bitmap.getHeight() <= 0) {
30                     fireFailEvent(FailType.DECODING_ERROR, null);
31                 }
32             }
33         } catch (IllegalStateException e) {
34             fireFailEvent(FailType.NETWORK_DENIED, null);
35         } catch (TaskCancelledException e) {
36             throw e;
37         } catch (IOException e) {
38             L.e(e);
39             fireFailEvent(FailType.IO_ERROR, e);
40         } catch (OutOfMemoryError e) {
41             L.e(e);
42             fireFailEvent(FailType.OUT_OF_MEMORY, e);
43         } catch (Throwable e) {
44             L.e(e);
45             fireFailEvent(FailType.UNKNOWN, e);
46         }
47         return bitmap;
48     }
从3~12行是尝试从磁盘缓存中加载Bitmap。第19行判断磁盘中是否有缓存,就开始进行网络下载(tryCacheImageOnDisk())。在tryCacheImageOnDisk()函数中有个tryCacheImageOnDisk()的 loaded = downloadImage()这行进行图片下载。
    private boolean downloadImage() throws IOException {
        InputStream is = getDownloader().getStream(uri, options.getExtraForDownloader());
        return configuration.diskCache.save(uri, is, this);
    }
这个函数做的事情很简单,就是获取一个实现Image Downloader的downloader(当然这里,作者根据网络情况将downloader分为慢速(slowNetworkDownloader)、正常速度(downloader)、网络拒绝(networkDeniedDownloader)情况下的download,在这里我们不展开,你只要知道他们是imageDownloader接口的实现者就行,后面的文章会探讨这个问题),然后利用Disk Cache将Bitmap写入磁盘缓存中。返回到之前我们进入downloadImage()函数中的tryLoadBitmap(),在将图片缓存到磁盘中。是否缓存到磁盘跟配置有关)后,紧接着调用 bitmap = decodeImage(Scheme.FILE.wrap(imageFile.getAbsolutePath()));解析图片。进入decodeImage()函数中,我们发现UIL调用Image Decoder进行图片的解析。
1     private Bitmap decodeImage(String imageUri) throws IOException {
2         ViewScaleType viewScaleType = imageAware.getScaleType();
3         ImageDecodingInfo decodingInfo = new ImageDecodingInfo(memoryCacheKey, imageUri, uri, targetSize, viewScaleType,
4                 getDownloader(), options);
5         return decoder.decode(decodingInfo);
6     }
decode()函数最终是调用BaseImageDecoder.decode()方法进行解析的,这个利用之前获得的inputStream,直接从它身上读取数据,然后进行解析,并对整个下载任务的网络接口进行重置。
 1 public Bitmap decode(ImageDecodingInfo decodingInfo) throws IOException {
 2         Bitmap decodedBitmap;
 3         ImageFileInfo imageInfo;
 4
 5         InputStream imageStream = getImageStream(decodingInfo);
 6         try {
 7             imageInfo = defineImageSizeAndRotation(imageStream, decodingInfo);
 8             imageStream = resetStream(imageStream, decodingInfo);
 9             Options decodingOptions = prepareDecodingOptions(imageInfo.imageSize, decodingInfo);
10             decodedBitmap = BitmapFactory.decodeStream(imageStream, null, decodingOptions);
11         } finally {
12             IoUtils.closeSilently(imageStream);
13         }
14
15         if (decodedBitmap == null) {
16             L.e(ERROR_CANT_DECODE_IMAGE, decodingInfo.getImageKey());
17         } else {
18             decodedBitmap = considerExactScaleAndOrientatiton(decodedBitmap, decodingInfo, imageInfo.exif.rotation,
19                     imageInfo.exif.flipHorizontal);
20         }
21         return decodedBitmap;
22     }
接下来,有了解析好的Bitmap对象后,剩下的就是在Image View对象中显示它了。我们回到文章一开始介绍到的ImageLoader.displayImage(...)函数中(相关的代码在文章的开头处可以看到)。
为了方便,我还是将ImageLoader.displayImage(...)中涉及的代码贴在下面。
1         DisplayBitmapTask displayBitmapTask = new DisplayBitmapTask(bmp, imageLoadingInfo, engine, loadedFrom);
2         runTask(displayBitmapTask, syncLoading, handler, engine);
我们进去DisplayBitmapTask.run()函数中看看。除去前面几行的ImageLoadingListener.ImageLoadingListener()代码,相关代码其实就一行 displayer.display(bitmap, imageAware, loadedFrom),它其实就是调用BitmapDisplayer这个对象将Bitmap对象显示到ImageView上。根据实现BitmapDisplayer接口的不同对象,还有SimpleBitmapDisplayer、FadeInBitmapDisplayer、RoundedBitmapDisplayer、RoundedVignetteBitmapDisplayer这5种对象。
最后,让我们用任务流图概况以上的处理流程中对应接口。

在接下去的文章中,我们会介绍UIL中的包设计、缓冲、下载、多任务机制。
作者:kissazi2
出处:http://www.cnblogs.com/kissazi2/
本文版权归作者所有,欢迎转载,但未经作者同意必须保留此段声明,且在文章页面明显位置给出原文连接,否则保留追究法律责任的权利。

