CentOS7 安装 YAPI
官网安装教程 : https://hellosean1025.github.io/yapi/devops/index.html
环境要求
- nodejs(7.6+)
- mongodb(2.6+)
- git
环境准备
- nodejs12
# 清除yum命令缓存

	sudo yum clean all

# yum卸载低版本nodejs

	yum remove nodejs npm -y

# # 获取资源,安装高版本nodejs

	curl -sL https://rpm.nodesource.com/setup_8.x | bash -

	sudo yum install -y nodejs

# 验证版本

    [root@iz2ze9d7x8qiddthmdvrv6z local]# node -v
    v12.13.1
    [root@iz2ze9d7x8qiddthmdvrv6z local]# npm -v
    6.12.1
- git
# 验证版本
	git --version

# 安装
	yum install -y git
- mongodb4.0
# 配置MongoDB的yum源,vi /etc/yum.repos.d/mongodb-org-4.0.repo,添加内容:

    [mongodb-org-4.0]
    name=MongoDB Repository
    baseurl=https://repo.mongodb.org/yum/redhat/7Server/mongodb-org/4.0/x86_64/
    gpgcheck=0
    enabled=1
    gpgkey=https://www.mongodb.org/static/pgp/server-4.0.asc

# 安装MongoDB

	yum install -y mongodb-org

# 安装完毕后,看看都装到哪里去了

	rpm -ql mongodb-org-server

# 如有必要,修改配置文件,vi /etc/mongod.conf

# 官方教程有提到selinux对mongodb会产生负面影响,故选择禁用。vim /etc/selinux/config

	将SELINUX=enforcing改为SELINUX=disabled,wq保存。

# 启动mongodb

	systemctl enable mongod
        systemctl start mongod
        systemctl status mongod
YAPI安装
- npm install -g yapi-cli --registry https://registry.npm.taobao.org
[root@iz2ze9d7x8qiddthmdvrv6z yum.repos.d]# npm install -g yapi-cli --registry https://registry.npm.taobao.org
/usr/bin/yapi -> /usr/lib/node_modules/yapi-cli/bin/yapi-cli
/usr/bin/yapi-cli -> /usr/lib/node_modules/yapi-cli/bin/yapi-cli
+ yapi-cli@1.5.0
added 266 packages from 125 contributors in 14.992s
- yapi server
安装过程大约两分钟,安装成功后,前台页面和后台服务器都会有提示!
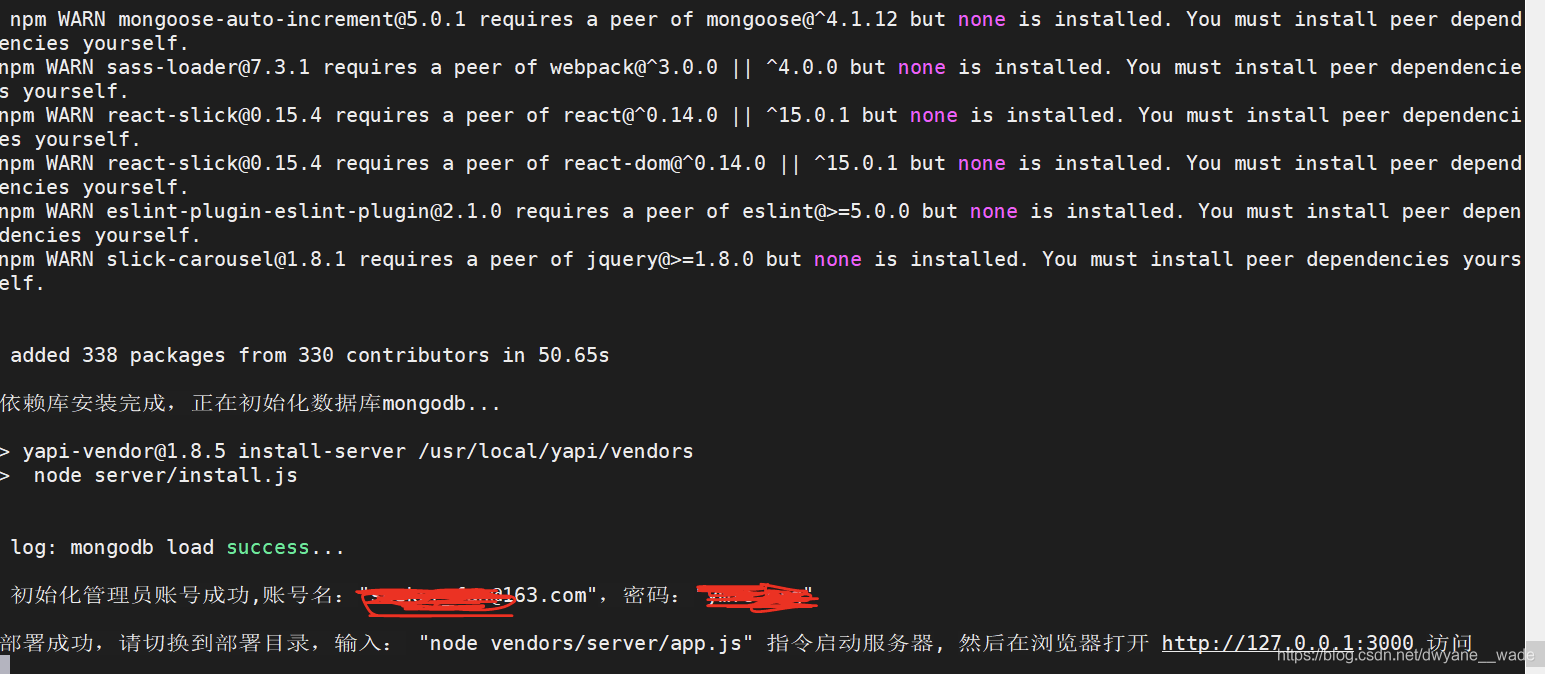
 1 [root@iz2ze9d7x8qiddthmdvrv6z yum.repos.d]# yapi server
 2 在浏览器打开 http://0.0.0.0:9090 访问。非本地服务器,请将 0.0.0.0 替换成指定的域名或ip
 3 当前安装版本: 1.8.5
 4 连接数据库成功!
 5 开始下载平台文件压缩包...
 6 http://registry.npm.taobao.org/yapi-vendor/download/yapi-vendor-1.8.5.tgz
 7 部署文件完成,正在安装依赖库...
 8  npm WARN deprecated babel@6.23.0: In 6.x, the babel package has been deprecated in favor of babel-cli. Check https://opencollective.com/babel to support the Babel maintainers
 9
10 ......
11 ......
12
13 > core-js@2.6.10 postinstall /usr/local/yapi/vendors/node_modules/core-js
14 > node postinstall || echo "ignore"
15
16 ......
17 ......
18  added 338 packages from 330 contributors in 50.65s
19
20 依赖库安装完成,正在初始化数据库mongodb...
21
22 > yapi-vendor@1.8.5 install-server /usr/local/yapi/vendors
23 >  node server/install.js
24
25  log: mongodb load success...
26
27  初始化管理员账号成功,账号名:"seekxx@163.com",密码:"ymfe.org"
28
29 部署成功,请切换到部署目录,输入: "node vendors/server/app.js" 指令启动服务器, 然后在浏览器打开 http://127.0.0.1:3000 访问

- 这里我们不急着根据提示进行启动,有些参数我们可以通过修改配置达到。
# 修改config.json ,vim /root/my-yapi/config.json

 {
  "port": "80",
  "adminAccount": "yizitadmin@yizit.cn",
  "db": {
       "servername": "127.0.0.1",
       "DATABASE": "yapi",
       "port": "27017"
   },
  "mail": {
       "enable": true,
       "host": "smtp.163.com",
       "port": 465,
       "from": "可用于发送邮件的163邮箱",
       "auth": {
           "user": "163邮箱",
           "pass": "163邮箱对应的密码或授权码"
       }
  },
  "ldapLogin": {
      "enable": true,
      "server": "ldap://你的LDAP服务器IP:389",
      "baseDn": "CN=Admin,CN=Users,DC=test,DC=com",
      "bindPassword": "123456",
      "searchDn": "OU=UserContainer,DC=test,DC=com",
      "searchStandard": "mail"
   },
  "closeRegister":true
}

1. LDAP配置项(ldapLogin)

enable 表示是否配置 LDAP 登录,true(支持 LDAP登录 )/false(不支持LDAP登录);
server LDAP 服务器地址,前面需要加上 ldap:// 前缀,也可以是 ldaps:// 表示是通过 SSL 连接;
baseDn LDAP 服务器的登录用户名,必须是从根结点到用户节点的全路径;
bindPassword 登录该 LDAP 服务器的密码;
searchDn 查询用户数据的路径,类似数据库中的一张表的地址,注意这里也必须是全路径;
searchStandard 查询条件,这里是 mail 表示查询用户信息是通过邮箱信息来查询的。注意,该字段信息与LDAP数据库存储数据的字段相对应,如果如果存储用户邮箱信息的字段是 email, 这里就需要修改成 email.

2. 注册配置项(closeRegister)

值为true,表示禁止用户注册
值为false(缺损),表示允许注册
- cd /usr/local/yapi/ && node vendors/server/app.js
[root@iz2ze9d7x8qiddthmdvrv6z yapi]# node vendors/server/app.js
log: -------------------------------------swaggerSyncUtils constructor-----------------------------------------------
log: 服务已启动,请打开下面链接访问:
http://127.0.0.1:3000/
log: mongodb load success...
- 浏览器访问:http://127.0.0.1:3000/,安装成功


- 这样存在一个问题,当shell窗口关闭时,服务也关闭了,解决方法:
# 安装pm2

    npm install -g pm2 --registry=https://registry.npm.taobao.org

提示

[root@iz2ze9d7x8qiddthmdvrv6z yapi]# npm install -g pm2 --registry=https://registry.npm.taobao.org
/usr/bin/pm2 -> /usr/lib/node_modules/pm2/bin/pm2
/usr/bin/pm2-dev -> /usr/lib/node_modules/pm2/bin/pm2-dev
/usr/bin/pm2-docker -> /usr/lib/node_modules/pm2/bin/pm2-docker
/usr/bin/pm2-runtime -> /usr/lib/node_modules/pm2/bin/pm2-runtime
npm WARN optional SKIPPING OPTIONAL DEPENDENCY: fsevents@2.1.2 (node_modules/pm2/node_modules/fsevents):
npm WARN notsup SKIPPING OPTIONAL DEPENDENCY: Unsupported platform for fsevents@2.1.2: wanted {"os":"darwin","arch":"any"} (current: {"os":"linux","arch":"x64"})

+ pm2@4.2.0
added 206 packages from 202 contributors in 12.917s

# 后台启动,关闭

    我的yapi是安装在/usr/local/yapi/
    启动执行: pm2 start /usr/local/yapi/vendors/server/app.js
    关闭执行: pm2 stop /usr/local/yapi/vendors/server/app.js


[root@iz2ze9d7x8qiddthmdvrv6z yapi]# pm2 start /usr/local/yapi/vendors/server/app.js

                        -------------

__/\\\\\\\____/\\____________/\\____/\\\\\_____
 _/\/\\_/\\\________/\\\__/\///\\___
  _/\\_______/\\_/\//\\____/\//\\_///______//\\__
   _/\\\\\\/__/\\///\/\/_/\\___________/\/___
    _/\/____/\\__///\/___/\\________/\//_____
     _/\\_____________/\\____///_____/\\_____/\//________
      _/\\_____________/\\_____________/\\___/\/___________
       _/\\_____________/\\_____________/\\__/\\\\\\\\_
        _///______________///______________///__///__


                          Runtime Edition

        PM2 is a Production Process Manager for Node.js applications
                     with a built-in Load Balancer.

                Start and Daemonize any application:
                $ pm2 start app.js

                Load Balance 4 instances of api.js:
                $ pm2 start api.js -i 4

                Monitor in production:
                $ pm2 monitor

                Make pm2 auto-boot at server restart:
                $ pm2 startup

                To go further checkout:
                http://pm2.io/


                        -------------

[PM2] Spawning PM2 daemon with pm2_home=/root/.pm2
[PM2] PM2 Successfully daemonized
[PM2] Starting /usr/local/yapi/vendors/server/app.js in fork_mode (1 instance)
[PM2] Done.
┌─────┬──────┬─────────────┬─────────┬─────────┬──────────┬────────┬──────┬───────────┬──────────┬──────────┬──────────┬──────────┐
│ id  │ name │ namespace   │ version │ mode    │ pid      │ uptime │ ↺    │ status    │ cpu      │ mem      │ user     │ watching │
├─────┼──────┼─────────────┼─────────┼─────────┼──────────┼────────┼──────┼───────────┼──────────┼──────────┼──────────┼──────────┤
│ 0   │ app  │ default     │ 1.8.5   │ fork    │ 19180    │ 0s     │ 0    │ online    │ 0%       │ 11.0mb   │ root     │ disabled │
└─────┴──────┴─────────────┴─────────┴─────────┴──────────┴────────┴──────┴───────────┴──────────┴──────────┴──────────┴──────────┘
- 验证进程:
ps aux | grep yapi
YAPI升级
YApi的升级非常容易,且不会影响用户的数据,只会更新vendors目录
cd /usr/local/yapi/ && yapi ls

# 更新到最新版本

    yapi update

# yapi也支持升级到指定的版本

    yapi update -v {Version}
备注
- 每次服务器重启,mongodb和yapi都需要重启
- 如果安装失败,可能是目录权限问题,本文基于centos7.4 root用户安装,安装过程未遇到明显问题。