Spring的AOP的底层实现
Spring的AOP的底层用到了两种代理机制:
- JDK的动态代理:针对实现了接口的类产生代理。
- Cglib的动态代理:针对没有实现接口的类产生代理,应用的是底层的字节码增强的技术,生成当前类的子类对象。
AOP开发中的相关术语
- Joinpoint(连接点):所谓连接点是指那些被拦截到的点。在Spring中,这些点指的是方法,因为Spring只支持方法类型的连接点。
- Pointcut(切入点):所谓切入点是指我们要对哪些Joinpoint进行拦截的定义。
- Advice(通知/增强):所谓通知是指拦截到Joinpoint之后所要做的事情就是通知。通知分为前置通知、后置通知、异常通知、最终通知和环绕通知(切面要完成的功能)。
- Aspect(切面):是切入点和通知的结合。
- Target(目标对象):代理的目标对象(要增强的类)
- Weaving(织入):是指把增强应用到目标对象来创建新的代理对象的过程。Spring采用动态代理织入,而AspectJ采用编译期织入和类装载期织入。
- Proxy(代理):一个类被AOP织入增强后,就产生一个结果代理类。
- Introduction(引介):引介是一种特殊的通知在不修改类代码的前提下,Introduction可以在运行期为类动态地添加一些方法或Field。
例如有如下一个类:
public class User {
    public void add() {

    }

    public void update() {

    }

    public void delete() {

    }
}
下面是用比较通俗易懂的话来阐述AOP开发中的常见的相关术语:
- 连接点:在User类里面有3个方法,这3个方法都可以被增强,类里面的哪些方法可以被增强,这些方法就可被成为连接点。
- 切入点:在一个类中可以有很多的方法被增强,在实际操作中,如若只增强了类里面的add方法,则实际增强的方法被称为切入点。
-
增强/通知:比如增强User类里面的add方法,在add方法中添加了日志功能,这个日志功能就称为增强。
通知类型:- 前置通知:在增强的方法执行之前进行操作。
- 后置通知:在增强的方法执行之后进行操作。
- 环绕通知:在增强的方法执行之前和执行之后进行操作。
- 最终通知:增强了两个方法,执行第一个方法,执行第二个方法,在第二个方法执行之后进行操作。
也可理解为后置通知后面执行的通知或者无论目标方法是否出现异常,最终通知都会执行。 - 异常通知:程序出现异常之后执行的通知。
- 切面:把增强应用到切入点的过程。即把具体增强的逻辑用到具体的方法上面的过程。
- 目标对象:增强的方法所在的类,即要增强的类。
- Weaving(织入):是指把增强应用到目标对象的过程。即把把advice应用到target的过程。
Spring的基于AspectJ的AOP开发
@AspectJ的简介
AspectJ是一个面向切面的框架,它扩展了Java语言。AspectJ定义了AOP语法所以它有一个专门的编译器用来生成遵守Java字节编码规范的Class文件。AspectJ是一个基于Java语言的AOP框架。Spring2.0以后新增了对AspectJ切点表达式的支持。@AspectJ是JDK5新增的功能,通过JDK5注解技术,允许直接在Bean类中定义切面。新版本Spring框架,建议使用AspectJ方式来开发AOP,使用AspectJ需要导入Spring AOP和AspectJ相关的Jar包。
从上面的阐述中,我们应认识到AspectJ并不是Spring框架的一部分,而是一个单独的面向切面的框架,只不过它经常和Spring框架一起使用进行AOP的操作而已。
使用AspectJ方式来开发AOP共有两种方式:
- 基于AspectJ的xml配置文件的方式
- 基于AspectJ的注解的方式
Spring使用AspectJ进行AOP的开发:XML的方式
第一步,引入相应的Jar包
上面我说过,除了导入最基本的Jar包外,使用AspectJ还需要导入Spring AOP和AspectJ相关的Jar包。
- Spring的传统AOP的开发的包:
- spring-aop-4.2.4.RELEASE.jar
- aopalliance-1.0.jar
- AspectJ的开发包
- aspectjweaver-1.8.7.jar
- spring-aspects-4.2.4.RELEASE.jar
第二步,编写目标类
在src目录下创建一个cn.itcast.aop包,并在该包下编写一个目标类。
public class Book {

    public void add() {
        System.out.println("book add.................");
    }

}
第三步,创建增强的类以及增强的方法
public class MyBook {

    // 前置通知
    public void before1() {
        System.out.println("before........");
    }

}
我们现在要求在Book类里面的add方法之前执行MyBook类里面的before1的方法。
第四步,在Spring配置文件中进行配置
- 在Spring配置文件中引入aop约束
<beans xmlns="http://www.springframework.org/schema/beans"
    xmlns:xsi="http://www.w3.org/2001/XMLSchema-instance"
    xmlns:aop="http://www.springframework.org/schema/aop" xsi:schemaLocation="
        http://www.springframework.org/schema/beans
        http://www.springframework.org/schema/beans/spring-beans.xsd
        http://www.springframework.org/schema/aop
        http://www.springframework.org/schema/aop/spring-aop.xsd">
- 配置两个类对象
<!-- book对象 -->
<bean id="book" class="cn.itcast.aop.Book"></bean>
<bean id="myBook" class="cn.itcast.aop.MyBook"></bean>
- 配置AOP操作,即需要配置切入点和切面。
<!-- 配置AOP的操作  -->
<aop:config>
    <!-- 配置切入点,对Book类里面的所有方法都增强 -->
    <aop:pointcut expression="execution(* cn.itcast.aop.Book.*(..))" id="pointcut1"></aop:pointcut>

    <!-- 配置切面    aop:aspect标签里面使用属性ref,ref属性值写增强类的bean的id值 -->
    <aop:aspect ref="myBook">
        <!--
            增强类型
            method属性:增强类的方法名称
            pointcut-ref属性:切入点的id值
        -->
        <!-- 前置通知 -->
        <aop:before method="before1" pointcut-ref="pointcut1"></aop:before>
    </aop:aspect>
</aop:config>
第五步,编写一个单元测试类并进行测试
在cn.itcast.aop包下编写一个TestDemo单元测试类。
public class TestDemo {

    @Test
    public void testUser() {
        ApplicationContext context = new ClassPathXmlApplicationContext("bean2.xml");
        Book book = (Book) context.getBean("book");
        book.add();
    }
}
其实我们也可以整合Junit单元测试,Spring对Junit4进行了支持,可以通过注解方便的测试Spring程序,所以就不必写那么麻烦的单元测试类了。首先导入如下Jar包: 
然后编写如下的单元测试类:
@RunWith(SpringJUnit4ClassRunner.class)
@ContextConfiguration("/bean2.xml") // 或者也可写为:@ContextConfiguration("classpath:bean2.xml")
public class TestDemo {

    @Autowired
    private Book book;

    @Test
    public void demo1() {
        book.add();
    }

}
演示其他通知类型
先将MyBook增强类的代码修改为:
public class MyBook {

    // 前置通知
    public void before1() {
        System.out.println("before........");
    }

    // 后置通知
    public void after11() {
        System.out.println("after...........");
    }

    // 环绕通知
    public void around1(ProceedingJoinPoint joinPoint) throws Throwable {
        System.out.println("方法之前执行...........");
        // 让被增强的方法执行
        joinPoint.proceed();
        System.out.println("方法之后执行...........");
    }

}
然后再在Spring配置文件中进行配置。
<!-- 配置AOP的操作  -->
<aop:config>
    <!-- 配置切入点,对Book类里面的所有方法都增强 -->
    <aop:pointcut expression="execution(* cn.itcast.aop.Book.*(..))" id="pointcut1"></aop:pointcut>

    <!-- 配置切面    aop:aspect标签里面使用属性ref,ref属性值写增强类的bean的id值 -->
    <aop:aspect ref="myBook">
        <!--
            增强类型
            method属性:增强类的方法名称
            pointcut-ref属性:切入点的id值
        -->
        <!-- 前置通知 -->
        <aop:before method="before1" pointcut-ref="pointcut1"></aop:before>
        <!-- 后置通知 -->
        <aop:after-returning method="after11" pointcut-ref="pointcut1"></aop:after-returning>
        <!-- 环绕通知 -->
        <aop:around method="around1" pointcut-ref="pointcut1"></aop:around>
    </aop:aspect>
</aop:config>
切入点表达式
通过execution函数,可以定义切点的方法切入。
语法为:execution(<访问修饰符>?<返回类型><方法名>(<参数>)<异常>)。
例如:
- 匹配所有类的public方法:
execution(public *.*(..)) - 匹配指定包下所有类的方法:
execution(* cn.itcast.dao.*(..)),但不包含子包 execution(* cn.itcast.dao..*(..)),..*表示包、子孙包下所有类。- 匹配指定类所有方法:
execution(* cn.itcast.service.UserService.*(..)) - 匹配实现特定接口的所有类的方法:
execution(* cn.itcast.dao.GenericDAO+.*(..)) - 匹配所有save开头的方法:
execution(* save*(..)) - 匹配所有类里面的所有的方法:
execution(* *.*(..))
Log4j操作
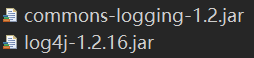
在项目开发中,我们通常会导入类似这样的日志Jar包: 
使用Log4j,可以查看到当前运行程序中对象创建的过程,也可以看到更详细的信息。Log4j适合使用在程序调试中。
例如,在本文中讲解上面的Web项目使用Log4j。
首先导入log4j的jar包,如下:
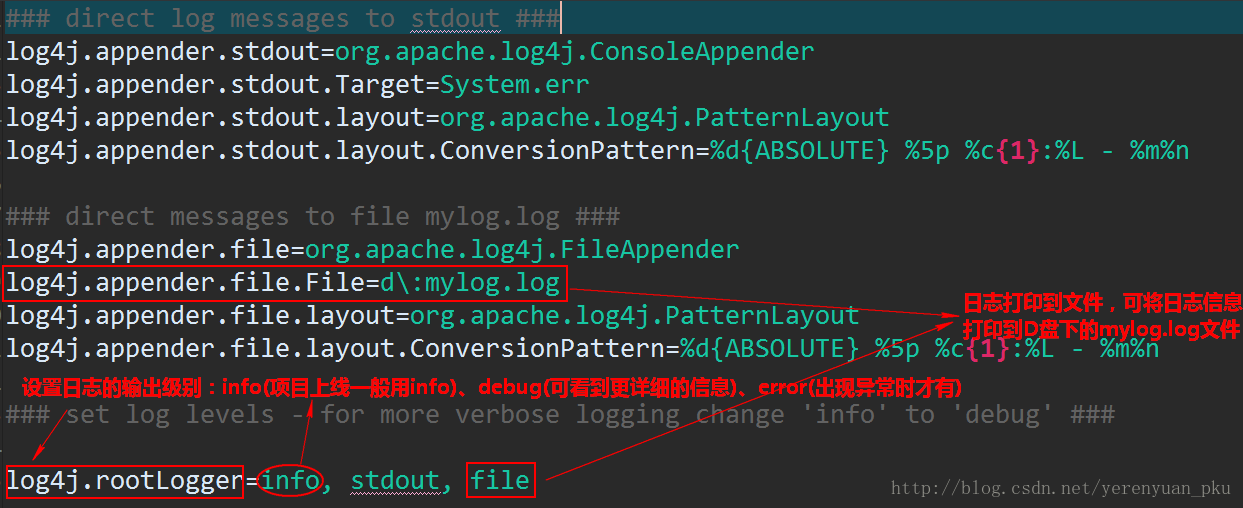
然后添加log4j配置文件——log4j.properties,添加到src目录下面,该文件内容如下:
### direct log messages to stdout ###
log4j.appender.stdout=org.apache.log4j.ConsoleAppender
log4j.appender.stdout.Target=System.err
log4j.appender.stdout.layout=org.apache.log4j.PatternLayout
log4j.appender.stdout.layout.ConversionPattern=%d{ABSOLUTE} %5p %c{1}:%L - %m%n

### direct messages to file mylog.log ###
log4j.appender.file=org.apache.log4j.FileAppender
log4j.appender.file.File=d:mylog.log
log4j.appender.file.layout=org.apache.log4j.PatternLayout
log4j.appender.file.layout.ConversionPattern=%d{ABSOLUTE} %5p %c{1}:%L - %m%n

### set log levels - for more verbose logging change 'info' to 'debug' ###

log4j.rootLogger=info, stdout, file
粗略讲解如下图:
Spring使用AspectJ进行AOP的开发:注解方式
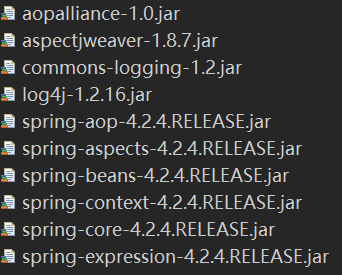
创建一个Web项目, 引入相关的jar包。所要导入的jar包如下:
引入Spring的配置文件。主要引入AOP的约束:
<?xml version="1.0" encoding="UTF-8"?>
<beans xmlns="http://www.springframework.org/schema/beans"
    xmlns:xsi="http://www.w3.org/2001/XMLSchema-instance"
    xmlns:aop="http://www.springframework.org/schema/aop" xsi:schemaLocation="
        http://www.springframework.org/schema/beans
        http://www.springframework.org/schema/beans/spring-beans.xsd
        http://www.springframework.org/schema/aop
        http://www.springframework.org/schema/aop/spring-aop.xsd">

</beans>
编写目标类。
在Web项目的src目录下创建一个cn.itcast.aop包,并在该包下编写一个Book类:
public class Book {

    public void add() {
        System.out.println("book add.................");
    }

}
编写切面类。
再在cn.itcast.aop包下编写一个MyBook增强类:
public class MyBook {

    public void before1() {
        System.out.println("before........");
    }

}
在增强的类上面使用@Aspect注解
@Aspect
public class MyBook {

    public void before1() {
        System.out.println("before........");
    }

}
在增强类的方法里面,使用注解配置通知类型:
@Aspect
public class MyBook {

    // 前置通知
    // *:方法的访问修饰符,也可写为execution(public void cn.itcast.aop.Book.*(..)),但一般都不会用
    @Before("execution(* cn.itcast.aop.Book.*(..))")
    public void before1() {
        System.out.println("before........");
    }

}
AspectJ的AOP的注解:
@Aspect:定义切面类的注解@Before:前置通知,相当于BeforeAdvice@AfterReturning:后置通知,相当于AfterReturningAdvice@Around:环绕通知,相当于MethodInterceptor@AfterThrowing:抛出通知,相当于ThrowAdvice@After:最终final通知,不管是否异常,该通知都会执行@Pointcut:定义切入点的注解
开启AspectJ的注解
<aop:aspectj-autoproxy></aop:aspectj-autoproxy>
创建Book类和MyBook类的两个对象(使用配置文件)
<bean id="book" class="cn.itcast.aop.Book"></bean>
<bean id="myBook" class="cn.itcast.aop.MyBook"></bean>
最后在cn.itcast.aop包下编写一个TestDemo单元测试类
public class TestDemo {

    @Test
    public void testBook() {
        ApplicationContext context = new ClassPathXmlApplicationContext("bean1.xml");
        Book book = (Book) context.getBean("book");
        book.add();
    }
}