1 日志采集Flume安装
详见:尚硅谷大数据技术之Flume
集群规划:
|
服务器hadoop102 |
服务器hadoop103 |
服务器hadoop104 |
|
|
Flume(采集日志) |
Flume |
Flume |
2 项目经验之Flume组件选型
1)Source
(1)Taildir Source相比Exec Source、Spooling Directory Source的优势
TailDir Source:断点续传、多目录。Flume1.6以前需要自己自定义Source记录每次读取文件位置,实现断点续传。
Exec Source可以实时搜集数据,但是在Flume不运行或者Shell命令出错的情况下,数据将会丢失。
Spooling Directory Source监控目录,支持断点续传。
(2)batchSize大小如何设置?
答:Event 1K左右时,500-1000合适(默认为100)
2)Channel
采用Kafka Channel,省去了Sink,提高了效率。KafkaChannel数据存储在Kafka里面,所以数据是存储在磁盘中。
注意在Flume1.7以前,Kafka Channel很少有人使用,因为发现parseAsFlumeEvent这个配置起不了作用。也就是无论parseAsFlumeEvent配置为true还是false,都会转为Flume Event。这样的话,造成的结果是,会始终都把Flume的headers中的信息混合着内容一起写入Kafka的消息中,这显然不是我所需要的,我只是需要把内容写入即可。
3 日志采集Flume配置
1)Flume配置分析
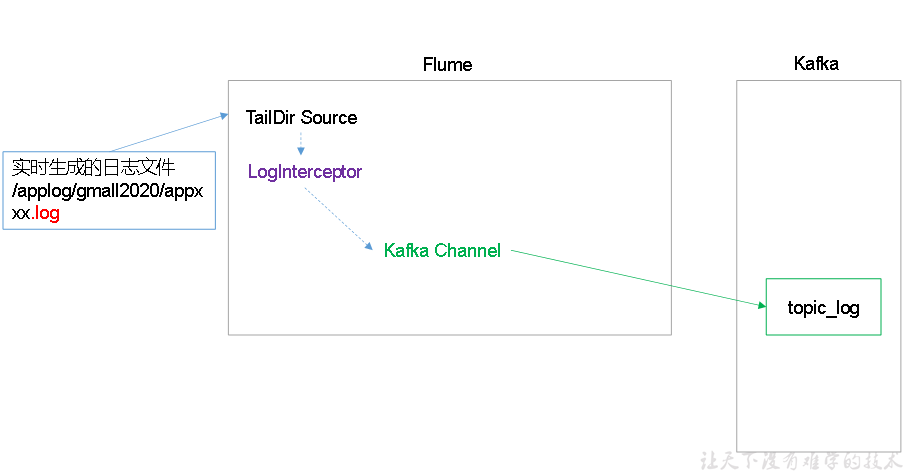
Flume直接读log日志的数据,log日志的格式是app.yyyy-mm-dd.log。
2)Flume的具体配置如下:
(1)在/opt/module/flume/conf目录下创建file-flume-kafka.conf文件
[atguigu@hadoop102 conf]$ vim file-flume-kafka.conf
在文件配置如下内容
#为各组件命名
a1.sources = r1
a1.channels = c1

#描述source
a1.sources.r1.type = TAILDIR
a1.sources.r1.filegroups = f1
a1.sources.r1.filegroups.f1 = /opt/module/applog/log/app.*
a1.sources.r1.positionFile = /opt/module/flume/taildir_position.json
a1.sources.r1.interceptors =  i1
a1.sources.r1.interceptors.i1.type = com.atguigu.flume.interceptor.ETLInterceptor$Builder

#描述channel
a1.channels.c1.type = org.apache.flume.channel.kafka.KafkaChannel
a1.channels.c1.kafka.bootstrap.servers = hadoop102:9092,hadoop103:9092
a1.channels.c1.kafka.topic = topic_log
a1.channels.c1.parseAsFlumeEvent = false

#绑定source和channel以及sink和channel的关系
a1.sources.r1.channels = c1
注意:com.atguigu.flume.interceptor.ETLInterceptor是自定义的拦截器的全类名。需要根据用户自定义的拦截器做相应修改。
4 Flume拦截器
1)创建Maven工程flume-interceptor
2)创建包名:com.atguigu.flume.interceptor
3)在pom.xml文件中添加如下配置
<dependencies>
    <dependency>
        <groupId>org.apache.flume</groupId>
        <artifactId>flume-ng-core</artifactId>
        <version>1.9.0</version>
        <scope>provided</scope>
    </dependency>

    <dependency>
        <groupId>com.alibaba</groupId>
        <artifactId>fastjson</artifactId>
        <version>1.2.62</version>
    </dependency>
</dependencies>

<build>
    <plugins>
        <plugin>
            <artifactId>maven-compiler-plugin</artifactId>
            <version>2.3.2</version>
            <configuration>
                <source>1.8</source>
                <target>1.8</target>
            </configuration>
        </plugin>
        <plugin>
            <artifactId>maven-assembly-plugin</artifactId>
            <configuration>
                <descriptorRefs>
                    <descriptorRef>jar-with-dependencies</descriptorRef>
                </descriptorRefs>
            </configuration>
            <executions>
                <execution>
                    <id>make-assembly</id>
                    <phase>package</phase>
                    <goals>
                        <goal>single</goal>
                    </goals>
                </execution>
            </executions>
        </plugin>
    </plugins>
</build>
4)在com.atguigu.flume.interceptor包下创建JSONUtils类
package com.atguigu.flume.interceptor;

import com.alibaba.fastjson.JSON;
import com.alibaba.fastjson.JSONException;

public class JSONUtils {
    public static boolean isJSONValidate(String log){
        try {
            JSON.parse(log);
            return true;
        }catch (JSONException e){
            return false;
        }
    }
}
5)在com.atguigu.flume.interceptor包下创建LogInterceptor类
package com.atguigu.flume.interceptor;

import com.alibaba.fastjson.JSON;
import org.apache.flume.Context;
import org.apache.flume.Event;
import org.apache.flume.interceptor.Interceptor;

import java.nio.charset.StandardCharsets;
import java.util.Iterator;
import java.util.List;

public class ETLInterceptor implements Interceptor {

    @Override
    public void initialize() {

    }

    @Override
    public Event intercept(Event event) {

        byte[] body = event.getBody();
        String log = new String(body, StandardCharsets.UTF_8);

        if (JSONUtils.isJSONValidate(log)) {
            return event;
        } else {
            return null;
        }
    }

    @Override
    public List<Event> intercept(List<Event> list) {

        Iterator<Event> iterator = list.iterator();

        while (iterator.hasNext()){
            Event next = iterator.next();
            if(intercept(next)==null){
                iterator.remove();
            }
        }

        return list;
    }

    public static class Builder implements Interceptor.Builder{

        @Override
        public Interceptor build() {
            return new ETLInterceptor();
        }
        @Override
        public void configure(Context context) {

        }

    }

    @Override
    public void close() {

    }
}
6)打包

7)需要先将打好的包放入到hadoop102的/opt/module/flume/lib文件夹下面。
[atguigu@hadoop102 lib]$ ls | grep interceptor
flume-interceptor-1.0-SNAPSHOT-jar-with-dependencies.jar
8)分发Flume到hadoop103、hadoop104
[atguigu@hadoop102 module]$ xsync flume/
9)分别在hadoop102、hadoop103上启动Flume
[atguigu@hadoop102 flume]$ bin/flume-ng agent --name a1 --conf-file conf/file-flume-kafka.conf &

[atguigu@hadoop103 flume]$ bin/flume-ng agent --name a1 --conf-file conf/file-flume-kafka.conf &
5 日志采集Flume启动停止脚本
1)在/home/atguigu/bin目录下创建脚本f1.sh
[atguigu@hadoop102 bin]$ vim f1.sh
在脚本中填写如下内容
#! /bin/bash

case $1 in
"start"){
        for i in hadoop102 hadoop103
        do
                echo " --------启动 $i 采集flume-------"
                ssh $i "nohup /opt/module/flume/bin/flume-ng agent --conf-file /opt/module/flume/conf/file-flume-kafka.conf --name a1 -Dflume.root.logger=INFO,LOGFILE >/opt/module/flume/log1.txt 2>&1  &"
        done
};;
"stop"){
        for i in hadoop102 hadoop103
        do
                echo " --------停止 $i 采集flume-------"
                ssh $i "ps -ef | grep file-flume-kafka | grep -v grep |awk  '{print $2}' | xargs -n1 kill -9 "
        done

};;
esac
说明1:nohup,该命令可以在你退出帐户/关闭终端之后继续运行相应的进程。nohup就是不挂起的意思,不挂断地运行命令。
说明2:awk 默认分隔符为空格
说明3:xargs 表示取出前面命令运行的结果,作为后面命令的输入参数。
2)增加脚本执行权限
[atguigu@hadoop102 bin]$ chmod u+x f1.sh
3)f1集群启动脚本
[atguigu@hadoop102 module]$ f1.sh start
4)f1集群停止脚本
[atguigu@hadoop102 module]$ f1.sh stop