转自:http://www.doc88.com/p-995532241886.html
首先我们定义一个简单的注解
 1 package com.qjy.annotation;
 2
 3 import java.lang.annotation.Documented;
 4 import java.lang.annotation.ElementType;
 5 import java.lang.annotation.Retention;
 6 import java.lang.annotation.RetentionPolicy;
 7 import java.lang.annotation.Target;
 8
 9 @Target(ElementType.TYPE)
10 @Retention(RetentionPolicy.RUNTIME)
11 @Documented
12 public @interface MyAnnotation1 {
13     String value();
14 }
java用 @interface Annotation{ } 定义一个注解 @Annotation,一个注解是一个类。注解相当于一种标记,在程序中加上了注解就等于为程序加上了某种标记,以后,JAVAC编译器,开发工具和其他程序可以用反射来了解你的类以及各种元素上有无任何标记,看你有什么标记,就去干相应的事。
@interface
java用@interface MyAnnotation1定义一个注解
@Target
表明注解标注位置。
ElementType枚举有:
1)TYPE 类、接口、enum声明
2)FIELD 域、属性声明
3)METHOD 方法声明
4)PARAMETER 参数声明
5)CONSTRUCTOR 构造方法声明
6)PACKAGE 包声明
7)ANNOTATION_TYPE 注释类型声明
8)LOCAL_VARIABLE 局部变量声明
@Retention
表明该注解类的生命周期。
RetentionPolicy枚举有:
1)SOURCE 在源文件中有效
2)CLASS 在class文件中有效
3)RUNNTIME 在运行时有效
只有指定注解RetentionPolicy.RUNNTIME,我们才可以在注解处理器中通过反射读取
@Documented
表明此注解是否包含在javadoc中
接下来,我们定义一个包含两个值的注解
 1 package com.qjy.annotation;
 2
 3 import java.lang.annotation.Documented;
 4 import java.lang.annotation.ElementType;
 5 import java.lang.annotation.Retention;
 6 import java.lang.annotation.RetentionPolicy;
 7 import java.lang.annotation.Target;
 8
 9 @Target(ElementType.METHOD)
10 @Retention(RetentionPolicy.RUNTIME)
11 @Documented
12 public @interface MyAnnotation2 {
13     String description();
14     boolean isAnnotation();
15 }
下面我们看下这两个注解的用法
1 package com.qjy.annotation;
2
3 @MyAnnotation1(value="this is annotation1")
4 public class AnnotationDemo {
5     @MyAnnotation2(description="this is Annotation2",isAnnotation=true)
6     public void sayhello(){
7         System.out.println("hello world");
8     }
9 }
当我们互换@MyAnnotation1和@MyAnnotation2时,ide会报错,这就是@Target作用啦!
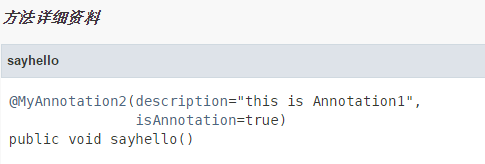
下面我们通过命令行执行:javadoc -d doc *.java,生成javadoc文档。注解MyAnnotation2使用@Documented时,文档方法如下:

如果不使用@Documented时,文档如下:

这就是@Documented作用啦!
下面我们编写一个完整的自定义注解。
第一步:编写一个用于对象赋值的注解
 1 package com.qjy.annotation;
 2
 3 import java.lang.annotation.Documented;
 4 import java.lang.annotation.ElementType;
 5 import java.lang.annotation.Retention;
 6 import java.lang.annotation.RetentionPolicy;
 7 import java.lang.annotation.Target;
 8
 9 @Target(ElementType.METHOD)
10 @Retention(RetentionPolicy.RUNTIME)
11 @Documented
12 public @interface ValueBind {
13     enum fieldType{STRING,INT};
14     fieldType type();
15     String value();
16 }
第二步:使用注解
 1 package com.qjy.annotation;
 2
 3 import com.qjy.annotation.ValueBind.fieldType;
 4
 5 public class Student {
 6     private String name = "";
 7     private int age = 0;
 8     private String studentid = "";
 9
10     public String getName() {
11         return name;
12     }
13
14     @ValueBind(type=fieldType.STRING,value="aa")
15     public void setName(String name) {
16         this.name = name;
17     }
18     public int getAge() {
19         return age;
20     }
21
22     @ValueBind(type=fieldType.INT,value="25")
23     public void setAge(int age) {
24         this.age = age;
25     }
26     public String getStudentid() {
27         return studentid;
28     }
29
30     @ValueBind(type=fieldType.STRING,value="101")
31     public void setStudentid(String studentid) {
32         this.studentid = studentid;
33     }
34
35     @Override
36     public String toString() {
37         return "Student [name=" + name + ", age=" + age + ", studentid="
38                 + studentid + "]";
39     }
40
41 }
第三步:编写注解处理器
 1 package com.qjy.annotation;
 2
 3 import java.lang.reflect.Method;
 4
 5 /**
 6  * 注解处理器
 7  *
 8  * @author admin
 9  *
10  */
11 public class PersistStudent {
12     public static void main(String[] args) throws Exception{
13
14         Object obj = Class.forName("com.qjy.annotation.Student").newInstance();
15         //获取类所有方法(包含私有)
16         Method[] methodArray = obj.getClass().getDeclaredMethods();
17
18         for(int i = 0; i < methodArray.length; i ++) {
19             //如果该方法上存在ValueBind注解
20             if(methodArray[i].isAnnotationPresent(ValueBind.class)) {
21                 ValueBind annotation = methodArray[i].getAnnotation(ValueBind.class);
22                 String type = String.valueOf(annotation.type());
23                 String value = annotation.value();
24                 //根据类型,执行set方法
25                 if(type.equals("INT")) {
26                     methodArray[i].invoke(obj, new Integer[]{new Integer(value)});
27                 } else {
28                     methodArray[i].invoke(obj, new String[]{value});
29                 }
30             }
31         }
32
33         System.out.println(obj.toString());
34
35     }
36 }
运行结果为:
Student [name=aa, age=25, studentid=101]
如果将ValueBind中Retention改为:@Retention(RetentionPolicy.SOURCE)或者@Retention(RetentionPolicy.CLASS),运行结果为:
Student [name=, age=0, studentid=]
我们就无法通过反射获取注解指定的值。