虚拟机客户端vmware player
linux版本:CentOS Linux release 7.4.1708 (Core)
CentOS安装类型:Basic Web Server
参照官网最新文档描述安装
https://docs.mongodb.com/manual/tutorial/install-mongodb-on-red-hat/
一、安装
1、配置下载mongodb的仓库文件
vi /etc/yum.repos.d/mongodb-org-4.0.repo
填充内容
[mongodb-org-4.0]
name=MongoDB Repository
baseurl=https://repo.mongodb.org/yum/redhat/$releasever/mongodb-org/4.0/x86_64/
gpgcheck=1
enabled=1
gpgkey=https://www.mongodb.org/static/pgp/server-4.0.asc
2、下载安装包到/home/mongodb-rpm-package下
yum install --downloaddir=/home/mongodb-rpm-package/ --downloadonly mongodb-org
3、安装
rpm -ivh /home/mongodb-rpm-package/*
4、启动mongo
systemctl start mongod.service
5、登陆,查询

[root@localhost ~]# mongo
MongoDB shell version v4.0.6
connecting to: mongodb://127.0.0.1:27017/?gssapiServiceName=mongodb
Implicit session: session { "id" : UUID("b2bdeeaa-dbcc-4cd2-a12c-681c6e10d83b") }
MongoDB server version: 4.0.6
Welcome to the MongoDB shell.
For interactive help, type "help".
For more comprehensive documentation, see
    http://docs.mongodb.org/
Questions? Try the support group
    http://groups.google.com/group/mongodb-user
Server has startup warnings:
2019-02-23T11:05:19.118+0800 I CONTROL  [initandlisten]
2019-02-23T11:05:19.118+0800 I CONTROL  [initandlisten] ** WARNING: Access control is not enabled for the database.
2019-02-23T11:05:19.118+0800 I CONTROL  [initandlisten] **          Read and write access to data and configuration is unrestricted.
2019-02-23T11:05:19.118+0800 I CONTROL  [initandlisten]
2019-02-23T11:05:19.118+0800 I CONTROL  [initandlisten]
2019-02-23T11:05:19.118+0800 I CONTROL  [initandlisten] ** WARNING: /sys/kernel/mm/transparent_hugepage/enabled is 'always'.
2019-02-23T11:05:19.118+0800 I CONTROL  [initandlisten] **        We suggest setting it to 'never'
2019-02-23T11:05:19.119+0800 I CONTROL  [initandlisten]
2019-02-23T11:05:19.119+0800 I CONTROL  [initandlisten] ** WARNING: /sys/kernel/mm/transparent_hugepage/defrag is 'always'.
2019-02-23T11:05:19.119+0800 I CONTROL  [initandlisten] **        We suggest setting it to 'never'
2019-02-23T11:05:19.119+0800 I CONTROL  [initandlisten]
---
Enable MongoDB's free cloud-based monitoring service, which will then receive and display
metrics about your deployment (disk utilization, CPU, operation statistics, etc).

The monitoring data will be available on a MongoDB website with a unique URL accessible to you
and anyone you share the URL with. MongoDB may use this information to make product
improvements and to suggest MongoDB products and deployment options to you.

To enable free monitoring, run the following command: db.enableFreeMonitoring()
To permanently disable this reminder, run the following command: db.disableFreeMonitoring()
---

> show dbs
admin   0.000GB
config  0.000GB
local   0.000GB
>
可以看到,mongodb默认有三个db,分别为admin,config,local
到此,通过默认安装方式已经完成,
二、修改配置
通过默认安装,mongodb不允许远程登陆,也没有访问控制,默认mongodb的日志和db路径分别被放到了/var/log/mongodb/和/var/lib/mongo下(如果需要,则自定义日志和db路径)
1、停止mongod
systemctl stop mongod.service
2、配置访问控制
Security – Role-Based Access Control中对访问控制有明确描述,我们通过在配置文件中添加security.authorization参数进行访问控制,该值默认为disabled
vim /etc/mongod.conf
添加如下配置

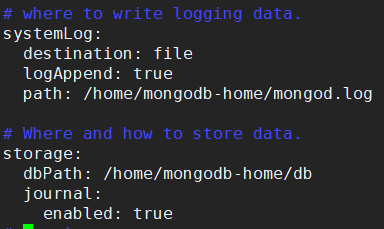
3、配置mongodb日志和db路径
新建mongodb日志和db路径(PS:最初将db和log放入/home/mongodb下,但使用开机服务一直都无法启动mongodb,建议自定义log和db时不要使用上述路径)
mkdir -p /home/mongodb-home/log
mkdir -p /home/mongodb-home/db
chown -R mongod:mongod /home/mongodb-home
vim /etc/mongod.conf
修改配置
systemLog.path修改为/home/mongodb-home/mongod.log
storage.dbPath修改为/home/mongodb-home/db

移动数据库
mv /var/lib/mongo/* /home/mongodb-home/db/
5、配置远程访问
vim /etc/mongod.conf
bindIp修改为0.0.0.0,即允许所有的ip地址访问

5、其他配置修改
如需其他配置修改,可参考该官方文档
https://docs.mongodb.com/manual/reference/configuration-options/
6、启动mongodb实例
systemctl start mongod.service
正常登陆,但此时show dbs已经不能查询出数据库
PS:

如果没有使用默认的mongodb安装路径或者端口,并且SELinux是enforceing模式,则需要配置下SELinux,否则将不能够正常访问mongodb,最简单的方式就是配置/etc/selinux/config中SELINUX=disabled

本例中虚拟机安装完成之后,该模式已经为disabled,所以并未影响使用
三、初始化超级用户
1、可以通过mongo登陆后,执行如下命令
use admin
db.createUser(
         {
                 user: "root",
                 pwd: "mongo",
                 roles: [ { role: "root", db: "admin" } ]
   }
 )
2、将以上命令放入js文件执行,如js名称为initUser.js,或者直接在客户端执行
cat ./initUser.js | mongo --shell
3、也可以直接使用mongo 文件名执行js脚本
4、测试(登陆并查询数据库)
mongo -u root -p mongo
[root@localhost work]# mongo -u root -p mongo
MongoDB shell version v4.0.6
connecting to: mongodb://127.0.0.1:27017/?gssapiServiceName=mongodb
Implicit session: session { "id" : UUID("1fcc117d-5c26-448d-9363-ad1bcadf3e93") }
MongoDB server version: 4.0.6
Server has startup warnings:
2019-02-24T09:37:46.920+0800 I CONTROL  [initandlisten]
2019-02-24T09:37:46.920+0800 I CONTROL  [initandlisten] ** WARNING: /sys/kernel/mm/transparent_hugepage/enabled is 'always'.
2019-02-24T09:37:46.920+0800 I CONTROL  [initandlisten] **        We suggest setting it to 'never'
2019-02-24T09:37:46.921+0800 I CONTROL  [initandlisten]
2019-02-24T09:37:46.921+0800 I CONTROL  [initandlisten] ** WARNING: /sys/kernel/mm/transparent_hugepage/defrag is 'always'.
2019-02-24T09:37:46.921+0800 I CONTROL  [initandlisten] **        We suggest setting it to 'never'
2019-02-24T09:37:46.921+0800 I CONTROL  [initandlisten]
---
Enable MongoDB's free cloud-based monitoring service, which will then receive and display
metrics about your deployment (disk utilization, CPU, operation statistics, etc).

The monitoring data will be available on a MongoDB website with a unique URL accessible to you
and anyone you share the URL with. MongoDB may use this information to make product
improvements and to suggest MongoDB products and deployment options to you.

To enable free monitoring, run the following command: db.enableFreeMonitoring()
To permanently disable this reminder, run the following command: db.disableFreeMonitoring()
---

> show dbs
admin   0.000GB
config  0.000GB
local   0.000GB
>
正常
PS:
1、需要注意的是,一旦设置了访问控制,即将配置文件中security.authorization设置为enabled,则mongo会提供一个localhost exception以便用于创建第一个用户,当然,也可以在设置访问控制前新建用户,但是必须要有一个具有超级权限的用户
2、Security -- Authentication中有一段描述需要关注下

3、root角色具有最大权限,一下为内置用户角色
https://docs.mongodb.com/manual/reference/built-in-roles/
四、脚本安装
将以上步骤整合成shell脚本安装mongodb
提前获取到mongod.conf,将所需参数进行修改,拷贝到默认路径/etc下,mongodb安装时会根据该配置配置数据库,日志等信息

mongod.conf

# mongod.conf

# for documentation of all options, see:
#   http://docs.mongodb.org/manual/reference/configuration-options/

# where to write logging data.
systemLog:
  destination: file
  logAppend: true
  path: /home/mongodb-home/log/mongod.log

# Where and how to store data.
storage:
  dbPath: /home/mongodb-home/db
  journal:
    enabled: true
#  engine:
#  mmapv1:
#  wiredTiger:

# how the process runs
processManagement:
  fork: true  # fork and run in background
  pidFilePath: /var/run/mongodb/mongod.pid  # location of pidfile
  timeZoneInfo: /usr/share/zoneinfo

# network interfaces
net:
  port: 27017
  bindIp: 0.0.0.0  # Enter 0.0.0.0,:: to bind to all IPv4 and IPv6 addresses or, alternatively, use the net.bindIpAll setting.


#security:

#operationProfiling:

#replication:

#sharding:

## Enterprise-Only Options

#auditLog:

#snmp:
脚本installMongo.sh

#!/bin/bash

nowpath=$(cd "$(dirname "$0")";pwd)

## 设置SENLINUX Mode为disabled
setenforce 0
sed -i 's/SELINUX=enforcing/SELINUX=disabled/g' /etc/selinux/config

## 将已经修改后的配置文件拷贝到/etc/下,mongodb启动后将会根据该配置文件安装数据库等操作
cp ./mongod.conf /etc/
## 安装
rpm -ivh ./mongodb-rpm-package/*

## 新建mongodb日志和数据库地址路径,并设置其组合用户为mongod
mkdir -p /home/mongodb-home/log
mkdir -p /home/mongodb-home/db
chown -R mongod:mongod /home/mongodb-home

## 启动mongodb
systemctl start mongod

## 初始化用户
cat ./initUser.js | mongo --shell
五、卸载mongo
mongodb的卸载很简单
1、停止服务
2、执行如下卸载命令
sudo yum erase $(rpm -qa | grep mongodb-org)
3、删除日志和db文件,对应/etc/mongod.conf中的systemLog.path和storage.dbPath路径
