1.创建apps/oauth模块进行oauth认证
'''2.1 在apps文件夹下新建应用: oauth'''
cd syl/apps
python ../manage.py startapp oauth # 切换到apps文件夹下执行创建命令
'''2.2 添加子路由: oauth/urls.py'''
from django.urls import path
from . import views
urlpatterns = [
]
'''2.3 在syl/settings.py中添加应用'''
INSTALLED_APPS = [
'oauth.apps.OauthConfig',
]
'''2.4 在syl/urls.py主路由中添加'''
urlpatterns = [
path('oauth/', include('oauth.urls')),
]
2.生成微博授权URL接口
1.1 添加子路由: oauth/urls.py
urlpatterns = [
     path('weibo/', views.WeiboUrl.as_view()), # /oauth/weibo/ 返回微博登录地址
]
1.2 syl/settings.py 中配微博地址
1.2 视图函数: oauth/views.py
from rest_framework.permissions import AllowAny
from rest_framework.response import Response
from rest_framework.views import APIView
from urllib.parse import urlencode

# 生成前端跳转到微博扫码页面的url
class WeiboUrl(APIView):
    '''
    生成微博的登陆页面路由地址
    https://api.weibo.com/oauth2/authorize?   # 微博oauth认证地址
    client_id=app key3&     # 注册开发者id
    response_type=code&
    redirect_uri=http://127.0.0.1:8888/oauth/callback/ # 获取code后将code回 调给后端地址
    '''

    # 自定义权限类
    permission_classes = (AllowAny,)

    def post(self, request):
        url = 'https://api.weibo.com/oauth2/authorize?'   # 微博授权的 url地址
        data = {
            'client_id': '自己微博的app key',     # 微博 App Key
            'response_type': 'code',
            'redirect_uri': '设置回调地址', # VUE的回 调,微博后台授权的回调地址
        }
        weibo_url = url + urlencode(data)
        # https://api.weibo.com/oauth2/authorize? client_id=1234565&response_type=code&redirect_uri=http://127.0.0.1:8000/api/we ibo_back/
        # return Response({'weibo_url': weibo_url})
        return Response({'code': '0', 'msg': '成功', 'data': {'url': weibo_url}})
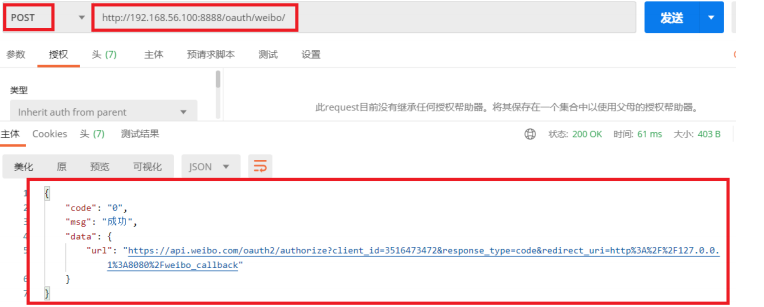
3.测试生成微博售前URL接口
- 测试接口获取新浪微博地址
http://192.168.56.100:8888/oauth/weibo/

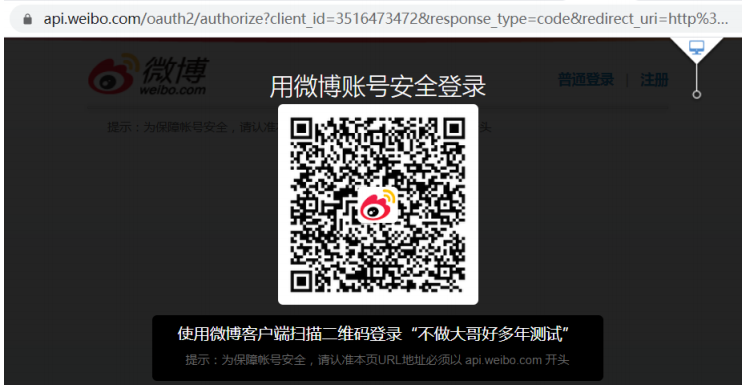
- 在浏览器访问返回地址即可回到新浪扫码界面
https://api.weibo.com/oauth2/authorize? client_id=3516473472&response_type=code&redirect_uri=http%3A%2F%2F127.0.0.1%3A808 0%2Fweibo_callback

4.在Vue页面加载时动态发送请求获取微博授 权url
1.1 在 componentscommonlab_header.vue 中写oauth动态获取微 博授权URL
// 获取微博登录地址
oauth() {
// 从后端获取 微博登录地址
oauth_post().then((resp) => {
console.log(resp)
//{'code': '0', 'msg': '成功', 'data': {'url': url}}
let url = resp.data.url;
this.weibo_url = url;
})
},
1.2 在vue的mounted函数中调用获取微博授权url函数
  mounted() {
      this.oauth()
 },
1.3 点击"登录"弹出的form表单中加入url
<form
  action="/login"
  method="post"
>
  <div class="form-group widget-signin">
    <a :href="weibo_url"><i class="fa fa-weibo"></i></a>
  </div>
</form>
python re.sub
eclipse 安装git插件
一组神奇的 3D Gif 动图
互联网颠覆房地产
一位IT行业高收入者的理财规划方案
阿里核心系统团队介绍
大规模SNS中兴趣圈子的自动挖掘
关于 MySQL LEFT JOIN 你可能需要了解的三点
Could not connect to SMTP host: localhost, port: 25;