1、如果页面上指明了应用和控制层(ng-app/ng-controller),主要是ng-app的值不为空的时候,就需要用js去定义和控制应用,初始化数据
<div ng-app="my-app" ng-controller="myCtro">
  <p>名字 : <input type="text" ng-model="name"></p>
  <h1>Hello {{name}}</h1>
</div>
<script>
    var app = angular.module("my-app",[]);
    app.controller("myCtro", function($scope) {
        $scope.name = "";
    })
</script>
2、循环(ng-repeat)
3、自定义指令(directive)
要调用自定义指令,HTML 元素上需要添加自定义指令名。
使用驼峰法来命名一个指令, runoobDirective, 但在使用它时需要以 - 分割, runoob-directive:
<runoob-directive></runoob-directive>

<script>
var app = angular.module("myApp", []);
app.directive("runoobDirective", function() {
    return {
        template : "<h1>自定义指令!</h1>"
    };
});
</script>
调用指令:
- 元素名(E)
<runoob-directive></runoob-directive>
- 属性(A)
<div runoob-directive></div>
- 类名(C)
<div class="runoob-directive"></div>
- 注释(M)
<!-- directive: runoob-directive -->
注意:可以通过添加 restrict 属性,并设置值,来设置指令只能通过属性的方式来调用
app.directive("runoobDirective", function() {
    return {
        restrict : "A",
        template : "<h1>自定义指令!</h1>"
    };
});
指令也可以传参数,放在scope里面
phonecatApp.directive('isolateScope', function () {
  return {
    restrict: 'AE',
    replace: true,
    scope: {
      data: '@'
    },
    template: '<h3>{{data}}</h3>'
  }
})
4、模型(ng-model)
5、作用域
(1)$scope
有一个reset() 时间,重置掉输入的。
<div ng-app="myApp" ng-controller="formCtrl">
  <form novalidate>
    First Name:<br>
    <input type="text" ng-model="user.firstName"><br>
    Last Name:<br>
    <input type="text" ng-model="user.lastName">
    <br><br>
    <button ng-click="reset()">RESET</button>
  </form>
  <p>form = {{user}}</p>
  <p>master = {{master}}</p>
</div>

<script>
var app = angular.module('myApp', []);
app.controller('formCtrl', function($scope) {
    $scope.master = {firstName: "John", lastName: "Doe"};
    $scope.reset = function() {
        $scope.user = angular.copy($scope.master);
    };
    $scope.reset();
});
(2)$rootScope(根作用域)
6、请求($http)
在1.5以后$http 的 success 和 error 方法已废弃。使用 then 方法替代。
var app = angular.module('myApp', []);

app.controller('siteCtrl', function($scope, $http) {
    $http({
        method: 'GET',
        url: 'https://www.runoob.com/try/angularjs/data/sites.php'
    }).then(function successCallback(response) {
            $scope.names = response.data.sites;
        }, function errorCallback(response) {
            // 请求失败执行代码
    });

});
在$http({})中,使用post请求的时候,data如果是对象的话,需要加上transformRequest,目的在于把参数转成序列化的格式,如果不用这个参数的话,可以在使用的时候,事先将data转成序列化的形式
$http({
            method: "POST",
            url: "",
            data: id,
            headers: { 'Content-Type': 'application/x-www-form-urlencoded' },
            transformRequest: function(obj) {
                var str = [];
                for (var p in obj) {
                    str.push(encodeURIComponent(p) + "=" + encodeURIComponent(obj[p]));
                }
                return str.join("&");
            }
})
7、选择框
使用以下形式更好,对选择的值是对象的时候,应用更加灵活
<div ng-app="myApp" ng-controller="myCtrl">

<p>选择网站:</p>

<select ng-model="selectedSite">
<option ng-repeat="x in sites" value="{{x.url}}">{{x.site}}</option>
</select>

<h1>你选择的是: {{selectedSite}}</h1>

</div>

<script>
var app = angular.module('myApp', []);
app.controller('myCtrl', function($scope) {
   $scope.sites = [
        {site : "Google", url : "http://www.google.com"},
        {site : "Runoob", url : "https://www.runoob.com"},
        {site : "Taobao", url : "http://www.taobao.com"}
    ];
});
</script>
ng-options 使用对象有很大的不同,使用对象作为数据源, x 为键(key), y 为值(value):ng-options="x for (x, y) in sites"
$scope.cars = {
car01 : {brand : "Ford", model : "Mustang", color : "red"},
car02 : {brand : "Fiat", model : "500", color : "white"},
car03 : {brand : "Volvo", model : "XC90", color : "black"}
};
8、表格
表格的显示序号可以用$index表示
区分奇偶的:$odd、$even
9、ng-disabled
直接绑定应用程序数据到 HTML 的 disabled 属性
ng-show/ng-hide
隐藏或显示一个 HTML 元素
10、ng-click
定义了 AngularJS 点击事件
11、ng-switch
<div ng-switch="myVar">
  <div ng-switch-when="dogs">
     <h1>Dogs</h1>
     <p>Welcome to a world of dogs.</p>
  </div>
  <div ng-switch-when="tuts">
     <h1>Tutorials</h1>
     <p>Learn from examples.</p>
  </div>
  <div ng-switch-when="cars">
     <h1>Cars</h1>
     <p>Read about cars.</p>
  </div>
</div>
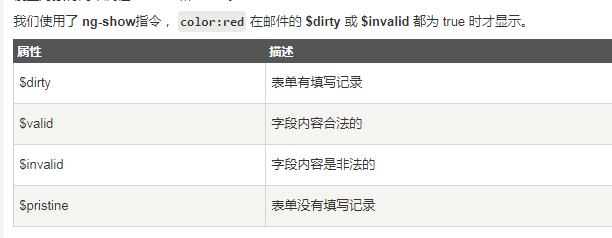
12、输入验证
13、组件模板
默认情况下,组件$ctrl用作控制器别名,但如果需要,我们可以覆盖它。
phonecatApp.component("myTest", {
    template: `
        <p>1232 {{$ctrl.user}}</p>
        <span>23</span>
    `,
    controller: function() {
        var ctrl = this;
        ctrl.user = 'world';
    }
});
14、过滤器
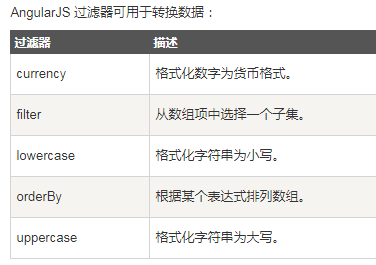
自定义的话,使用filter:
<div ng-app="myApp" ng-controller="myCtrl">


姓名: {{ msg | reverse }}

</div>

<script>
var app = angular.module('myApp', []);
app.controller('myCtrl', function($scope) {
    $scope.msg = "Runoob";
});
app.filter('reverse', function() { //可以注入依赖
    return function(text) {
        return text.split("").reverse().join("");
    }
});
</script>
15、服务
(1)$location
返回当前页面的 URL 地址
(2)$http
(3)$timeout
对应了 JS window.setTimeout 函数
(4)$interval
对应了 JS window.setInterval 函数
(5)自定义服务
app.service('hexafy', function() {
    this.myFunc = function (x) {
        return x.toString(16);
    }
});
app.controller('myCtrl', function($scope, hexafy) {
  $scope.hex = hexafy.myFunc(255);
});
16、子父组件之间的传值
(1)子组件向父组件传值($emit:向上分发,子作用域向父作用域)
// 子组件
$scope.$emit('emit',"test");

// 父组件
$scope.$on ('emit', function(e, newName) {
      console.info(newName)
});
(2)$broadcast:向下广播,父作用域向子作用域
(3)在子组件的bindings中定义一个方法,该方法传给父组件的时候可传参数
// 子组件
ctrl.onPostChildren({childrens:data.data})

// 父组件
元素上: on-post-children='showChildrens(childrens)
js上: $scope.showChildrens=function(childrens){
        $scope.children_list_ = childrens;
     }
17、依赖注入
依赖注入步骤:
(1)value
一个简单的 javascript 对象,用于向控制器传递值(配置阶段)
// 创建 value 对象 "defaultInput" 并传递数据
app.value("defaultInput", 5);


// 将 "defaultInput" 注入到控制器
app.controller('CalcController', function($scope, CalcService, defaultInput) {
});
(2)factory
是一个函数用于返回值。在 service 和 controller 需要时创建,通常我们使用 factory 函数来计算或返回值。
// 创建 factory "MathService" 用于两数的乘积 provides a method multiply to return multiplication of two numbers
app.factory('MathService', function() {
   var factory = {};

   factory.multiply = function(a, b) {
      return a * b
   }
   return factory;
});
(3)service
// 在 service 中注入 factory "MathService"
app.service('CalcService', function(MathService){
   this.square = function(a) {
      return MathService.multiply(a,a);
   }
});
(4)provider
通过 provider 创建一个 service、factory等(配置阶段)。
Provider 中提供了一个 factory 方法 get(),它用于返回 value/service/factory
// 使用 provider 创建 service 定义一个方法用于计算两数乘积
app.config(function($provide) {
   $provide.provider('MathService', function() {
      this.$get = function() {
         var factory = {};

         factory.multiply = function(a, b) {
            return a * b;
         }
         return factory;
      };
   });
});
(5)constant(常量)用来在配置阶段传递数值,注意这个常量在配置阶段是不可用的
app.constant("configParam", "constant value");
18、监听参数的变化($watch)
$scope.$watch('name', function(newValue, oldValue) {
    console.info(newValue, oldValue)
  });
19、transclude/ng-transclude 相当于vue中的solt
比如:在buttonBar指令中,它提供了一个transclude:true属性,同时在它的模板里面使用ng-transclude指令。执行之后,在运行的过程中,Angular获取到自定义指令的内容,处理完了之后把结果放到了模板中链接上ng-transclude的div。
transclude单个位置:
phonecatApp.directive('primary', function() {
  return {
      restrict: 'AC',
      link: function(scope, element, attrs) {
          element.addClass('btn btn-primary');
      }
  }
});

phonecatApp.directive('buttonBar', function() {
  return {
      restrict: 'EA',
      template: `<div class="span4 well clearfix">
      <div class="pull-left" ng-transclude></div>
      </div>`,
      replace: true,
      transclude: true
  };
});
<button-bar>
        <button class="primary">Primary1</button>
     <button primary>Primary2</button>
</button-bar>
transclude到多个位置:
phonecatApp.directive('btnPrimary', function() {
  return {
      restrict: 'AC',
      link: function(scope, element, attrs) {
          element.addClass('btn btn-primary');
      }
  }
});

phonecatApp.directive('btnInfo', function() {
  return {
      restrict: 'AC',
      link: function(scope, element, attrs) {
          element.addClass('btn btn-info');
      }
  }
});

phonecatApp.directive('buttonBar', function() {
  return {
      restrict: 'EA',
      template: `<div class="span4 well clearfix">
      <div class="pull-left" ng-transclude="left"></div>
      <div class="pull-right" ng-transclude="right"></div>
      <div ng-transclude>我是模版中的默认插入点的内容</div>
      </div>`,
      replace: true,
      transclude: {
          left: "?buttonsLeft", // 这里如果不加?的话,在使用该指令的时候一定要有这个
          right: "?buttonsRight",
      }
  };
});
<button-bar>
      <buttons-left>
        <button class="btn-primary" ng-click="onPrimary1Click()">{{primary1Label}}</button>
        <button btn-primary>Primary2</button>
      </buttons-left>
      <buttons-right>
          <button btn-info>Primary3</button>
      </buttons-right>
      <button class="btn btn-danger">默认</button>
</button-bar>
20、$q
是angular自己封装实现的一种promise的实现。
(1)$q.defer(); 创建一个deferred对象,这个对象可以执行几个常用的方法,比如:resolve、reject、notify等
(2)$q.all()传入Promise的数组,批量执行,返回一个Promise对象
(3)$q.when();传入一个不确定的参数,如果符合Promise标准,就返回一个promise对象
phonecatApp.service('taskList', function ($http, $q) {
  var deferred = $q.defer();

  $http.post(RD.kpUrl + "do")
    .then(function (data) {
      deferred.resolve(data);
    })
  return deferred.promise;
})

调用:
phonecatApp
taskList.then(function (data) {})
});
21、$eval
$eval是scope对象上的一个方法,用来解析表达式的。
比如在$scope中定义了一个变量,其中变量名有的是动态的话,在页面渲染的时候,需要做下面的转义
$scope.name1 = "$eval111";
$scope.name2 = "$eval222";

<ul>
      <li ng-repeat="arr in [1,2]">{{$eval('name'+($index+1))}}</li>
</ul>
22、unsafe
比如给a标签的href用变量,会生成一个unsafe:javascript:void(0)
$scope.nhref="javascript:void(0)";

<a ng-href="{{nhref}}">测试</a>
这样对于chrome是无所谓的, 但是firefox就把它当成一个新的地址跳转了, 这不是我们预期的, 所以必须去掉unsafe:这个前缀.
phonecatApp.config([
  '$compileProvider',
  function ($compileProvider) {
      $compileProvider.aHrefSanitizationWhitelist(/^s*(https?|ftp|javascript|mailto|tel|file|sms):/);
  }
])
查看angular的版本,在项目里面运行命令行:ng -v angularjs