亲自下厨编译
- 前言:之前我都是用别人的现成的东西,下面我来重新编译Uboot、kerenl、rootfs
在编译之前要先安装工具链,我使用的是
gcc version 6.3.1 20170109 (Linaro GCC 6.3-2017.02)
1.U-BOOT
获取uboot源码(TF卡启动,用spiflash启动可以获取另一个uboot源码):
git clone https://github.com/Lichee-Pi/u-boot.git -b v3s-current
进入uboot目录
然后添加Bootcommand和Boottargs,具体文件 include/configs/sun8i.h
#define CONFIG_BOOTCOMMAND   "setenv bootm_boot_mode sec; "
                            "load mmc 0:1 0x41000000 zImage; "
                            "load mmc 0:1 0x41800000 sun8i-v3s-licheepi-zero-dock.dtb; "
                            "bootz 0x41000000 - 0x41800000;"

#define CONFIG_BOOTARGS      "console=ttyS0,115200 panic=5 rootwait root=/dev/mmcblk0p2 earlyprintk rw  vt.global_cursor_default=0"
然后编译:
ARCH=arm CROSS_COMPILE=arm-linux-gnueabihf- make LicheePi_Zero_800x480LCD_defconfig

ARCH=arm make menuconfig

ARCH=arm CROSS_COMPILE=arm-linux-gnueabihf- make -j4
查看当前目录,编译完成会生成一个u-boot-sunxi-with-spl.bin文件。
烧录进TF卡
sudo dd if=u-boot-sunxi-with-spl.bin of=/dev/sdc bs=1024 seek=8
1.1 使用Uboot的NFS命令烧录DTB和kernel
下面在uboot中使用nfs来传输dtb和kernel,这样就能减少tf卡的插拔和烧录。
首先要使uboot支持Ethernet
make menuconfig
Device Drivers ---->
[* ]Network device suppoty ------> 这里注意按下“Y”键打上星号,没有星号按下回车里面什么都没有!!
[*] Allwinner Sun8i Ethernet MAC support
然后修改DTS,这里很有意思,uboot和kernel一样,都采用了dts,以后可以研究一下。
arch/arm/dts/sun8i-v3s-licheepi-zero.dts:
diff --git a/arch/arm/dts/sun8i-v3s-licheepi-zero.dts b/arch/arm/dts/sun8i-v3s-licheepi-zero.dts
index 3d9168c..b8b9fc3 100644
--- a/arch/arm/dts/sun8i-v3s-licheepi-zero.dts
+++ b/arch/arm/dts/sun8i-v3s-licheepi-zero.dts
@@ -49,6 +49,7 @@
        compatible = "licheepi,licheepi-zero", "allwinner,sun8i-v3s";

        aliases {
+               ethernet0 = &emac;
                serial0 = &uart0;
        };

@@ -81,3 +82,14 @@
        usb0_id_det-gpio = <&pio 5 6 GPIO_ACTIVE_HIGH>;
        status = "okay";
 };
+
+&emac {
+       phy = <&phy0>;
+       phy-mode = "mii";
+       allwinner,use-internal-phy;
+       allwinner,leds-active-low;
+       status = "okay";
+       phy0: ethernet-phy@0 {
+               reg = <1>;
+       };
+};
arch/arm/dts/sun8i-v3s.dtsi:
diff --git a/arch/arm/dts/sun8i-v3s.dtsi b/arch/arm/dts/sun8i-v3s.dtsi
index ebefc0f..cb81dd5 100644
--- a/arch/arm/dts/sun8i-v3s.dtsi
+++ b/arch/arm/dts/sun8i-v3s.dtsi
@@ -96,6 +96,11 @@
                #size-cells = <1>;
                ranges;

+               syscon: syscon@01c00000 {
+                       compatible = "allwinner,sun8i-h3-syscon","syscon";
+                       reg = <0x01c00000 0x34>;
+               };
+
                mmc0: mmc@01c0f000 {
                        compatible = "allwinner,sun7i-a20-mmc";
                        reg = <0x01c0f000 0x1000>;
@@ -208,6 +213,17 @@
                        interrupt-controller;
                        #interrupt-cells = <3>;

+                       emac_rgmii_pins: emac0@0 {
+                               allwinner,pins = "PD0", "PD1", "PD2", "PD3",
+                                               "PD4", "PD5", "PD7",
+                                               "PD8", "PD9", "PD10",
+                                               "PD12", "PD13", "PD15",
+                                               "PD16", "PD17";
+                               allwinner,function = "emac";
+                               allwinner,drive = <SUN4I_PINCTRL_40_MA>;
+                               allwinner,pull = <SUN4I_PINCTRL_NO_PULL>;
+                       };
+
                        uart0_pins_a: uart0@0 {
                                pins = "PB8", "PB9";
                                function = "uart0";
@@ -270,6 +286,20 @@
                        status = "disabled";
                };

+               emac: ethernet@1c30000 {
+                       compatible = "allwinner,sun8i-h3-emac";
+                       reg = <0x01c30000 0x104>, <0x01c00030 0x4>;
+                       reg-names = "emac", "syscon";
+                       interrupts = <GIC_SPI 82 IRQ_TYPE_LEVEL_HIGH>;
+                       resets = <&ccu RST_BUS_EMAC>, <&ccu RST_BUS_EPHY>;
+                       reset-names = "ahb", "ephy";
+                       clocks = <&ccu CLK_BUS_EMAC>, <&ccu CLK_BUS_EPHY>;
+                       clock-names = "ahb", "ephy";
+                       #address-cells = <1>;
+                       #size-cells = <0>;
+                       status = "disabled";
+               };
+
                gic: interrupt-controller@01c81000 {
                        compatible = "arm,cortex-a7-gic", "arm,cortex-a15-gic";
                        reg = <0x01c81000 0x1000>,
改完重新编译:
make clean //可以选择clean一下

ARCH=arm CROSS_COMPILE=arm-linux-gnueabihf- make -j4
烧录
sudo dd if=u-boot-sunxi-with-spl.bin of=/dev/sdc bs=1024 seek=8
上电:
U-Boot 2017.01-rc2 (Jan 07 2021 - 21:01:47 +0800) Allwinner Technology

CPU:   Allwinner V3s (SUN8I 1681)
Model: Lichee Pi Zero
DRAM:  64 MiB
MMC:   SUNXI SD/MMC: 0
*** Warning - bad CRC, using default environment

Setting up a 800x480 lcd console (overscan 0x0)
dotclock: 33000kHz = 33000kHz: (1 * 3MHz * 66) / 6
In:    serial@01c28000
Out:   serial@01c28000
Err:   serial@01c28000
Net:   phy interface0
eth0: ethernet@1c30000
可以看到eth0已经识别了。
设置下板子的ip地址:
setenv ipaddr 192.168.1.115
ping一下我的虚拟机:
=> ping 192.168.1.105
Using ethernet@1c30000 device
host 192.168.1.105 is alive
ping通了,说明没有问题。
然后使用nfs命令,使用之前ubuntu要开启nfs服务器,具体方法可以去查查其它大佬的博客。
首先设置ubuntu的ip地址:
setenv serverip 192.168.1.105 //可以在ubuntu中使用ifconfig查询ip地址
然后就可以用nfs命令把kernel加载进DRAM中:
=> nfs 41000000 192.168.1.105:/home/book/nfs/zImage
	//  DRAM地址     虚拟机ip地址       文件位置

#################################################################
         #################################################################
         #################################################################
         #################################################################
         #################################################################
         #################################################################
         #################################################################
         #################################################################
         #################################################################
         #################################################################
         #################################################################
         #################################################################
         #####
done
Bytes transferred = 4016104 (3d47e8 hex)
把dtb加载进DRAM:
=> nfs 41800000 192.168.1.105:/home/book/nfs/sun8i-v3s-licheepi-zero-dock.dtb
		DRAM地址    虚拟机ip地址                 文件位置
###
done
Bytes transferred = 11803 (2e1b hex)
然后启动内核:
bootz 41000000 - 418000000
当然了前提是你的TF卡要有rootfs,以后使用nfs网络根文件系统,就可以不用把rootfs从tf卡中加载了。
1.2 自动开机通过nfs下载zImage和dtb
打开 include/configs/sun8i.h ,添加以下代码:
#define CONFIG_BOOTCOMMAND "setenv bootm_boot_mode sec;"
			   "setenv ipaddr 192.168.1.115;"
			   "setenv serverip 192.168.1.105;"
		       "nfs 41000000 192.168.1.105:/home/book/nfs/img/zImage;"        //
			   "nfs 41800000 192.168.1.105:/home/book/nfs/img/sun8i-v3s-licheepi-zero-dock.dtb;"
			   "bootz 0x41000000 - 0x41800000;"
上面代码意思,设置板子ip地址、主机ip地址,从主机/home/book/nfs/img/目录把zImage下载到DRAM的0x41000000,同样的把dtb下载到DRAM的0x41800000
1.3 开机logo设置
https://blog.csdn.net/Bruno_Mars/article/details/104576492
2.Linux内核
获取linux内核,我使用的版本是5.2
git clone https://github.com/Lichee-Pi/linux.git -b zero-5.2.y
下载完之后,进入目录执行命令:
生成licheepi配置文件
CROSS_COMPILE=arm-linux-gnueabihf- ARCH=arm make licheepi_zero_defconfig
配置内核
make ARCH=arm menuconfig
可以选择配置支持网络
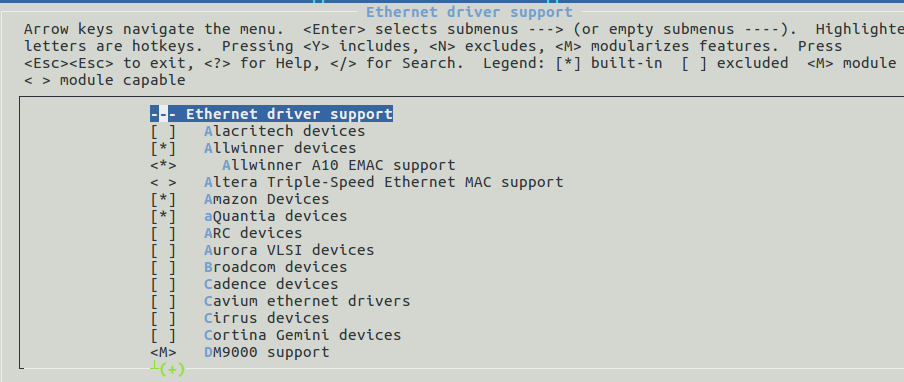
Device Drivers --->
Network device support --->
Ethernet driver support --->
编译内核
make ARCH=arm CROSS_COMPILE=arm-linux-gnueabihf- -j4
如果编译出错:
scripts/extract-cert.c:21:25: fatal error: openssl/bio.h: No such file or directory
可以参考:https://blog.csdn.net/beilson/article/details/79774036
编译完后可以在:arch/arm/boot/找到zImage
编译设备树
make ARCH=arm CROSS_COMPILE=arm-linux-gnueabihf- dtbs
编译完后可以在:arch/arm/boot/dts/找到sun8i-v3s-licheepi-zero-dock.dtb
烧录进TF卡中或者用nfs命令下载到DRAM的0x41000000,上电开机即可。
2.1 测试eth0
设置IP和掩码:
ifconfig eth0 192.168.1.115 netmask 255.255.255.0
设置网关:
route add default gw 192.168.1.1
启动网卡:
ifup eth0
最后ping主机即可
2.2配置内核支持NFS
https://www.cnblogs.com/PengfeiSong/p/6442899.html
3.根文件系统
3.1Buildroot编译
获取buildroot源码
地址:https://buildroot.org/downloads/
我使用的是buildroot-2017.08.1.tar
配置buildroot:
make menuconfig
如果如果用了sudo去解压,直接make会出现以下错误:
Makefile:182: *** output directory "" does not exist。 停止。
Makefile:79: recipe for target '_all' failed
make: *** [_all] Error 2
把设置目录buildroot-2017.08.1的权限为777
sudo chmod 777 buildroot-2017.08.1
注意:如果你用了sudo去解压,记得给buildroot加权限
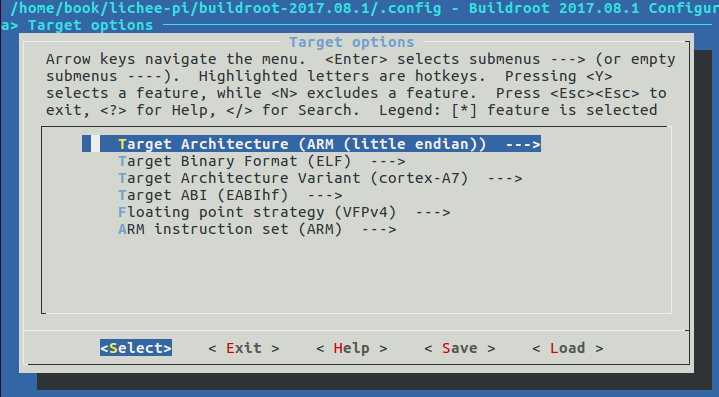
Target options
Toolchain
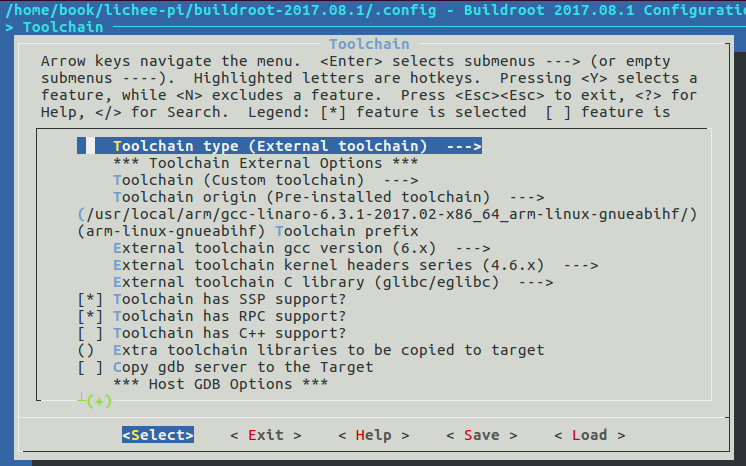
其中,Toolchain path是根据你内核使用的交叉编译器的位置,我用的6.3.1,所以gcc version是6.x,kernel headers series可以在你交叉编译器的:gcc-linaro-6.3.1-2017.02-x86_64_arm-linux-gnueabihf/arm-linux-gnueabihf/libc/usr/include/linux/version.h中找到:
  1 #define LINUX_VERSION_CODE 263680
  2 #define KERNEL_VERSION(a,b,c) (((a) << 16) + ((b) << 8) + (c))
将263680转成十六进制就是0x40600,所以就填4.6.x。
编译:
make
编译完之后,输出文件rootfs.tar在 output/images
最后解压到TF卡的第二分区中:
sudo tar xvf rootfs.tar -C /mnt
3.2 使用NFS挂载根文件系统
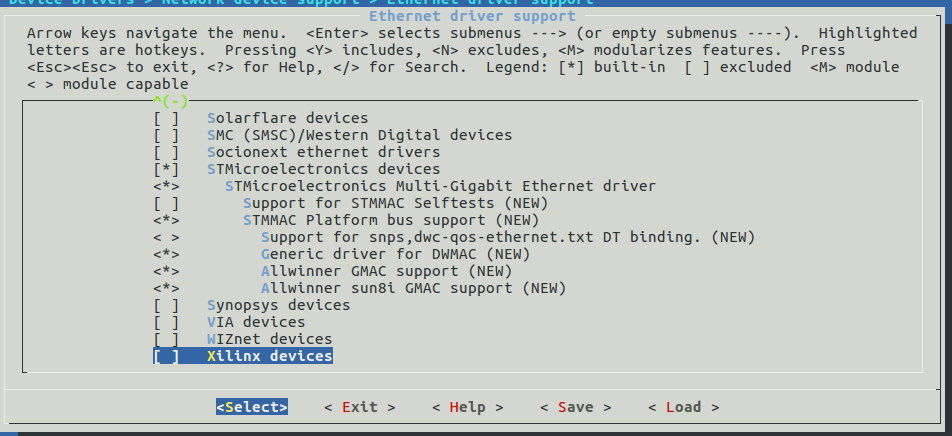
首先确保内核已经有网卡驱动了,kernel版本5.2y是不需要去配置的。
但是要配置一下设备树:
arch/arm/boot/dts/un8i-v3s-licheepi-zero.dts:
@@ -50,6 +50,7 @@

        aliases {
                serial0 = &uart0;
+               ethernet0 = &emac;
        };

        chosen {
@@ -101,3 +102,10 @@
        usb0_id_det-gpio = <&pio 5 6 GPIO_ACTIVE_HIGH>;
        status = "okay";
 };
+
+&emac {
+       phy-handle = <&int_mii_phy>;
+       phy-mode = "mii";
+       allwinner,leds-active-low;
+       status = "okay";
+};
编译内核:
make ARCH=arm CROSS_COMPILE=arm-linux-gnueabihf- -j4
编译设备树
make ARCH=arm CROSS_COMPILE=arm-linux-gnueabihf- dtbs
参考:https://www.kancloud.cn/lichee/lpi0/327886
最后得到zImage和dtb,烧录进TF卡,上电。
然后进入系统,使用命令:
ifup eth0
如果出现错误:Ignoring unknown interface eth0
 1.在荔枝派终端下打开/etc/network/下的interfaces

  vi /etc/network/interfaces

  2.添加这两行到interfaces文件下

  auto eth0
  iface eth0 inet dhcp

  3.保存并退出
再次执行ifup eth0
参考:https://www.cnblogs.com/zhq-blog/p/8808540.html
然后ping主机,成功了就试试挂载主机上的文件,使用命令:
mount -n -o nolock 192.168.1.105:/home/book/nfs /mnt/
如果可以挂载,说明nfs服务器是已经开启了。
接下来修改uboot,让内核的目录改为nfs:
include/configs/sun8i.h:
#define CONFIG_BOOTARGS "console=ttyS0,115200 panic=5 fbcon=map:1 rootwait root=/dev/nfs rw earlyprintk rw vt.global_cursor_default=0 nfsroot=192.168.1.105:/home/book/nfs/nfs ip=192.168.1.115:192.168.1.105:192.168.1.1:255.255.255.0::eth0:0ff"
nfsroot=192.168.1.105:/home/book/nfs/nfs ip=192.168.1.115:192.168.1.105:192.168.1.1:255.255.255.0::eth0:0ff
/home/book/nfs/nfs 为挂载的文件系统
192.168.1.115为板子临时的ip地址,之前通过setenv ipaddr 192.168.1.115设置的。
192.168.1.105为主机的ip地址
192.168.1.1为网关
255.255.255.0 掩码
重新编译uboot后,把镜像烧录进第一分区,插上网线,直接上电,就会发现挂载成功,然后发现主机没有办法在/home/book/nfs/nfs目录下写文件,原因是没有权限,添加权限:
sudo chmod 777 /home/book/nfs/nfs
如果出现挂载失败:
[    4.488609] dwmac-sun8i 1c30000.ethernet eth0: Link is Up - 100Mbps/Full - flow control rx/tx
[    4.548320] IP-Config: Complete:
[    4.551559]      device=eth0, hwaddr=02:03:fa:73:60:d3, ipaddr=192.168.1.115, mask=255.255.255.0, gw=192.168.1.1
[    4.561744]      host=192.168.1.115, domain=, nis-domain=(none)
[    4.567657]      bootserver=192.168.1.105, rootserver=192.168.1.105, rootpath=
[    4.575227] vcc5v0: disabling
[    4.578206] ALSA device list:
[    4.581254]   #0: V3s Audio Codec
[    4.586215] VFS: Cannot open root device "nfs" or unknown-block(0,255): error -6
[    4.593720] Please append a correct "root=" boot option; here are the available partitions:
[    4.602111] b300        31166976 mmcblk0
[    4.602117]  driver: mmcblk
[    4.608933]   b301           32768 mmcblk0p1 e3466b70-01
[    4.608935]
[    4.615727]   b302        31132672 mmcblk0p2 e3466b70-02
[    4.615729]
[    4.622535] Kernel panic - not syncing: VFS: Unable to mount root fs on unknown-block(0,255)
[    4.630965] CPU: 0 PID: 1 Comm: swapper/0 Not tainted 5.2.0-licheepi-zero #5
[    4.638001] Hardware name: Allwinner sun8i Family
[    4.642736] [<c010ed14>] (unwind_backtrace) from [<c010b72c>] (show_stack+0x10/0x14)
[    4.650478] [<c010b72c>] (show_stack) from [<c06be9b0>] (dump_stack+0x84/0x98)
[    4.657699] [<c06be9b0>] (dump_stack) from [<c011dddc>] (panic+0x110/0x2fc)
[    4.664658] [<c011dddc>] (panic) from [<c0901358>] (mount_block_root+0x214/0x2f0)
[    4.672135] [<c0901358>] (mount_block_root) from [<c090160c>] (prepare_namespace+0x150/0x194)
[    4.680652] [<c090160c>] (prepare_namespace) from [<c06d6e04>] (kernel_init+0x8/0x10c)
[    4.688563] [<c06d6e04>] (kernel_init) from [<c01010e8>] (ret_from_fork+0x14/0x2c)
[    4.696120] Exception stack(0xc3833fb0 to 0xc3833ff8)
[    4.701169] 3fa0:                                     00000000 00000000 00000000 00000000
[    4.709336] 3fc0: 00000000 00000000 00000000 00000000 00000000 00000000 00000000 00000000
[    4.717502] 3fe0: 00000000 00000000 00000000 00000000 00000013 00000000
[    4.724123] Rebooting in 5 seconds..
可以参考https://blog.csdn.net/weixin_42445727/article/details/86101798