本文是翻译大牛Josh Smith的文章,WPF Apps With The Model-View-ViewModel Design Pattern,译者水平有限,如有什么问题请看原文,或者与译者讨论(非常乐意与你讨论)。
本文讨论的内容:
WPF与设计模式、MVP模式、对WPF来说为什么MVVM是更好的选择、用MVVM构建WPF程序、本文涉及的技术、WPF、数据绑定。
目录:
1引言
2有序与混乱
3模型-视图-视图模型的演变
4为什么WPF开发者喜欢MVVM
5演示程序
5.1中继命令逻辑
5.2ViewModel类层级结构
5.3ViewModelBase类
5.4CommandViewModel类
5.5MainWindowViewModel类
5.6View对应ViewModel
5.7数据模型和Repository
5.8新增客户数据表单
5.9所有客户视图
6总结
1引言
开发UI,对一个专业软件并不容易。它需要未知数据、交互式设计,可视化设计、联通性,多线程、国际化、验证、单元测试以及其他的一些东西才能完成。考虑到UI要展示开发的系统并且必须满足用户对系统风格不可预知的变更,因此它是很多应用程序最脆弱的地方。
有很多的设计模式可以帮助解决UI不断变更这头难缠的野兽,但是恰当的分离和描述多个关注点可能很困难。模式越复杂,之后用到的捷径越可能破坏之前正确的努力。
这并不总是设计模式的错。有时使用要写很多的代码复杂设计模式,这是因为我们使用的UI平台并不适合简单是设计模式。UI平台需要做的是很容易使用简单的,久经考验的,开发者认识的设计模式构建UI。庆幸的是,WPF就是这样一个平台。
随着是使用WPF开发的比例不断升高,WPF社区发展了自己的模式与实践生态圈子。在本文,我将讨论一些设计与实现客户端应用程序的WPF最佳实践。利用WPF和MVVM设计模式衔接的一些核心功能,我将通过一个例子介绍,用“正确”的方式构建一个WPF程序是多么的简单。
data templates, commands, data binding, the resource system以及 MVVM 模式怎么揉合到一起创建一个简单的、可测试的、健壮的框架,并且任何WPF程序都能使用,到文章最后,这一切都很清晰明了。文中的例程可以作为现实中一个WPF应用程序的模版,并且使用MVVM设计模式作为其核心架构。例程解决方案中的单元测试部分,展示了测试ViewModel类的功能是很容易的。在深入本文之前,我们首先看一下我们要使用像MVVM这样的设计模式。
2有序与混乱
没有必要在一个”Hello,World!”的程序中使用设计模式。任何一个合格的开发者看一眼就指导那几行代码是干什么的。然而随着程序功能点的增加,随之代码的数量以及移动部件也会增多。最终系统的复杂度以及不断出现问题,促使开发者组织他们的代码,以便它们更容易理解,讨论、扩展以及维护。我们通过给代码中某些实体命以众所周知的名字,减少复杂系统认知误区。我们给函数块命名主要依据系统中的功能角色。
开发者有意识的根据设计模式组织他们的代码,而不是根据设计模式自动去组织。无论哪一种,都没有什么问题。但是在本文中,我说明在WPF程序中明确使用MVVM模式的好处。
某些类的名称,包括MVVM模式中著名的术语,如果类是View的抽象类就以ViewModel结束。这种方式有助于避免之前提到的认知误区。相反,你也可以让那种受控的误区存在,这正是大部分软件开发项目的自热状态。
3模型-视图-视图模型的演变
自从人们开始构建UI时,就有很多流行的设计模式让UI构建更容易。比如,MVP模式在各种UI编程平台中都非常流行。MVP是MVC模式的一种变体,MVC模式已经流行了几十年了。以防你之前从没用过MVP模式,这里做一个简单的解释。你在屏幕上看到的是View,它显示的数据是Model,Presenter就是把两者联系起来。View依赖Presenter并通过Presenter展示Model数据,响应用户输入,提供数据验证(或许委托给Model去完成)以及其他的一些任务。如果你想了解更过关于MVP模式,我建议你去读Jean-Paul Boodhoo的August 2006 Design Patterns column。
2004年晚些时候,Martin Fowler发表了一篇叫Presentation Model(PM)的模式。PM模式和MVP类似,MVP是把一个View从行为和状态分离出来。PM中令人关注的部分是创建view的抽象,叫做Presentation Model。之后,View就仅仅是Presentation Model的展示了。在Fowler的论文中,他展示了Presentation Model经常更新View,以便两个彼此同步。同步逻辑组作为代码存在于Presentation Model类中。
2005年,John Gossman,目前是微软WPF和Silverlight架构师,在他的博客上披露了Model-View-ViewModel (MVVM)模式。MVVM和Fowler的Presentation Model是一致的,两个模式的特征都是View的抽象,都包含了View的行为和状态。Fowler引入Presentation Model是作为创建独立平台的View的抽象,而Gossman引入MVVM是作为标准化的方法,利用WPF的核心特点去简化UI的创建。从这种意义上来讲,我把MVVM作为一般PM模式的一个特例。
在Glenn Block一遍优秀的文章"Prism: Patterns for Building Composite Applications with WPF",于2008年9月微软大会发布,他解释了WPF微软组合程序开发向导。术语ViewModel没有用到,然而PM却用来描述View的抽象。这篇文章自始至终,都没没有出现我要将MVVM模式,以及View的抽象ViewModel。我发现这个术语在WPF和Silverlight社区中比较流行。
不像MVP中的Presenter,ViewModel不需要引用View。View 绑定ViewModel的属性,ViewMode向Viewl暴露Model对象的数据以及其他的状态。View和ViewModel之间的绑定很容易构造,因为ViewModel对象可以设置为View的DataContext。如果ViewModel中的属性值发生改变,新值将通过绑定自动传送给View。当用户点击View中的按钮时,ViewMode对于的Command将执行请求的动作。ViewModel,绝不是View,去执行实体对象的修改。
View类并不知道Model类是否存在,同时ViewModel和Model也不知道View。实际上,,Model完全不知道ViewModel和View存在,这是一个非常松耦合的设计,在很多方面都有好处,这不就你就会看到。
4为什么WPF开发者喜欢MVVM
一旦开发者适应了WPF和MVVM,就很难区别两者。因为MVVM非常适合WPF平台,并且WPF被设计使用MVVM模式更容易构建应用程序,MVVM就成了WPF开发者的通用语。事实上,微软内部正在用MVVM开发WPF应用程序,像Microsoft Expression Blend,然而,当时WPF平台的核心功能依然在开发之中。WPF的很多方面,像控制模型以及数据模版,都利用了MVVM推荐的显示状态和行为分离技术。
MVVM之所以成为一个伟大设计模式,是因为WPF的一个最重要的特征数据绑定构造。通过把Viewde 属性绑定到ViewModel,你就可以得到两者松耦合的设计,并且完全去除ViewModel更新View的那部分代码。数据绑定系统支持输入验证,并且输入验证提供了传递错误给View的标准方法。
另两个WPF的特点,数据模版和资源系统让MVVM模式更加可用。数据模版把View应用在ViewModel对象上,以便其能够在UI上显示。你可以在Xaml中声明模版,让资源系统在系统运行过程中自动定位并应用这些模版。你可以从我2008年7月写的一篇文章, "Data and WPF: Customize Data Display with Data Binding and WPF.",获取更多关于绑定和数据模版的信息。
要不是WPF对Command的支持,MVVM模式就不会那么强大。本文中,我会为你展示ViewModel怎样把Commands暴露给View,并且让View消费它的功能。如果你对Command不是很熟悉,我推荐你读一下2008年9月Brian Noyes发布的文章, "Advanced WPF: Understanding Routed Events and Commands in WPF"。
除了WPF(Silverlight2)本身让MVVM以一种自然的方式去构建程序之外,造成MVVM模式流行还有一个原因,那就是ViewModel类很容易进行单元测试。从某种意义来讲,View和单元测试只是ViewModel两个不同类型的消费者。拥有一套应用程序的单元测试,可以为提供更自由、快速的回归测试,而回归测试有助于降低之后应用的维护成本。
除了促进创建自动化回归测试外,ViewModel类的可测试性也有助于设计更容易分离的UI。当你设计应用时,你可以通过想象某些东西是否要创建单元测试消费ViewModel,来确定它们是放到View里面还是ViewModel里面。如果你可以为ViewModel写单元测试而不用创建任何UI控件,你也可以把ViewModel剥离出来,因为它不依赖任何具体可视化的组件。
最后,对于要和设计者合作的开发者来说,使用MVVM模式使得创建平滑的开发/设计工作流更加容易。既然View可以是ViewModel的任意一个消费者,就很容易去掉一个View通过新增一个View去渲染ViewModel。这个简单的步骤允许设计师构建快速原型以及评估UI设计。
这样开发团队可以关注创建健壮的ViewModel类,而设计团队可以关注设计界面友好的View。要融合两个团队输出只需要在View的xaml上进行正确的绑定即可。
5演示程序
到此为止,我们回顾了MVVM的历史以及具体操作理论。我也说明了它在WPF开发者中间如此流行的原因。现在是时候继续我们的步伐,看一下MVVM模式在实际中的应用。这篇文章中的演示程序以各种方式使用MVVM设计模式,它提供了丰富的例子,帮助在上下文中理解MVVM的概念。我用VS2008 SP1创建的这个演示程序, 框架是Microsoft .NET Framework 3.5 SP1。单元测试是用的Visual Studio unit testing。
应用可以包含任意数量的“Workspace”,每一个都可以由用户点击左侧导航区的命令链接打开。所有的Workspace寄宿在主区域TabControl中,用户可以通过点击Workspace的 tab item上关闭按钮关闭Workspace。应用程序有两个可用的Workspace:"All Customers" 和 "New Customer"。运行程序,打开一些Workspace,UI看起来如图1所示。
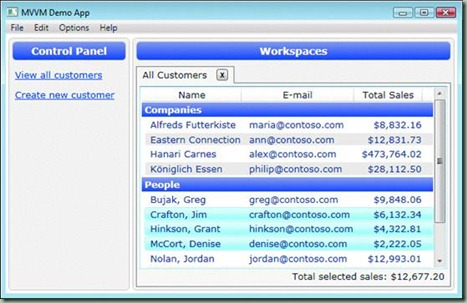
图1 Workspaces
一次只有一个All Customers Workspace的实例可以打开,但是可以打开多个New Customer Workspace。当用户决定创建一个新客户时,她必须填完图2所示的数据输入表单。
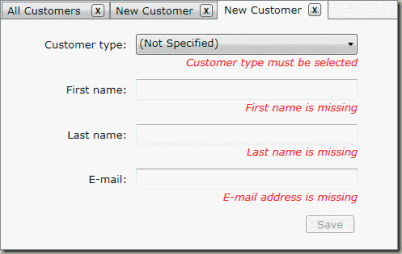
图2 新客户数据输入表单
填完数据输入表单的所有有效值点击“Save”按钮,新客户的名称将会出现在tab item 上面,同时新客户也会增加到客户列表中。应用程序不支持删除或者编辑客户,但是这和其它功能类似,很容易在已有的程序架构上去实现。现在你已经对演示程序有了更深层次的理解了,接下来我们研究它是如何设计以及实现的。
5.1中继命令逻辑(Relaying Command Logic)
除了类构造器里调用初始化组件标准的样板代码,应用中的每一View的code-behind文件都是空的。实际上你可以移除View的code-behind文件,程序让人能够争正确的编译和运行。尽管View中没有事件处理方法,但是当用户点击按钮时,程序依然能够响应并满足用户的请求。之所以这样,是因为UI上Hyperlink、 Button以及MenuItem控件的Command属性被绑定了。绑定机制确保当用户在控件上点击时,由ViewModel暴露的ICommand对象能够执行。你可以把command对象看作一个适配器,这个适配器让command对象很容易消费在View中声明的ViewModel功能。
当ViewModel暴露ICommad类型的实例属性,被暴露的Command对象使用ViewModel中的对象去完成它的工作。其中一个可能的实现模式是在ViewModel内创建一个私有嵌套类,以便command能够访问包含在ViewModel中的私有成员,而不至于污染命名空间。嵌套类实现了ICommand接口,包含在ViewModel中对象的引用注入到其构造器中。但是为ViewModel暴露的每个Command创建实现ICommad的嵌套类,会增加ViewModel类的大小。更多的代码意味着存在BUGS潜力更大。
在演示程序中,RelayCommand类解决了这个问题。RelayCommand允许通过把委托传给其构造器,以实现对命令逻辑的注入。这种方式允许在ViewMode类中可以简单明了的实现Command。
RelayCommand是DelegateCommand的一个简单的变体,DelegateCommand可以在Microsoft Composite Application Library找到。RelayCommand类代码如图3所示。
图3 RelayCommand类
public class RelayCommand : ICommand
{
#region Fields
readonly Action<object> _execute;
readonly Predicate<object> _canExecute;
#endregion // Fields
#region Constructors
public RelayCommand(Action<object> execute)
: this(execute, null)
{
}
public RelayCommand(Action<object> execute, Predicate<object> canExecute)
{
if (execute == null)
throw new ArgumentNullException("execute");
_execute = execute;
_canExecute = canExecute;
}
#endregion // Constructors
#region ICommand Members
[DebuggerStepThrough]
public bool CanExecute(object parameter)
{
return _canExecute == null ? true : _canExecute(parameter);
}
public event EventHandler CanExecuteChanged
{
add { CommandManager.RequerySuggested += value; }
remove { CommandManager.RequerySuggested -= value; }
}
public void Execute(object parameter)
{
_execute(parameter);
}
#endregion // ICommand Members
}
作为接口ICommad实现一部分,事件CanExecuteChanged有一些值得关注的特征。它委托订阅CommandManager. RequerySuggested事件。这样以确保无论何时调用内置命令时,WPF命令架构都能调用所有能够执行的RelayCommand对象。
RelayCommand _saveCommand;
public ICommand SaveCommand
{
get
{
if (_saveCommand == null)
{
_saveCommand = new RelayCommand(param => this.Save(),
param => this.CanSave );
}
return _saveCommand;
}
}
5.2ViewModel类层级图
大部分ViewModel类有共同的特征,他们要实现INotifyPropertyChanged接口,需要显示一个友好的名字,以之前说道Workspace为例,它需要能够关闭(即从UI上移除)。要解决这个问题,自然就需要创建一个或二个ViewModel基类,以便新的ViewModel类能够从基类集成通用的功能。所有的ViewModel类形成如图4的层级图。
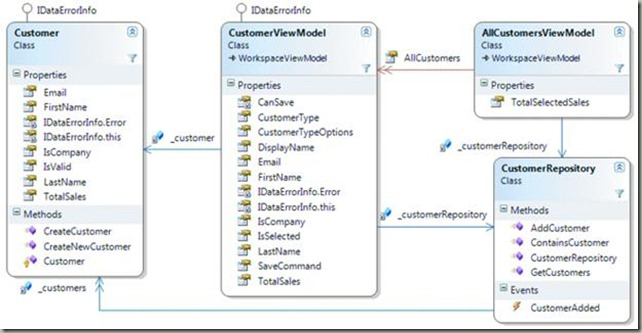
图4 继承层级图
为你的ViewModel创建一个基类并不是必须。如果你喜欢在类中通过组合几个小一点的类以获得那些功能,而不是用继承的方式,这并没有什么问题。就像任何其他的设计模式一样,MVVM是一套指导方针,而不是规则。
5.3ViewModelBase 类
ViewModelBase 是层级中的根类,这就是它要实现通用INotifyPropertyChanged接口以及有一个DisplayName属性的原因。INotifyPropertyChanged接口包含一个叫PropertyChanged的事件。无论何时ViewModel对象的属性的发生改变时,它都会触发PropertyChanged事件,把新值通知给WPF绑定系统。根据通知,绑定系统检索属性,UI组件上绑定的属性将接受新值。
为了让WPF知道是那一个属性发生了改变,PropertyChangedEventArgs类暴露了一个string类型的属性PropertyName 。你一定要为事件参数传递正确的属性名,否则WPF将会为新值检索出一个错误的属性。
ViewModelBase一个值得关注的地方就是它为给定的属性名提供了验证,验证属性是否存在ViewModel对象上。重构时,这非常有用。因为通过VS 2008重构功能去改变属性名,不会更新源代码中字符串,而这些字符串正好包含属性名(其实不应该包含)。在事件参数中传递不正确的属性名,触发PropertyChanged事件时,可能会导致微小的BUGs,并且这些BUGs很难追踪,因此这个细微的特征将会节省大量的时间。ViewModelBase中增加了这个有用的特征,其代码如下:
图5 属性验证
// In ViewModelBase.cs
public event PropertyChangedEventHandler PropertyChanged;
protected virtual void OnPropertyChanged(string propertyName)
{
this.VerifyPropertyName(propertyName);
PropertyChangedEventHandler handler = this.PropertyChanged;
if (handler != null)
{
var e = new PropertyChangedEventArgs(propertyName);
handler(this, e);
}
}
[Conditional("DEBUG")]
[DebuggerStepThrough]
public void VerifyPropertyName(string propertyName)
{
// Verify that the property name matches a real,
// public, instance property on this object.
if (TypeDescriptor.GetProperties(this)[propertyName] == null)
{
string msg = "Invalid property name: " + propertyName;
if (this.ThrowOnInvalidPropertyName)
throw new Exception(msg);
else
Debug.Fail(msg);
}
}
5.4CommandViewModel 类
CommandViewModel是最简单的ViewModelBase子类,它暴露了一个类型为ICommad的Command属性。MainWindowViewModel通过Commands属性暴露了CommandViewModel对象的一个集合。主窗口左手侧的导航区域,显示了MainWindowViewModel暴露每个CommandViewModel对象链接,像“View all customers”和“Create new customer”。当用户点击链接,将会执行相应的Command,在主窗口的TabControl中打开一个workspace。CommandViewModel类的定义如下所示:
public class CommandViewModel : ViewModelBase
{
public CommandViewModel(string displayName, ICommand command)
{
if (command == null)
throw new ArgumentNullException("command");
base.DisplayName = displayName;
this.Command = command;
}
public ICommand Command { get; private set; }
}
在MainWindowResources.xaml文件中存在一个key为CommandsTemplate的数据模版,主窗口(MainWindow)使用这个模版渲染之前提到的CommandViewModel对象集合。这个模版是简单在ItemsControl里把每个CommandViewModel对象渲染成一个链接,每个链接的Command属性绑定到CommandViewModel对象的Command属性。数据模版Xaml如图6所示:
图6 渲染Command列表
<!-- In MainWindowResources.xaml -->
<!--
This template explains how to render the list of commands on
the left side in the main window (the 'Control Panel' area).
-->
<DataTemplate x:Key="CommandsTemplate">
<ItemsControl ItemsSource="{Binding Path=Commands}">
<ItemsControl.ItemTemplate>
<DataTemplate>
<TextBlock Margin="2,6">
<Hyperlink Command="{Binding Path=Command}">
<TextBlock Text="{Binding Path=DisplayName}" />
</Hyperlink>
</TextBlock>
</DataTemplate>
</ItemsControl.ItemTemplate>
</ItemsControl>
</DataTemplate>
5.5MainWindowViewModel 类
如前面看到的类图一样,WorkspaceViewModel类继承于ViewModelBase并增加了“关闭”的能力。这个“关闭”,我的意思是在运行的时候能把workspace从UI上移除。有三个类继承于WorkspaceViewModel,他们分别为MainWindowViewModel,AllCustomersViewModel和CustomerViewModel。MainWindowViewModel的关闭请求是由App类处理的,其中App类创建了MainWindow以及它对应的ViewModel对象。创建代码如图7所示.
图7 创建ViewModel
// In App.xaml.cs
protected override void OnStartup(StartupEventArgs e)
{
base.OnStartup(e);
MainWindow window = new MainWindow();
// Create the ViewModel to which
// the main window binds.
string path = "Data/customers.xml";
var viewModel = new MainWindowViewModel(path);
// When the ViewModel asks to be closed,
// close the window.
viewModel.RequestClose += delegate
{
window.Close();
};
// Allow all controls in the window to
// bind to the ViewModel by setting the
// DataContext, which propagates down
// the element tree.
window.DataContext = viewModel;
window.Show();
}
MainWindow包含一个菜单项,该菜单项的Command属性绑定到MainWindowViewModel上的CloseCommand属性上。当用户点击该菜单,App类响应请求,调用窗体的关闭方法。菜单Xaml如下所示:
<!-- In MainWindow.xaml -->
<Menu>
<MenuItem Header="_File">
<MenuItem Header="_Exit" Command="{Binding Path=CloseCommand}" />
</MenuItem>
<MenuItem Header="_Edit" />
<MenuItem Header="_Options" />
<MenuItem Header="_Help" />
</Menu>
MainWindowViewModel包含了WorkspaceViewModel对象一个observable类型的集合,该集合的名称为Workspaces。主窗体包含了一个TabControl,其ItemsSource绑定到上述的集合。每一个tab item都有一个关闭按钮,其Command属性绑定到它对应WorkspaceViewModel实例的CloseCommand上。模版展示了如何渲染一个带关闭按钮的tab item。配置tab item模版的简化版会展示在下面代码中,这段代码可以在MainWindowResources.xaml文件中找到。
<DataTemplate x:Key="ClosableTabItemTemplate">
<DockPanel Width="120">
<Button
Command="{Binding Path=CloseCommand}"
Content="X"
DockPanel.Dock="Right"
Width="16" Height="16"
/>
<ContentPresenter Content="{Binding Path=DisplayName}" />
</DockPanel>
</DataTemplate>
当用户点击tab item上的关闭按钮时,会执行WorkspaceViewModel的CloseCommand,触发它的RequestClose事件。MainWindowViewModel会监控workspace的RequestClose事件,根据请求从Workspaces集合中移除相应的workspace。因为MainWindow的TabControl的ItemsSource绑定到WorkspaceViewModel的observable集合,从集合中移除对象,会引起从TabControl中移除相应的workspace。MainWindowViewModel相应的逻辑如图8所示
图8 从UI上移除workspace
// In MainWindowViewModel.cs
ObservableCollection<WorkspaceViewModel> _workspaces;
public ObservableCollection<WorkspaceViewModel> Workspaces
{
get
{
if (_workspaces == null)
{
_workspaces = new ObservableCollection<WorkspaceViewModel>();
_workspaces.CollectionChanged += this.OnWorkspacesChanged;
}
return _workspaces;
}
}
void OnWorkspacesChanged(object sender, NotifyCollectionChangedEventArgs e)
{
if (e.NewItems != null && e.NewItems.Count != 0)
foreach (WorkspaceViewModel workspace in e.NewItems)
workspace.RequestClose += this.OnWorkspaceRequestClose;
if (e.OldItems != null && e.OldItems.Count != 0)
foreach (WorkspaceViewModel workspace in e.OldItems)
workspace.RequestClose -= this.OnWorkspaceRequestClose;
}
void OnWorkspaceRequestClose(object sender, EventArgs e)
{
this.Workspaces.Remove(sender as WorkspaceViewModel);
}
在UnitTests项目中,MainWindowViewModelTests.cs文件包含了一个测试方法,该方法验证上述功能是否正确执行。很容易为ViewModel类创建单元测试是MVVM模式的一个大卖点,因为它只需测试应用程序的功能,而不用写和UI交互的代码。上述测试方法图9所示
图9 测试方法
// In MainWindowViewModelTests.cs
[TestMethod]
public void TestCloseAllCustomersWorkspace()
{
// Create the MainWindowViewModel, but not the MainWindow.
MainWindowViewModel target =
new MainWindowViewModel(Constants.CUSTOMER_DATA_FILE);
Assert.AreEqual(0, target.Workspaces.Count, "Workspaces isn't empty.");
// Find the command that opens the "All Customers" workspace.
CommandViewModel commandVM =
target.Commands.First(cvm => cvm.DisplayName == "View all customers");
// Open the "All Customers" workspace.
commandVM.Command.Execute(null);
Assert.AreEqual(1, target.Workspaces.Count, "Did not create viewmodel.");
// Ensure the correct type of workspace was created.
var allCustomersVM = target.Workspaces[0] as AllCustomersViewModel;
Assert.IsNotNull(allCustomersVM, "Wrong viewmodel type created.");
// Tell the "All Customers" workspace to close.
allCustomersVM.CloseCommand.Execute(null);
Assert.AreEqual(0, target.Workspaces.Count, "Did not close viewmodel.");
}
5.6把View应用到ViewModel上
MainWindowViewModel间接从主窗体的TabControl控件中增加移除WorkspaceViewModel对象。通过数据绑定,TabItem的Content属性显示继承于ViewModelBase的对象。ViewModelBase并不是一个UI元件,因此他并不支持渲染它自己。默认在TextBlock中,WPF的一个非可视化对象通过调用ToString方法以显示该对象。很明显这不是你想要的,除非你的用户迫切的想知道ViewModel的类型名。
我们通过强类型数据模版很容易告诉WPF如何渲染ViewModel对象。强类型数据模版key属性名没有赋值,但是其DataType属性要赋以类型类的实例。如果WPF要去渲染ViewModel对象,它会检查在资源系统范围内是否有一个强类型数据模版的DataType和ViewModel对象(或者其基类)的类型一样。如果找到一个这样的模版的话,他会用该模版去渲染被TabItem Content属性绑定的ViewModel对象。
MainWindowResources.xaml文件中有一个ResourceDictionary(资源字典),该字典被增加到主窗体的资源层级中,这意味着文件包含的资源在正窗体范围内有效。当一个TabItem的Content属性设置ViewModel对象时,该字典中的强类型数据模版会提供一个View(即用户自定义控件)去渲染TabItem Content。具体如图10所示
图10 提供View
<!--
This resource dictionary is used by the MainWindow.
-->
<ResourceDictionary
xmlns="http://schemas.microsoft.com/winfx/2006/xaml/presentation"
xmlns:x="http://schemas.microsoft.com/winfx/2006/xaml"
xmlns:vm="clr-namespace:DemoApp.ViewModel"
xmlns:vw="clr-namespace:DemoApp.View"
>
<!--
This template applies an AllCustomersView to an instance
of the AllCustomersViewModel class shown in the main window.
-->
<DataTemplate DataType="{x:Type vm:AllCustomersViewModel}">
<vw:AllCustomersView />
</DataTemplate>
<!--
This template applies a CustomerView to an instance
of the CustomerViewModel class shown in the main window.
-->
<DataTemplate DataType="{x:Type vm:CustomerViewModel}">
<vw:CustomerView />
</DataTemplate>
<!-- Other resources omitted for clarity... -->
</ResourceDictionary>
你不需要写任何代码去决定哪一个View去展示ViewModel对象。WPF资源系统把你从繁重的工作解脱出来,让你去关注更重要的事情。在复杂的场景中,可能需要通过编程去选择View,但是在大部分情况下,通过编程选择View是不必要的。
5.7The Data Model and Repository数据模型和存储库
你已经知道应用程序如何去加载,显示以及关闭一个ViewModel对象。现在一切已经就位,你可以在整个应用程序范围内,回顾一下具体实现的细节。在深入理解应用程序的两个workspace,“All Customers” 和 “New Customer”之前,我们先审视一下数据模型和数据存取类。这些类的设计和MVVM模式并没有什么关系,因为你可以创建一个ViewModel类,以适应任何对WPF友好的数据对象。
演示程序中唯一的模型类Customer类,该类有些属性表征一个公司的客户,像他们的姓名,email等。它通过实现IDataErrorInfo接口提供属性验证信息,该接口在WPF大行其道之前已存在多年。Customer类里面并没有什么,并不是建议其用于MVVM架构,或者甚至应用和WPF应用程序。这个类很容易从遗留的业务库中获取。
数据必须存到某个地方,在这个应用程序中,CustomerRepository类的实例加载并存储所有的Customer对象。该CustomerRepository从xml文件加载所有的客户数据,这与外部的数据源无关。数据可能来自数据库、Web服务、命名管道、磁盘上的文件甚至信鸽,这并没有什么关系。只要你有一个有数据.net对象,不管它来自何方,MVVM模式都能在屏幕上获取其包含数据。
CustomerRepository类暴露了一些方法,这些方法允许你获取所有的Customer对象,增加一个Customer对象到存储室并检查其子啊存储室是否存在。既然应用程序不允许删除客户,存储室也不允许你去删除客户。当一个新Customer通过AddCustomer方法增加到CustomerRepository时,会触发CustomerAdded事件。
很明显,和真实业务程序所需的相比,该程序的数据模型是轻量级的,但是这并没有关系。重要的是,要理解ViewModel类如何利用Customer和CustomerRepository类。知道CustomerViewModel是对Customer对象的封装,其通过一系列的属性暴露了Customer的状态,以及被CustomerView使用的状态。CustomerViewModel并不是复制Customer对象的状态,而是通过委托暴露这状态,具体如下:
public string FirstName
{
get { return _customer.FirstName; }
set
{
if (value == _customer.FirstName)
return;
_customer.FirstName = value;
base.OnPropertyChanged("FirstName");
}
}
当用户在CustomerView控件中创建新客户点击保存按钮时,与该视图关联的CustomerViewModel会增加一个Customer对象到CustomerRepository 。这会触发存储库的CustomerAdded事件,该事件让AllCustomersViewModel知道他应该增加一个CustomerViewModel对象到AllCustomers集合。从某种意义说,CustomerRepository在各自ViewModel和他们要处理的Customer对象间扮演数据同步的角色,或许有人会把这当成中介者模式。我会在接下来的内容中介绍其实现机理,但是为了更进一步了解这些类如何连接在一起,我们现在先看一下图11所示的类图

图11 Customer关系图
5.8New Customer Data Entry Form新增客户数据输入表单
当用户点击“Create new customer”链接,MainWindowViewModel会增加一个CustomerViewModel到workspaces集合,相应的CustomerView回去显示。用户在输入框输入有效值之后,Save按钮变为可用状态,以便用户能存储增加客户信息。这并没有超出常规的地方,只是一个带有验证信息和Save按钮的常规输入表单而已。
Customer类内置输入验证支持,这是通过实现IDataErrorInfo接口获得。输入验证确保客户有一个名字,合法的email地址,如果客户是个人客户,还需要姓氏。如果Customer对象的IsCompany属性为真,则其LastName属性不能有值。该验证逻辑从Customer对象的角度看是有意义的,但是它并不能满足UI的需要,UI要求用户选择客户类别是个人还是公司。Customer类别选择器初始值是: (Not Specified),如果Customer对象的IsCompany属性只允许是true和false,客户类别是unspecified时,UI如何告诉用户?
假定你对整个软件系统拥有控制权限,你可以把IsCompany属性类型改变为Nullable<bool>,该类型允许“未选择”值(即空值-译者注)。然而在现实世界中,不是这么简单。假设你不能改变Customer类,因为它来自公司其他团队所开发系统。要是因为数据库的原因,没有简单方法存储未选择的值,怎么办?要是其它程序已经使用Customer类,并且其依赖正常Boolean类型的IsCompany属性,怎么办?诸如此类,可以使用ViewModel去解决。
图12所示的测试方法展示了该功能如何在CustomerViewModel中工作,CustomerViewModel暴露了一个CustomerTypeOptions属性,以便UI上的客户类型选择器有三个字符串显示。同时它也暴露了一个CustomerType属性,该属性存放选择器选中的字符串。当CustomerType被赋值时,它会潜在的Customer对象IsCompany属性,把字符类型转化为Boolean类型。图13展示了这两个属性。
图12 测试方法
// In CustomerViewModelTests.cs
[TestMethod]
public void TestCustomerType()
{
Customer cust = Customer.CreateNewCustomer();
CustomerRepository repos = new CustomerRepository(
Constants.CUSTOMER_DATA_FILE);
CustomerViewModel target = new CustomerViewModel(cust, repos);
target.CustomerType = "Company"
Assert.IsTrue(cust.IsCompany, "Should be a company");
target.CustomerType = "Person";
Assert.IsFalse(cust.IsCompany, "Should be a person");
target.CustomerType = "(Not Specified)";
string error = (target as IDataErrorInfo)["CustomerType"];
Assert.IsFalse(String.IsNullOrEmpty(error), "Error message should
be returned");
}
图13 CustomerTypeOptions和CustomerType
// In CustomerViewModel.cs
public string[] CustomerTypeOptions
{
get
{
if (_customerTypeOptions == null)
{
_customerTypeOptions = new string[]
{
"(Not Specified)",
"Person",
"Company"
};
}
return _customerTypeOptions;
}
}
public string CustomerType
{
get { return _customerType; }
set
{
if (value == _customerType ||
String.IsNullOrEmpty(value))
return;
_customerType = value;
if (_customerType == "Company")
{
_customer.IsCompany = true;
}
else if (_customerType == "Person")
{
_customer.IsCompany = false;
}
base.OnPropertyChanged("CustomerType");
base.OnPropertyChanged("LastName");
}
}
CustomerView用户控件中有一个ComboBox绑定这两个属性,如下所示:
<ComboBox
ItemsSource="{Binding CustomerTypeOptions}"
SelectedItem="{Binding CustomerType, ValidatesOnDataErrors=True}"
/>
当ComboBox中的选择项发生改变时,其数据源的将会扫描IDataErroInfo接口查看新值是否有效。之所以这样,是因为绑定的SelectedItem属性有一个ValidateOnDataErrors设置为true。既然数据源是一个CustomerViewModel对象,绑定系统会会向CustomerViewModel对象要求一个对CustomerType属性的验证信息。大多情况下,CustomerViewModel会把所有的验证请求委托给其包含的Customer对象。然而,因为Customer的IsCompany属性没有未选中状态的概念,所以CustomerViewModel必须对ComboBox中新选择项进行处理。具体代码如图14所示。
图14 验证CustomerViewModel对象
// In CustomerViewModel.cs
string IDataErrorInfo.this[string propertyName]
{
get
{
string error = null;
if (propertyName == "CustomerType")
{
// The IsCompany property of the Customer class
// is Boolean, so it has no concept of being in
// an "unselected" state. The CustomerViewModel
// class handles this mapping and validation.
error = this.ValidateCustomerType();
}
else
{
error = (_customer as IDataErrorInfo)[propertyName];
}
// Dirty the commands registered with CommandManager,
// such as our Save command, so that they are queried
// to see if they can execute now.
CommandManager.InvalidateRequerySuggested();
return error;
}
}
string ValidateCustomerType()
{
if (this.CustomerType == "Company" ||
this.CustomerType == "Person")
return null;
return "Customer type must be selected";
}
该部分代码重点在于CustomerViewModel实现了IDataErrorsInfo接口,可以处理对CustomerViewModel具体属性的验证请求,同时把其它请求委托给Customer对象处理。这样允许我们使用Model类的验证逻辑,其它属性验证在ViewModel类中才有意义。
通过SaveCommand属性去保存CustomerViewModel对象,该命令使用了之前陈述的RelayCommand,允许CustomerViewModel决定其是否能保存自己以及被告知保存其状态时做什么。在该程序中,保存一个新客户只是把其增加到CustomerRepository。决定一个新客户是否能够保存,需要两方面的许可,一是Customer对象是否有效,二是CustomerViewModel必须是有效的。这两方面是必要条件,由于前面陈述的ViewModel其特定属性以及Customer对象验证信息。CustomerViewModel的保存逻辑如图15所示
图15 CustomerViewModel的保存逻辑
// In CustomerViewModel.cs
public ICommand SaveCommand
{
get
{
if (_saveCommand == null)
{
_saveCommand = new RelayCommand(
param => this.Save(),
param => this.CanSave
);
}
return _saveCommand;
}
}
public void Save()
{
if (!_customer.IsValid)
throw new InvalidOperationException("...");
if (this.IsNewCustomer)
_customerRepository.AddCustomer(_customer);
base.OnPropertyChanged("DisplayName");
}
bool IsNewCustomer
{
get
{
return !_customerRepository.ContainsCustomer(_customer);
}
}
bool CanSave
{
get
{
return String.IsNullOrEmpty(this.ValidateCustomerType()) &&_customer.IsValid;
}
}
这里ViewModel的使用使得创建显示Customer对象的View更加容易,并且允许像Boolean类型未选中这样事情存在。同时它很容易告诉客户保存其状态。如果View直接绑定到Customer对象,View将会需要很多代码才能恰当的工作。在一个设计良好的MVVM架构中,大部分View的背后代码应该为空,或者最多只包含操纵View内的控件以及资源的代码。有时在View后面写一些代码也是必须的,因为要和ViewModel对象进行交互,像传递事件或者调用方法否则从ViewModel做些事情很难。
5.9All Customers View所有客户视图
演示程序也包含了一个在ListView中显示所有客户列表的workspace。这些客户通过根据其是个人客户还是公司客户进行分组。用户一次可以选择一个或者多个客户,在右下方查看其总销售额。
该UI是AllCustomersView控件,用以渲染AllCustomersViewModel对象。每个ListViewItem代表一个CustomerViewModel对象,该对象存在于AllCustomerViewModel对象暴露的AllCustomers集合中。在前一部分,你看到CustomerViewModel如何渲染成数据输入表单,而现在一模一样的CustomerViewModel对象却被渲染成ListView中的一个Item。CustomerViewModel并不知道那一个可视化的组件去显示它,这使得其重用成为可能。
AllCustomersView创建了在ListView中看到的分组,这是通过把ListView的ItemsSource绑定到配置如图16所示的CollectionViewSource中实现的。
图16 CollectionViewSource
<!-- In AllCustomersView.xaml -->
<CollectionViewSource
x:Key="CustomerGroups"
Source="{Binding Path=AllCustomers}"
>
<CollectionViewSource.GroupDescriptions>
<PropertyGroupDescription PropertyName="IsCompany" />
</CollectionViewSource.GroupDescriptions>
<CollectionViewSource.SortDescriptions>
<!--
Sort descending by IsCompany so that the ' True' values appear first,
which means that companies will always be listed before people.
-->
<scm:SortDescription PropertyName="IsCompany" Direction="Descending" />
<scm:SortDescription PropertyName="DisplayName" Direction="Ascending" />
</CollectionViewSource.SortDescriptions>
</CollectionViewSource>
ListViewItem和CustomerViewModel之间的关联是通过ListView的ItemContainerStyle属性建立的。指定给该属性的Style应用于每个ListViewItem,这使得ListViewItem的属性可以绑定到CustomerViewModel对象的属性上。这个Style一个重要的绑定就是在ListViewItem的IsSelected属性和CustomerViewModel的IsSelected属性之间建立的联系,如下所示:
<Style x:Key="CustomerItemStyle" TargetType="{x:Type ListViewItem}">
<!-- Stretch the content of each cell so that we can
right-align text in the Total Sales column. -->
<Setter Property="HorizontalContentAlignment" Value="Stretch" />
<!-- Bind the IsSelected property of a ListViewItem to the IsSelected property of a CustomerViewModel object.-->
<Setter Property="IsSelected" Value="{Binding Path=IsSelected, Mode=TwoWay}" />
</Style>
当CustomerViewModel对象被选中还是未选中,会引起所有选中客户销售总额发生改变。AllCustomersViewModel负责维护总销售额,以便ListView下部的ContentPresenter显示正确的数字。图17显示AllCustomersViewModel如何监控被选中或未选中的每个客户,并通知View更新要显示的值。
图17 监控选中或未选中的客户
// In AllCustomersViewModel.cs
public double TotalSelectedSales
{
get
{
return this.AllCustomers.Sum(custVM=>custVM.IsSelected ? custVM.TotalSales : 0.0);
}
}
void OnCustomerViewModelPropertyChanged(object sender, PropertyChangedEventArgs e)
{
string IsSelected = "IsSelected";
// Make sure that the property name we're
// referencing is valid. This is a debugging
// technique, and does not execute in a Release build.
(sender as CustomerViewModel).VerifyPropertyName(IsSelected);
// When a customer is selected or unselected, we must let the
// world know that the TotalSelectedSales property has changed,
// so that it will be queried again for a new value.
if (e.PropertyName == IsSelected)
this.OnPropertyChanged("TotalSelectedSales");
}
UI绑定了TotalSelectedSales属性,并把该值置为货币格式。ViewModel对象,而不是View,通过返回TotalSelectedSales属性Double类型值的字符串形式,设置其货币格式。.NET Framework 3.5 SP1 为ContentPresenter增加了ContentStringFormat属性,如果你使用更老版本的WPF,你需要在代码中设置货币格式。
<!-- In AllCustomersView.xaml -->
<StackPanel Orientation="Horizontal">
<TextBlock Text="Total selected sales: " />
<ContentPresenter
Content="{Binding Path=TotalSelectedSales}"
ContentStringFormat="c"/>
</StackPanel>
6Wrapping Up总结
WPF为应用程序开发者提供了很多,学习利用WPF赋予的力量,但需要转变思维模式。MVVM模式是设计和开发WPF程序的一种简单而又有效的一套指导方针。它允许你创建数据、行为和展示强分离的程序,这更容易控制软件开发中的混乱因素。