学习要点
- 如何使用PHP中的GD库
- 设计验证码类
- PHP图片处理
- 设计图像图处理类
如何使用PHP中的GD库
在网站上GD库通常用来生成缩略图,或者用来对图片加水印,或者用来生成汉字验证码,或者对网站数据生成报表等。
通过phpinfo()查询GD库版本:
演示示例:D01GDLib.php
<?php
phpinfo();
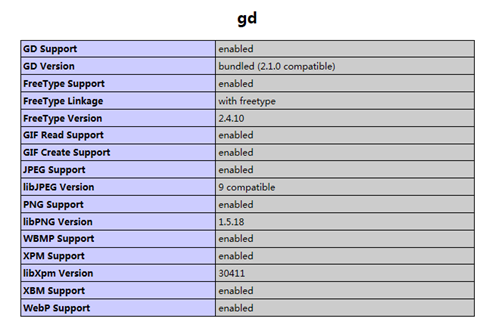
由查询结果可知,PHP5.5.12版本支持的图像文件格式有:GIF、JPEG、PNG、WBMP、XPM、XBM。
在PHP中创建一个图像的基本四个步骤:
1、创建画布
2、绘制图像
3、输出图像
4、释放资源
演示示例:D02ImageDemo.php
<?php
//创建画布,返回资源类型,在内存中开辟一块临时区域
$image=imagecreatetruecolor(100, 100);

//设置图像中所需颜色,相当于准备颜料盒
$white=imagecolorallocate($image, 0xFF, 0xFF, 0xFF);//白色
$gray=imagecolorallocate($image, 0xC0, 0xC0, 0xC0);//灰色
$darkgray=imagecolorallocate($image, 0x90, 0x90, 0x90);//深灰
$navy=imagecolorallocate($image, 0x00, 0x00, 0x80);//海蓝色
$darknavy=imagecolorallocate($image, 0x00, 0x00, 0x50);//深蓝
$red=imagecolorallocate($image, 0xFF, 0x00, 0x00);//红
$darkred=imagecolorallocate($image, 0x90, 0x00, 0x00);//暗红

//画布添加背景色
imagefill($image, 0, 0, $white);

//制作3d饼状图
for($i=60;$i>50;$i--){
	imagefilledarc($image, 50, $i, 100, 50, -160, 40, $darknavy, IMG_ARC_PIE);
	imagefilledarc($image, 50, $i, 100, 50, 40, 75, $gray, IMG_ARC_PIE);
	imagefilledarc($image, 50, $i, 100, 50, 75, 200, $darkred, IMG_ARC_PIE);
}

//画圆弧
imagefilledarc($image, 50, $i, 100, 50, -160, 40, $darknavy, IMG_ARC_PIE);
imagefilledarc($image, 50, $i, 100, 50, 40, 75, $gray, IMG_ARC_PIE);
imagefilledarc($image, 50, $i, 100, 50, 75, 200, $darkred, IMG_ARC_PIE);

//输出字符
imagestring($image, 1, 15, 55, '34.7%', $white);
imagestring($image, 1, 15, 35, '55.58%', $white);

//http协议设置,浏览器输出图像
header('Content-type:image/png');
//向浏览器输出
imagepng($image);
//销毁内存图像资源
imagedestroy($image);
画布管理
使用GD库处理图像时,需要进行画布管理。相当于在内存开辟一块区域,创建一个图像资源。
1、创建画布的函数有:
- resource imagecreate ( int $x_size , int $y_size ) //256色
- resource imagecreatetruecolor ( int $width , int $height ) //真彩色,不支持GIF图像文件
2、获取图像画布大小的函数:
<?php

$image=imagecreatetruecolor(500, 600);

echo ''.imagesx($image).'<br>';

echo 'height'.imagesy($image);
3、销毁图像函数
bool imagedestroy ( resource $image )
设置颜色
PHP输出图像,需要对图像进行颜色设置,需要调用imagecolorallocate()函数完成。如果图像中需要多种颜色,需要对该函数多次调用,语法格式如下:
int imagecolorallocate ( resource $image , int $red , int $green , int $blue )
说明:imagecolorallocate() 返回一个标识符,代表了由给定的 RGB 成分组成的颜色。red,green 和 blue 分别是所需要的颜色的红,绿,蓝成分。这些参数是 0 到 255 的整数或者十六进制的 0x00 到 0xFF。imagecolorallocate() 必须被调用以创建每一种用在 image 所代表的图像中的颜色。
注意:用 imagecreate() 建立的图像,第一次对 imagecolorallocate() 的调用会给基于调色板的图像填充背景色。
示例代码:
//创建画布资源

$image=imagecreate(100, 100);

//设置背景色

$background=imagecolorallocate($image, 255, 0, 0);

//设定颜色

$white=imagecolorallocate($image, 255, 255, 255);//10进制颜色

$black=imagecolorallocate($image, 0, 0, 0);//10进制颜色

$white=imagecolorallocate($image, 0xFF, 0xFF, 0xFF);//16进制颜色

$black=imagecolorallocate($image, 0x00, 0x00, 0x00);//16进制颜色

//http协议设置,浏览器输出图像

header('Content-type:image/png');

//向浏览器输出

imagepng($image);

//销毁内存图像资源

imagedestroy($image);
输出图像
绘制图像完成后,需要输出到浏览器或者保存图像,直接生成GIF、JPEG、PNG、WBMP四种格式图像,可以通过下列函数生成:
1、bool imagegif ( resource $image [, string $filename ] )
image资源以filename为文件名输出GIF图像。
2、bool imagejpeg ( resource $image [, string $filename [, int $quality ]] )
image资源以filename为文件名输出JPEG图像。quality设定图像品质[0-100]。
3、bool imagepng ( resource $image [, string $filename ] )
image资源以filename为文件名输出PNG图像。
4、bool imagewbmp ( resource $image [, string $filename [, int $foreground ]] )
image资源以filename为文件名输出PNG图像。foreground设置前景色。
绘制图像
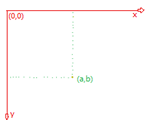
PHP提供了点、线、各种几何图形等各种形状绘制平面图形的函数。这些函数需要通过图像资源进行图像的绘制。画布的坐标:
1、图形区域填充
图形填充函数:
bool imagefill ( resource $image , int $x , int $y , int $color )
函数说明:在 image 图像的坐标 x,y(图像左上角为 0, 0)处用 color 颜色执行区域填充(即与 x, y 点颜色相同且相邻的点都会被填充)。
示例代码:
$image = imagecreatetruecolor(100, 100);

// 将背景设为红色

$red = imagecolorallocate($image, 255, 0, 0);

imagefill($image, 0, 0, $red);//填充整个画布

header('Content-type: image/png');

imagepng($image);

imagedestroy($image);
2、绘制点
绘制点的函数(理论上可用通过这个函数绘制所有图形):
bool imagesetpixel ( resource $image , int $x , int $y , int $color )
函数说明:在 image 图像中用 color 颜色在 x,y 坐标(图像左上角为 0,0)上画一个点。
示例代码——绘制正方形对角线:
$image = imagecreatetruecolor ( 100, 100 );

// 绘制红色对角线

$red = imagecolorallocate ( $image, 255, 0, 0 );

$gray = imagecolorallocate ( $image, 0xC0, 0xC0, 0xC0 );

// 设置画布背景色

imagefill ( $image, 0, 0, $gray );

// 正方形对角线1

for($i = 0; $i <= 100; $i ++) {

   imagesetpixel ( $image, $i, $i, $red );

}

// 正方形对角线2

for($i = 0, $j = 100; $i <= 100; $i ++, $j --) {

   imagesetpixel ( $image, $j, $i, $red );

}

header ( 'Content-type: image/png' );

imagepng ( $image );

imagedestroy ( $image );
3、绘制线
两点确定一条直线,绘制线的函数:
bool imageline ( resource $image , int $x1 , int $y1 , int $x2 , int $y2 , int $color )
函数说明:用 color 颜色在图像 image 中从坐标 x1,y1 到 x2,y2(图像左上角为 0, 0)画一条线段。
示例代码:D08ImageLine.php(绘制粗线条)
<?php
/**
 * 定义绘制粗线函数
 * @param resource $image
 * @param int $x1
 * @param int $y1
 * @param int $x2
 * @param int $y2
 * @param callback $color
 * @param int $thick 线条粗细
 */
function imagelinethick($image, $x1, $y1, $x2, $y2, $color, $thick = 1) {
	/*
	 * 下面两行只在线段直角相交时好使
	 * imagesetthickness($image, $thick);
	 * return imageline($image, $x1, $y1, $x2, $y2, $color);
	 */
	if ($thick == 1) {
		return imageline ( $image, $x1, $y1, $x2, $y2, $color );
	}
	$t = $thick / 2 - 0.5;
	if ($x1 == $x2 || $y1 == $y2) {
		// 画矩形并填充
		return imagefilledrectangle ( $image, round ( min ( $x1, $x2 ) - $t ), round ( min ( $y1, $y2 ) - $t ), round ( max ( $x1, $x2 ) + $t ), round ( max ( $y1, $y2 ) + $t ), $color );
	}
	$k = ($y2 - $y1) / ($x2 - $x1); // y = kx + q
	$a = $t / sqrt ( 1 + pow ( $k, 2 ) );
	$points = array (
			round ( $x1 - (1 + $k) * $a ),
			round ( $y1 + (1 - $k) * $a ),
			round ( $x1 - (1 - $k) * $a ),
			round ( $y1 - (1 + $k) * $a ),
			round ( $x2 + (1 + $k) * $a ),
			round ( $y2 - (1 - $k) * $a ),
			round ( $x2 + (1 - $k) * $a ),
			round ( $y2 + (1 + $k) * $a )
	);
	imagefilledpolygon ( $image, $points, 4, $color );
	return imagepolygon ( $image, $points, 4, $color );
}

$image = imagecreatetruecolor ( 100, 100 );
// 绘制红色对角线
$red = imagecolorallocate ( $image, 255, 0, 0 );
$gray = imagecolorallocate ( $image, 0xC0, 0xC0, 0xC0 ); // 灰色
                                                         // 设置画布背景色
imagefill ( $image, 0, 0, $gray );
// 正方形对角线
imagelinethick ( $image, 0, 0, 100, 100, $red, 5 );
header ( 'Content-type: image/png' );
imagepng ( $image );
imagedestroy ( $image );
4、绘制矩形
bool imagerectangle ( resource $image , int $x1 , int $y1 , int $x2 , int $y2 , int $col )
函数说明:imagerectangle() 用 col 颜色在 image 图像中画一个矩形,其左上角坐标为 x1, y1,右下角坐标为 x2, y2。图像的左上角坐标为 0, 0。
bool imagefilledrectangle ( resource $image , int $x1 , int $y1 , int $x2 , int $y2 , int $color )
函数说明:在 image 图像中画一个用 color 颜色填充了的矩形,其左上角坐标为 x1,y1,右下角坐标为 x2,y2。0, 0 是图像的最左上角。
示例代码:D09Imagerectangle.php
<?php
/**绘制矩形*/
$image = imagecreatetruecolor ( 100, 100 );
// 绘制红色对角线
$red = imagecolorallocate ( $image, 255, 0, 0 );
$gray = imagecolorallocate ( $image, 0xC0, 0xC0, 0xC0 ); // 灰色
// 设置画布背景色
imagefill ( $image, 0, 0, $gray );
// 绘制矩形
//imagerectangle($image, 10, 10, 80, 20, $red);
// 绘制矩形并填充矩形
imagefilledrectangle($image, 10, 10, 90, 40, $red);
header ( 'Content-type: image/png' );
imagepng ( $image );
imagedestroy ( $image );
5、绘制多边形
bool imagepolygon ( resource $image , array $points , int $num_points , int $color )
函数说明:points 是一个 PHP 数组,包含了多边形的各个顶点坐标,即 points[0] = x0,points[1] = y0,points[2] = x1,points[3] = y1,以此类推。num_points 是顶点的总数。
bool imagefilledpolygon ( resource $image , array $points , int $num_points , int $color )
函数说明:在 image 图像中画一个填充了的多边形.
演示示例:D10Imagepolygon.php
<?php
/**绘制多边形*/
// 创建画布
$image = imagecreatetruecolor ( 400, 300 );

// 设置画背景色
$bacground = imagecolorallocate ( $image, 0, 0, 0 );

// 设置多边形线条颜色
$col_poly = imagecolorallocate ( $image, 255, 255, 255 );

// 绘制多边形
//imagepolygon ( $image, array (0,0,100,200,300,200), 3, $col_poly );

//绘制多边形并填充
imagefilledpolygon($image, array (0,0,100,200,300,200), 3, $col_poly);
// 输出图象
header ( "Content-type: image/png" );
imagepng ( $image );
imagedestroy ( $image );
6、绘制椭圆
bool imageellipse ( resource $image , int $cx , int $cy , int $width , int $height , int $color )
函数说明:在指定的坐标上画一个椭圆。
参数:image—画布。cx中间的 X 坐标。 cy中间的 Y 坐标。width椭圆的宽度。 height椭圆的高度。color椭圆的颜色。颜色标识符由 imagecolorallocate() 创建。
bool imagefilledellipse ( resource $image , int $cx , int $cy , int $width , int $height , int $color )
函数说明:绘制椭圆并填充。
示例代码:D11Imageellipse.php
<?php
/**绘制椭圆*/
// 创建画布
$image = imagecreatetruecolor ( 400, 300 );

// 设置画布背景色
$bacground = imagecolorallocate ( $image, 0, 0, 0 );

// 椭圆颜色
$col_ellipse = imagecolorallocate ( $image, 255, 255, 255 );

//绘制椭圆
//imageellipse($image, 200, 150, 300, 200, $col_ellipse);

// 绘制椭圆并填充
imagefilledellipse ( $image, 200, 150, 300, 200, $col_ellipse );

// 输出图像
header ( "Content-type: image/png" );
imagepng ( $image );
imagedestroy($image);
7、绘制弧线
bool imagearc ( resource $image , int $cx , int $cy , int $w , int $h , int $s , int $e , int $color )
函数说明:以 cx,cy(图像左上角为 0, 0)为中心在 image 所代表的图像中画一个椭圆弧。w 和 h 分别指定了椭圆的宽度和高度,起始和结束点以 s 和 e 参数以角度指定。0°位于三点钟位置,以顺时针方向绘画。
示例代码:
<?php
/**绘制弧线*/
// 创建一个 200X200 的图像
$img = imagecreatetruecolor(200, 200);

// 分配颜色
$white = imagecolorallocate($img, 255, 255, 255);
$black = imagecolorallocate($img, 0, 0, 0);

//设置画布背景色
imagefill($img, 0, 0, $white);

// 画一个黑色的圆弧
imagearc($img, 100, 100, 150, 150, 90, 270, $black);
// 将图像输出到浏览器
header("Content-type: image/png");
imagepng($img);
// 释放内存
imagedestroy($img);
绘制文字
在图像中显示的文字也需要按坐标位置画上去。在PHP中不仅支持比较多的字体库,而且提供了非常灵活的文字绘制方法。例如,在图中绘制缩放、倾斜、旋转的文字等。可以使用imageString()、imageStringUP()或imageChar()等函数使用的字体文字绘制到图像中。这些函数的原型如下所示:
 bool imagestring(resource $image,int $font,int $x ,int $y,string $s,int $color)              #函数说明:水平地画一行字符串

bool imagestringup(resource $image,int $font,int $x ,int $y,string $s,int $color)                 #函数说明:垂直地画一行字符串

bool imagechar(resource $image,int $font,int $x ,int $y,char $c,int $color)                #函数说明:水平地画一个字符

bool imagecharup(resource $image,int $font,int $x ,int $y,char $c,int $color)                 #函数说明:垂直地画一个字符
参数$font为文字字体标识符,值为1、2、3、4或5,使用内置的字体,数字越大则输出的文字尺寸就越大。
示例代码:D13ImageString.php
<?php
$image = imagecreate ( 600, 600 );

$bacground = imagecolorallocate ( $image, 255, 255, 255 ); // 设置画布的背景为白色
$black = imagecolorallocate ( $image, 0, 0, 0 ); // 设置一个颜色变量为黑色

$string = "Hello Image String"; // 在图像中输出的字符

imagestring ( $image, 5, 50, 150, $string, $black ); // 水平的将字符串输出到图像中
imagestringup ( $image, 5, 150, 200, $string, $black ); // 垂直由下而上输到图像中
for($i = 0, $j = strlen ( $string ); $i < strlen ( $string ); $i ++, $j --) { // 循环单个字符输出到图像中
	imagechar ( $image, 5, 10 * ($i + 1)+20, 10 * ($j + 2)+20, $string [$i], $black ); // 向下倾斜输出每个字符
	imagecharup ( $image, 5, 10 * ($i + 1), 10 * ($j + 2), $string [$i], $black ); // 向上倾斜输出每个字符
}

header ( 'Content-type:image/png' );
imagepng ( $image );
imagedestroy($image);
imageTtfText()函数输出一种可以缩放的与设备无关的TrueType字体。
array imagettftext(resource $image,float $size ,float $angle,int $x,int $y,int $color ,string $fontfile,string $text)
函数说明:
- 参数$image需要提供一个图像资源。
- 参数$size用来设置字体大小,根据GD库版本不同,应该以像素大小指定(GD1)或点大小(GD2)。
- 参数$angle是角度制表示的角度,0º为从左向右读的文本,更高数值表示逆时针旋转。例如90º表示从下向上读的文本。
- 并由($x,$y)两个参数所表示的坐标,定义了一个字符的基本点,大概是字符的左下角。而这和imagestring()函数有所不同,其($x,$y)坐标定义了第一个字符的左上角。
- 参数$color指定颜色索引。使用负的颜色索引值具有关闭防锯齿的效果。
- $fontfile是想要使用的TrueType字体的路径。根据PHP所使用的GD库的不同,当fontfil没有以“/”开头时则“.ttf”将被加到文件名之后,并且会在库定义字体路径中尝试搜索该文件名。
- 最后一个参数$text指定需要输出的文本字符串,可以包含十进制数字化字符表示(形式为:€)来访问字体中超过位置127的字符。UTF-8编码的字符串可以直接传递。如果字符串中使用的某个字符不被字体支持,一个空心矩形将替换该字符。
- imagettftext()函数返回一个含有8个单元的数组,表示了文本外框的四个角,顺序为左下角,右下角,右上角,左上角。这些点是相对于文本的而和角度无关,因此“左上角”指的是以水瓶方向看文字时其左上角。
示例代码:D14Imagettftext.php
<?php
$image = imagecreatetruecolor(600, 40);            //创建400 30像素大小的画布

$white = imagecolorallocate($image, 255, 255, 255);//白色
$grey = imagecolorallocate($image, 128, 128, 128);//灰色
$black = imagecolorallocate($image, 0, 0, 0);//黑色

imagefilledrectangle($image, 0, 0, 599, 39, $white);       //输出一个使用白色填充的矩形作为背景

/**如果有中文输出,需要将其转码,转换为UTF-8的字符串才可以直接传递
 * string iconv ( string $in_charset , string $out_charset , string $str )
 * 将字符串 str 从 in_charset 转换编码到 out_charset。
 */
$text = iconv("GB2312", "UTF-8", "imagettftext支持输出trueType文字");

//设定字体,将系统中微软雅黑字体复制到当前目录下
$font = 'SIMLI.TTF';

/**
 * array imagettftext ( resource $image , float $size , float $angle , int $x , int $y , int $color , string $fontfile , string $text )
 * size字体的尺寸。根据 GD 的版本,为像素尺寸(GD1)或点(磅)尺寸(GD2)。
 */
imagettftext($image, 20, 0, 12, 29, $grey, $font, $text);      //输出一个灰色的字符串作为阴影
imagettftext($image, 20, 0, 10, 28, $black, $font, $text);         //在阴影上输出一个黑色的字符串

header("Content-type: image/png");
imagepng($image);
imagedestroy($image);
图像无法输出的浏览器的问题
PHP会把绘制和处理的图像放在buffer缓存中
缓存的默认配置为4096字节(php.ini)配置文件中
output_buffering = 4096
当使用echo,print等输出用户数据的时候,输出数据都会写入到output_buffering中,直到output_buffering写满,会将这些数据通过TCP响应到客户端浏览器显示。
也可以通过 ob_start()手动激活output_buffering机制,使得即便输出超过了4kb数据,也不把数据交给TCP协议响应到客户端浏览器,因为ob_start()将buffer空间设置到了足够大 。
只有直到脚本结束,或者调用ob_end_flush函数,才会把数据发送给客户端浏览器。
PHP缓存原则:如果output_buffering(以下简称ob缓存)缓存打开,则echo的数据首先放在ob缓存。如果是header信息,直接放在程序缓存。当页面执行到最后,会把ob缓存的数据放到程序缓存,然后依次返回给浏览器。
常见刷新缓存函数:
| 函数 | 作用 |
| flush() | 强制刷新程序缓存到客户端浏览器。必须同时使用 ob_flush() 和flush() 函数来刷新ob并响应到客户端。 |
|
ob_clean() |
清空(擦掉)ob,忽略脚本中已输出的数据。通常用于清除脚本中已经输出的数据,输出当前缓存中的数据。 |
| ob_flush() | 冲刷出(送出)输出缓冲区中的内容,把ob缓存的数据刷新(剪切)到程序缓存。ob_flush()的作用就是将本来存在ob中的内容取出来,设置为等待输出状态,但不会直接发送到客户端,这时你就需要先使用ob_flush()再使用flush(),客户端才能立即获得脚本的输出。 |
| ob_end_clean() | 清空(擦除)缓冲区并关闭ob。 |
| ob_end_flush() | 冲刷出(送出)ob区内容并关闭缓冲。把ob缓存的数据刷新(剪切)到程序缓存并关闭ob缓存 |
| ob_get_contents() | 获取ob缓存中的数据。 |
设计验证码类
示例:D15Vcode
<?php
/**验证码类 */
class Vcode {
	private $width; // 验证码图片的宽度
	private $height; // 验证码图片的高度
	private $codeNum; // 验证码字符的个数
	private $disturbColorNum; // 干扰元素的数量
	private $checkCokde; // 验证码字符
	private $image; // 验证码资源画布

	/**
	 * 构造方法初始化成员变量
	 *
	 * @param int $width
	 *        	验证码图片宽度,默认80px
	 * @param int $height
	 *        	验证码图片高度,默认20px
	 * @param int $codeNum
	 *        	验证码中字母和数字的个数,默认4个
	 */
	function __construct($width = 100, $height = 30, $codeNum = 4) {
		$this->width = $width;
		$this->height = $height;
		$this->codeNum = $codeNum;
		$number = floor ( $height * $width / 15 );
		if ($number > 240 - $codeNum) {
			$this->disturbColorNum = 240 - $codeNum;
		} else {
			$this->disturbColorNum = $number;
		}
		$this->checkCokde = $this->createCheckCode ();
	}

	/**
	 * 输出验证码图片,向服务器保存了验证码,使用echo直接输出验证码图片
	 */
	function __toString() {
		/* 验证码存储到SESSION */
		$_SESSION ['code'] = strtoupper ( $this->checkCokde );
		$this->outImage ();
		return '';
	}

	/**
	 * 输出图像
	 */
	private function outImage() {
		$this->getCreateImage ();
		$this->setDisturbColor ();
		$this->outputText ();
		$this->outputImage ();
	}

	/**
	 * 创建图像资源,初始化图像背景
	 */
    private function getCreateImage() {
		$this->image = imagecreatetruecolor ( $this->width, $this->height ); // 创建画布资源
		$backColor = imagecolorallocate ( $this->image, rand ( 225, 255 ), rand ( 225, 255 ), rand ( 225, 255 ) ); // 设置画布背景色
		@imagefill ( $this->image, 0, 0, $backColor ); // 填充画布背景
		$border = imagecolorallocate ( $this->image, 0, 0, 0 ); // 画布边框
		imagerectangle ( $this->image, 0, 0, $this->width - 1, $this->height - 1, $border ); // 绘制画布边框
	}

	/**
	 * 随机生成指定个数的字符串,去掉容易混淆的字符oOLlz和数字012
	 */
	private function createCheckCode() {
		$code = "3456789abcdefghijkmnpqrstuvwxyABCDEFGHIJKMNPQRSTUVWXY"; // 随机字符原字符串
		$ascii = '';
		for($i = 0; $i < $this->codeNum; $i ++) {
			$char = $code {rand ( 0, strlen ( $code ) - 1 )};
			$ascii .= $char;
		}
		return $ascii;
	}

	/**
	 * 设置干扰像素,向图像中输出不同颜色的点
	 */
	private function setDisturbColor() {
		for($i = 0; $i <= $this->disturbColorNum; $i ++) {
			$color = imagecolorallocate ( $this->image, rand ( 0, 255 ), rand ( 0, 255 ), rand ( 0, 255 ) ); // 干扰色
			imagesetpixel ( $this->image, rand ( 1, $this->width - 2 ), rand ( 1, $this->height - 2 ), $color ); // 随机绘制点
		}
		for($i = 0; $i < 10; $i ++) {
			$color = imagecolorallocate ( $this->image, rand ( 0, 255 ), rand ( 0, 255 ), rand ( 0, 255 ) ); // 干扰色
			imagearc ( $this->image, rand ( - 10, $this->width ), rand ( - 10, $this->height ), rand ( 30, 300 ), rand ( 20, 200 ), 55, 44, $color ); // 随机绘制曲线
		}
	}

	/**
	 * 随机颜色、随机摆放、随机字符串向图像中输出
	 */
	private function outputText() {
		for($i = 0; $i < $this->codeNum; $i ++) {
			$fontColor = imagecolorallocate ( $this->image, rand ( 0, 128 ), rand ( 0, 128 ), rand ( 0, 128 ) ); // 设置文本颜色
			//$fontSize = rand ( 4, 5 );
 			//$x = floor ( $this->width / $this->codeNum ) * $i + 3; // 每个字符x坐标
 			//$y = rand ( 0, $this->height - imagefontheight ( $fontSize ) ); // 每个字符y坐标
			//imagechar ( $this->image, $fontSize, $x, $y, $this->checkCokde {$i}, $fontColor );
			$x = floor ( $this->width / $this->codeNum ) * $i + 3; // 每个字符x坐标
			$y = rand ( $this->height-10, $this->height); // 每个字符y坐标
			$font = '../MSYH.TTF';
			imagettftext($this->image, 18, 0, $x, $y, $fontColor, $font, $this->checkCokde{$i});
		}
	}

	/**
	 * 自动检测GD支持的图像类型,生成图像
	 */
	private function outputImage() {
		if (imagetypes () & IMG_PNG) {
			header ( 'Content-type:image/png' );
			imagepng ( $this->image );
		} elseif (imagetypes () & IMG_JPG) {
			header ( 'Content-type:image/jpeg' );
			imagejpeg ( $this->image, "", 0.5 );
		} elseif (imagetypes () & IMG_GIF) {
			header ( 'Content-type:image/gif' );
			imagegif ( $this->image );
		} elseif (imagetypes () & IMG_WBMP) {
			header ( 'Content-type:image/vnd.wap.wbmp' );
			imagewbmp ( $this->image );
		} else {
			die ( "PHP不支持图像创建!" );
		}
	}

	/**
	 * 析构方法,销毁图像资源
	 */
	function __destruct() {
		imagedestroy ( $this->image );
	}
}
输出验证码:
<?php
/**输出验证码图片*/
session_start();
require_once 'vcode.class.php';
echo new Vcode();
登陆页面测试:
<?php
session_start();
if(isset($_POST['submit'])){
	if(strtoupper(trim($_POST['code']))==$_SESSION['code']){
		echo "验证码输入正确<br>";
	}else{
		echo "验证码输入错误!<br>";
	}
}

?>

<html>
<head>
<title>登陆页面</title>
<script type="text/javascript">

function newcode(obj,url){
	obj.src=url+'?nowtime='+new Date().getTime();
}

</script>
</head>

<body>

	<form action="login.php" method="post">
		<p>
			验证码:<input type="text" name="code" /> <img alt="看不清,换一张!"
				src="imagecode.php" style="cursor: pointer;"
				onclick="javascript:newcode(this,this.src);">
		</p>

		<p>
			<input type="submit" name="submit" value="提交">
		</p>

	</form>

</body>
</html>
PHP图片处理
图片背景管理
除了使用imagecreate()和imageCreateTrueColor()两个函数去创建画布资源,如果需要对已有的图像进行处理,可以直接打开图像。由文件或 URL 创建一个新图象的函数有:
- resource imagecreatefromjpeg ( string $filename )
- resource imagecreatefrompng ( string $filename )
- resource imagecreatefromgif ( string $filename )
当然,由以上函数打开的图片,可以保存为其他格式图片。
一般来说,打开是哪种格式的图片,就保存对应图片格式。但是图像作为资源,在保存的时候,需要知道他之前是何种类型的图片,以及图片大小,所以需要了解另一个函数:
array getimagesize ( string $filename [, array &$imageinfo ] )
函数说明:测定图像文件的大小并返回图像的尺寸以及文件类型和一个可以用于普通 HTML 文件中 IMG 标记中的 height/width 文本字符串。PHP7中增加了bits、channels、mime三项关联索引信息,分别表示图片位数、通道数和MIME类型。
返回一个具有四个单元的数组。索引 0 包含图像宽度的像素值,索引 1 包含图像高度的像素值。索引 2 是图像类型的标记:1 = GIF,2 = JPG,3 = PNG,4 = SWF,5 = PSD,6 = BMP,7 = TIFF(intel byte order),8 = TIFF(motorola byte order),9 = JPC,10 = JP2,11 = JPX,12 = JB2,13 = SWC,14 = IFF,15 = WBMP,16 = XBM。内容为"height="yyy" width="xxx"",可直接用于 IMG 标记。
示例代码:D15GetImagesize.php
<?php
list($width,$height,$type,$attr)=getimagesize("flower.jpg");
echo '<img src="flower.jpg"'.$attr.'>';
添加水印示例代码:D16ImageAddString.php
<?php
/**
向不同格式的图片中间画一个字符串(也是文字水印)
@param string $filename 图片的名称字符串,如果不是当前目录下的图片,请指明路径
@param string $string 水印文字字符串,如果使用中文请使用utf-8字符串
*/
function image($filename, $string) {
/* 获取图片的属性, 第一个宽度, 第二个高度, 类型1=>gif, 2=>jpeg, 3=>png */
list ( $width, $height, $type ) = getimagesize ( $filename );
/* 可以处理的图片类型 */
$types = array (
1 => "gif",
2 => "jpeg",
3 => "png"
);
/* 通过图片类型去组合,可以创建对应图片格式的,创建图片资源的GD库函数 */
$createfrom = "imagecreatefrom" . $types [$type];
/*
* 通过“变量函数”去打对应的函数去创建图片的资源
* resource imagecreatefromjpeg ( string $filename )
* resource imagecreatefrompng ( string $filename )
* resource imagecreatefromgif ( string $filename )
*/
$image = $createfrom ( $filename );
/**
* 根据文件类型转换字符串编码:本例在本文件输出,本文件为utf-8,所以不需要转换
*/
$text = iconv ( "UTF-8", "UTF-8", $string );
$fontsize = 18;
/* 设置水印的X轴作标位置---居中 */
$x = ($width - $fontsize * 0.7 * strlen ( $text )) / 2;
/* 设置水印的X轴作标位置---居下 */
$y = $height - $fontsize - 5;
/* 设置字体的颜色为红色 */
$fontcolor = imagecolorallocate ( $image, 255, 0, 0 );
/* 向图片上画一个指定的字符串 */
$font = 'MSYH.TTF';
imagettftext ( $image, $fontsize, 0, $x, $y, $fontcolor, $font, $text );
$output = "image" . $types [$type];
/*
* 通过变量函数去保存对应格式的图片
* 例如函数:
* imamgepng()
* imagegif()...
*/
$output ( $image, $filename );
/* 销毁图像资源 */
imagedestroy ( $image );
}
image ( "images/test.gif", "向图片添加水印" ); // 向flower.jpg格式为jpeg的图片中央画一个字符串JPEG
image ( "images/test.png", "向图片添加水印" );
image ( "images/test.jpg", "向图片添加水印" );
图片缩放
网站在优化的过程,以及实现图片分级读取,需要用到图片的缩放。PHP提供了两个函数实现图片的缩放:
bool imagecopyresized ( resource $dst_image , resource $src_image , int $dst_x , int $dst_y , int $src_x , int $src_y , int $dst_w , int $dst_h , int $src_w , int $src_h )
函数说明:将一幅图像中的一块矩形区域拷贝到另一个图像中。dst_image 和 src_image 分别是目标图像和源图像的标识符。处理后的图像质量低,不推荐使用。
bool imagecopyresampled ( resource $dst_image , resource $src_image , int $dst_x , int $dst_y , int $src_x , int $src_y , int $dst_w , int $dst_h , int $src_w , int $src_h )
函数说明:将一幅图像中的一块正方形区域拷贝到另一个图像中,平滑地插入像素值,因此,尤其是,减小了图像的大小而仍然保持了极大的清晰度。推荐使用。
示例代码:D17ImageThumb.php
<?php
/**
 用于对图片进行缩放
 @param	string	$filename	图片的URL
 @width	int		$width		设置图片缩放的最大宽度
 @height	int		$height		设置图片缩放的最大高度
 */
function thumb($filename, $width = 200, $height = 200) {
	/* 获取原图像$filename的宽度$width_orig和高度$hteight_orig */
	list ( $width_orig, $height_orig ) = getimagesize ( $filename );

	/* 根据参数$width和$height值,换算出等比例缩放的高度和宽度 */
	if ($width && ($width_orig < $height_orig)) {
		$width = ($height / $height_orig) * $width_orig;
	} else {
		$height = ($width / $width_orig) * $height_orig;
	}

	/* 将原图缩放到这个新创建的图片资源中 */
	$image_p = imagecreatetruecolor ( $width, $height );
	/* 获取原图的图像资源 */
	$image = imagecreatefromjpeg ( $filename );

	/* 使用imagecopyresampled()函数进行缩放设置 */
	imagecopyresampled ( $image_p, $image, 0, 0, 0, 0, $width, $height, $width_orig, $height_orig );

	/* 将缩放后的图片$image_p保存, 100(最佳质量,文件最大) */
	imagejpeg ( $image_p, $filename, 100 );

	imagedestroy ( $image_p ); // 销毁图片资源$image_p
	imagedestroy ( $image ); // 销毁图片资源$image
}

thumb ( "images/flower.jpg", 100, 100 );  		//将brophp.jpg图片缩放成100x100的小图
/* thumb("images/flower.jpg", 200,2000);  	//如果按一边进行等比例缩放,只需要将另一边给个无限大的值 */
图片裁剪
图片裁剪也是使用函数:
bool imagecopyresampled ( resource $dst_image , resource $src_image , int $dst_x , int $dst_y , int $src_x , int $src_y , int $dst_w , int $dst_h , int $src_w , int $src_h )
示例代码:D18ImageCut.php
<?php
/**
 在一个大的背景图片中剪裁出指定区域的图片,以jpeg图片格式为例
 @param	string	$filename	需要剪切的背景图片
 @param	int	$x		剪切图片左边开始的位置
 @param	int	$y		剪切图片顶部开始的位置
 @param	int	$width	图片剪裁的宽度
 @param	int	$height	图片剪裁的高度
 */
function cut($filename, $x, $y, $width, $height){
	/* 创建背景图片的资源 */
	$back = imagecreatefromjpeg($filename);
	/* 创建一个可以保存裁剪后图片的资源 */
	$cutimg = imagecreatetruecolor($width, $height);

	/* 使用imagecopyresampled()函数对图片进行裁剪 */
	imagecopyresampled($cutimg, $back, 0, 0, $x, $y, $width, $height, $width, $height);

	/* 保存裁剪后的图片,如果不想覆盖原图片,可以为裁剪后的图片加上前缀 */
	imagejpeg($cutimg, $filename);

	imagedestroy($cutimg);      		//销毁图像资源$cutimg
	imagedestroy($back);        		//销毁图像资源$back
}

/* 调用cut()函数去裁剪brophp.jpg图片,从50,50开始裁出宽度和高度都为200像素的图片 */
cut("images/tree.jpg", 50, 50, 200, 200);
添加图片水印
添加图片水印使用imagecopy()函数,语法格式:
bool imagecopy ( resource $dst_im , resource $src_im , int $dst_x , int $dst_y , int $src_x , int $src_y , int $src_w , int $src_h )
函数说明:将 src_im 图像中坐标从 src_x,src_y 开始,宽度为 src_w,高度为 src_h 的一部分拷贝到 dst_im 图像中坐标为 dst_x 和 dst_y 的位置上。
示例代码:D19Imagecopy.php
<?php
/**
 为背景图片添加图片水印(位置随机),背景图片格式为jpeg, 水印图片格式为gif
 @param	string	$filename	需要添加水印的背景图片
 @param	string	$water		水印图片
 */
function watermark($filename, $water) {
	/* 获取背景图片的宽度和高度 */
	list ( $b_w, $b_h ) = getimagesize ( $filename );

	/* 获取水印图片的宽度和高度 */
	list ( $w_w, $w_h ) = getimagesize ( $water );

	/* 在背景图片中放水印图片的随机起始位置 */
// 	$posX = rand ( 0, ($b_w - $w_w) );
// 	$posY = rand ( 0, ($b_h - $w_h) );

	$posX = $b_w - $w_w-30;
	$posY = $b_h - $w_h-20;


	$back = imagecreatefromjpeg ( $filename ); // 创建背景图片的资源
	$water = imagecreatefrompng ( $water ); // 创建水印图片的资源

	/* 使用imagecopy()函数将水印图片复制到背景图片指定的位置中 */
	imagecopy ( $back, $water, $posX, $posY, 0, 0, $w_w, $w_h );

	/* 保存带有水印图片的背景图片 */
	imagejpeg ( $back, $filename );

	imagedestroy ( $back ); // 销毁背京图片资源$back
	imagedestroy ( $water ); // 销毁水印图片资源$water
}

/* 调用watermark()函数,为背景JPEG格式的图片brophp.jpg,添加GIF格式的水印图片logo.gif */
watermark ( "images/view.jpg", "images/logo.png" );
图片旋转和翻转
图片旋转采用GD提供的imagerotate()函数,语法格式:
resource imagerotate ( resource $image , float $angle , int $bgd_color [, int $ignore_transparent = 0 ] )
函数说明:将 src_im 图像用给定的 angle 角度旋转。bgd_color 指定了旋转后没有覆盖到的部分的颜色。
旋转的中心是图像的中心,旋转后的图像会按比例缩小以适合目标图像的大小——边缘不会被剪去。
示例代码:D20ImageRotate.php
<?php
/**
 用给定角度旋转图像,以jpeg图处格式为例
 @param	string	$filename	要旋转的图片名称
 @param	int		$degrees	指定旋转的角度
 */
function rotate($filename, $degrees) {
	/* 创建图像资源,以png格式为例 */
	$source = imagecreatefrompng ( $filename );
	/* 使用imagerotate()函数按指定的角度旋转 */
	$rotate = imagerotate ( $source, $degrees, 0 );
	/* 将旋转后的图片保存 */
	imagejpeg ( $rotate, $filename );
}

/* 将把一幅图像brophp.jpg旋转 180 度,即上下颠倒 */
rotate ( "logo1.png", 180 );
图片翻转的概念是不能按照任意角度,而只能沿着x和y方向水平或垂直翻转,就是将原图沿着x或者y方向上下或者左右对调图像元素。
都是采用imagecopy函数实现。
Y轴翻转示例代码:D21Trun_y.php
<?php
/**图片沿Y轴翻转,以jpeg格式为例
 * @param	string	$filename	图片名称
 */
function trun_y($filename) {
	/* 创建图片背景资源,以jpeg格式为例 */
	$back = imagecreatefromjpeg ( $filename );

	$width = imagesx ( $back ); // 获取图片的宽度
	$height = imagesy ( $back ); // 获取图片的高度

	/* 创建一个新的图片资源,用来保存沿Y轴翻转后的图片 */
	$new = imagecreatetruecolor ( $width, $height );
	/* 沿Y轴翻转就是将原图从右向左按一个像素宽度向新资中逐个复制 */
	for($x = 0; $x < $width; $x ++) {
		/* 逐条复制图片本身高度,1个像素宽度的图片到新资源中 */
		imagecopy ( $new, $back, $width - $x - 1, 0, $x, 0, 1, $height );
	}

	/* 保存翻转后的图片资源 */
	imagejpeg ( $new, $filename );

	imagedestroy ( $back ); // 销毁原背景图像资源
	imagedestroy ( $new ); // 销毁新的图片资源
}

/* 图片沿Y轴翻转 */
trun_y ( "women.jpg" );
X轴翻转示例代码:D22Trun_x.php
<?php
/**
 图片沿X轴翻转,以jpeg格式为例
 @param	string	$filename	图片名称
 */
function trun_x($filename) {
	/* 创建图片背景资源,以jpeg格式为例 */
	$back = imagecreatefromjpeg ( $filename );

	$width = imagesx ( $back ); // 获取图片的宽度
	$height = imagesy ( $back ); // 获取图片的高度

	/* 创建一个新的图片资源,用来保存沿X轴翻转后的图片 */
	$new = imagecreatetruecolor ( $width, $height );

	/* 沿x轴翻转就是将原图从上向下按一个像素高度向新资中逐个复制 */
	for($y = 0; $y < $height; $y ++) {
		/* 逐条复制图片本身宽度,1个像素高度的图片到新资源中 */
		imagecopy ( $new, $back, 0, $height - $y - 1, 0, $y, $width, 1 );
	}

	/* 保存翻转后的图片资源 */
	imagejpeg ( $new, $filename );

	imagedestroy ( $back ); // 销毁原背景图像资源
	imagedestroy ( $new ); // 销毁新的图片资源
}

/* 将图片brophp.jpg沿x轴翻转 */
trun_x ( "women.jpg" );
设计图像图处理类
- 示例代码:D23ImgConvet
<?php
	/**
		file: image.class.php 类名为Image
		图像处理类,可以完成对各种类型的图像进行缩放、加图片水印和剪裁的操作。
	*/
	class Image {
		/* 图片保存的路径 */
		private $path;

		/**
		 * 实例图像对象时传递图像的一个路径,默认值是当前目录
		 * @param	string	$path	可以指定处理图片的路径
		 */
		function __construct($path="./"){
			$this->path = rtrim($path,"/")."/";
		}

		/**
		 * 对指定的图像进行缩放
		 * @param	string	$name	是需要处理的图片名称
		 * @param	int	$width		缩放后的宽度
		 * @param	int	$height		缩放后的高度
		 * @param	string	$qz		是新图片的前缀
		 * @return	mixed			是缩放后的图片名称,失败返回false;
		 */
		function thumb($name, $width, $height,$qz="th_"){
			/* 获取图片宽度、高度、及类型信息 */
			$imgInfo = $this->getInfo($name);
			/* 获取背景图片的资源  */
			$srcImg = $this->getImg($name, $imgInfo);
			/* 获取新图片尺寸 */
			$size = $this->getNewSize($name,$width, $height,$imgInfo);
			/* 获取新的图片资源 */
			$newImg = $this->kidOfImage($srcImg, $size,$imgInfo);
			/* 通过本类的私有方法,保存缩略图并返回新缩略图的名称,以"th_"为前缀 */
			return $this->createNewImage($newImg, $qz.$name,$imgInfo);
		}

		/**
		* 为图片添加水印
		* @param	string	$groundName	背景图片,即需要加水印的图片,暂只支持GIF,JPG,PNG格式
		* @param	string	$waterName	图片水印,即作为水印的图片,暂只支持GIF,JPG,PNG格式
		* @param	int	$waterPos		水印位置,有10种状态,0为随机位置;
		* 								1为顶端居左,2为顶端居中,3为顶端居右;
		* 								4为中部居左,5为中部居中,6为中部居右;
		*								7为底端居左,8为底端居中,9为底端居右;
		* @param	string	$qz			加水印后的图片的文件名在原文件名前面加上这个前缀
		* @return	mixed				是生成水印后的图片名称,失败返回false
		*/
		function waterMark($groundName, $waterName, $waterPos=0, $qz="wa_"){
			/*获取水印图片是当前路径,还是指定了路径*/
			$curpath = rtrim($this->path,"/")."/";
			$dir = dirname($waterName);
			if($dir == "."){
				$wpath = $curpath;
			}else{
				$wpath = $dir."/";
				$waterName = basename($waterName);
			}

			/*水印图片和背景图片必须都要存在*/
			if(file_exists($curpath.$groundName) && file_exists($wpath.$waterName)){
				$groundInfo = $this->getInfo($groundName);         		 //获取背景信息
				$waterInfo = $this->getInfo($waterName, $dir);    		 //获取水印图片信息
				/*如果背景比水印图片还小,就会被水印全部盖住*/
				if(!$pos = $this->position($groundInfo, $waterInfo, $waterPos)){
					echo '水印不应该比背景图片小!';
					return false;
				}

				$groundImg = $this->getImg($groundName, $groundInfo);    //获取背景图像资源
				$waterImg = $this->getImg($waterName, $waterInfo, $dir); //获取水印图片资源

				/* 调用私有方法将水印图像按指定位置复制到背景图片中 */
				$groundImg = $this->copyImage($groundImg, $waterImg, $pos, $waterInfo);
				/* 通过本类的私有方法,保存加水图片并返回新图片的名称,默认以"wa_"为前缀 */
				return $this->createNewImage($groundImg, $qz.$groundName, $groundInfo);

			}else{
				echo '图片或水印图片不存在!';
				return false;
			}
		}

		/**
		* 在一个大的背景图片中剪裁出指定区域的图片
		* @param	string	$name	需要剪切的背景图片
		* @param	int	$x			剪切图片左边开始的位置
		* @param	int	$y			剪切图片顶部开始的位置
		* @param	int	$width		图片剪裁的宽度
		* @param	int	$height		图片剪裁的高度
		* @param	string	$qz		新图片的名称前缀
		* @return	mixed			裁剪后的图片名称,失败返回false;
		*/
		function cut($name, $x, $y, $width, $height, $qz="cu_"){
			$imgInfo=$this->getInfo($name);                 //获取图片信息
			/* 裁剪的位置不能超出背景图片范围 */
			if( (($x+$width) > $imgInfo['width']) || (($y+$height) > $imgInfo['height'])){
				echo "裁剪的位置超出了背景图片范围!";
				return false;
			}

			$back = $this->getImg($name, $imgInfo);         //获取图片资源
			/* 创建一个可以保存裁剪后图片的资源 */
			$cutimg = imagecreatetruecolor($width, $height);
			/* 使用imagecopyresampled()函数对图片进行裁剪 */
			imagecopyresampled($cutimg, $back, 0, 0, $x, $y, $width, $height, $width, $height);
			imagedestroy($back);
			/* 通过本类的私有方法,保存剪切图并返回新图片的名称,默认以"cu_"为前缀 */
			return $this->createNewImage($cutimg, $qz.$name,$imgInfo);
		}

		/* 内部使用的私有方法,用来确定水印图片的位置 */
		private function position($groundInfo, $waterInfo, $waterPos){
			/* 需要加水印的图片的长度或宽度比水印还小,无法生成水印 */
			if( ($groundInfo["width"]<$waterInfo["width"]) || ($groundInfo["height"]<$waterInfo["height"]) ) {
				return false;
			}
			switch($waterPos) {
				case 1:			//1为顶端居左
					$posX = 0;
					$posY = 0;
					break;
				case 2:			//2为顶端居中
					$posX = ($groundInfo["width"] - $waterInfo["width"]) / 2;
					$posY = 0;
					break;
				case 3:			//3为顶端居右
					$posX = $groundInfo["width"] - $waterInfo["width"];
					$posY = 0;
					break;
				case 4:			//4为中部居左
					$posX = 0;
					$posY = ($groundInfo["height"] - $waterInfo["height"]) / 2;
					break;
				case 5:			//5为中部居中
					$posX = ($groundInfo["width"] - $waterInfo["width"]) / 2;
					$posY = ($groundInfo["height"] - $waterInfo["height"]) / 2;
					break;
				case 6:			//6为中部居右
					$posX = $groundInfo["width"] - $waterInfo["width"];
					$posY = ($groundInfo["height"] - $waterInfo["height"]) / 2;
					break;
				case 7:			//7为底端居左
					$posX = 0;
					$posY = $groundInfo["height"] - $waterInfo["height"];
					break;
				case 8:			//8为底端居中
					$posX = ($groundInfo["width"] - $waterInfo["width"]) / 2;
					$posY = $groundInfo["height"] - $waterInfo["height"];
					break;
				case 9:			//9为底端居右
					$posX = $groundInfo["width"] - $waterInfo["width"];
					$posY = $groundInfo["height"] - $waterInfo["height"];
					break;
				case 0:
				default:		//随机
					$posX = rand(0,($groundInfo["width"] - $waterInfo["width"]));
					$posY = rand(0,($groundInfo["height"] - $waterInfo["height"]));
					break;
			}
			return array("posX"=>$posX, "posY"=>$posY);
		}


		/* 内部使用的私有方法,用于获取图片的属性信息(宽度、高度和类型) */
		private function getInfo($name, $path=".") {
			$spath = $path=="." ? rtrim($this->path,"/")."/" : $path.'/';

			$data = getimagesize($spath.$name);
			$imgInfo["width"]	= $data[0];
			$imgInfo["height"]  = $data[1];
			$imgInfo["type"]	= $data[2];

			return $imgInfo;
		}

		/*内部使用的私有方法, 用于创建支持各种图片格式(jpg,gif,png三种)资源  */
		private function getImg($name, $imgInfo, $path='.'){

			$spath = $path=="." ? rtrim($this->path,"/")."/" : $path.'/';
			$srcPic = $spath.$name;

			switch ($imgInfo["type"]) {
				case 1:					//gif
					$img = imagecreatefromgif($srcPic);
					break;
				case 2:					//jpg
					$img = imagecreatefromjpeg($srcPic);
					break;
				case 3:					//png
					$img = imagecreatefrompng($srcPic);
					break;
				default:
					return false;
					break;
			}
			return $img;
		}

		/* 内部使用的私有方法,返回等比例缩放的图片宽度和高度,如果原图比缩放后的还小保持不变 */
		private function getNewSize($name, $width, $height, $imgInfo){
			$size["width"] = $imgInfo["width"];          //原图片的宽度
			$size["height"] = $imgInfo["height"];        //原图片的高度

			if($width < $imgInfo["width"]){
				$size["width"]=$width;             		 //缩放的宽度如果比原图小才重新设置宽度
			}

			if($height < $imgInfo["height"]){
				$size["height"] = $height;            	 //缩放的高度如果比原图小才重新设置高度
			}
			/* 等比例缩放的算法 */
			if($imgInfo["width"]*$size["width"] > $imgInfo["height"] * $size["height"]){
				$size["height"] = round($imgInfo["height"]*$size["width"]/$imgInfo["width"]);
			}else{
				$size["width"] = round($imgInfo["width"]*$size["height"]/$imgInfo["height"]);
			}

			return $size;
		}

		/* 内部使用的私有方法,用于保存图像,并保留原有图片格式 */
		private function createNewImage($newImg, $newName, $imgInfo){
			$this->path = rtrim($this->path,"/")."/";
			switch ($imgInfo["type"]) {
		   		case 1:				//gif
					$result = imageGIF($newImg, $this->path.$newName);
					break;
				case 2:				//jpg
					$result = imageJPEG($newImg,$this->path.$newName);
					break;
				case 3:				//png
					$result = imagePng($newImg, $this->path.$newName);
					break;
			}
			imagedestroy($newImg);
			return $newName;
		}

		/* 内部使用的私有方法,用于加水印时复制图像 */
		private function copyImage($groundImg, $waterImg, $pos, $waterInfo){
			imagecopy($groundImg, $waterImg, $pos["posX"], $pos["posY"], 0, 0, $waterInfo["width"],$waterInfo["height"]);
			imagedestroy($waterImg);
			return $groundImg;
		}

		/* 内部使用的私有方法,处理带有透明度的图片保持原样 */
		private function kidOfImage($srcImg, $size, $imgInfo){
			$newImg = imagecreatetruecolor($size["width"], $size["height"]);
			$otsc = imagecolortransparent($srcImg);
			if( $otsc >= 0 && $otsc < imagecolorstotal($srcImg)) {
		  		 $transparentcolor = imagecolorsforindex( $srcImg, $otsc );
		 		 $newtransparentcolor = imagecolorallocate(
			   		 $newImg,
			  		 $transparentcolor['red'],
			   	         $transparentcolor['green'],
			   		 $transparentcolor['blue']
		  		 );
		  		 imagefill( $newImg, 0, 0, $newtransparentcolor );
		  		 imagecolortransparent( $newImg, $newtransparentcolor );
			}
			imagecopyresized( $newImg, $srcImg, 0, 0, 0, 0, $size["width"], $size["height"], $imgInfo["width"], $imgInfo["height"] );
			imagedestroy($srcImg);
			return $newImg;
		}
	}
- 测试代码1:
<?php
	/* 加载图像处理类所在的文件 */
	include "image.class.php";
	/* 实例化图像处理类对象,通过构造方法的参数指定图片所在路径 */
	$img = new Image('./image/');

	/* 将上传到服务器的大图控制在500X500以内,最后一个参数使用了'',将原来图片覆盖 */
	$filename = $img -> thumb("brophp.jpg", 500, 500, '');

	/* 另存为一张250X250的中图,返回的图片名称会默认加上th_前缀 */
	$midname = $img -> thumb($filename, 250,250);
	/* 另存为一张80X80的小图标,返回的图片名称前使用指定的icon_作为前缀 */
	$icon = $img -> thumb($filename, 80, 80, 'icon_');

	echo $filename.'<br>';     //缩放成功输出brophp.jpg
	echo $midname.'<br>';      //缩放成功输出th_brophp.jpg
	echo $icon.'<br>';         //缩放成功输出icon_brophp.jpg
- 测试代码2:
<?php
	/* 加载图像处理类所在的文件 */
	include "image.class.php";
	/* 实例化图像处理类对象,没有通过参数指定图片所在路径,所以默认为当前路径 */
	$img = new Image();

	/* 为图片brophp.jpg,添加一个imge目录下的logo.gif图片水印 ,第三个参数使用1,水印位置顶部居左*/
	echo $img -> watermark('brophp.jpg', './image/logo.gif', 1, 'wa1_');  //输出wa1_brophp.jpg
	echo $img -> watermark('brophp.jpg', './image/logo.gif', 2, 'wa2_');  //输出wa2_brophp.jpg
	echo $img -> watermark('brophp.jpg', './image/logo.gif', 3, 'wa3_');  //输出wa3_brophp.jpg
	echo $img -> watermark('brophp.jpg', './image/logo.gif', 4, 'wa4_');  //输出wa4_brophp.jpg
	echo $img -> watermark('brophp.jpg', './image/logo.gif', 5, 'wa5_');  //输出wa5_brophp.jpg
	echo $img -> watermark('brophp.jpg', './image/logo.gif', 6, 'wa6_');  //输出wa6_brophp.jpg
	echo $img -> watermark('brophp.jpg', './image/logo.gif', 7, 'wa7_');  //输出wa7_brophp.jpg
	echo $img -> watermark('brophp.jpg', './image/logo.gif', 8, 'wa8_');  //输出wa8_brophp.jpg
	echo $img -> watermark('brophp.jpg', './image/logo.gif', 9, 'wa9_');  //输出wa9_brophp.jpg

	/* 没有指定第四个参数(名称前缀),使用默认的名称前缀"wa_" */
	echo $img -> watermark('brophp.jpg', './image/logo.gif', 0);          //输出wa_brophp.jpg
	/* 第四个参数(名称前缀)设置空(''),就会将原来brophp.jpg图片覆盖掉 */
	echo $img -> watermark('brophp.jpg', './image/logo.gif', 0,'');       //输出brophp.jpg
	/* 第二个参数如果没有指定路径,则logo.gif图片和brophp.jpg图片在同一个目录下 */
	echo $img -> watermark('brophp.jpg', 'logo.gif', 0, 'wa0_');          //输出wa0_brophp.jpg
- 测试代码3:
<?php
	/* 加载图像处理类所在的文件 */
	include "image.class.php";
	/* 实例化图像处理类对象,通过构造方法的参数指定图片所在路径 */
	$img = new Image('./image/');

	/* 在图片brophp.jpg中,从50X50开始,裁剪出120X120的图片,返回带默认前缀“cu_”的图片名称 */
	$img -> cut("t.jpg", 50, 50, 120,120);               //cu_t.jpg
	/* 可以通过第6个参数,为裁剪出来的图片指定名称前缀,实现同一张背景图片中裁剪出多张图片 */
	$img -> cut("t.jpg", 50, 50, 120,120, 'user_');      //user_t.jpg
	/* 如果第6个参数设置为'', 则是使用裁剪出来的图片将原图覆盖掉 */
	$img -> cut("t.jpg", 50, 50, 120,120, '');           //t.jpg