实验环境
CentOS 6.9
MySQL 5.7.18
Keepalived v1.2.13
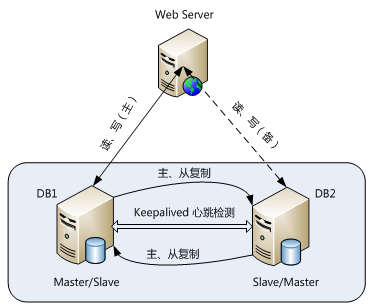
拓扑图
10.180.2.161 M1
10.180.2.162 M2
10.180.2.200 VIP
环境准备
关闭SELINUX
[root@M1 keepalived]# setenforce 0
setenforce: SELinux is disabled , 并修改/etc/sysconfig/selinux 下的SELINUX=disabled
关闭IPTABLES
[root@M1 keepalived]# service iptables stop
[root@M1 keepalived]# chkconfig --del iptables
安装Mysql 软件包,请详见之前的笔记
搭建主从结构
两台节点的server-id 必须不同,这里我设置M1 为13306,M2 未23306
开启GTID 模式,并更新自己的binlog
gtid-mode=on
enforce-gtid-consistency=1
log_slave_updates = 1
M1创建测试库,并导入到M2
root@localhost:mysql3306.sock [(none)]>select * from testha.t1;
+----+------+
| id | c1 |
+----+------+
| 1 | a1 |
| 2 | a2 |
| 3 | a3 |
| 4 | a4 |
+----+------+
4 rows in set (0.00 sec)
M1 :mysqldump --single-transaction --master-data=2 --databases=testha -uroot -p123456 -S /data/mysql3306.sock > /tmp/testha.sql
M2 :mysql -uroot -p -S /data/mysql3306.sock < testha.sql
创建复制账号,复制配置
两个节点 : create user repl@'%' identified by '123456'; grant replication slave on *.* to repl@'%' ;
M2: change master to master_host='M1',MASTER_USER='repl',master_password='123456',master_port=3306,master_auto_position=1; /GTID 必须的设置
M2: root@localhost:mysql3306.sock [(none)]>start slave;
检查主从状态
root@localhost:mysql3306.sock [(none)]>show slave status\G
*************************** 1. row ***************************
Slave_IO_State: Waiting for master to send event
Master_Host: M1
Master_User: repl
Master_Port: 3306
Connect_Retry: 60
Master_Log_File: 3306-binlog.000007
Read_Master_Log_Pos: 870
Relay_Log_File: M2-relay-bin.000002
Relay_Log_Pos: 873
Relay_Master_Log_File: 3306-binlog.000007
Slave_IO_Running: Yes
Slave_SQL_Running: Yes
尝试在M1 insert 一行是否能同步到M2, insert into t1 values(5,'a5');
在M2 select * from t1;
root@localhost:mysql3306.sock [(none)]>select * from testha.t1;
+----+------+
| id | c1 |
+----+------+
| 1 | a1 |
| 2 | a2 |
| 3 | a3 |
| 4 | a4 |
| 5 | a5 |
因为使用GTID, 已经执行过的SQL 语句不会在M1 上面再次执行,所以在M1 可以直接change master to , 然后start slave
root@localhost:mysql3306.sock [testha]>show slave status\G
*************************** 1. row ***************************
Slave_IO_State: Waiting for master to send event
Master_Host: M2
Master_User: repl
Master_Port: 3306
Connect_Retry: 60
Master_Log_File: 3306-binlog.000001
Read_Master_Log_Pos: 154
Relay_Log_File: M1-relay-bin.000002
Relay_Log_Pos: 371
Relay_Master_Log_File: 3306-binlog.000001
Slave_IO_Running: Yes
Slave_SQL_Running: Yes
安装Keepalived
两个节点都安装以下包
yum install keepalived
yum install MySQL-python
创建用于监控mysql 状态的用户
grant replication client on *.* to monitor@'%' identified by 'P@ssw0rd'; /在其中一个节点执行即可,因为已经互为主备
M1 M2修改 /etc/keepalived/keepalived.conf
vrrp_script vs_mysql_82 {
script "/etc/keepalived/checkMySQL.py -h 10.180.2.161 -P 3306" /用于检测mysql 心跳, IP 写自身IP
interval 60
}
vrrp_instance VI_82 {
state BACKUP
nopreempt /新加入的节点不抢占
interface eth1 /根据自身网卡
virtual_router_id 82 /同一组keepalived 必须一样,并且同一个局域网必须唯一,要不然VRRP 会冲突报错
priority 100 /建议所有节点都一样
advert_int 5
authentication {
auth_type PASS
auth_pass 1111 /不能超过8位
}
track_script {
vs_mysql_82
}
virtual_ipaddress {
10.180.2.200
}
}
编辑监控脚本
/etc/keepalived/checkMySQL.py
[root@M1 keepalived]# more checkMySQL.py
#!/usr/bin/python
#coding: utf-8
#
import sys
import os
import getopt
import MySQLdb
import logging
dbhost='10.180.2.161'
dbport=3306
dbuser='monitor'
dbpassword='Password'
def checkMySQL():
global dbhost
global dbport
global dbuser
global dbpassword
shortargs='h:P:'
opts, args=getopt.getopt(sys.argv[1:],shortargs)
for opt, value in opts:
if opt=='-h':
dbhost=value
elif opt=='-P':
dbport=value
#print "host : %s, port: %d, user: %s, password: %s" % (dbhost, int(dbport), dbuser, dbpassword)
db = instanceMySQL(dbhost, dbport, dbuser, dbpassword)
st = db.ishaveMySQL()
#if ( db.connect() != 0 ):
# return 1
#db.disconnect()
return st
class instanceMySQL:
conn = None
def __init__(self, host=None,port=None, user=None, passwd=None):
self.dbhost= host
self.dbport = int(port)
self.dbuser = user
self.dbpassword = passwd
def ishaveMySQL(self):
cmd="ps -ef | egrep -i \"mysqld\" | grep %s | egrep -iv \"mysqld_safe\" | grep -v grep | wc -l" % self.dbport
mysqldNum = os.popen(cmd).read()
cmd ="netstat -tunlp | grep \":%s\" | wc -l" % self.dbport
mysqlPortNum= os.popen(cmd).read()
#print mysqldNum, mysqlPortNum
if ( int(mysqldNum) <= 0):
print "error"
return 1
if ( int(mysqldNum) > 0 and mysqlPortNum <= 0):
return 1
return 0
def connect(self):
# print "in db conn"
# print "host : %s, port: %d, user: %s, password: %s" % (self.dbhost, self.dbport, self.dbuser, self.dbpassword)
try:
self.conn=MySQLdb.connect(host="%s"%self.dbhost, port=self.dbport,user="%s"%dbuser, passwd="%s"%self.dbpas
sword)
except Exception, e:
# print " Error"
print e
return 1
return 0
def disconnect(self):
if (self.conn):
self.conn.close()
self.conn = None
if __name__== "__main__":
st=checkMySQL()
sys.exit(st)
测试脚本是否成功
[root@M1 keepalived]# ./checkMySQL.py -h 10.180.2.261 -P 3306 如果没有返回说明正常
启动keepalived
service keepalived start
检测keepalived状态
tail -f /var/log/messages
M1:
Jul 28 10:21:19 M1 Keepalived_vrrp[15221]: Using LinkWatch kernel netlink reflector...
Jul 28 10:21:19 M1 Keepalived_vrrp[15221]: VRRP_Instance(VI_82) Entering BACKUP STATE
Jul 28 10:21:19 M1 Keepalived_vrrp[15221]: VRRP sockpool: [ifindex(2), proto(112), unicast(0), fd(10,11)]
Jul 28 10:21:19 M1 Keepalived_healthcheckers[15220]: Using LinkWatch kernel netlink reflector...
Jul 28 10:21:19 M1 Keepalived_vrrp[15221]: VRRP_Script(vs_mysql_82) succeeded
Jul 28 10:21:35 M1 Keepalived_vrrp[15221]: VRRP_Instance(VI_82) Transition to MASTER STATE
Jul 28 10:21:40 M1 Keepalived_vrrp[15221]: VRRP_Instance(VI_82) Entering MASTER STATE
Jul 28 10:21:40 M1 Keepalived_vrrp[15221]: VRRP_Instance(VI_82) setting protocol VIPs.
Jul 28 10:21:40 M1 Keepalived_vrrp[15221]: VRRP_Instance(VI_82) Sending gratuitous ARPs on eth1 for 10.180.2.200
Jul 28 10:21:40 M1 Keepalived_healthcheckers[15220]: Netlink reflector reports IP 10.180.2.200 added
Jul 28 10:21:45 M1 Keepalived_vrrp[15221]: VRRP_Instance(VI_82) Sending gratuitous ARPs on eth1 for 10.180.2.200
M2:
[root@M2 keepalived]# tail -f /var/log/messages
Jul 28 10:21:26 M2 Keepalived_vrrp[5179]: Registering gratuitous ARP shared channel
Jul 28 10:21:26 M2 Keepalived_healthcheckers[5178]: Opening file '/etc/keepalived/keepalived.conf'.
Jul 28 10:21:26 M2 Keepalived_healthcheckers[5178]: Configuration is using : 5157 Bytes
Jul 28 10:21:26 M2 Keepalived_vrrp[5179]: Opening file '/etc/keepalived/keepalived.conf'.
Jul 28 10:21:26 M2 Keepalived_vrrp[5179]: Configuration is using : 62857 Bytes
Jul 28 10:21:26 M2 Keepalived_vrrp[5179]: Using LinkWatch kernel netlink reflector...
Jul 28 10:21:26 M2 Keepalived_vrrp[5179]: VRRP_Instance(VI_82) Entering BACKUP STATE
Jul 28 10:21:26 M2 Keepalived_vrrp[5179]: VRRP sockpool: [ifindex(2), proto(112), unicast(0), fd(10,11)]
Jul 28 10:21:26 M2 Keepalived_healthcheckers[5178]: Using LinkWatch kernel netlink reflector...
Jul 28 10:21:26 M2 Keepalived_vrrp[5179]: VRRP_Script(vs_mysql_82) succeeded
至此双主KeepAlived 搭建成功。