磁盘IO优化的几个方面
优化读取
适用于大文件的直接IO
当磁盘文件超过size大小之后,使用directIO功能,避免Buffered IO模式下磁盘页缓存中的拷贝消耗
Syntax: directio size | off;  #配置文件最大后表示大于大小
Default: directio off;
Context: http, server, location


Syntax: directio_alignment size;  读取文件缓冲区
Default: directio_alignment 512;
Context: http, server, location
异步IO
普通IO:当程序发起一个系统调用去读一个文件时,程序这时会被阻塞住等待读取到文件再次执行,这是先到内核空间发起一个read请求,开始去读磁盘数据,读到高速缓存(内存)里,这时唤醒进程继续执行;写的时候是直接写到高速缓存(内存)里,之后自动同步
异步IO: 当用户发起一个读操作时,程序不会被阻塞在哪里,可以去处理其他请求

nginx指令启用异步IO
Syntax: aio on | off | threads[=pool];  # 最后这个是线程池;调应的
Default: aio off;
Context: http, server, location


Syntax: aio_write on | off;  #设置写时启用AIO;默认是关闭的;
Default: aio_write off;
Context: http, server, location
异步IO线程池的定义,默认未编译--with-threads
线程池:worker进程在处理时,有一些请求可能会发生一些阻塞,这是我们就不能接受worker进程的阻塞,而是在worker进程里定义一些线程池,由线程池里的线程处理这些可能发生系统阻塞的工作;为什么会出现这样的场景呢:因为nginx在做静态资源服务器的时候,处理了太多的文件,因为处理文件太多,会导致文件缓存的inode失效,因为内存不够大而导致的,一些操作大部分情况下会命中内存中缓存的。

定义线程池
Syntax: thread_pool name threads=number [max_queue=number];  #在静态服务的情况下使用线程池
Default: thread_pool default threads=32 max_queue=65536; # max_queue是定义队列最大长度;threads=32 线程池里线程个数
Context: main
异步IO中缓存
Syntax: output_buffers number size;
Default: output_buffers 2 32k;
Context: http, server, location
empty_gif 模块默认是编译进nginx中的
ngx_http_empty_gif_module
功能:从前端用户做用户行为分析时,由于跨域等请求,前端打点的上报数据是get请求,且考虑到浏览器接卸DOM树的性能消耗,所以请求透明图片消耗最小,而1*1的gift图片体积最小(仅43字节),故通常请求gif图片,并在请求中把用户行为信息上报服务器;Nginx可以在access日志中获取到请求参数,进而统计用户行为,但若在磁盘中读取1x1的文件有磁盘IO消耗,empty_gif模块将图片放在内存中,加速了处理速度
Syntax: empty_gif;
Default: —
Context: location
记录日志时启用压缩功能
Syntax: access_log path [format [buffer=size] [gzip[=level]] [flush=time][if=condition]];  #[buffer=缓存大小][gzip[=压缩比例可选1-9,数字越大压缩的越小,话的时间越多]] [flush=最长刷新时间]
Default: access_log logs/access.log combined;
Context: http, server, location, if in location, limit_except
error.log 日志内容输出到内存中
场景:开发环境下定位,若需要打开debug级别日志,但大量的debug日志引发性能问题不能容忍,可以将日志输出到内存中
配置语法
error_log memory:32m debug;
查看中日志方法
gdb-p[worker 进程 ID ] -ex "source nginx.gdb" --batch nginx.gdb脚本内容
set $log = ngx_cycle->log
while $log->writer != ngx_log_memory_writer
set $log = $log->next
end
set $buf = (ngx_log_memory_buf_t *) $log->wdata
dump binary memory debug_log.txt $buf->start $buf->end
syslog协议

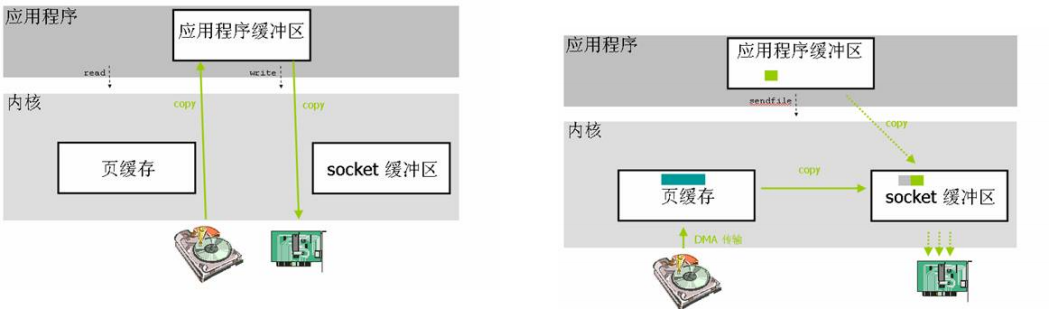
应用程序普通调用:应用程序先发起一个读请求,从磁盘读到内核再从内核读到应用程序缓存里,然后程序再把缓存里的数据写到内核的socket缓冲再进行发送
sendfile技术:程序程序只发起一个sendfile 的调用,告诉内核我要把磁盘数据从哪里开始读读取多少字节,然后把读到的数据发送到那个socket套接字上
直接IO会禁用sendfile技术
location /video/ {
sendfile on;
aio on;
directio 8m;
}
  当文件大小超过8M时,启用AIO与directio
Syntax: gzip_static on | off | always; #不管客户端是否支持压缩我都把压缩文件发给客户端always ;on是会判断客户端是否会支持压缩
Default: gzip_static off; Context: http, server, location
gunzip : 模块ngx_http_gunzip_module,通过--with-http_gunzip_module启用该模块
功能:当客户端不支持gzip压缩时,且磁盘上仅有压缩文件,则实时解压缩并将其发送给客户端
Syntax: gunzip on | off;
Default: gunzip off;
Context: http, server, location


Syntax: gunzip_buffers number size;  #打开内存缓存区
Default: gunzip_buffers 32 4k|16 8k;
Context: http, server, location
 wget https://github.com/gperftools/gperftools/releases/download/gperftools-2.7/gperftools-2.7.tar.gz
[root@python ]# tar xf gperftools-2.7.tar.gz
[root@python ]# cd gperftools-2.7/
[root@python gperftools-2.7]# ./configure
[root@python gperftools-2.7]# make && make install
查看生成库文件路径/usr/local/lib/
ll /usr/local/lib/libtcmalloc.so