论文:《Conditional Generative Adversarial Nets》
年份:2014年
引言
原始的GAN过于自由,训练会很容易失去方向,导致不稳定且效果差。比如说GAN生成MNIST数字的过程,虽然可以生成数字,但生成的结果是随机的(因为是根据输入的随机噪声生成的图片),没有办法控制模型生成的具体数字。
CGAN就是在原来的GAN模型中加入一些先验条件,使得GAN变得更加可控制。具体来说,我们可以在生成模型G和判别模型D中同时加入条件约束y来引导数据的生成过程。条件可以是任何补充的信息,如类标签等,这样我们在生成新的样本的同时,还能确切地控制新样本的类型。
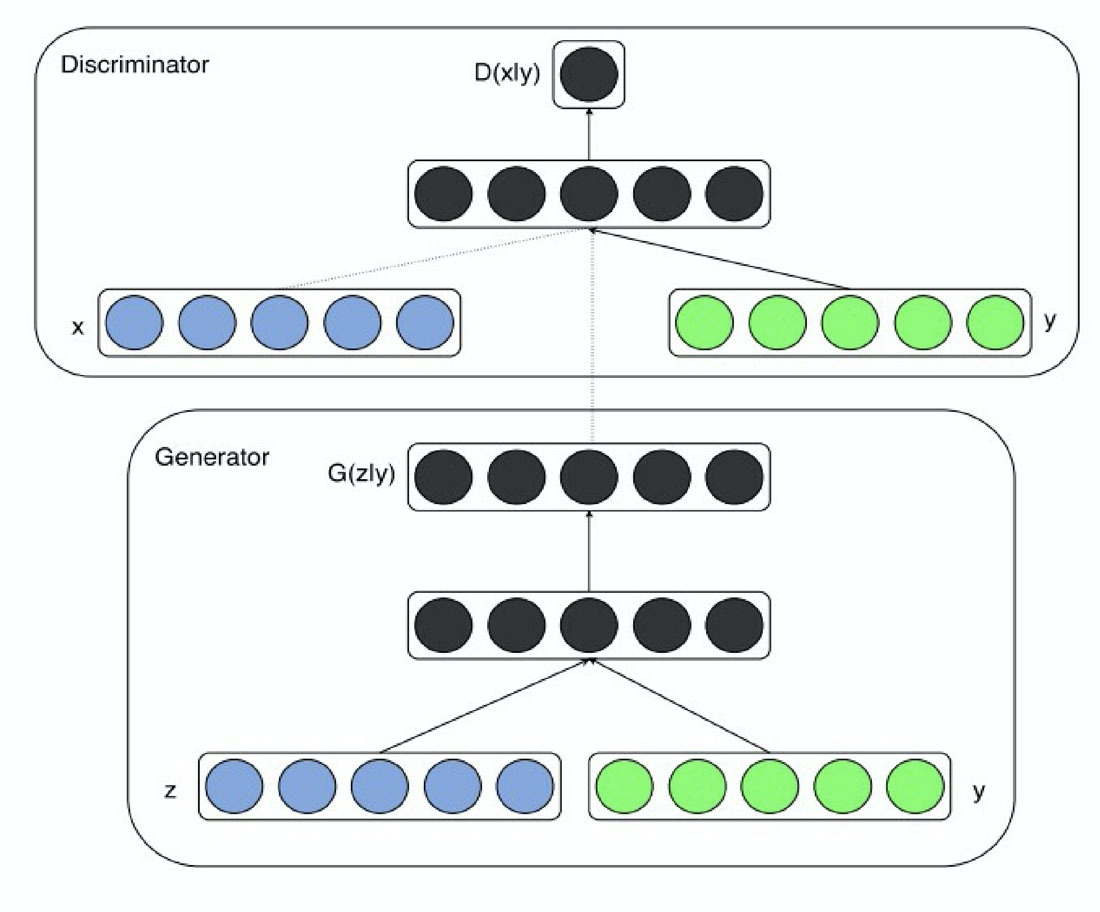
cGAN结构
cGAN的全程是Conditional Generative Adversarial Networks,即条件对抗生成网络。它为生成器、判别器都额外加入了一个条件y,这个条件实际上是希望生成的标签。
生成器G必须要生成和条件y匹配的样本,判别器不仅要判别图像是否真实,还要判别图像和条件y是否匹配。cGAN的输入输出为:
- 生成器G:输入一个噪声z,一个条件y,输出符合该条件的图像G。
- 判别器D:输入一张图像x,一个条件y,输出该图像在该条件下的真实概率D(x|y)
优化目标
在原始的GAN中,优化目标为:

在cGAN中,在其中加入条件y,则优化目标修改成了:

以MNIST为例,生成器G和判别器D的输入输出是:
- G输入一个噪声z,一个数字标签y(y的取值范围是0~9)。输出和数字标签相符合的图像G(z|y)。
- D输入一个图像x,一个数字标签y。输出图像和数字符合的概率D(x|y)。
显然,在训练完成后,向G输入某个数字标签和噪声,可以生成对应数字的图像。
Pytorch代码实现
cGAN生成器
定义生成器及前向传播函数:
class Generator(nn.Module):
  def __init__(self):
    super().__init__()
    self.label_emb = nn.Embedding(10, 10)
    self.model = nn.Sequential(
      nn.Linear(110, 256),
      nn.LeakyReLU(0.2, inplace=True),
      nn.Linear(256, 512),
      nn.LeakyReLU(0.2, inplace=True),
      nn.Linear(512, 1024),
      nn.LeakyReLU(0.2, inplace=True),
      nn.Linear(1024, 784),
      nn.Tanh()
    )
  def forward(self, z, labels):
    z = z.view(z.size(0), 100)
    c = self.label_emb(labels)
    x = torch.cat([z, c], 1)
    out = self.model(x)
    return out.view(x.size(0), 28, 28)
其中,torch.nn.Embedding的函数介绍如下:
nn.Embedding(num_embeddings, embedding_dim)
"""
params:
- num_embeddings - 词嵌入字典大小,即一个字典里要有多少个词。
- embedding_dim - 每个词嵌入向量的大小。
"""
cGAN判别器
定义判别器及前向传播函数:
class Discriminator(nn.Module):
  def __init__(self):
    super().__init__()
    self.label_emb = nn.Embedding(10, 10)
    self.model = nn.Sequential(
      nn.Linear(794, 1024),
      nn.LeakyReLU(0.2, inplace=True),
      nn.Dropout(0.4),
      nn.Linear(1024, 512),
      nn.LeakyReLU(0.2, inplace=True),
      nn.Dropout(0.4),
      nn.Linear(512, 256),
      nn.LeakyReLU(0.2, inplace=True),
      nn.Dropout(0.4),
      nn.Linear(256, 1),
      nn.Sigmoid()
    )
    def forward(self, x, labels):
      x = x.view(x.size(0), 784)
      c = self.label_emb(labels)
      x = torch.cat([x, c], 1)
      out = self.model(x)
      return out.squeeze()
cGAN损失函数
定义判别器对真、假图像的损失函数:
# 定义判别器对真图像的损失函数:
real_validity = D(images, labels)
d_loss_real = criterion(real_validity, real_labels)

# 定义判别器对假图像(即由潜在空间点生成的图像)的损失函数
z = torch.randn(batch_size, 100).to(device)
fake_labels = torch.randint(0,10,(batch_size,)).to(device)
fake_images = G(z, fake_labels)
fake_validity = D(fake_images, fake_labels)
d_loss_fake = criterion(fake_validity, torch.zeros(batch_size).to(device))

#CGAN总的损失值
d_loss = d_loss_real + d_loss_fake
cGAN可视化
利用网格(10×10)的形式显示指定条件下生成的图像
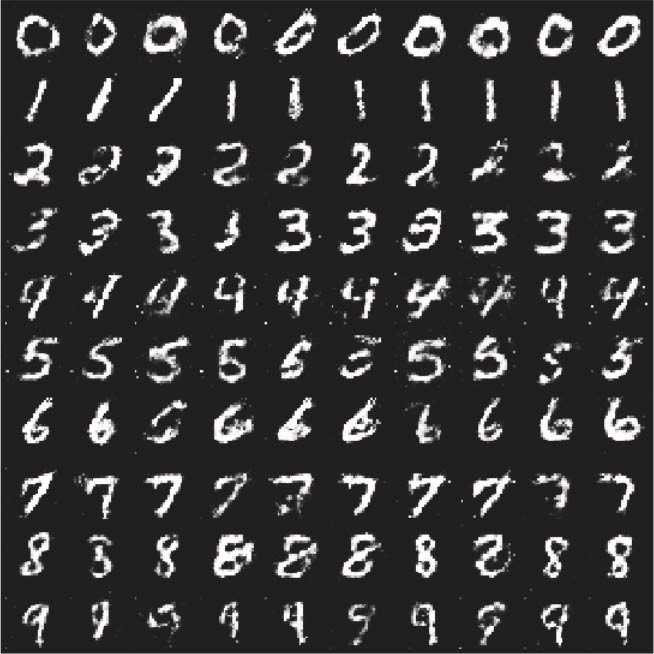
from torchvision.utils import make_grid
z = torch.randn(100, 100).to(device)
labels = torch.LongTensor([i for i in range(10) for _ in range(10)]).to(device)
images = G(z, labels).unsqueeze(1)
grid = make_grid(images, nrow=10, normalize=True)
fig, ax = plt.subplots(figsize=(10,10))
ax.imshow(grid.permute(1, 2, 0).detach().cpu().numpy(), cmap='binary')
ax.axis('off')
查看指定标签数据
可视化指定单个数字条件下生成的数字:
def generate_digit(generator, digit):
  z = torch.randn(1, 100).to(device)

  label = torch.LongTensor([digit]).to(device)

  img = generator(z, label).detach().cpu()

  img = 0.5 * img + 0.5

  return transforms.ToPILImage()(img)

# 调用
generate_digit(G, 8)
可视化损失值
记录判别器和生成器的损失变化:
writer.add_scalars('scalars', {'g_loss': g_loss, 'd_loss': d_loss}, step)
