前言
Spring Boot 设计之初就是为了用最少的配置,以最快的速度来启动和运行 Spring 项目。Spring Boot使用特定的配置来构建生产就绪型的项目。
Hello World
- 可以在 Spring Initializr上面添加,也可以手动在 pom.xml中添加如下代码∶
<dependency>
    <groupId>org.springframework.boot</groupId>
    <artifactId>Spring-boot-starter-web</artifactId>
</dependency>
pom.xml 文件中默认有个模块∶
<dependency>
    <groupId>org.springframework.boot</groupId>
    <artifactId>spring-boot-starter-test</artifactId>
    <scope>test</scope>
</dependency>
<scope>test</scope>表示依赖的组件仅仅参与测试相关的工作,包括测试代码的编译和执行,不会被打包包含进去;spring-boot-starter-test 是 Spring Boot 提供项目测试的工具包,内置了多种测试工具,方便我们在项目中做单元测试、集成测试。
2. 编写 Controller 内容
在目录 srcmainjava下新建一个包:com.reminis.web,然后在该包下创建 HelloController∶
@RestController
public class HelloController {
    @RequestMapping("/hello")
    public String hello(){
        return "hello world";
    }
 }
- @RestControler 的意思是 Contoller 里面的方法都以JSON格式输出,不需要有其他额外的配置;如果配置为@Controller,代表输出内容到页面。
- @RequestMapping("hello")提供路由信息,"hello"路径的HTTP Request 都会被映射到hello()方法上进行处理。
- 启动主程序
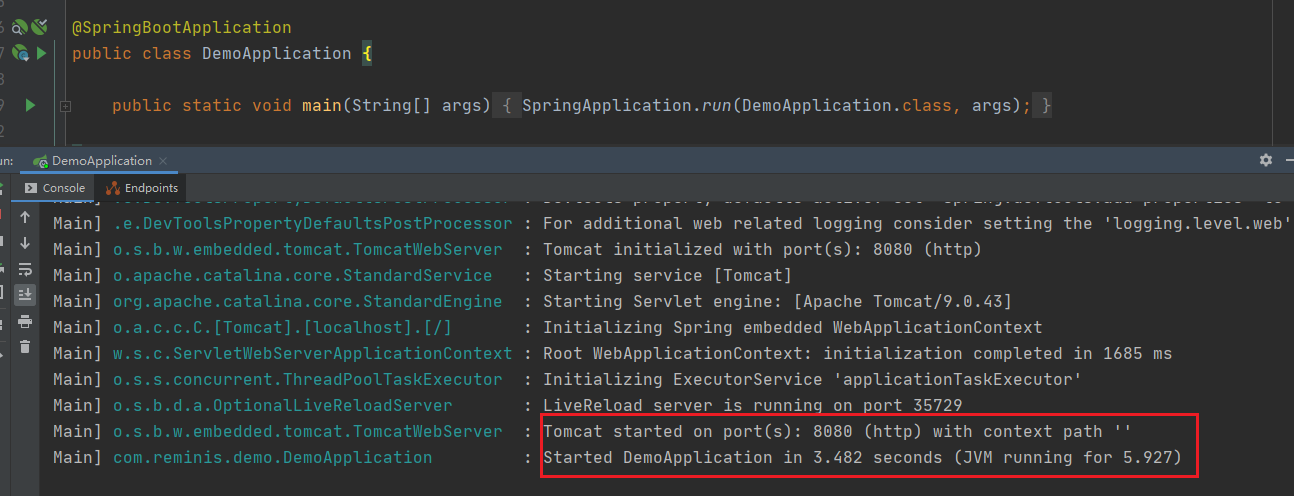
右键单击项目中的 DemoAppicationrun命令,就可以启动项目了,若出现以下内容表示启动成功∶
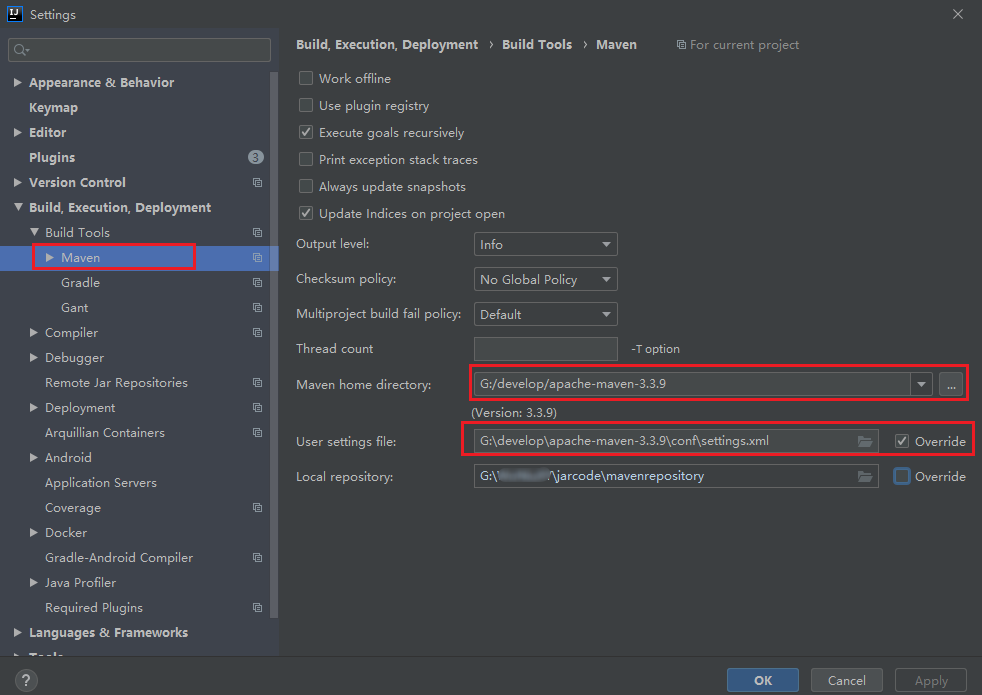
如果启动过程中出现javaClassNotFoundException 异常,请检查 M aven 配置是否正确,具体如下:- 检查 Maven 的 settigs.xml文件是否引入正确。
- 检查 IDE 工具中的 Maven插件是否配置为本机的 Maven地址,如下图
Spring Boot 还提供了另外两种启动项目的方式∶ - 在项目路径下,使用命令行mvnspring-boot∶run来启动,其效果和上面"启动主程序"的效果是一致的;
- 或者将项目打包,打包后以Jar 包的形式来启动。
 # 进行项目根目录
 cd ../demo
 # 执行打包命令
 mvn clean package
 # 以 Jar 包的形式启动
 java -jar target/hello-0.0.1-SNAPSHOT.jar
启动成功后,打开浏览器输入网址∶http∶//localhost:8080/hello, 就可以看到以下内容了∶

开发阶段建议使用第一种方式启动,便于开发过程中调试。
4. 如果我们想传入参数怎么办?
请求传参一般分为URL地址传参和表单传参两种方式,两者各有优缺点,但基本都以键值对的方式将参数传递到后端。作为后端程序不用关注前端采用的那种方式,只需要根据参数的键来获取值,Spring提供了很多种参数接收方式,本章我们了解最简单的方式∶通过 URL传参。只要后端处理请求的方法中存在参数键相同名称的属性,在请求的过程中Spring会自动将参数值赋值到属性中,最后在方法中直接使用即可。下面我们以 hello()为例进行演示。
@RestController
public class HelloController {

    @RequestMapping("/hello")
    public String hello(String name) {
        System.out.println("name..." + name);
        return "hello world, " + name;
    }
}
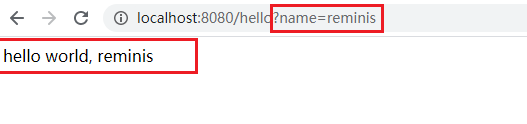
重新启动项目,打开浏览器输入网址 http∶//localhost8080/hello?name=reminis,返回如下内容:
到这里,我们的第一个 Spring Boot项目就开发完成了,有没有感觉很简单?经过测试发现,修改Controllr内相关的代码,需要重新启动项目才能生效,这样做很麻烦是不是?别着急,Spring Boot又给我们提供了另外一个组件来解决。
热部署
热启动就需要用到一个组件∶spring-boot-devtools。它是 Spring Boot 提供的一组开发工具包,其中就包含我们需要的热部署功能,在使用这个功能之前还需要再做一些配置。
- 添加依赖
在 pom.xml文件中添加 spring-boot-devtools 组件。
        <dependency>
            <groupId>org.springframework.boot</groupId>
            <artifactId>spring-boot-devtools</artifactId>
            <optional>true</optional>
        </dependency>
在 plugin 中配置另外一个属性 fork,并且配置为 true。
    <build>
        <plugins>
            <plugin>
                <groupId>org.springframework.boot</groupId>
                <artifactId>spring-boot-maven-plugin</artifactId>
                <configuration>
                    <fork>true</fork>
                </configuration>
            </plugin>
        </plugins>
    </build>
OK,以上的配置就完成了,如果你使用的是 Eclipse 集成开发环境,那么恭喜你大功告成了;如果你使用的是 IDEA 集成开发环境,那么还需要做以下配置。配置 IDEA
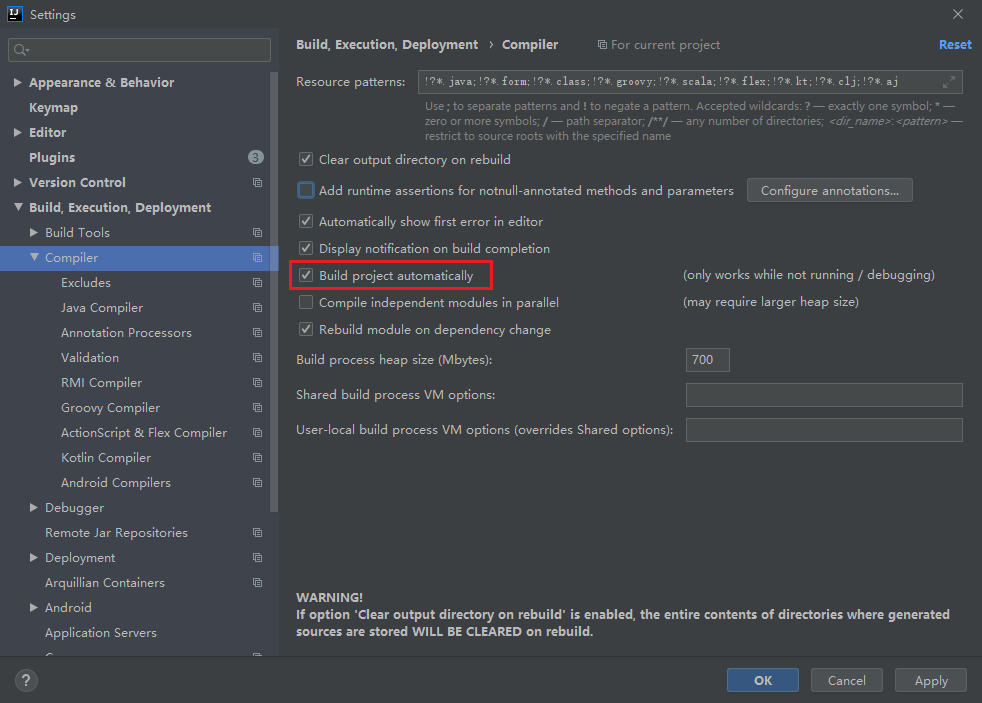
选择 File-Settings-Compiler 命令,然后勾选 Build project automati cally复选框,低版本的 IDEA请勾选make project automatically 复选框。
使用快捷键Ctrl+Shift+A,在输入框中输入 Registry,勾选 复选框∶
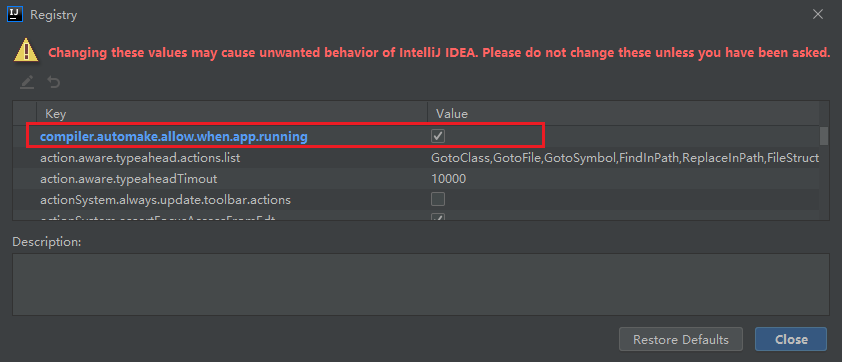
全部配置完成后,IDEA 就支持热部署了,大家可以试着去改动一下代码,等待5秒就会发现 Spring Boot会自动重新加载,再也不需要手动单击重新启动了。
为什么 IDEA需要多配置后面这一步呢?因为 IDEA默认不是自动编译的,需要我们手动去配置后才会自动编译,而热部署依赖于项目的自动编译功能。
该模块在完整的打包环境下运行的时候会被禁用,如果你使用 java-jar 启动应用或者用一个特定的classloader 启动,它会认为这是一个"生产环境"。
单元测试
单元测试在我们日常开发中必不可少,一个优秀的程序员,单元测试开发也非常完善。下面我们看下 Spring Boot 对单元测试又做了哪些支持?
如果我们只想运行一个hello world,只需要一个@Test 注解就可以了。在src/test 目录下新建一个 HelloTest类,代码如下∶
public class HelloTest {
    @Test
    private void hello() {
        System.out.println("hello world");
    }
}
右键单击"运行"按钮,发现控制台会输出∶hello world。如果需要测试 Web 层的请求呢? Spring Boot 也给出了支持。
以往我们在测试 Web 请求的时候,需要手动输入相关参数在页面测试查看效果,或者自己写post 请求。在 Spring Boot体系中,Spring 给出了一个简单的解决方案,使用 MockMVC进行 Web测试, MockMVC内置了很多工具类和方法,可以模拟 post、get 请求,并且判断返回的结果是否正确等,也可以利用 print()打印执行结果。
@SpringBootTest(classes = DemoApplication.class)
class DemoApplicationTests {

    private MockMvc mockMvc;

    @BeforeEach
    public void setUp() {
        mockMvc = MockMvcBuilders.standaloneSetup(new HelloController()).build();
    }

    @Test
    public void getHello() throws Exception {
        mockMvc.perform(MockMvcRequestBuilders
                .post("/hello?name=reminis")
                .accept(MediaType.APPLICATION_JSON))
                .andDo(MockMvcResultHandlers.print());
    }
}
-
@BeforeEach注解的方法表示在测试启动的时候优先执行,一般用作资源初始化。由于我的SpringBoot项目版本是2.4.3,集成的是Junit5,JUnit5的环境下, @BeforeEach 和@AfterEach去替代@Before和@After注解。Junit4是使用@Before和@After注解.
-
在类的上面添加@SpringBootTest,系统会自动加载 Spring Boot 容器。在日常测试中,可以注入bean 来做一些局部的业务测试。MockMvcRequestBuilders 可以支持 post、get 请求,使用 MockMvcResultHandlers.print() 方法会将请求和相应的过程都打印出来,具体如下∶
MockHttpServletRequest:
      HTTP Method = POST
      Request URI = /hello
       Parameters = {name=[reminis]}
          Headers = [Accept:"application/json"]
             Body = <no character encoding set>
    Session Attrs = {}

Handler:
             Type = com.reminis.demo.controller.HelloController
           Method = com.reminis.demo.controller.HelloController#hello(String)

Async:
    Async started = false
     Async result = null

Resolved Exception:
             Type = null
ModelAndView:
        View name = null
             View = null
            Model = null

FlashMap:
       Attributes = null

MockHttpServletResponse:
           Status = 200
    Error message = null
          Headers = [Content-Type:"application/json", Content-Length:"20"]
     Content type = application/json
             Body = hello world, reminis
    Forwarded URL = null
   Redirected URL = null
          Cookies = []
             Type = null

ModelAndView:
        View name = null
             View = null
            Model = null

FlashMap:
       Attributes = null

MockHttpServletResponse:
           Status = 200
    Error message = null
          Headers = [Content-Type:"application/json", Content-Length:"20"]
     Content type = application/json
             Body = hello world, reminis
    Forwarded URL = null
   Redirected URL = null
          Cookies = []
从返回的Body= hello world ,reminis可以看出请求成功了。当然每次请求都看这么多返回结果,不太容易识别,MockMVC提供了更多方法来判断返回结果,其中就有判断返回值。我们将上面的 getHello()方法稍稍进行改造,具体如下所示∶
    @Test
    public void getHello() throws Exception {
        mockMvc.perform(MockMvcRequestBuilders
                .post("/hello?name=reminis")
                .accept(MediaType.APPLICATION_JSON))
                /*.andDo(MockMvcResultHandlers.print())*/
                .andExpect(MockMvcResultMatchers.content(). string(Matchers.containsString("reminis")));
    }
MockMvcResultMatchers.content()这段代码的意思是获取到 Wceb 请求执行后的结果;Matchers.contansString("reminis"),判断返回的结果集中是否包含"reminis"这个字符串.
我们简单做一下对比,使用Spring Boot之前和使用之后。使用 Spring Boot 前∶
- 配置 web.xml,加载Spring和 Spring MVC
- 配置数据库连接、配置 Spring 事务
- 配置加载配置文件的读取,开启注解
- 配置日志文件
- 配置完成之后部署 Tomcat 调试
- 使用Spring Boot之后,仅仅三步即可快速搭建起一个Web项目∶
- 页面配置导入到开发工具中
- 进行代码编写
- 运行
通过对比可以发现Spring Boot在开发阶段做了大量优化,非常容易快速构建一个项目。