https://github.com/PacktPublishing/Unity-5.x-Animation-Cookbook
https://assetstore.unity.com/packages/tools/animation/final-ik-14290
项目Unity版本 5.3.4f1
Chapter 1: Working with Animations (已看)
Chapter 2: Working with the Animation View (已看)
Chapter 3: 2D and User Interface Animation (已看)
Chapter 4: Character Movement (已看)
Chapter 5: Character Actions and Expressions (已看)
Chapter 8: Animating Cutscenes
Chapter 9: Physics and Animations
Chapter 1: Working with Animations
This chapter explains the essentials of working with animations in Unity and covers the following topics:
- Importing skeletal animations
- Configuring generic and humanoid rigs
- Creating and assigning an Animator Controller
- Creating animation transitions in Animator Controller
- Using parameters to control the animation flow
- Using animations from multiple assets
- Looping mirroring and offsetting animations
- Adjusting the playback speed of animations
- Using override Animator Controllers to animate different types of characters
- Importing object animation from a 3D package
Introduction
animate everything
Importing skeletal animations
skeleton (called rig in Unity)

Unity uses four different rig configurations:
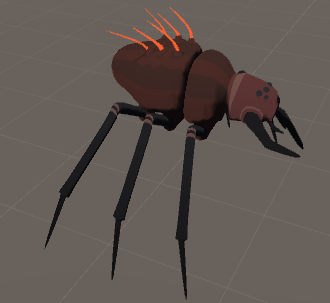
- Generic rig: This one is used for quadrupeds, spiders, and other non-humanoid chracters. It uses Unity's Mecanim system for controlling animation flow. It can use root motion if you provide a Root node - a bone responsible for character movement
- Humanoid rig: This one is used for humanoid characters only. It also uses Mecanim system for controlling animation. If you are using Humanoid rigs, you have more options for importing animations. The biggest advantage is automatic animation retargeting - you can use the same animation clip on various types of humanoid characters (for example, a dwarf and atroll)
- Legacy: This option is used mostly for backward compatibility with previous versions of Unity. It is similar to the Generic rig but uses scripts instead of Mecanim for controlling animation flow. I recommend using Generic rig instead
- None: This last option turns off the rig and disable animation import
Configuring generic and humanoid rigs
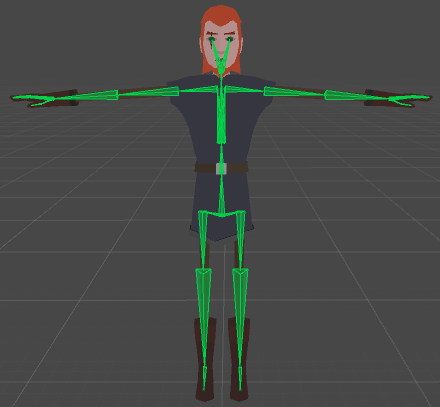
If you are creating your characters from scratch, the bones hierarchy of your humanoid rig is important for Unity to recognize the rig as a humanoid. It should follow this pattern:

Generic
Humanoid

 (bone mapping)
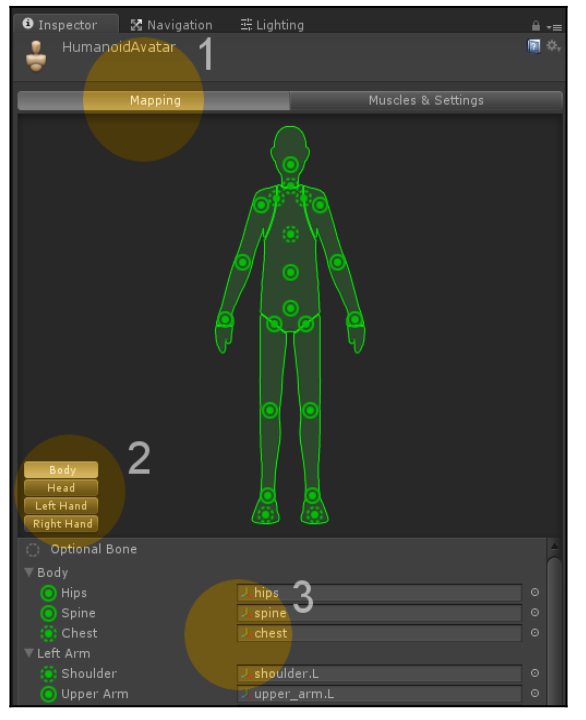
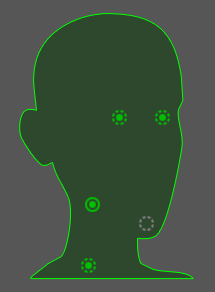
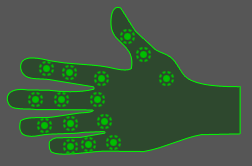
Make sure you are in the Mapping section (1). All recognized and assigned bones are shown as green body parts on the displayed dummy character. If a required bone is missing or is not assigned, it will show up as red. You can navigate between the Body, Head, Left Hand, and Right Hand sections by clicking on a corresponding button (2). All bones are displayed in a list (3) for each section. Required bones are marked with circle icons and optional bones are marked with dotted circle icons.
Body
Head
Left Hand

Right Hand

Humanoid rig uses more advanced Mecanim features than the Generic rig.
- Automatic retargeting: This is one of the most important differences between those two rigs. The Humanoid rig uses automatic retargeting, which means thatyou can have the same animations on different humanoid characters. Your characters can share a group of animations (basic movement or some common actions). It gives you the possibility to buy your animation assets from the Asset Store and easily use them on your characters. Generic rigs don't support this feature. You have to prepare animations for your specific rig or retarget them in a 3D package.
- Inverse kinematics: This feature lets you control your characters' feet and hands position with scripting. It is useful for making your characters stand on uneven ground or grab an object in the scene. It is a built-in feature for Humanoid rigs in Unity. Generic rigs have to use custom-made solutions.
- Advanced animation settings: Humanoid rigs have more settings for animation import, such as the mirror option. We will discuss them in depth in the Looping mirroring and offsetting animations recipe.
- Look at: Unity has a built-in solution for humanoid characters looking at something. You have to write custom systems for generic characters.
- Additional bones: A lot of people think that they cannot use additional bones with Humanoid rigs. It is not true. If your rig has an animated weapon slot for instance, you can still use it with the Humanoid rig. All you need to do is to find the Mask section in your animation import settings and enable the additional bone for each animation it is used in (you need to use the Transform foldout to find your additional bone).

You can preview the range of movement in the Muscle Group Preview section by adjusting the sliders (1). You can preview the range of movement per muscle in the Per-Muscle Settings section. You can also adjust the range here by unfolding a given muscle foldout and using the slider (2). In the Additional Settings section, you can adjust more options of your avatar. These are mainly responsible for the flexibility of your rig. You can set how much a bone can be stretched during animation for instance.
The Translation DoF option enables animating bones transition in your Humanoid rig. It is turned off by default, meaning that only rotation of the bones is used in animation.
In the Rig tab in the model import settings, you can find some additional options
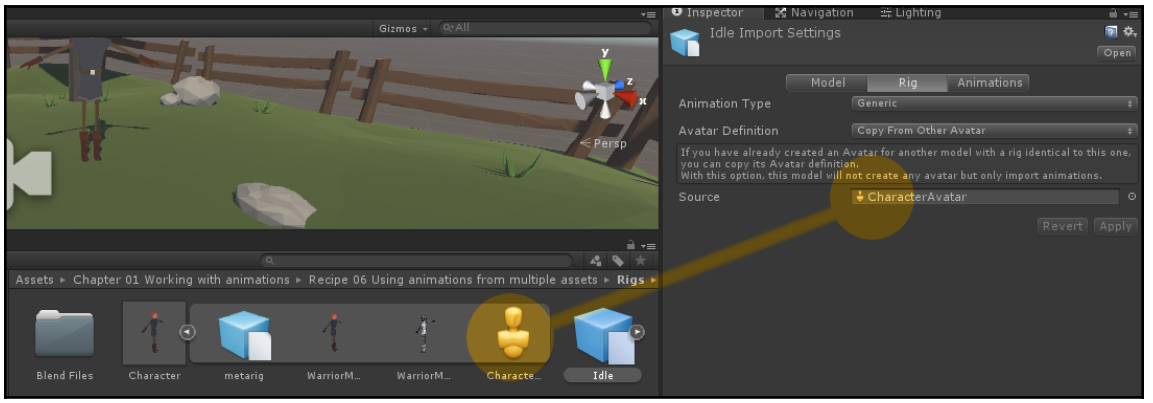
- Avatar Definition: This option is responsible for creating a new avatar or copying the avatar from another model. The second option is useful for storing animations in multiple files. It will be discussed further in the Using animations from multiple assets recipe.
- Optimize Game Objects: This option lets you hide all bones from the Hierarchy view. The number of game objects in the game has an impact on the performance. You can still choose a number of bones that will be displayed in the Hierarchy. It is useful for having exposing weapon slots and similar gameplay-related bones while hiding others.
- Root node: This option is visible only for Generic rigs. It lets you choose the bone responsible for root motion calculation
Creating and assigning an Animator Controller
Animator Controllers are state machines (graphs) responsible for controlling the flow of animations of any animated object in the game. The same Animator Controller asset can be used by multiple objects or characters. Unity will create an independent runtime copy of the asset for each animated object it is assigned to.


- Controller: This is the field we have to attach the Animator Controller asset to. It determines which animation graph the Animator component will use.
- Avatar: In Unity, Avatars are rig definitions. For instance, if we have multiple files containing animations with the same Generic rig, we should use the same Avatar for all of them. You can find more information about it in the Using animations from multiple assets recipe.
- Apply Root Motion: With this checkbox, we can turn the root motion on and off. It can be useful when we have animations with root motion but don't want to use the root motion definition for a given character.
- Update Mode: This parameter tells Unity in which update the animations should be evaluated. The Normal option makes the animations synchronized with the normal Update() call, the Animate Physics option synchronizes animations with the physics FixedUpdate() call, and the Unscaled Time option synchronizes the animation with the normal Update() call, but disables animation time scaling (the animation is played with 100 percent speed regardless of the Time.timeScale variable value).
- Culling Mode: This parameter tells Unity when to turn off the animation playback on a given Animator. The Always Animate option makes the Animator always play animations (event when off-screen), the Cull Update Transforms option culls Retarget and IK Transforms when the Animator is not visible on screen, and the Cull Completely option disables the animation completely when the Animator is not visible on screen.
Creating animation transitions in Animator Controller

State transition define how we can travel through the graph of animations

- Has Exit Time: If set to true, this enables the transition only after a given percentage of the animation has been already played. If disabled, the transition will take place instantly after its conditions are met. If you want to create a sequence of animations, set it to true.
- Exit Time: This is the percentage (0-1 range) of the animation length after which the Has Exit Time condition is met. If you set it to 0.5, for instance, the state will transition after 50 percent of the animation was played.
- Fixed Duration: This property is combined with the next one, Transition Duration (s). If it's on, the Transition Duration (s) is in seconds, and if it's off, the Transition Duration (s) is in percentage of the animation time.
- Transition Duration (s): the time of the state transition. This is how long the animations will transition one into another. Animations are being blended together during the transition. Longer transitions are smoother, shorter, are more sharp. A good default value is around 0.25.
- Transition Offset: This offsets the target animation in time. The value is in percentage of the animation. Setting it to 0.3 means that the target animation will start from 30 percent of its length instead of the beginning.
- Interruption Source: This setting tells Unity whether the transition can be interrupted by other transitions. You can set it to:
None: the transition cannot be interrupted by any other transition.
Current State: The transition can be interrupted by transitions from the state we are trying to transition from.
Next State: The transition can be interrupted by transition from the state we are trying to transition to.
Current State then Next State: The transition can be interrupted by the transitions of the state we are trying to transition from or by the transitions of the state we are trying to transition to. The transitions from the state we are trying to transition from take the priority.
Next State then Current State: The transition can be interrupted by the transitions of the state we are trying to transition from or by the transitions of the state we are trying to transition to. The transitions from the state we are trying to transition to take the priority.
Ordered Interruption: If set to false, this lets the transition be interrupted by other transitions independently of their order. If set to true,the order of the transitions matters.
When you create an Animator Controller, you can see three more nodes apart from your animation states
- Entry and Exit: This node is used when you transition between state machines (Animator Controllers or substate machines).
- Any state: This node can be used as a helper to make a transition from any state to a given state. It is used when you have an animation that can be played anytime, for instance, a hit animation.
Using parameters to control the animation flow


using UnityEngine;
using System.Collections;

public class Wave : MonoBehaviour {
    //The anim variable is used to store the reference
    //to the Animator component of the character.
    private Animator anim;

    void Start () {
        //We get the component and assign it to
        //the anim variable when the game starts
        anim = GetComponent<Animator>();
    }

    void Update () {
        //We check if player pressed the spacebar
        if (Input.GetKeyDown(KeyCode.Space))
        {
            /*We cal the SetTrigger() function on the Animator component stored in the anim variable. The function requires one
parameter - the name of the trigger parameter set in our Animator Controller ("Wave" in our example). Make sure to match
it with the name of the parameter you've created in your Animator Controller*/
            anim.SetTrigger("Wave");
        }
    }
}
You can use several types of parameters and corresponding script functions to set them:
- Trigger: This is the simplest parameter. It is set to true with the SetTrigger(string name) function called on the Animator component object. It is reset by the Animator Controller after it is consumed (used) by a transition. The string name parameter of the function has to match your trigger parameter name set in the Animator Controller.
- Int: This is an integer parameter. When you use it, you have to specify a logical comparison in the condition. The transition will only occur if the value of the parameter meets the comparison condition with a given number. You can use the Equal, Greater, Less, and Not Equal options to compare the value of your parameter with the given number. Integer type parameters are set with the SetInteger(string name, int value) function. The string name parameter needs to match the parameter name set in the controller. The int value parameter is the value to set the controller parameter to.
- Float: This is a float parameter. It works the same as the integer type, but uses floating point numbers instead of integers. It is set using the SetFloat(string name, float value) function.
- Bool: This is a Boolean parameter. The condition can check if the parameter is true or false. The value of the parameter is set with the SetBool(string name, bool value) function.

Using animations from multiple assets
All Generic rigs can use animations from multiple assets that share the same Avatar Definition. To share the same Avatar Definition, Generic rigs have to have exactly the same rigs (the same hierarchy, the same bone names and transforms). All Humanoid rigs
can use animations from multiple assets that are also set to Humanoid. Additionally, they don't need to have the same rigs because Unity automatically retargets all humanoid animations.
Looping, mirroring and offsetting the animations

- Looping animations: This is a common technique used for all cyclic movements (walk and run cycles, idle animations, and so on). If you don't set an animation to loop, it will play once and freeze on the last frame.
- Offsetting animations: Sometimes it is convenient to offset the cycle of a looped animation. It is often used with the Mirror option for steering animations (clips used to turn the character while moving).
- Mirroring animations: This option works only with Humanoid rigs. It is used to flip the animation left to right and can save up to 50 percent of steering animations when combined with the Offset Cycle option.
Adjusting the playback speed f animations

using UnityEngine;
using System.Collections;

public class AdjustSpeedByScript : MonoBehaviour {

    //This is a variable, in which we store the reference to the Animator component
    private Animator anim;
    //We store the wanted animation speed in this variable, the default value is 2 (200%).
    public float newAnimationSpeed = 2f;
    void Start () {

        //At the start of the game we assign the Animator component to our anim variable
        anim = GetComponent<Animator>();
    }

    void Update () {

        //We check if player pressed the Space button
        if (Input.GetKeyDown(KeyCode.Space))
        {
            //And set the playback speed of the whole Animator Controller (it multiplies all states animation playback speed)
            anim.speed = newAnimationSpeed;

            /*If you want to change the speed of just one animation state,
            add a float parameter to your Animator Controller, use this parameter
            in the Multiplier field in the animation state Inspector
            and change the parameter using:

            anim.SetFloat("YourParameterName", newAnimationSpeed);

            function, where YourParamterName is the name of your paramter in the Animator Controller,
            and newAnimationSpeed is the float value you want to set the parameter and playback speed to*/
        }

    }
}
Using override animator controllers to animate different types of characters
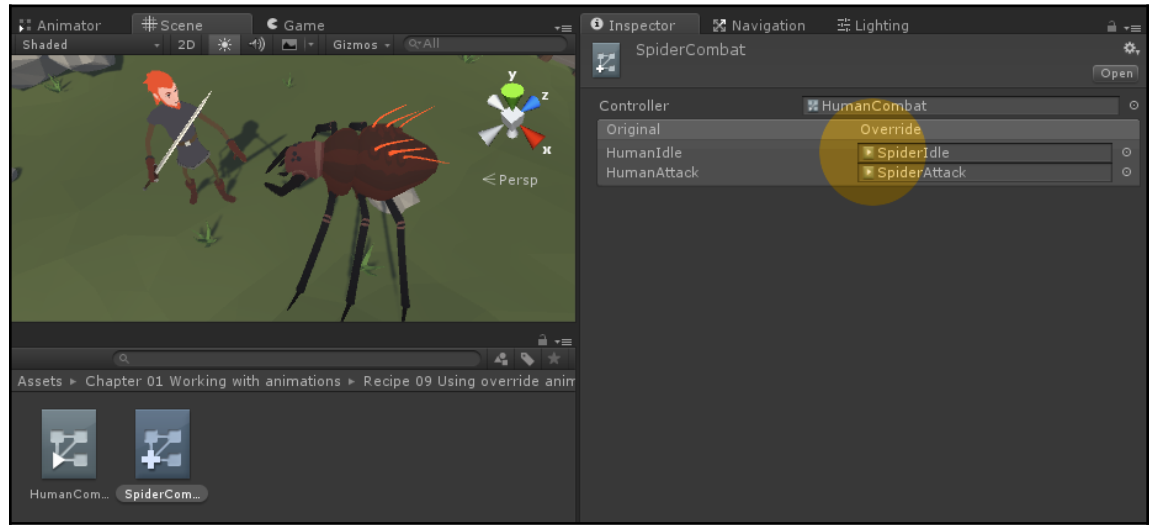
Override Animator Controller only replace animation clips from your original Animator Controller. The logic of the original controller stays the same (so you can also use the same scripts to set the same parameters and so on). It is extremely useful for creating NPC
characters in your games. You create the Animator Controller once, you write the scripts driving the controller once and only change the animations.
Importing object animation from a 3D package
Chapter 2: Working with the Animation View
This chapter explains the Animation View, which is an essential tool in Unity's animation workflow, and the following topics are covered in this chapter:
- Using the Animation View to create a flickering light
- Blending light colors with the Animation View and the Animator Controller
- Animating object's world position – creating a moving platform
- Animating object's local position – creating automatic doors
- Using the Hierarchy to animate local rotation – creating an orbiting planet
- Animating triggers – creating a death trap
- Creating an elevator triggered by player input
Introduction
Using the Animation View to create a flickering light
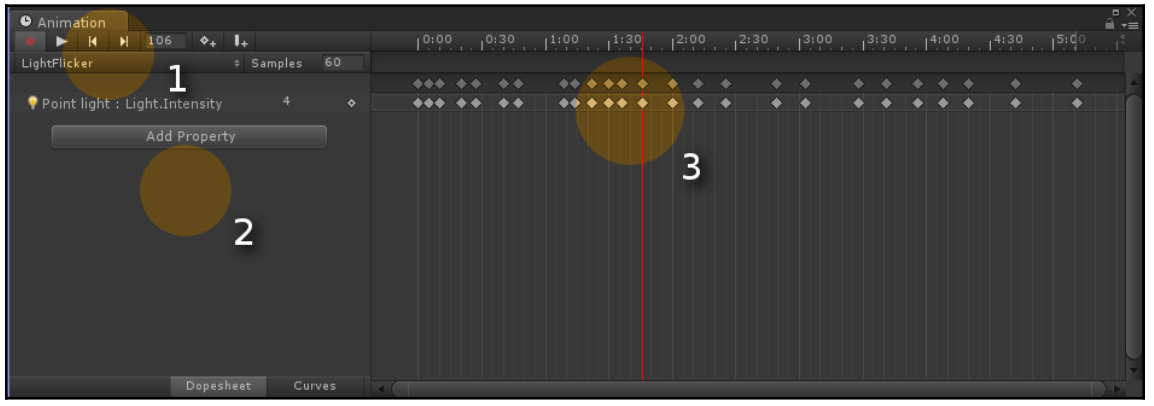
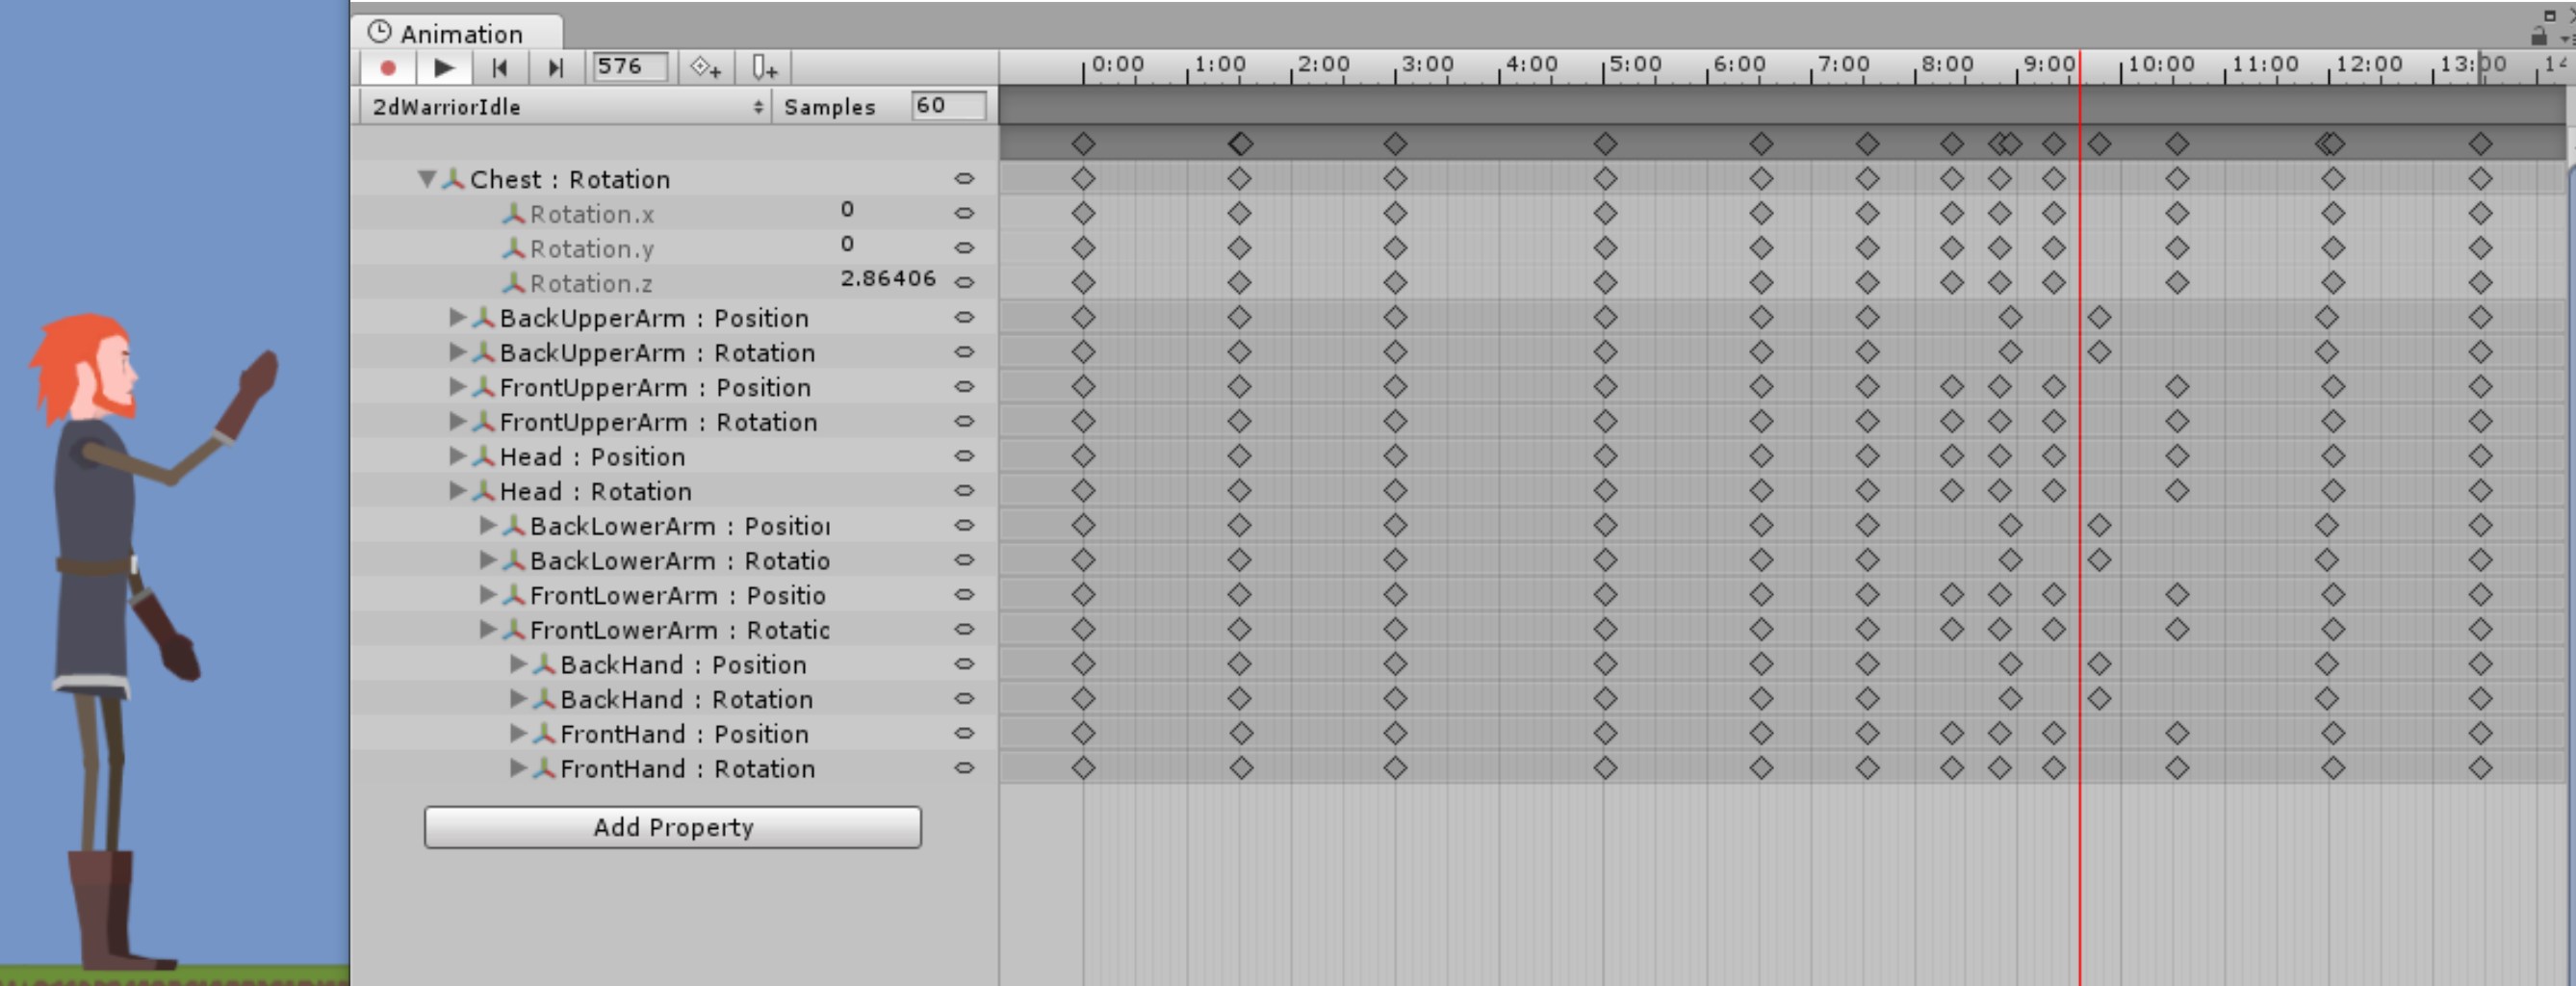
- Playback buttons (1): Here you can play back the animation on your scene (you do not have to enter Play Mode to see your animation). On the right to the play back buttons, you can find an Insert Key Frame button and an Insert Animation Event button. You can use the first one to insert key frames; the second one inserts Animation Events that allow to call script functions from an animation . Just below the playback buttons, you can find a drop-down menu, with which you can switch between this object's animations and add new ones.
- Animated properties (2): Here you can find all the properties of the game object used by this animation. You can also click on the Add Property button to add new properties to the animation.
- Timeline (3): It represents the time in the animation. You can find all the key frames (and animation events) here. You can click on the timeline header (the one with time displayed in seconds) to go to the frame you clicked on. If you click on a key frame instead, the timeline will automatically jump to that exact key frame.
- Dope Sheet: This mode displays key frames in the timeline.
- Curves: With this mode, you can adjust the interpolation curves of the animation. When you click on a property, its animation curves will be displayed. You can manipulate the handles to adjust the shape of the curves. You can also right-click on any handle to change its tangent type, as shown in the following screenshot:

Blending light colors with the Animation View and the Animator Controller

Animating an object's world position - creating a moving platform

using UnityEngine;
using System.Collections;

public class Platform : MonoBehaviour {
    /*This function is called by Unity every time this object
    starts to collide with any other game object with a Collider
    component attached.The Collision collisionInfo object
    parameter stores the information about the collision and the
    object we are colliding with.*/
    void OnCollisionEnter(Collision collisionInfo)
    {
        /*We are checking if the object we are colliding with
        has a RigidBody component and the RigidBody is not set
        to kinematic. Optionally we can also check the tag of
        the object we are colliding with here (to make it work
        only for the player for instance).*/
        if (collisionInfo.rigidbody != null&& !collisionInfo.rigidbody.isKinematic)
        {
            /*We are setting the parent of the object we are
            colliding with to the platform game object (the
            object out script is attached to).This will make
            our character move with the platform instead of
            slide from it.*/
            collisionInfo.transform.parent = transform;
        }
    }
    /*This function is called by Unity every time this object stop
    colliding with any object with a Collider component attached.
    The CollisionInfo collision info parameter stores the same
    information as in the OnCollisionEnter function.*/
    void OnCollisionExit(Collision collisionInfo)
    {
        /*We are checking the same conditions as before*/
        if (collisionInfo.rigidbody != null&& !collisionInfo.rigidbody.isKinematic)
        {
        /*We are setting the parent of the object we are
        colliding with to null. The object has no parent
        at all and stops moving with the platform*/
        collisionInfo.transform.parent = null;
        }
    }
}
This is the most simple but working moving platform solution. It uses a few key elements:
- Animation-driven movement: The platform is moved only by the Animation Clip created with the Animation View. This allows you to experiment with the movement easily.
- Kinematic Rigid body: To animate a game object with a Rigidbody component attached, you need to set the Kinematic checkbox to true. It completely disables the physics of the Rigid Body. You can still animate the object with Kinematic set to false, but physics will still have an impact on the movement (the object will not be able to penetrate other objects, it will rotate on collisions, and so on).
- Animate Physics option: Set in the Update Mode parameter of the Rigidbody component. This option makes the Rigid body to be animated in the physics loop (you can think of it as the FixedUpdate() function equivalent). It prevents the Rigid Bodies colliding with this object to jitter and behave in strange ways.
- Animation in world space: Our platform is animated in world coordinates. This means that the animation sets the object's position regarding the scene's 0x, 0y, 0z point. It does not matter where the object is placed in the scene; after playing the animation, it will be placed in the positions stored in the animation's key frames.
- Moving platform as a parent to the character: We are setting the platform as the parent to the in-game character, which collides with it. Rigid bodies parented to other Transforms try to move with them in game. This is the easiest and rather bulletproof way of making our character move with/relative to the platform game object. And because the platform moves with the Update Mode set to Animate Physics, no jittering will occur. Instead of parenting the character to the platform, you could also experiment with creating a physical material with appropriate friction, or write your own custom solution that would add the platform's speed to the character's speed.
Animating object's local position - creating automatic doors
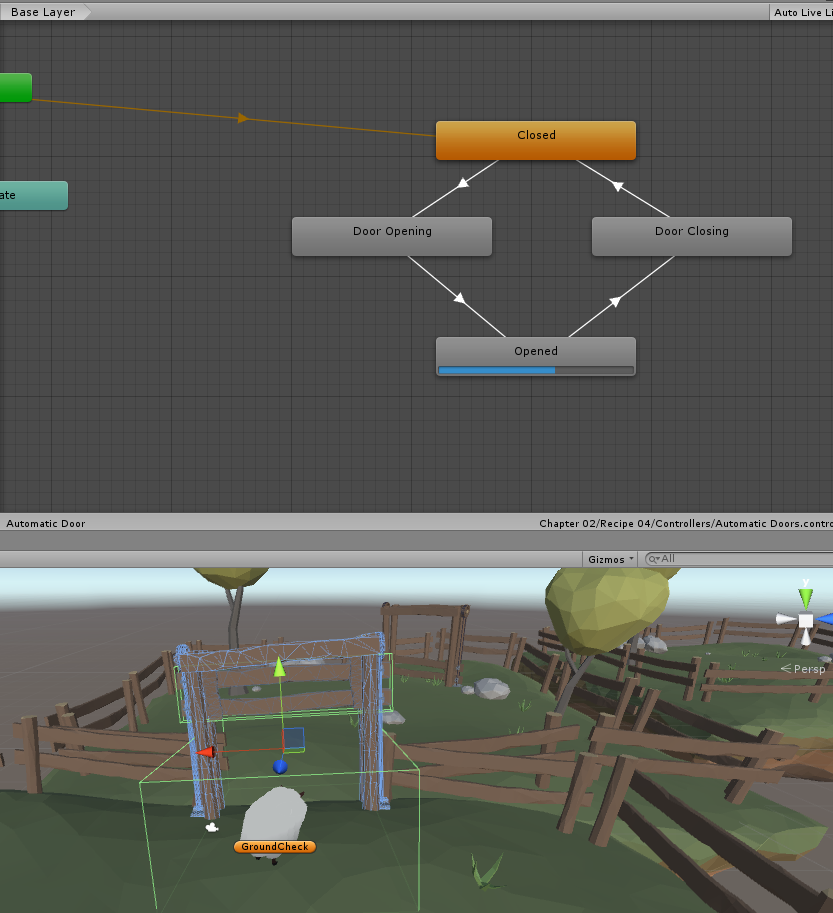
using UnityEngine;
using System.Collections;

public class AutomaticDoor : MonoBehaviour {

    /*The anim variable is used to store the reference
    to the Animator component*/
    private Animator anim;

    void Start()
    {
        /*We assign the Animator component of the parent object
        because this script is attached to the trigger, which
        is the child object of our animated doors*/
        anim = transform.parent.GetComponent<Animator>();
    }
    /* This function is called when a Rigidbody intersects with
    the collider attached to our game object for the first time.
    Our collider has to be set to trigger. The Collider other
    parameter stores information about the object which collided
    with our trigger (entered the trigger).*/
    void OnTriggerEnter (Collider other) {

        //Here we check the tag of the object entering the trigger
        if (other.gameObject.CompareTag("Player"))
        {
            /*If the tag equals "Player", we set the
            bool parameter "Open" to true in our
            Animator Controller - that plays the open
            animation and opens the doors*/

            anim.SetBool("Open", true);
        }

    }

    /* This function is called when a Rigidbody exists the trigger
    (stops colliding with our trigger collider).*/
    void OnTriggerExit (Collider other) {

        /*Again, we check if the object was the player*/
        if (other.gameObject.CompareTag("Player"))
        {
            /*If it's true, we set the bool parameter "Open"
            to false in our Animator Controller. That plays
            the close animation and closes the doors.*/
            anim.SetBool("Open", false);
        }
    }
}
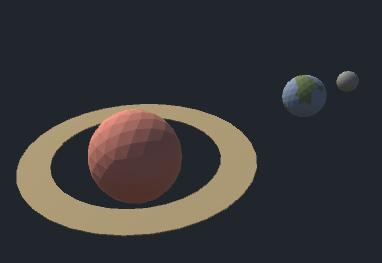
Using the Hierarchy to animate local rotation - creating an orbiting planet
Animating triggers - creating a death trap
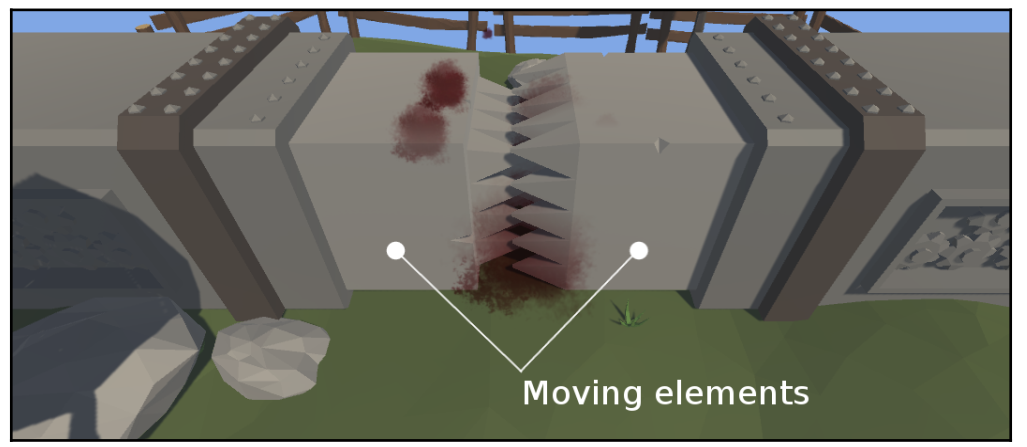
using UnityEngine;
using System.Collections;

public class Character : MonoBehaviour {

    /*We are going to store the reference to a blood effect prefab in this variable*/
    public GameObject bloodEffect;

    /*This variable is set to true when the character object was already killed*/
    bool isKilled = false;

    /*This function is called by the death trap,
    when we enter it*/
    public void Kill () {
        /*If the character was already killed by the trap,
        we don't want to do anything*/
        if (isKilled)
        {
            return;
        }
        /*If it was not killed, we set the isKilled
        variable to true*/
        isKilled = true;

        /*We check if the character has a Rigidbody component*/
        Rigidbody rb = GetComponent<Rigidbody>();

        if (rb != null)
        {

            /*If we find the component, we need to set it to kinematic
            to prevent our character from being launched in the air by
            the collision with our trap*/
            rb.isKinematic = true;
        }

        /*Here we spawn a blood effect prefab stored in the bloodEffect variable*/
        GameObject.Instantiate(bloodEffect, transform.position + Vector3.up*2f, Quaternion.identity);

        /*We are getting all the Renderer components of our character*/

        Renderer[] r = GetComponentsInChildren<Renderer>();

        for(int i = 0; i < r.Length; i++)
        {
            /*We are turning all the renderers of, making the object dissapear*/
            r[i].enabled = false;
        }

        /*We are also checking if our character uses our SimpleMove script
        if so, we are turning it off to prevent player from moving the character
        after death*/
        SimpleMove move = GetComponent<SimpleMove>();

        if (move != null)
        {
            move.enabled = false;
        }

    }
}
using UnityEngine;
using System.Collections;

public class DeathTrap : MonoBehaviour {


    /*This function is called when a Rigidbody enters the trigger object*/
    void OnTriggerEnter(Collider other) {

        /*We are checking if the object which entered the trigger
        has a Character script, if so we are calling the Kill() method on it*/
        Character characterScript = other.gameObject.GetComponent<Character>();

        if (characterScript != null)
        {
            characterScript.Kill();
        }

    }
}
Creating an elevator triggered by player input
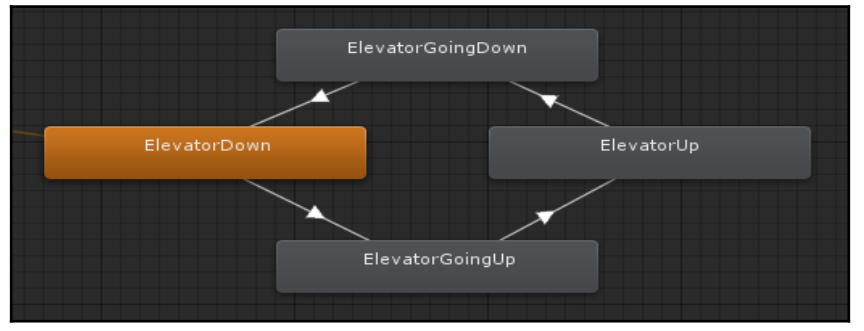
using UnityEngine;
using System.Collections;

public class Elevator : MonoBehaviour {

    // Update is called once per frame
    void Update () {

        /*When the player presses the E key, we are setting the Move trigger on the Animator component.
        We are assuming the Animator component is present on the game object our script is attached to*/
        if (Input.GetKeyDown(KeyCode.E))
        {
            GetComponent<Animator>().SetTrigger("Move");
        }

    }
}
Chapter 3: 2D and User Interface Animation
In this chapter, we are going to cover the following topics:
- Exporting a 2D sprite animation from a 3D package
- Creating a frame-by-frame sprite animation with the Animation View
- Creating a 2D sprite doll animation with the Animation View
- Using the Animator Controller to play sprite animations
- Creating a fade out-fade in transition with the Animation View
- Creating a swipe transition with the Animation View
- Using filled images for creating animated progress bars
- Using Mecanim states for animating UI button states
Introduction
Exporting a 2D sprite animation from a 3D package

Creating a frame-by-frame sprite animation with the Animation View

Creating a 2D sprite doll animation with the Animation View
Using the Animator Controller to play sprite animations

Animator Controller for 2D animations: Controlling 2D animations playback works very similar to 3D and skeletal animations in Unity. You can create Animator Controllers as usual, with all required states and transitions between
them.
Transition Duration set to 0: The Transition Duration parameter only makes sense with animations that can be blended together to create a smooth transition. In 2D frame by frame animation, this is not possible (Unity cannot create “in
between sprites” automatically). This is the reason to set the parameter to 0 and have a sharp, immediate transition. In case of the parameter value being greater than 0, the transition will still look sharp but also be delayed
using UnityEngine;
using System.Collections;

public class Warrior2dMove : MonoBehaviour {

    float hor = 0f;
    Animator animator;
    float speed = 0f;

    void Start () {

        //Finding the Animator component and creating a reference to it
        animator = GetComponent<Animator>();

    }

    void Update () {

        hor = Input.GetAxis("Horizontal");
        speed = Mathf.Abs(hor);

        //Here we check if we are walking right or left. We change the local X scale of the
        //character to flip it instead of creating new animations for left and right side
        if (hor > 0f)
        {
            transform.localScale = Vector3.one;

        }
        else if (hor < 0f)
        {
            transform.localScale = new Vector3(-1f, 1f, 1f);

        }

        //Here we set the Speed parameter of the Animator Controller to switch between
        //Idle and Walk animations

        animator.SetFloat("Speed", speed);

        //We move the character only if the speed is greater than 0.1
        //because this is the condition for Walk animation to start playing
        if (speed > 0.1f)
        {
            transform.Translate(Vector3.right * hor * Time.deltaTime);
        }


    }
}
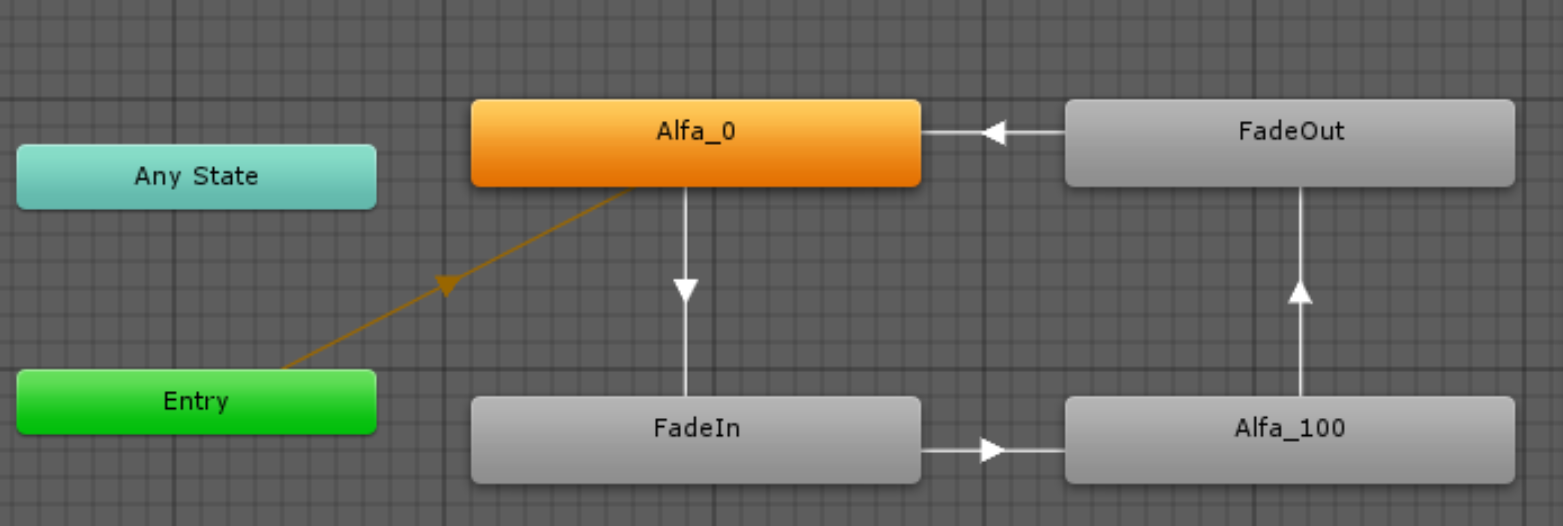
Creating a fade out - fade in transition with the Animation View
using UnityEngine;
using System.Collections;

public class Fade : MonoBehaviour {

    Animator animator;

    void Start () {

        //Here we assign a reference to the Animator component of the same game object
        animator = GetComponent<Animator>();

    }


    void Update () {

        if (Input.GetKeyDown(KeyCode.Space))
        {
            //We set the "Fade" trigger on the animator every time, player presses Space
            animator.SetTrigger("Fade");
        }

    }
}
Creating a swipe transition with the Animation View

using UnityEngine;
using System.Collections;

public class Fade : MonoBehaviour {

    Animator animator;

    void Start () {

        //Here we assign a reference to the Animator component of the same game object
        animator = GetComponent<Animator>();

    }


    void Update () {

        if (Input.GetKeyDown(KeyCode.Space))
        {
            //We set the "Fade" trigger on the animator every time, player presses Space
            animator.SetTrigger("Fade");
        }

    }
}
Using filled images for creating animated progress bars
using UnityEngine;
using UnityEngine.UI;
using System.Collections;

public class ProgressBars : MonoBehaviour {

    //The fillSpeed variable determines the fill amount increment of the progress bar per second
    public float fillSpeed = 0.5f;
    Image image;

    void Start () {

        //We assign a reference to the Image component of the same game object
        image = GetComponent<Image>();

    }

    void Update () {

        //We increase the fillAmount of the Image component in time
        image.fillAmount += Time.deltaTime * fillSpeed;

    }
}
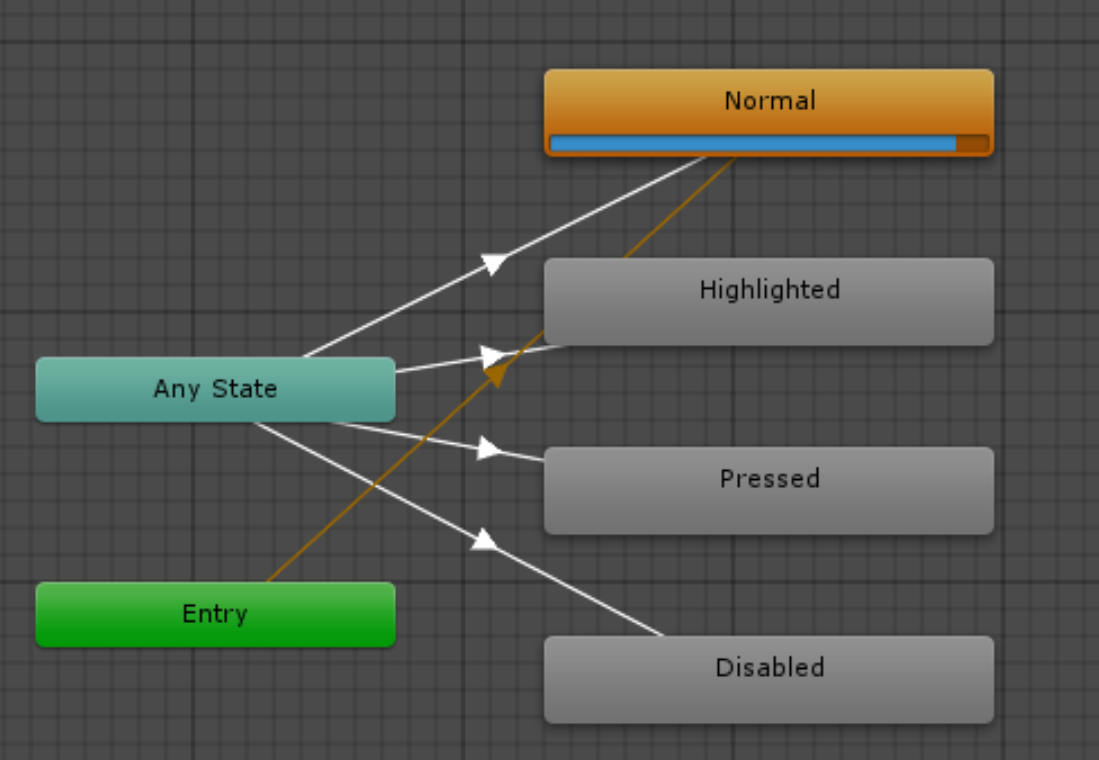
Using Mecanim states for animating UI button states
Chapter 4: Character Movement
This chapter explains the usage of animations for character movement and covers the following recipes:
- Using Blend Trees to blend walk and run animations
- Using root motion to drive Rigid Body characters' movement with animations
- Using root motion to steer a character
- Using animations for better looking transitionWe've seen a lot of “hovering”
- monsters in games in the past, but creatures flying s
- Using root motion for a 180 degrees turn
- Making a character jump with 3-phase animation
- Using root motion to drive Nav Mesh Agents' movement with animations
- Using triggers to grab an edge while jumping
- Changing the character's collision while crouching
- Adding animation to off-mesh links
- Using root motion for climbing
- Using root motion to create flying characters
Introduction
Character movement is an essential part of almost every game.
Using Blend Trees to blend walk and run animations


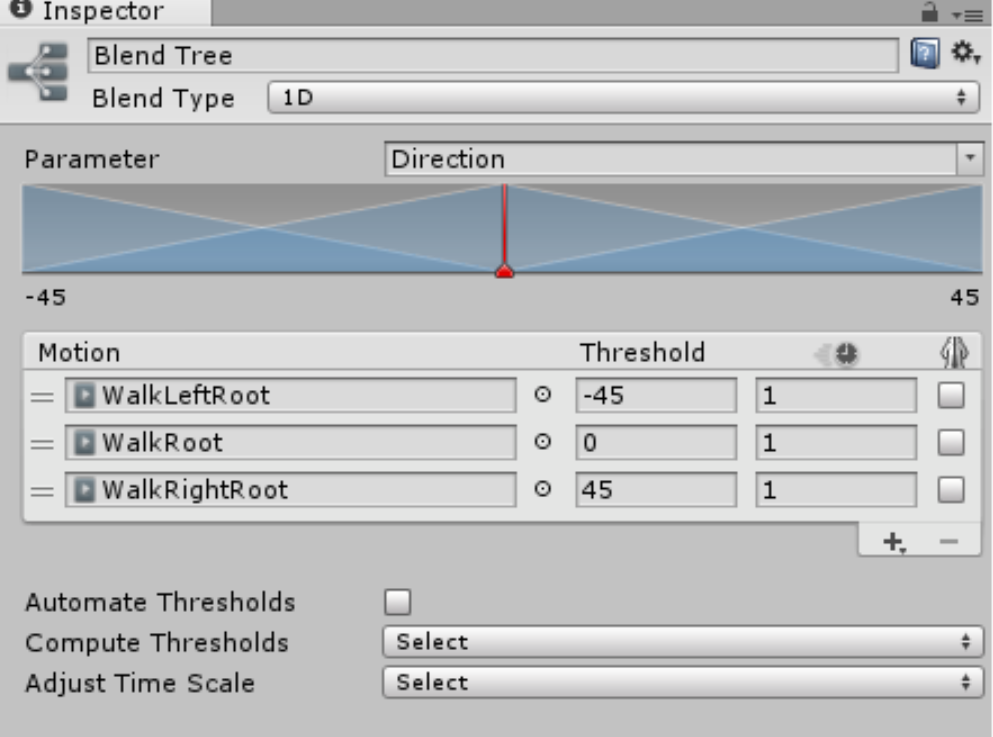
using UnityEngine;
using System.Collections;

public class SetSpeedFromAgent : MonoBehaviour {

    //We store the reference to the NavmeshAgent component in this variable
    NavMeshAgent agent;

    //We store the reference to the Animator component in this variable
    Animator anim;

    void Start () {
        //We assign the NavMeshAgent component to our agent variable
        agent = GetComponent<NavMeshAgent>();

        //We assign the Animator component to our anim variable
        anim = GetComponent<Animator>();
    }

    // Update is called once per frame
    void Update () {

        if (Input.GetKey(KeyCode.LeftShift) || Input.GetKey(KeyCode.RightShift))
        {
            agent.speed = 4f;
        }
        else
        {
            agent.speed = 1f;
        }

        //We set the "Speed" parameter of the Animator Controller to the magnitude of the agent's velocity.
        //This is used by the Blend Tree to blend between walk and run animations.
        //We are using the damp time (0.2 seconds) to damp any sudden changes and make sure our blends look smooth.
        anim.SetFloat("Speed", agent.desiredVelocity.magnitude, 0.2f, Time.deltaTime);

    }
}
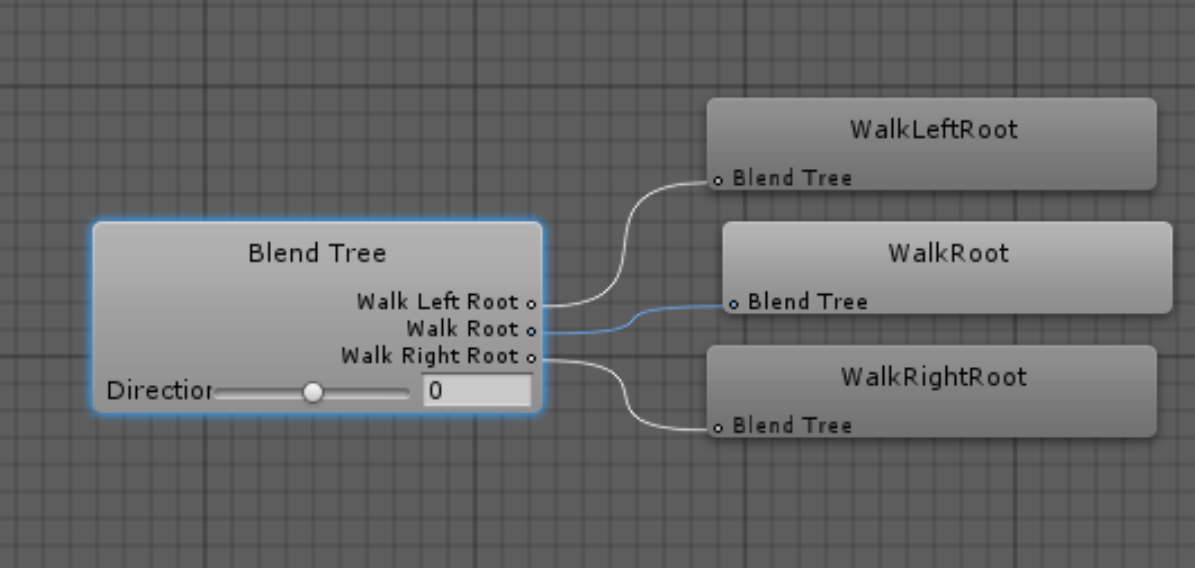
Blend Trees blend multiple animations based on the chosen Animator Controller parameter value and Motion fields' thresholds. In the standard Blend Tree, always only two animations are blended at the same time: the animation with a lower Threshold and the
animation with a higher Threshold. Each animation is blended with the weight corresponding to the distance between the actual parameter value and the Threshold of the animation. For instance, if your Walk animation Threshold is set to 1, your Run
animation Threshold is set to 2, and your current Speed parameter value equals 1.5, both Walk and Run animations will be played with 50 percent weight, which will most likely result in your character jogging slowly.
There are a few other interesting options in the Blend Tree settings:
You can set the Blend Type of a Blend Tree to the following:
- 1D: A simple Blend Tree using one parameter to define the weight of a currently played animation.
- 2D Simple Directional: This option uses two parameters for blending the animations, such as the X axis and Y axis. It is best used for motions representing different movement directions, for instance, walk forward, walk left, walk right, and walk back. It shouldn't be used with multiple animations representing movement in the same direction (such as walk forward and run forward).
- 2D Freeform Directional: This option is similar to the previous one, but you can use multiple animations representing movement in the same direction (such as walk and run). You need to add a single animation representing the motion in the 0, 0 position (such as idle).
- 2D Freeform Cartesian: This option is similar to the preceding one, but is used when your animations don't represent movement in different directions. It can be used to blend multiple versions of the idle animation, for instance.
- Direct: You can control the weight of each of the nodes (Motion fields) directly. This type is often used while blending facial expressions
You can set a few additional Motion field options:
- Time Scale: You can alter the playback speed of each animation in the Blend Tree by changing the number in the Time Scale field: the one with a clock icon. It is set to 1 (100 percent) by default.
- Mirror: You can mirror any of the animations in the Blend Tree by checking the Mirror option, the one with a mirrored humanoid icon.
You can also check the Automate Thresholds option, which will distribute the Motion fields' Thresholds evenly throughout the whole parameter's range. For instance, if your parameter's range is 0 to 9 and you have four animations, the first one will have a Threshold of 0, the second one 3, the third one 6, the fourth one 9. You can change the parameter range by clicking on the 0 and 1 numbers below the blending graph.
You can also use the Compute Thresholds option (Automate Thresholds have to be set to false). This option will compute the Thresholds based on the root motion information from your animations (speed magnitude, velocity in the X axis, velocity in the Y axis, velocity in the Z axis, angular speed in radians, and angular speed in degrees).
Using root motion to drive Rigid Body character's movement with animations


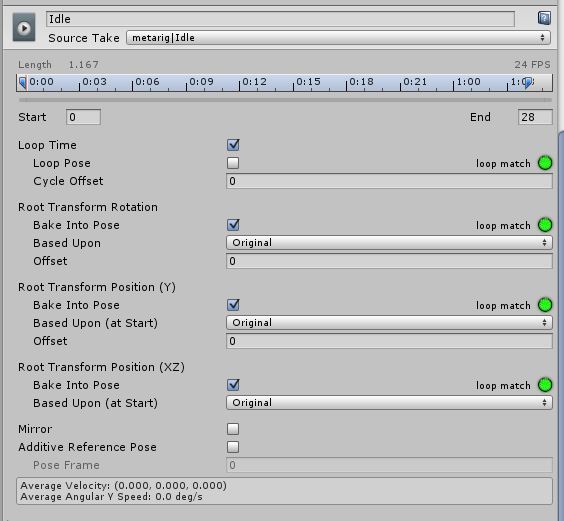
There are a few important options regarding root motion in the Animation Import Settings:
Root Transform Rotation: This option captures the rotation of the root node and applies it to the whole game object. You can set it to Bake Into Pose to disable the root motion rotation. With this option selected, the rotation will be treated as a visual effect of the animation and will not be applied to the game object. You should set it to true for every animation that shouldn't rotate the character. You can set the Based Upon option to one of the following options:
- Original: This is the original root node rotation from the animation file.
- Body Orientation: This alters the original rotation to make the character's upper body face the Z axis of the game object (the forward axis). You can also set the Offset option to offset the rotation.
Root Transform Position Y: This option captures the vertical movement of the root node and applies it to the whole game object. You can set it to Bake Into Pose to disable the root motion in the Y axis. With this option selected, the Y axis motion will be treated as a visual effect of the animation and will not be applied to the game object. You should set it to true for every “on ground” animation (unless it's a jump). You can set the Based Upon option to the following options:
- Original: This is the original root node Y axis motion from the animation file.
- Center Of Mass: This aligns the center of mass with the root node vertical position.
- Feet: This keeps the feet aligned with the vertical root node position. You can also set the Offset option to offset the vertical root node position.
Root Transform Position XZ : This option captures the horizontal (XZ) movement of the root node and applies it to the whole game object. You can set it to Bake Into Pose to disable the root motion in the X and Z axis. With this option selected, horizontal motion will be treated as a visual effect of the animation and will not be applied to the game object. You should set it to true for all stationary animations (such as Idle). You can set the Based Upon option to the following options:
- Original: This is the original root node horizontal motion from the animation file.
- Center Of Mass: This aligns the center of mass with the root node horizontal position. You can also set the Offset option to offset the horizontal root node position.
using UnityEngine;
using System.Collections;

public class MoveAndSteer : MonoBehaviour {

    //This is the speed with which we want to rotate our character
    public float rotationSpeed = 90f;

    //We will store the desired character speed (used in the Animator Controller) in this variable
    float desiredSpeed = 0f;

    //This variables are used to store Horizontal and Vertical input axes values.
    float hor = 0f;
    float ver = 0f;

    //We store the reference to the Animator component in this variable.
    Animator anim;

    void Start () {

        //We assign the Animator component to our anim variable when the game starts
        anim = GetComponent<Animator>();

    }

    // Update is called once per frame
    void Update() {

        hor = Input.GetAxis("Horizontal");
        ver = Input.GetAxis("Vertical");

        //We rotate our character in the global Y axis, depending on our Horizontal axis input
        transform.Rotate(Vector3.up * hor * rotationSpeed * Time.deltaTime);

        //If player holds left shift or right shift we set the desiredSpeed to 2, to make our character run.
        //If player doesn't hold any of the shift keys, we set it to 1, to make the character walk.
        if (Input.GetKey(KeyCode.LeftShift) || Input.GetKey(KeyCode.RightShift))
        {
            desiredSpeed = 2f;
        }
        else
        {
            desiredSpeed = 1f;
        }

        //We set the DesiredSpeed parameter based on the Vertical axis input.
        //If player doesn't hold the up arrow, the value of the ver variable will be 0,
        //so we will set the DesiredSpeed parameter to 0 and make the character play Idle animation
        anim.SetFloat("DesiredSpeed", desiredSpeed * ver, 0.2f, Time.deltaTime);


    }
}
Using root motion to steer a character

using UnityEngine;
using System.Collections;

public class RootMotionSteering : MonoBehaviour {

    //This variable stores the reference to the camera placed in the scene
    //we will move the character relative to the camera
    public Transform cameraTransform;

    //This variable stores the reference to the Animator component of this game object
    Animator anim;

    //These variables store Horizontal and Vertical input values
    float hor = 0f;
    float ver = 0f;

    //This variable is used to calculate the speed value and set the Speed parameter in the Animator Controller
    //It is a public variable, because we want to use it in another script later
    [HideInInspector]
    public float speed = 0f;

    //This variable is used to calculate the direction we want to go to and set the Direction parameter in the Animator Controller
    //It is a public variable, because we want to use it in another script later
    [HideInInspector]
    public float direction = 0f;

    //This vector will point in the same direction as camera's forward, but will be completely horizontal (with the Y axis set to 0)
    //We are going to use it to move our character.
    Vector3 cameraHorizontalForward;

    //This vector will be our desired move direction
    Vector3 desiredMoveDirection;

    void Start () {

        //We assign the Animator component to our anim variable when the game starts
        anim = GetComponent<Animator>();
    }

    // Update is called once per frame
    void Update () {

        //We set the hor and ver input values
        hor = Input.GetAxis("Horizontal");
        ver = Input.GetAxis("Vertical");

        //We calculate the horizontal camera forward direction, we use only horizontal axes
        cameraHorizontalForward = new Vector3(cameraTransform.forward.x, 0f, cameraTransform.forward.z).normalized;

        //We use player input stored in ver and hor variables along with horizontal camera forward vector and camera right vector to create
        //the desired move direction vector - this is a vector in world space in which we want to move our character
        desiredMoveDirection = ver * cameraHorizontalForward + hor * cameraTransform.right;

        //We calculate the angle between the forward axis of our character and the desired move vector. We multiply the angle by the sign (1 or -1) of the
        //dot product of our desired move direction vector and our character's right axis. This dot will be greater than 0 if our desired move vector points towards
        //the right axis of our character, and it will be less than 0, when i points in the left direction.
        direction = Vector3.Angle(transform.forward, desiredMoveDirection) * Mathf.Sign(Vector3.Dot(desiredMoveDirection, transform.right));

        //Speed is the magnitude of our desired move vector
        speed = desiredMoveDirection.magnitude;

        //We set the Direction and Speed parameters in our Animator Controller to make the character move.
        anim.SetFloat("Direction", direction, 0.2f, Time.deltaTime);
        anim.SetFloat("Speed", speed, 0.2f, Time.deltaTime);
    }
}
Using animations for better looking transitions


Animation Curves: You can add curves to your animations (multiple curves per animation clip) in the Import Settings, Animation tab. Curves assign arbitrary float values to the animation frames. If the name of the curve is the same as the name of a parameter in the Animator Controller, the value of the parameter will be set to the value of the curve in any given frame of the animation.
Using curve values: We are using the ToIdle value set by the Animation Curves in the WalkForward, WalkLeft, and WalkRight animations to trigger the transition from Steering to Idle (when the ToIdle value is less than 0.5) or from Steering to ToIdle animation (when the ToIdle parameter is greater than 0.5). This allows us to control the state transitions in the Animator Controller depending on the poses in the animations.
Using root motion or a 180 degrees turn

using UnityEngine;
using System.Collections;

public class SetRawDirectionAndSpeed : MonoBehaviour {


    //We are storing the reference to the RootMotionSteering script in this variable.
    //RootMotionSteering script is responsible for calculating the desired speed and direction
    //of our character
    RootMotionSteering steeringScript;

    //We store the reference to the Animator component in this variable
    Animator anim;

    void Start () {

        //We assing the RootMotionSteering script and Animator component to our variables when the game starts
        steeringScript = GetComponent<RootMotionSteering>();
        anim = GetComponent<Animator>();
    }

    // Update is called once per frame
    void Update () {

        //We set the DirectionRaw and SpeedRaw parameters to be equal to the calculated direction and speed (without any damping)
        anim.SetFloat("DirectionRaw", steeringScript.direction);
        anim.SetFloat("SpeedRaw", steeringScript.speed);


    }
}
Making a character jump with 3-phase animation
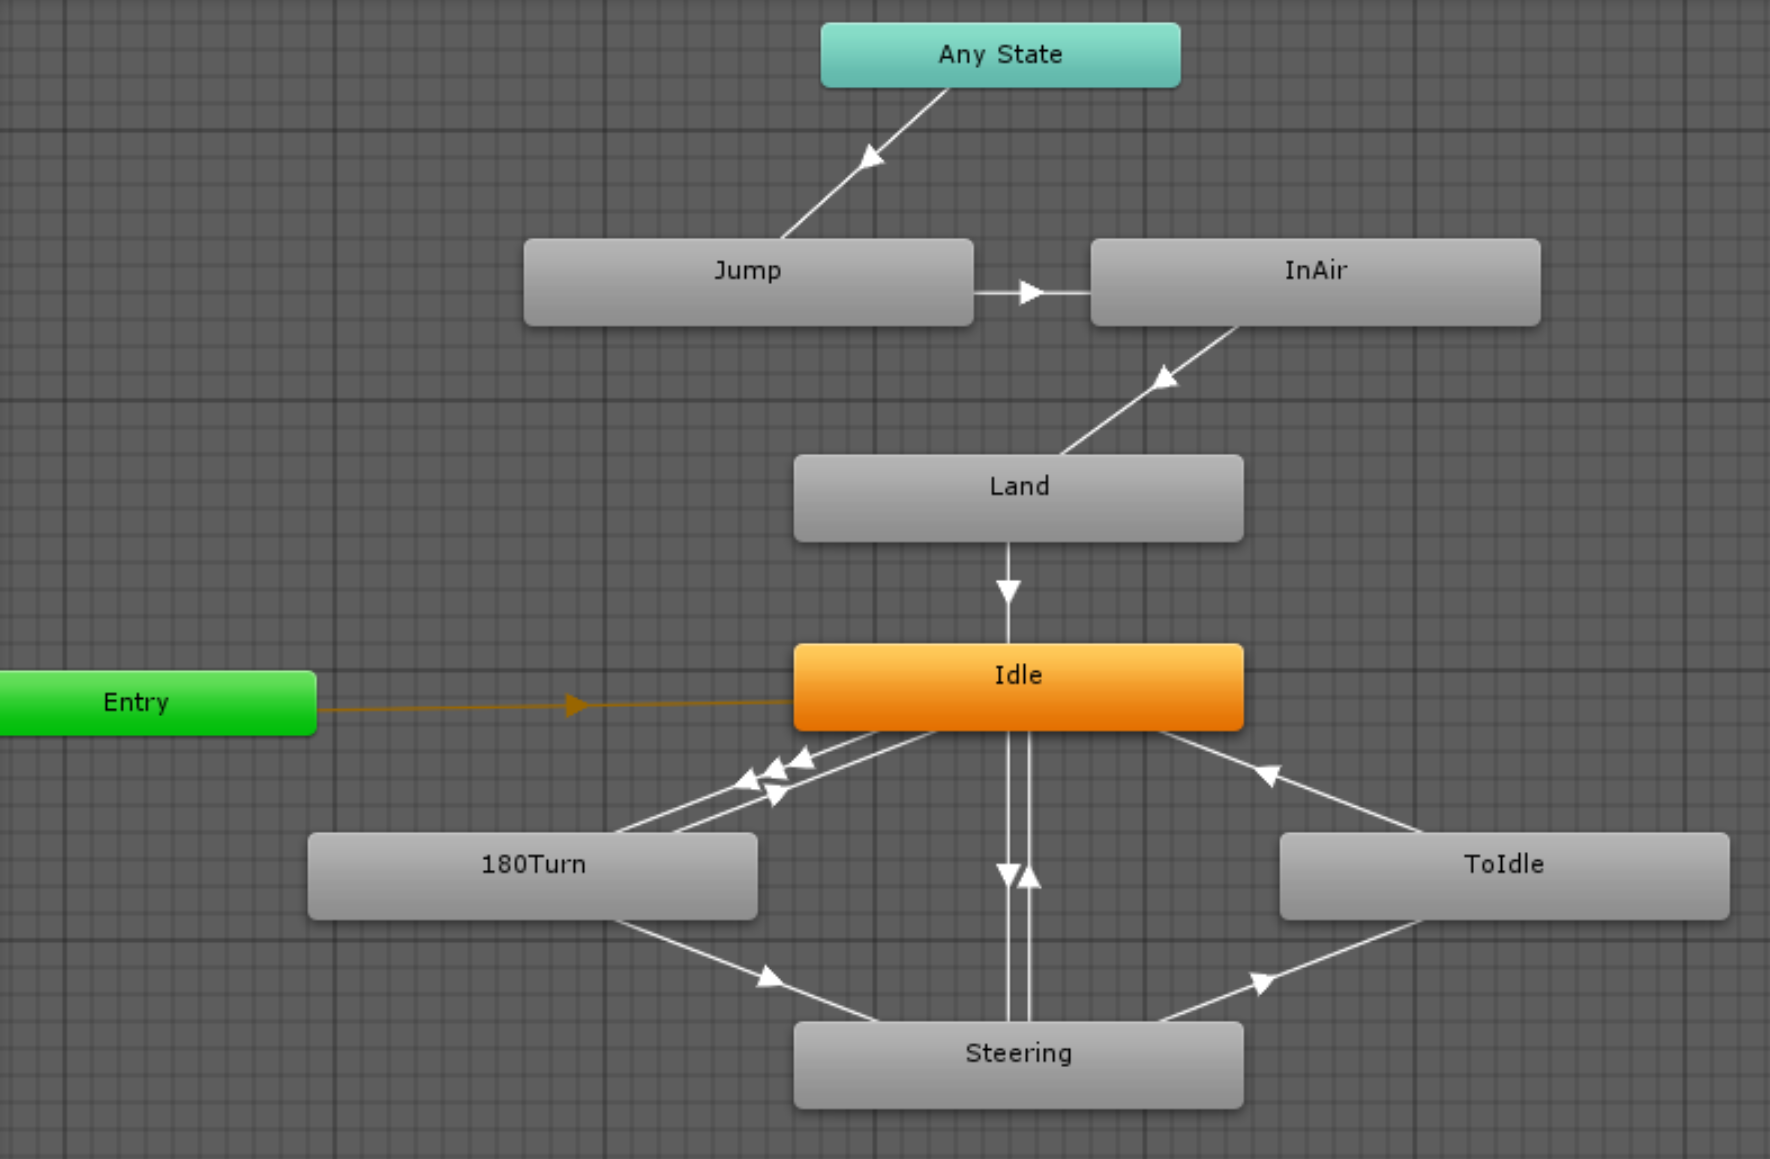
using UnityEngine;
using System.Collections;

public class Jump : MonoBehaviour {

    public float jumpForceUp = 10f;
    public float jumpForceForward = 20f;
    public float additionalGravity = 10f;
    public float maxGroundCheckDistance = 0.3f;
    public float groundCheckPauseTime = 0.5f;
    public Transform groundCheck;
    Animator anim;
    Rigidbody rb;

    public bool onGround = true;
    float lastJumpTime = 0f;
    // Use this for initialization
    void Start () {

        //We store the reference to the Animator and the Rigidbody components when the game starts
        anim = GetComponent<Animator>();
        rb = GetComponent<Rigidbody>();
    }

    // Update is called once per frame
    void Update () {

        //We check if player pressed SPACE and if the character is on ground
        if (Input.GetKeyDown(KeyCode.Space) && onGround)
        {
            //If the character is on ground, we save the lastJumpTime to pause the GroundCheck() function for a moment.
            lastJumpTime = Time.time;
            //We turn off the root motion in the Animator to make the character be moved only with physics.
            anim.applyRootMotion = false;
            //We set the onGround variable to false, because our character is in the air.
            onGround = false;
            //We apply the force to the Rigid Body component of the character to make it jump
            rb.AddForce(Vector3.up* jumpForceUp + transform.forward * jumpForceForward, ForceMode.Impulse);
            //We trigger the Jump Trigger in the Animator Controller to make the character play jump animation
            anim.SetTrigger("Jump");
        }
        GroundCheck();
    }

    //This function checks if the character stands on ground
    void GroundCheck()
    {
        //First we check if the groundCheckPause time has passed from the lastJumpTime
        //We need to pause the GroundCheck() for a short amount of time after jump
        //to let the character be in air
        if(Time.time > lastJumpTime + groundCheckPauseTime  &&
            Physics.Raycast(groundCheck.position, Vector3.down, maxGroundCheckDistance))
        {
            //If we're on ground we set the onGround variable and turn on the root motion in the Animator component
            onGround = true;
            anim.applyRootMotion = true;
        }
        else
        {
            onGround = false;
        }

        //We set the OnGround parameter in the Animator Controller accordingly to the onGround variable
        anim.SetBool("OnGround", onGround);
    }

    void FixedUpdate()
    {
        //We add some additional gravity force to make the character land faster
        if (additionalGravity > 0f && !onGround)
        {
            rb.AddForce(Vector3.down * additionalGravity, ForceMode.Force);
        }
    }
}
Jump animation is divided into three parts:
- Jump: In this animation, our character starts to jump
- InAir: This is a long looped animation of the character being in the air (or falling down)
- Land: This animation is played when the character touches the ground after being in the air
Using root motion to drive a NavMesh Agent's movement with animations

using UnityEngine;
using System.Collections;

public class NavAgent : MonoBehaviour {

    //This variables stores the reference to the Nav Mesh Agent component
    NavMeshAgent agent;

    //This variable stores the reference to the Animator component
    Animator anim;

    //This variable is used to calculate the speed value and set the Speed parameter in the Animator Controller
    //It is a public variable, because we want to use it in another script later
    [HideInInspector]
    public float speed = 0f;

    //This variable is used to calculate the direction we want to go to and set the Direction parameter in the Animator Controller
    //It is a public variable, because we want to use it in another script later
    [HideInInspector]
    public float direction = 0f;

    // Use this for initialization
    void Start()
    {
        //We set the references to the Nav Mesh Agent component and the Animator component
        agent = GetComponent<NavMeshAgent>();
        anim = GetComponent<Animator>();
    }
    // Update is called once per frame
    void Update()
    {
        //We turn off the rotation updating in the Nav Mesh Agent component,
        //because we will use root motion for that
        agent.updateRotation = false;

        //We calculate the angle between the forward axis of our character and the desired move vector. We multiply the angle by the sign (1 or -1) of the
        //dot product of our desired move direction vector and our character's right axis. This dot will be greater than 0 if our desired move vector points towards
        //the right axis of our character, and it will be less than 0, when i points in the left direction.
        direction = Vector3.Angle(transform.forward, agent.desiredVelocity) * Mathf.Sign(Vector3.Dot(agent.desiredVelocity, transform.right));

        //Speed is the magnitude of our desired move vector
        speed = agent.desiredVelocity.magnitude;

        //We set the Direction, DirectionRaw, Speed and SpeedRaw parameters in our Animator Controller to make the character move.
        anim.SetFloat("Direction", direction, 0.2f, Time.deltaTime);
        anim.SetFloat("DirectionRaw", direction);
        anim.SetFloat("Speed", speed, 0.2f, Time.deltaTime);
        anim.SetFloat("SpeedRaw", speed);
    }
    //This function is called every frame after all Animator states have been evaluated
    void OnAnimatorMove()
    {
        //We set the agent's velocity to be the equal to the root node velocity (delta position divided by the delta time).
        agent.velocity = anim.deltaPosition / Time.deltaTime;

        //We set the transform rotation to be the same as the root node rotation
        transform.rotation = anim.rootRotation;
    }

}
using UnityEngine;
using System.Collections;

public class NavAgentWithRigidBody : MonoBehaviour {

    //This variables stores the reference to the Nav Mesh Agent component
    NavMeshAgent agent;

    //This variable stores the reference to the Animator component
    Animator anim;

    //This variable is used to calculate the speed value and set the Speed parameter in the Animator Controller
    //It is a public variable, because we want to use it in another script later
    [HideInInspector]
    public float speed = 0f;

    //This variable is used to calculate the direction we want to go to and set the Direction parameter in the Animator Controller
    //It is a public variable, because we want to use it in another script later
    [HideInInspector]
    public float direction = 0f;

    // Use this for initialization
    void Start()
    {
        //We set the references to the Nav Mesh Agent component and the Animator component
        agent = GetComponent<NavMeshAgent>();
        anim = GetComponent<Animator>();
    }
    // Update is called once per frame
    void Update()
    {
        //We turn off the position and rotation updating in the Nav Mesh Agent component,
        //because we will use root motion for that
        agent.updatePosition = false;
        agent.updateRotation = false;

        //We calculate the angle between the forward axis of our character and the desired velocity vector of the agent. We multiply the angle by the sign (1 or -1) of the
        //dot product of our desired velocity vector and our character's right axis. This dot will be greater than 0 if our desired velocity vector points towards
        //the right axis of our character, and it will be less than 0, when it points in the left direction.
        direction = Vector3.Angle(transform.forward, agent.desiredVelocity) * Mathf.Sign(Vector3.Dot(agent.desiredVelocity, transform.right));

        //Speed is the magnitude of our desired velocity vector
        speed = agent.desiredVelocity.magnitude;

        //We set the Direction and Speed parameters in our Animator Controller to make the character move.
        anim.SetFloat("Direction", direction, 0.2f, Time.deltaTime);
        anim.SetFloat("Speed", speed, 0.2f, Time.deltaTime);


        //We force the agent position to be the same as the transform position (to make them synchronized)
        agent.nextPosition = transform.position;
    }
}
Using triggers to grab an edge while jumping

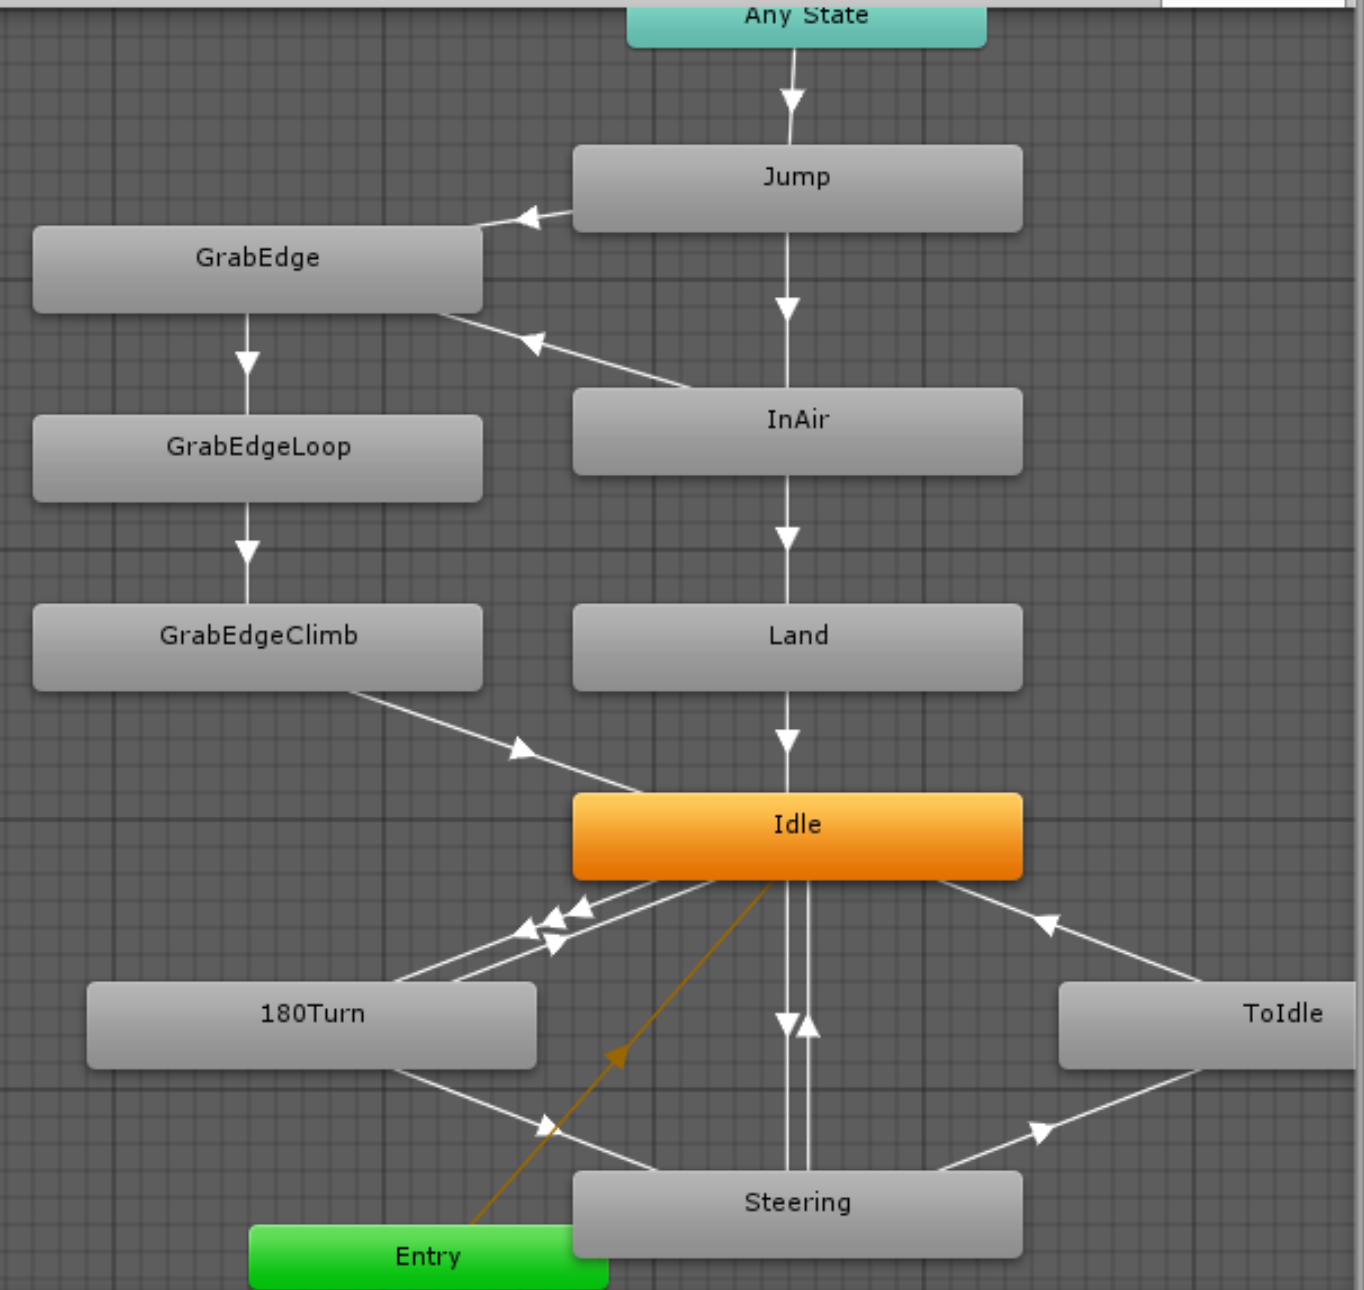


using UnityEngine;
using System.Collections;

public class EdgeGrab : MonoBehaviour {

    Animator anim;
    Rigidbody rb;
    //We need references to those scripts to turn them off while we grab the edge.
    //We don't want our character to move or jump when performing the edge grab action
    RootMotionSteering steeringScript;
    Jump jumpScript;
    //The trigger script is setting this variable for us in the Grab function. This is the target transform
    //that we want to match our position with
    Transform grabTarget;
    //This flag is used to determine wheter we should use Lerp function to adjust the character's position
    //when grabing an edge
    bool adjustPosition = false;
    //This is the speed multiplier in which we will interpolate the position and rotation of our character
    //to match the position of the edge
    public float lerpSpeed = 10f;

    void Start () {
        //Here we set all the references to the needed components
        anim = GetComponent<Animator>();
        rb = GetComponent<Rigidbody>();
        steeringScript = GetComponent<RootMotionSteering>();
        jumpScript = GetComponent<Jump>();
    }

    //This function is called from the trigger game object
    //It sets the grabTarget, makes our character play GrabEdge animations
    //turns on the GrabLerp method (with the adjustPosition flag)
    //and disables all the other scripts on our character.
    //It also turns the Rigid Body to be kinematic, that turns off the collision.
    //We need our character's collision to be turned off, because it climbs
    //the edge using animation. We also turn the root motion on, because we
    //want to use animation for climbing the edge.
    public void Grab (Transform target) {
        grabTarget = target;

        if (grabTarget != null)
        {
            anim.SetTrigger("GrabEdge");
            adjustPosition = true;
            steeringScript.enabled = false;
            jumpScript.enabled = false;
            rb.isKinematic = true;
            anim.applyRootMotion = true;

        }
    }
    //This function is called in FixedUpdate() and matches the position
    //and rotation of our character with the grabTarget transform.
    void GrabLerp()
    {
        if (grabTarget == null || !adjustPosition)
        {
            return;
        }
        if ((transform.position - grabTarget.position).sqrMagnitude > 0.001f)
        {
            //We use the Lerp method with the Time.delta time instead of a finite timer, so we need
            //to check if we are close enough to our destination. If so, we stop the interpolation and
            //set the position and rotation to match our target.
            transform.rotation = Quaternion.Lerp(transform.rotation, grabTarget.rotation, Time.deltaTime * lerpSpeed);
            transform.position = Vector3.Lerp(transform.position, grabTarget.position, Time.deltaTime * lerpSpeed);
         }
         else
         {
            transform.position = grabTarget.position;
            transform.rotation = grabTarget.rotation;
         }

    }
    //This function is used as an animation event in the GrabEdgeClimb animation
    //It's called after our character climbs the edge. It re-enables the scripts
    //and makes the rigid body non - kinematic again.
    public void StopGrab()
    {
        rb.isKinematic = false;
        steeringScript.enabled = true;
        jumpScript.enabled = true;
    }
    void FixedUpdate()
    {
        //We call GrabLerp() in FixedUpdate, because our character has a rigid body.
        GrabLerp();
    }
    void Update()
    {
        //We set the PullUp trigger in the Animator, when player presses the Up Arrow key
        //Input should be implemented in the Update() function, as it would be less responsive in FixedUpdate()
        if (Input.GetKeyDown(KeyCode.UpArrow))
        {
            if (anim.GetCurrentAnimatorStateInfo(0).IsName("Base Layer.GrabEdgeLoop"))
            {
                grabTarget = null;
                anim.SetTrigger("PullUp");
            }
        }
    }


}
using UnityEngine;
using System.Collections;

public class EdgeTrigger : MonoBehaviour {
    //This is the transform that will work aa the target for our character
    //when we grab the edge. Our character will math this rooTarget transform's
    //position and rotation.
    public Transform rootTarget;

    //This variable holds the distance in which we will re-enable the trigger after it was used.
    //We need a method to disable and enable the trigger to prevent our character from grabbing the
    //edge when we don't want it.
    public float reEnableDistance = 2f;
    //We store the player transform in this variable, after our character enters the trigger.
    //It is used to check the distance from the character to the rootTarget, to re-enable the trigger.
    Transform playerTransform;
    //This flag tells us that we want to start checking the distance to re-enable the trigger.
    bool checkToEnable = false;

    //This function is called when a rigid body enters the trigger
    void OnTriggerEnter (Collider other) {

        //We are checking if the entering object has the Player tag (to make sure it is our character)
        if (other.gameObject.CompareTag("Player"))
        {
            //We store the playerTransform to use it later for checking the distance
            playerTransform = other.gameObject.transform;

            //We get Animator and EdgeGrab components. EdgeGrab is the script that
            //handles grabbing the edge on our character's side.
            Animator anim = other.gameObject.GetComponent<Animator>();
            EdgeGrab grab = other.gameObject.GetComponent<EdgeGrab>();

            if (grab != null )
            {
                //We check if our character is plaing the InAir or Jump animations.
                //Only then we want to trigger the Grab function.
                if (anim.GetCurrentAnimatorStateInfo(0).IsName("Base Layer.InAir")
                    || anim.GetCurrentAnimatorStateInfo(0).IsName("Base Layer.Jump"))
                {
                    //We trigger the Grab() function in the EdgeGrab script attached to the player
                    //It handles the grab on the character's side.
                    grab.Grab(rootTarget);

                    //We disable the trigger's collider to prevent the character from grabbing the edge
                    //again, after it climbs it. We also set the checkToEnable flag to start checking when
                    //we can re-enable the trigger.
                    gameObject.GetComponent<Collider>().enabled = false;
                    checkToEnable = true;
                }
            }

        }

    }
    void Update()
    {
        //If the checkToEnable flag is true, we check the distance between our player character
        //and the rootTarget transform. If it is bigger than the reEnableDistance, we enable the
        //trigger again and stop checking further.
        if (checkToEnable)
        {
            if (playerTransform == null)
            {
                gameObject.GetComponent<Collider>().enabled = true;
            }
            else if((playerTransform.position - rootTarget.position).magnitude > reEnableDistance)
            {
                checkToEnable = false;
                gameObject.GetComponent<Collider>().enabled = true;
            }
        }
    }
}
Chapter 5: Character Actions and Expressions
This chapter explains the usage of animations for character actions and expressions and covers the following recipes:
- Creating an appear or a disappear animation
- Creating background characters and critters with animation-driven behavior
- Using Blend Trees to create randomized actions
- Using Quaternion.LookRotation() and Animator.SetLookAtPosition()
- methods to make characters follow an object with their gaze
- Action Points – performing an action in a specified spot
- Synchronizing an animation with objects in the scene
- Using IK for interacting with scene objects
- Animating facial expressions with Blend Shapes
Introduction
Creating an appear or a disppear animation
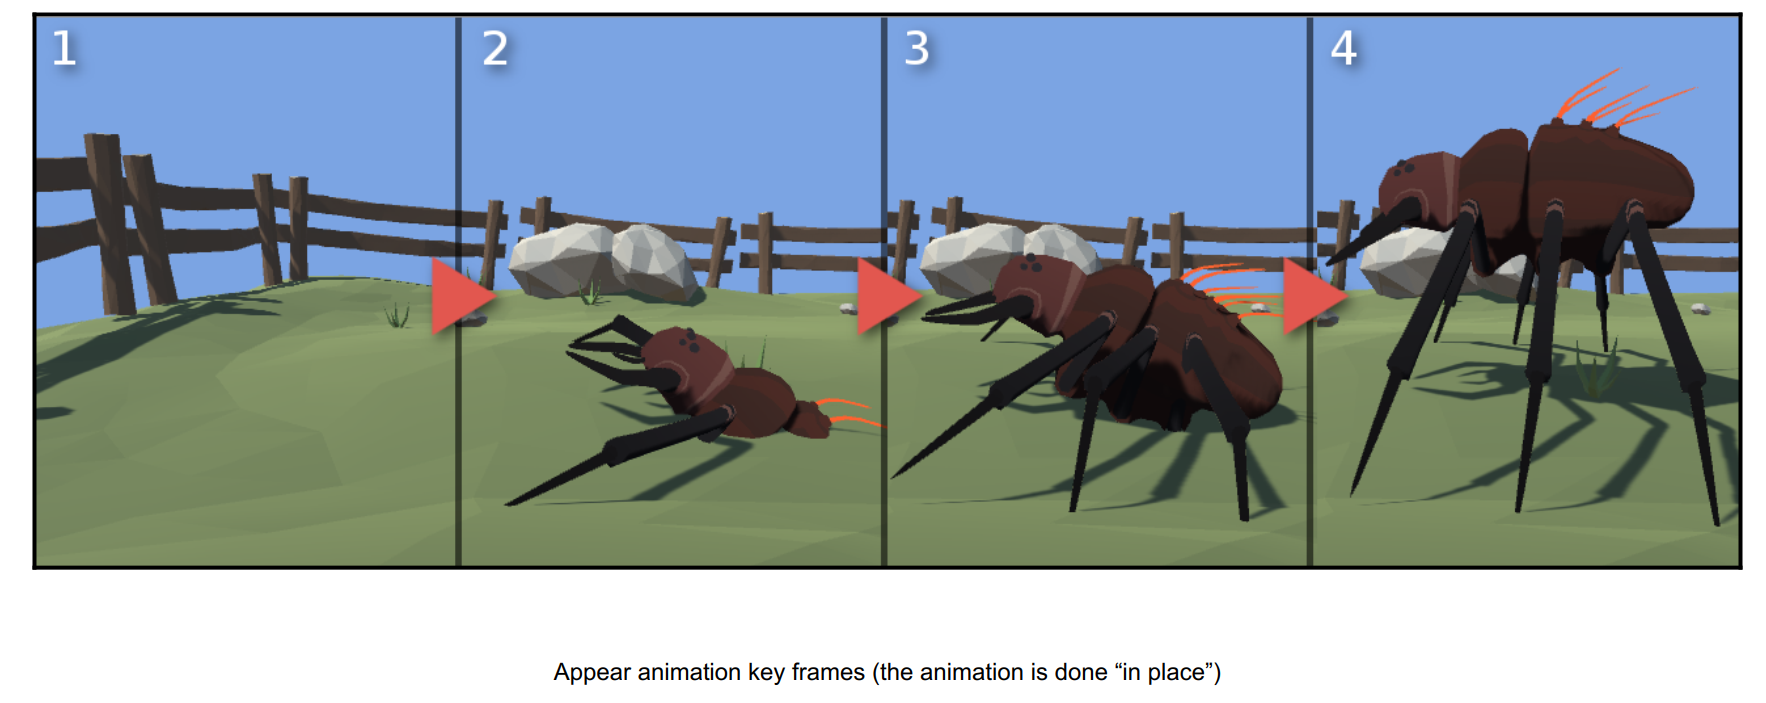
using UnityEngine;
using System.Collections;

public class Spawner : MonoBehaviour {

    public bool spawnAtStart = true;
    public float spawnAfterTime = 2f;
    public GameObject[] prefabs;

    // Use this for initialization
    void Start () {

        //If we want to spawn an object when the game starts, we start the SpawnAfterTimeCoroutine
        if (spawnAtStart)
        {
            StartCoroutine("SpawnAfterTime");
        }

    }

    IEnumerator SpawnAfterTime()
    {
        //Here we wait for the spawnAfterTime amount of seconds and spawn the prefab in our spawner position and with our spawner rotation
        yield return new WaitForSeconds(spawnAfterTime);
        Spawn(transform.position, transform.rotation);
    }

    //This function instantiates all prefabs defined in the prefabs[] array.
    //All game objects are spawned in the same position and with the same rotation
    public void Spawn (Vector3 spawnPosition, Quaternion spawnRotation) {

        for(int i = 0; i < prefabs.Length; i++)
        {
            if (prefabs[i] != null)
            {
                GameObject.Instantiate(prefabs[i], spawnPosition, spawnRotation);
            }
        }


    }
}
Creating background characters and critters with animation-driven behavior

using UnityEngine;
using System.Collections;

public class FlockDecoration : MonoBehaviour {
    GameObject[] birds;

    void Start () {

        //We find all the birds in the scene (they have the "Bird" tag assigned)
        birds = GameObject.FindGameObjectsWithTag("Bird");

        for (int i = 0; i < birds.Length; i++)
        {
            Animator anim = birds[i].GetComponent<Animator>();

            //Here we try to desynchronize the animations of the whole flock, by setting the
            //animation playback speed to a random value.
            anim.speed = Random.Range(0.8f, 1.3f);
        }

    }

    // Update is called once per frame
    void Update () {

        if (Input.GetKeyDown(KeyCode.Space))
        {
            for (int i = 0; i < birds.Length; i++)
            {
                Animator anim = birds[i].GetComponent<Animator>();

               //After we press the space button we invert the bool parameter "Fly" in each bird's Animator Controller
               //If the "Fly" parameter is true, birds try to fly, if it's false they try to land.
                anim.SetBool("Fly", !anim.GetBool("Fly"));
            }
        }

    }
}
Using Blend Trees to create randomized actions


using UnityEngine;
using System.Collections;

public class RandomAction : MonoBehaviour {

    public int numActions = 3;

    // Use this for initialization
    void Start () {

        //Here we create random number and set it as the value of the Random parameter in the Animator Controller
        //This parameter is used in a Blend Tree to play a randomized animation
        Animator anim = GetComponent<Animator>();
        int randomValue = Random.Range(0, numActions);
        anim.SetFloat("Random", (float)randomValue);
    }

}
Using Quaternion.LookRotation() and AnimatorSetLookAtPosition() methods to make characters follow an object with their gaze

using UnityEngine;
using System.Collections;

public class CharacterLookAtIK : MonoBehaviour {

    //This variable stores the reference to the Animator component
    Animator anim;
    //This is the target our character will look at
    public Transform target;
    //This is the time in which we will damp the look at vector, to make it look more smooth
    public float dampTime = 0.2f;
    //This is the weight of the look at. If it's set to 0, the look at will be turned off
    public float weight = 1f;

    //We use a helper variable to be able to make the look at position changes more smooth
    Vector3 targetPosition;
    //This is a reference vector used by the Vector3.SmoothDamp() function
    Vector3 dampVelocity;

    //Start is called when the game starts
    void Start () {

        //We assign the anim variable when the game starts.
        anim = GetComponent<Animator>();
    }

    //This function is called after all animation states were evaluated. It is used for IK operations.
    //You need to enable the IK Pass in the character's Animator Controller layer properties.
    void OnAnimatorIK(int layerIndex) {
        //We check if our look at weight is less or equal than 0. If so, we don't do anything.
        if (weight <= 0f)
        {
            return;
        }
        //Here we damp the changes of the look at targetPosition
        targetPosition = Vector3.SmoothDamp(targetPosition, target.position, ref dampVelocity, dampTime);
        //This function sets the look at position for a Humanoid character.
        anim.SetLookAtPosition(targetPosition);
        //This function sets the weight of the look at for a Humanoid character.
        //If you want a smooth transition to and from look at state, lerp the weight variable in time.
        anim.SetLookAtWeight(weight);
    }
}
using UnityEngine;
using System.Collections;
[System.Serializable]

public class CharacterLookAt : MonoBehaviour {

    //We store the bone we want to affect in this variable
    public Transform bone;
    //This is the target our character will look at
    public Transform target;
    //Most often bone's forward axis is not alligned with the face, so we need to apply additional rotation to match it
    public Vector3 additionalRotation;
    //This is the maximum angle the head can rotate in every axis
    public float maxAngle = 60f;
    //This is the time in which we will damp the look at vector, to make it look more smooth
    public float dampTime = 0.2f;
    //This is the weight of the look at. If it's set to 0, the look at will be turned off
    public float weight = 1f;

    //This is the final lookat direction
    Vector3 finalLookVector;
    //This is the raw look at direction (not clamped in any way)
    Vector3 lookDirection;
    //This is the final calculated rotation
    Quaternion rotation;
    //This is a reference vector used by the Vector3.SmoothDamp() function
    Vector3 dampVelocity;

    void LateUpdate () {

        //If weight is less or equal 0, we don't want to do any calculations
        if (weight <= 0f)
        {
            return;
        }

        //Here we calculate the raw lookDirection vector. We also use the SmoothDamp function to make the changes
        //of this vector less sudden (more smooth).
        lookDirection = Vector3.SmoothDamp(lookDirection, target.position - bone.position, ref dampVelocity, dampTime);

        //We check if the angle between our transform's forward vector and  the raw lookDirection vector is greater than maxAngle
        if (Vector3.Angle(lookDirection, transform.forward) > maxAngle)
        {
            //If so, our finalLookVector is calculated by rotating the transform's forward to the lookDirection vector by
            //the maxAngle degrees. This way we create a "cone of vision".
            finalLookVector = Vector3.RotateTowards(transform.forward, lookDirection, Mathf.Deg2Rad*maxAngle, 0.5f);
        }
        else
        {
            //If we are in the "cone of vision", we don't modify the lookDirection.
            finalLookVector = lookDirection;
        }

        //Here we draw two debug lines, to visualize the modified and original lookDirection
        //You can check them in the scene view.
        Debug.DrawLine(bone.position, bone.position + finalLookVector, Color.green);
        Debug.DrawLine(bone.position, bone.position + lookDirection, Color.red);

        //Finally we calculate the bone rotation using the finalLookVector applying additional rotation.
        rotation = Quaternion.LookRotation(finalLookVector) * Quaternion.Euler(additionalRotation);
        //We also interpolate the final bone rotation between the original one and the one we've calculated.
        //So setting the weight to 0, will turn of the look at system. If you want a smooth transition
        //to and from look at state, lerp the weight variable in time.
        bone.rotation = Quaternion.Lerp(bone.rotation, rotation, weight);
    }
}
Action Points - performing an action in a specified spot

using UnityEngine;
using System.Collections;

public class ActionPoint : MonoBehaviour {

    public NavMeshAgent agent;
    public string actionTrigger = "Action";
    public bool matchPosition = true;
    public bool matchRotation = true;
    public bool matchBeforeAction = true;
    public float actionDistance = 1f;
    public float lerpSpeed = 1f;

    Transform agentTransform;
    Animator anim;

    void Start () {

        agentTransform = agent.transform;
        anim = agentTransform.GetComponent<Animator>();

        //We start the PerformAction coroutine when the game starts.
        //You can also start it after the player clicks on the action point.
        StartCoroutine("PerformAction");
    }
    //This coroutine matches the character's position and rotation to the action point's position and rotation
    IEnumerator PerformAction () {

        //We check if our character is close enough to the action point
        while ((agentTransform.position - transform.position).sqrMagnitude > actionDistance * actionDistance)
        {
            //If not, we set the Nav Mesh Agent's destination to the action point's position
            agent.SetDestination(transform.position);
            agent.Resume();
            yield return null;
        }
        //If we are close enough we stop the Nav Mesh Agent
        agent.Stop();
        if (!matchBeforeAction)
        {
            //If we want don't want to match the character's position and rotation before we start the action,
            //we can start the action now
            anim.SetTrigger(actionTrigger);
        }
        while (matchRotation == true || matchRotation == true)
        {

            yield return null;
            //If we need to match the position, we check if our character is further away than an arbitrary "error value"
            if (matchPosition && (agentTransform.position - transform.position).sqrMagnitude > 0.01f)
            {
                //We interpolate the position of our character to match the position of the action point
                agentTransform.position = Vector3.Lerp(agentTransform.position, transform.position, Time.deltaTime * lerpSpeed);
            }
            else if(matchPosition)
            {
                //If we are close enough, we set the position of the character to exactly match the position of the action point
                matchPosition = false;
                agentTransform.position = transform.position;
            }
            //If we need to match the rotation, we check the angle between our character's forward axis and our action point's forward axis.
            if (matchRotation && Vector3.Angle(agentTransform.forward, transform.forward) > 1f)
            {
                //If it's greater than 1 degree, we interpotale the character's rotation to match the action point's rotation
                agentTransform.rotation = Quaternion.Lerp(agentTransform.rotation, transform.rotation, Time.deltaTime * lerpSpeed);
            }
            else
            {
                //If the difference is less than 1 degree, we set the character's rotation to match exactly the action point's rotation
                agentTransform.rotation = transform.rotation;
                matchRotation = false;
            }
        }
        //If we wanted to match before we start playing the action, we play the action now
        if (matchBeforeAction)
        {
            anim.SetTrigger(actionTrigger);
        }
    }
}
Synchronizing an animation with objects in the scene

using UnityEngine;
using System.Collections;

public class PlayAndStop : MonoBehaviour {

    //This variable stores the reference to the character's Animator component
    public Animator characterAnimator;
    //This variable stores the reference to the object's Animator component
    public Animator objectAnimator;

    bool play = false;

    void Update () {

        if (Input.GetKeyDown(KeyCode.Space))
        {
            //When the player presses Space, we invert the PlayAnim variable in both Animator components at the same time
            play = !play;
            characterAnimator.SetBool("PlayAnim", play);
            objectAnimator.SetBool("PlayAnim", play);
        }

    }
}
Animations that have the same number of frames and the same playback speed are synchronized in Unity. All we need to care about is to start them in the same frame. That's why we have the WheelStart animations. We also need to take care of the transitions—if the transitions length differs in both Animator Controllers, the animations can be out of sync.
Using IK for interacting with scene objects


using UnityEngine;
using System.Collections;

public class PickUpIK : MonoBehaviour {

    //We store the reference to the target transform in this variable
    public Transform ikTarget;
    Animator anim;
    float ikWeight = 0f;
    void Start () {

        anim = GetComponent<Animator>();

    }

    void Update()
    {
        //We play the Pickup animation when player presses Space
        if (Input.GetKeyDown(KeyCode.Space))
        {
            anim.SetTrigger("Pickup");
        }
    }
    //This function is called in the IK Pass (after all animations were evaluated)
    void OnAnimatorIK (int layerIndex) {

        //We set the ikWeight to the value of the PickupIK Animation Curve defined in the Pickup animation
        ikWeight = anim.GetFloat("PickupIK");
        //We set the IK Position for left hand to the ikTarget transform's position
        anim.SetIKPosition(AvatarIKGoal.LeftHand, ikTarget.position);
        anim.SetIKPositionWeight(AvatarIKGoal.LeftHand, ikWeight);

    }
}
- Animation Curve: We use an Animation Curve to smoothly set the weight for the IK solver during the Pickup animation playback.
- SetIKPosition(): This function sets the target position for a given body part. We are using a public Transform ikTarget variable in the script and pass it to the function. You can get the target in runtime.
- SetIKPositionWeight(): This function sets the weight of the IK solver. A weight value of 1 means that IK is in full control of a given body part and a value of 0 means that the animation is in full control.
- IK Pass: To be able to use inverse kinematics for Humanoid characters, we need to enable the IK Pass option in the controller's layer properties.
Animating facial expressions with Blend Shapes


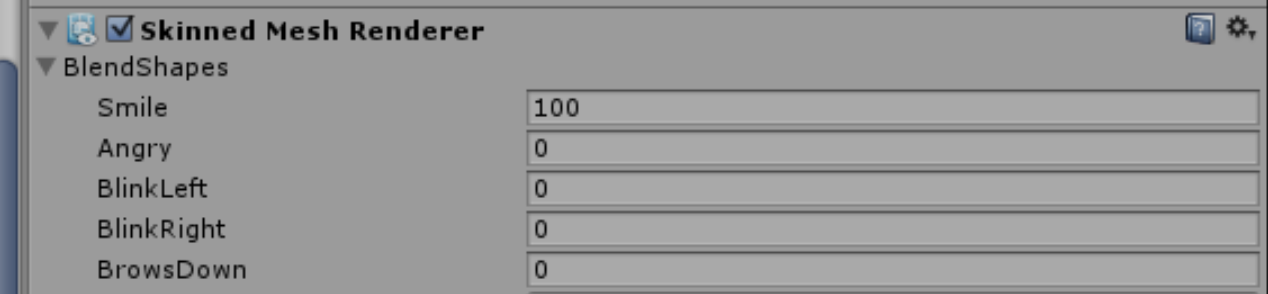
using UnityEngine;
using UnityEngine.UI;
using System.Collections;

public class BlendMultiple : MonoBehaviour {

    //This helper variables store the values of the corresponding parameters
    //in the Animator Controller
    public float Angry = 0f;
    public float Smile = 0f;
    public float BlinkLeft = 0f;
    public float BlinkRight = 0f;
    public float BrowsDown = 0f;

    Animator anim;
    // Use this for initialization
    void Start () {

        anim = GetComponent<Animator>();

    }
    void Update () {

        //We set the parameter values in the controller every frame
        anim.SetFloat("Angry", Angry);
        anim.SetFloat("Smile", Smile);
        anim.SetFloat("BlinkLeft", BlinkLeft);
        anim.SetFloat("BlinkRight", BlinkRight);
        anim.SetFloat("BrowsDown", BrowsDown);
    }

    //Functions called by a series of sliders in the UI
    //Used just for easier visualization
    public void SetSmile(Slider slider)
    {
        Smile = slider.value;
    }
    public void SetAngry(Slider slider)
    {
        Angry = slider.value;
    }
    public void SetBlinkLeft(Slider slider)
    {
        BlinkLeft = slider.value;
    }
    public void SetBlinkRight(Slider slider)
    {
        BlinkRight = slider.value;
    }
    public void SetBrowsDown(Slider slider)
    {
        BrowsDown = slider.value;
    }

}
using UnityEngine;
using System.Collections;

public class DirectBlendShapes : MonoBehaviour {

    public int blendShapeIndex = 0;
    public float blendShapeWeight = 0f;

    SkinnedMeshRenderer skinnedRenderer;

    void Start () {

        skinnedRenderer = GetComponentInChildren<SkinnedMeshRenderer>();
    }

    void Update () {

        //We can change the blend shape weight via scripts, but we need to know
        //the index of the blend shape in the blend shapes array.
        skinnedRenderer.SetBlendShapeWeight(blendShapeIndex, blendShapeWeight);

    }
}
Blend Shapes: You need to export the Blend Shapes from your 3D package. Blend Shapes store different version of the same mesh. The mesh has to have the same number of vertices. When creating new Blend Shapes, you can only move the vertices around (you cannot add or delete vertices).
FaceAnims game object: Our character is a child of a new game object, FaceAnims. This allows us to be able to animate facial expressions. As our character has its own Animator component and its own animations, we cannot
modify it with the Animation View. Adding a parent game object solves the problem.
Direct Blend Tree: We use a Blend Tree set to Direct. This allows us to blend multiple animations at once. This is suitable for Blend Shapes and facial expressions.
You don't have to create Animation Clips for Blend Shapes. Instead, you can manipulate them directly from code. Use the SetBlendShapeWeight() function on the Skinned Mesh Renderer component. You will need to know the index of the Blend Shape in the Blend Shapes array (you can check it in the Inspector, in the Skinned Mesh Renderer componen of the character). We've prepared a small script that sets the weight. It is attached to the DirectBlendShapes game object. You can also find it in the Scripts directory of this recipe.
Creating animations for Blend Shapes gives more flexibility. You can also animate the Blend Shapes' weight with the Animation View. This way you can create dialog animations and believable animated facial expressions.
Chapter 6: Handling Combat
This chapter explains usage of animations in combat and covers the following topics:
- Using Sub-State Machines in Animator Controller
- Using Animation Events to trigger script functions
- Using transitions from Any State to play hit reactions
- Using root motion to create a dodge move
- Checking what Animator state is currently active to disable or enable player actions
- Using Animation Events to draw a weapon
- Using Avatar Masks and animator controller layers to walk and aim
- Using the LookAt() method to aim
- Using Blend Trees to aim
- Detecting the hit location on a character
Introduction
Every game is different and every game handles combat mechanics in its own way. Despite that, there is a common set of concepts that are useful in almost every case.
Using Sub-State Machines in Animator Controller
Using Animation Events to trigger script functions
Using transitions from Any State to play hit reactions
Using root motion to create a dodge move
Checking what Animator state is currently active to disable or enable player actions
Using Animation Events to draw a weapon
Using Avatar Masks and animator controller layers to walk and anim
Using the LookAt() method to anim
Using Blend Trees to anim
Detecting the hit location on a chracter
Chapter 7: Special Effects
Introduction
Using Animation Events to trigger sound and visual effects
Creating camera shakes with the Animation View and the Animator Controller
Using the Animation View to animate public script variables
Using additive Mecanim layers to add extra motion to a character
Using Blend Shapes to morph an object into another one
Using wind emitters to create motion for foliage and particle systems
Using sprite sheets to animate particles
Animating properties of a particle system with the Animation View
Using waveform of a sound clip to animate objects in the scene
Creating a day and night cycle with the Animation View
Chapter 8: Animating Cutscenes
Introduction
Using the Animation View to animate the camera
Changing cameras with animation
Synchronizing animation of multiple objects
Importing a whole cutscene from a 3D package
Synchronizing subtitles
Using root motion to play cutscenes in gameplay
Chapter 9: Physics and Animations
Introduction
Using cloth
Using rigid body joints
Destructible objects
Creating a humanoid ragdoll with the ragdoll wizard
Creating a generic ragdoll with character joints
Applying force to a ragdoll
Dismemberment
Getting up from a ragdoll
Chapter 10: Miscellaneous
Introduction
Using math to animate an object
Using the Lerp() function to animate an object
Using the Rotate() function to animate an object
Preparing motion capture files for humanoid characters
Adding behaviors to Mecanim states