最近在公司闲着没事研究了几天,终于搞定了SSE从理论到实际应用,中间还是有一些坑的。
1.SSE简介
SSE(Server-sent events)翻译过来为:服务器发送事件。是基于http协议,和WebSocket的全双工通道(web端和服务端相互通信)相比,SSE只是单通道(服务端主动推送数据到web端),但正是由于此特性,在不需要客户端频繁发送消息给服务端,客户端却需要实时或频繁显示服务端数据的业务场景中可以使用。如:新邮件提示,在浏览网页时提示有新信息或新博客,监控系统实时显示数据。。。
在web端消息推送功能中,由于传统的http协议需要客户端主动发送请求,服务端才会响应;基本的ajax轮寻技术便是如此,但是此方法需要前端不停的发送ajax请求给后端服务,无论后端是否更新都要执行相应的查询,无疑会大大增加服务器压力,浪费不必要的资源。而SSE解决了这种问题,不需前端主动请求,后端如果有更新便会主动推送消息给web端。
在SSE中,浏览器发送一个请求给服务端,通过响应头中的Content-Type:text/event-stream;等 向客户端证明这是一个长连接,发送的是流数据,这时客户端不会关闭连接,一直等待服务端发送数据。
关于SSE的前端用法请自行百度或参考一下连接:
http://www.ruanyifeng.com/blog/2017/05/server-sent_events.html
2.python框架flask中SSE的包flask_sse的使用
坑点:刚开始根据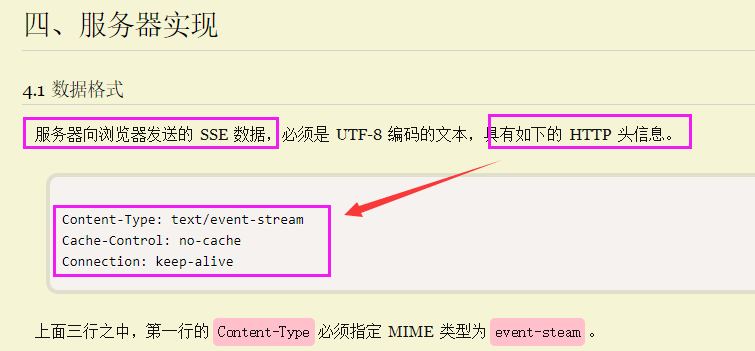 ,自信的以为在服务器返回数据时只要是response头部添加这三个字段便实现了SSE功能,但是在flask启动自带服务器后,发现浏览器总是触发error事件,并且从新连接。这样的话和ajax轮询没有任何区别。
后来找到flask框架的flask_sse文档 http://flask-sse.readthedocs.io/en/latest/quickstart.html 其中发现:
Server-sent events do not work with Flask’s built-in development server, because it handles HTTP requests one at a time. The SSE stream is intended to be an infinite stream of events, so it will never complete. If you try to run this code on with the built-in development server, the server will be unable to take any other requests once you connect to this stream. Instead, you must use a web server with asychronous workers. Gunicorn can work with gevent to use asychronous workers: see gunicorn’s design documentation.
flask内置服务器不适合SSE功能,一次只能处理一个请求。所以只能使用具有异步功能的服务器来完成此项功能。所以本人想在不引入任何包的情况下完成此功能是不可能的了。
在官方给出的flask_sse 文档中,使用 gunicorn(WSGI协议的一个容器,和uWSGI一样的功能) + gevent 作为异步功能的服务器。
ubuntu系统中安装:pip install flask-sse gunicorn gevent
由于官方文档中给出的实例代码是MTV(model-template-view)模式,前后端代码杂糅在一起,看着不舒服,于是改成了restful风格的代码。
下面给出restful风格的flask_sse实现的实时聊天(消息推送)功能。
后端主要文件
sse.py
 1 #coding:utf8
 2 # 将程序转换成可以使用gevent框架的异步程序
 3 from gevent import monkey
 4 monkey.patch_all()
 5
 6 from flask import Flask, send_from_directory, redirect, url_for, request, jsonify
 7 from flask_sse import sse
 8
 9 app = Flask(__name__)
10 #redis路径
11 app.config["REDIS_URL"] = "redis://localhost"
12 #app注册sse的蓝图,并且访问路由是/stream1
13 app.register_blueprint(sse, url_prefix='/stream1')
14
15 #重定向到发送消息页面
16 @app.route('/')
17 def index():
18     return redirect(url_for('.index', _external=True) + 'upload/'+'send_messages.html')
19
20 #接收send_messages.html文件中接口发送的数据,并且通过sse实时推送给用户
21 @app.route('/messages',methods=['POST'])
22 def send_messages():
23     channel=request.values.get('channel')
24     message=request.values.get('message')
25
26     #关于channel的使用==> http://flask-sse.readthedocs.io/en/latest/advanced.html
27     #如channel是channel_bob,则只有channel_bob.html才能接收数据
28     #sse推送消息
29     sse.publish({"message": message}, type='social', channel=channel)
30     return jsonify({'code': 200, 'errmsg': 'success', 'data': None})
31
32 @app.route('/upload/<path:path>')
33 def send_file(path):
34     return send_from_directory('upload/', path)
35
36 if __name__=='__main__':
37     app.run()
前端接收消息文件
channel_bob.html
1 <!DOCTYPE html> 2 <html> 3 <head> 4 <title>Flask-SSE Quickstart</title> 5 </head> 6 <body> 7 <h1>Channel:channel_bob</h1> 8 <div id="get_message"></div> 9 <script src="jquery-3.1.1.js" type="text/javascript" charset="utf-8"></script> 10 <script> 11 $(function () { 12 //只接收channel为channel_bob的消息 13 var source = new EventSource("/stream1?channel=channel_bob"); 14 source.addEventListener('social', function (event) { 15 var data = JSON.parse(event.data); 16 $('#get_message').append(data.message+' '); 17 }, false); 18 source.addEventListener('error', function (event) { 19 console.log('reconnected service!') 20 }, false); 21 }) 22 </script> 23 </body> 24 </html>
前端发送消息文件
send_messages.html
 1 <!DOCTYPE html>
 2 <html>
 3 <head>
 4     <meta charset="UTF-8">
 5     <title></title>
 6 </head>
 7 <body>
 8 channel:<input type="text" id="channel" value=""/>
 9 <div>You can choise these channels: channel_bob,channel_tom,channel_public</div>
10 <br/>
11 message:<input type="text" id="message" value=""/>
12 <br/>
13 <button id="button">send message</button>
14 <div id="success"></div>
15 <script src="jquery-3.1.1.js" type="text/javascript" charset="utf-8"></script>
16 <script type="text/javascript">
17     <!--发送消息页面,发送给三个不同的channel,点击发送按钮后,对于的channel页面会接收到数据-->
18     $(function () {
19         $("#button").click(function () {
20             var channel = $('#channel').val();
21             var message = $('#message').val();
22             var json_data = {
23                 'channel': channel,
24                 'message': message
25             }
26             var http_url = 'http://127.0.0.1:5000/';
27             $.ajax({
28                 url: http_url + "messages",
29                 type: 'post',
30                 dataType: "json",
31                 data: json_data,
32                 success: function (data) {
33                     if (data.code == 200) {
34                         $('#success').text('Send message success!')
35                     }
36                 },
37                 error: function (jqXHR, textStatus, errorThrown) {
38                     console.log(textStatus)
39                     hide_popover('#user_deatil_submit', '程序错误,请联系管理员')
40                 }
41             });
42         });
43     })
44 </script>
45 </body>
46 </html>
项目上传到github上,有详细注释。
https://github.com/Rgcsh/sse_chait
坑点:
1.uWSGI配置时,在sse_chait.ini配置文件中,socket参数是给在搭建nginx+uWSGI服务时用的,http参数是uWSGI服务(浏览器直接访问网址)时用的
2.在服务启动时,如果使用uWSGI+gevent启动服务时,要在sse.py顶部添加
from gevent import monkey
monkey.patch_all()
和sse_chait.ini添加
gevent = 100
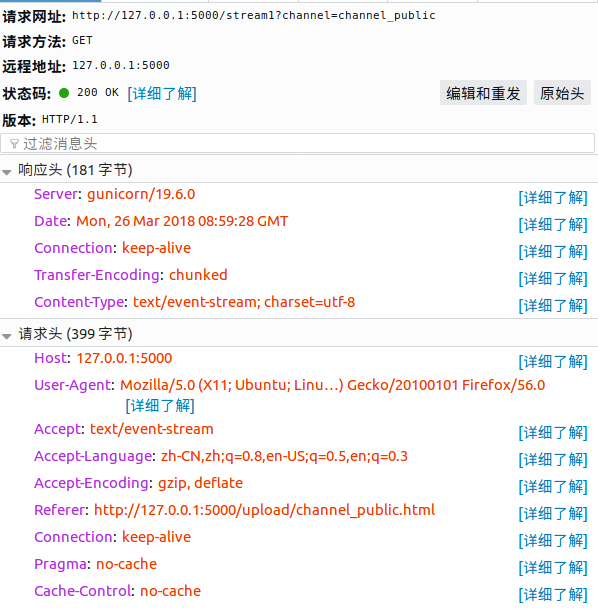
3.真正的SSE长连接,是一个连接持续工作,并非http请求一样,收到回复就断开连接,如果每次收到响应后,便触发error事件,说明开发的SSE功能有问题。
真正的SSE连接应该如下,响应时间和请求头,响应头如下

参考网址:
http://flask-sse.readthedocs.io/en/latest/index.html
https://www.cnblogs.com/ajianbeyourself/p/3970603.html
www.bubuko.com/infodetail-1028284.html
https://www.cnblogs.com/franknihao/p/7202253.html
http://gunicorn.readthedocs.io/en/latest/getstart.html
http://heipark.iteye.com/blog/1847421
www.ruanyifeng.com/blog/2017/05/server-sent_events.html
我的博客即将搬运同步至腾讯云+社区,邀请大家一同入驻:https://cloud.tencent.com/developer/support-plan