3. 节流(访问频率控制)
3.1 节流(访问频率控制)的简单实现
节流(访问频率控制)的简单实现的代码如下:
class VisitThrottle(object):

    def allow_request(self, request, view):
        # return True # 表示可以继续访问
        return False # 表示访问频率太高,被限制

    def wait(self):
        pass


class AuthView(APIView):
    """用于用户登录认证"""
    authentication_classes = []
    permission_classes = []
    throttle_classes = [VisitThrottle,]

    def post(self, request, *args, **kwargs):
        ret = {'code': 10000, 'msg': None}
        try:
            user = request._request.POST.get('username')
            pwd = request._request.POST.get('password')
            obj = models.UserInfo.objects.filter(username=user, password=pwd).first()
            if not obj:
                ret['code'] = 10001
                ret['msg'] = '用户名或密码错误!!!'
            # 为用户创建token
            token = md5(user)
            models.UserToken.objects.update_or_create(user=obj, defaults={'token': token})
            ret['token'] = token
        except Exception as e:
            ret['code'] = 10002
            ret['msg'] = '请求异常!!!'
        return JsonResponse(ret)
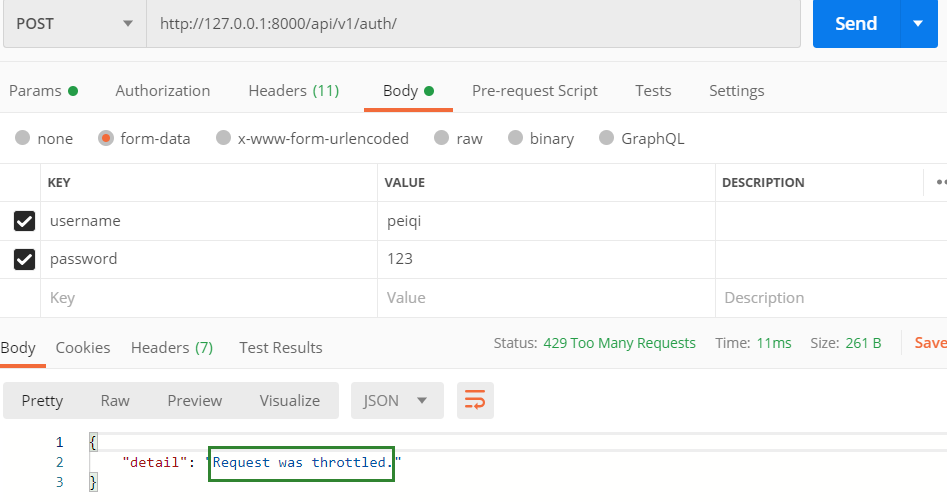
当频率控制类中的allow_request()方法的返回值如果是False时,代表访问频率太高,被限制,如下图:
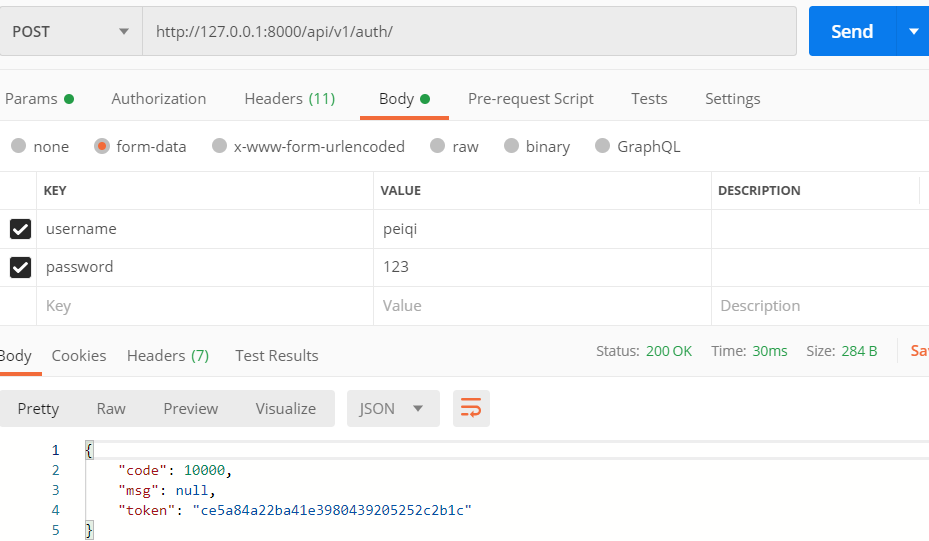
当频率控制类中的allow_request()方法的返回值如果是True时,代表可以继续访问,如下图:
3.2 节流(访问频率控制)的实现
目标:控制60s内只能访问3次。
实现如下:
import time
from rest_framework.throttling import BaseThrottle


VISIT_RECORD = {}

class VisitThrottle(object):

    def __init__(self):
        history = None

    def allow_request(self, request, view):
        # 获取用户IP
        remote_addr = request.META.get('REMOTE_ADDR')
        ctime = time.time()
        if remote_addr not in VISIT_RECORD:
            VISIT_RECORD[remote_addr] = [ctime,]
            return True
        history = VISIT_RECORD.get(remote_addr)
        self.history = history

        while history and history[-1] < ctime -60:
            history.pop()

        if len(history) < 3:
            history.insert(0, ctime)
            return True

        # return True # 表示可以继续访问
        # return False # 表示访问频率太高,被限制

    def wait(self):
        """
        还需要等多少秒才可以继续访问
        :return:
        """
        ctime = time.time()
        return 60 - (ctime-self.history[-1])


class AuthView(APIView):
    """用于用户登录认证"""
    authentication_classes = []
    permission_classes = []
    throttle_classes = [VisitThrottle,]

    def post(self, request, *args, **kwargs):
        ret = {'code': 10000, 'msg': None}
        try:
            user = request._request.POST.get('username')
            pwd = request._request.POST.get('password')
            obj = models.UserInfo.objects.filter(username=user, password=pwd).first()
            if not obj:
                ret['code'] = 10001
                ret['msg'] = '用户名或密码错误!!!'
            # 为用户创建token
            token = md5(user)
            models.UserToken.objects.update_or_create(user=obj, defaults={'token': token})
            ret['token'] = token
        except Exception as e:
            ret['code'] = 10002
            ret['msg'] = '请求异常!!!'
        return JsonResponse(ret)
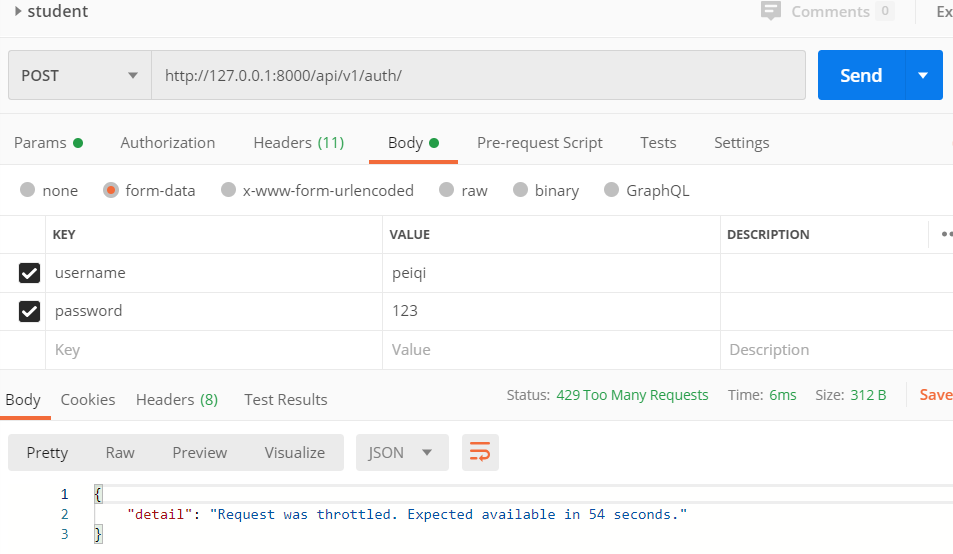
前三次都可以正常访问,第四次开始被控制,并且显示还有多少秒可以正常访问:
3.3 节流源码流程分析
前面和认证的源码流程分析是一样的,只是在initial()方法内出现了节流(访问频率控制):
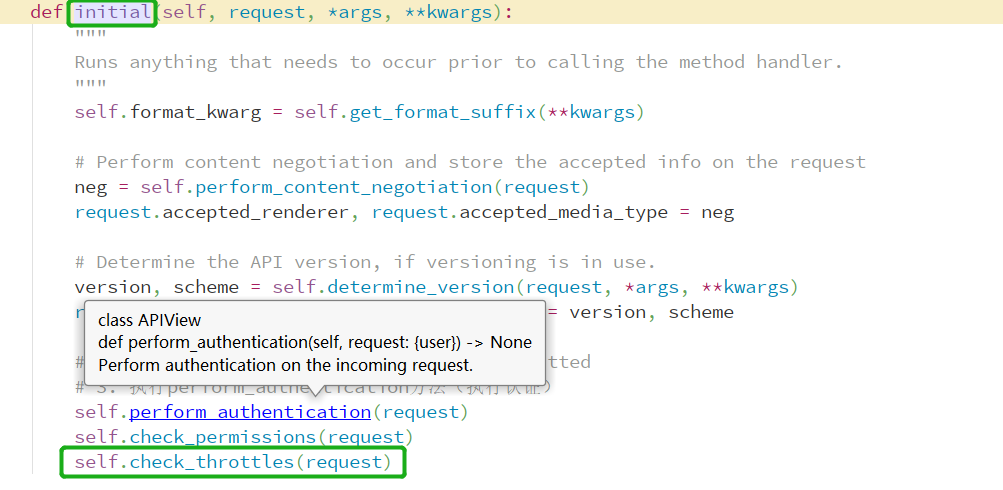
点开self.check_throttles()方法,查看其源码:
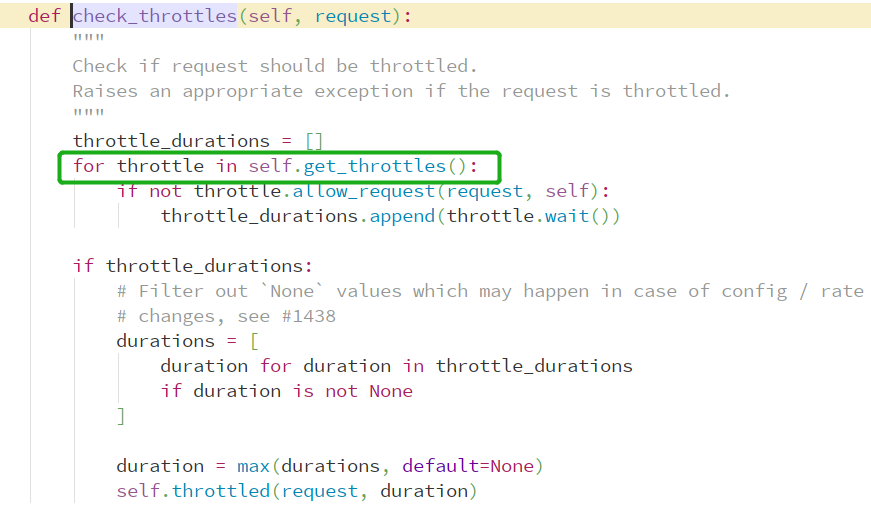
继续点开get_throttles()方法的源码:

继续点开self.throttles_classes的源码:
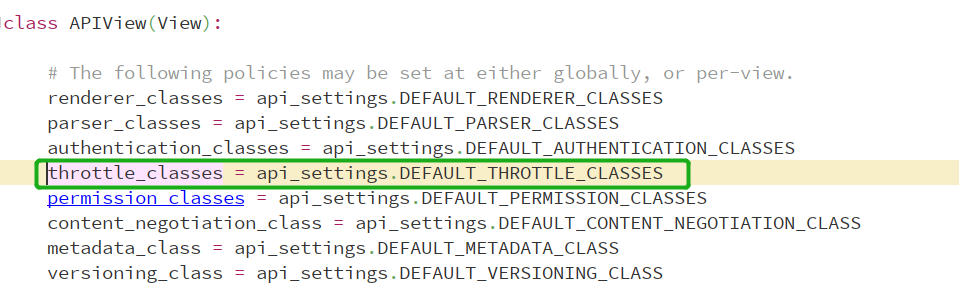
最后我们发现源码和认证以及权限都是几乎一样的,所以其全局配置或者局部配置也是和认证或者权限是一样的。
3.4 节流的配置文件
由上面的源码流程分析发现,权限的全局配置或者局部配置与认证的全局配置或局部配置是一样的。
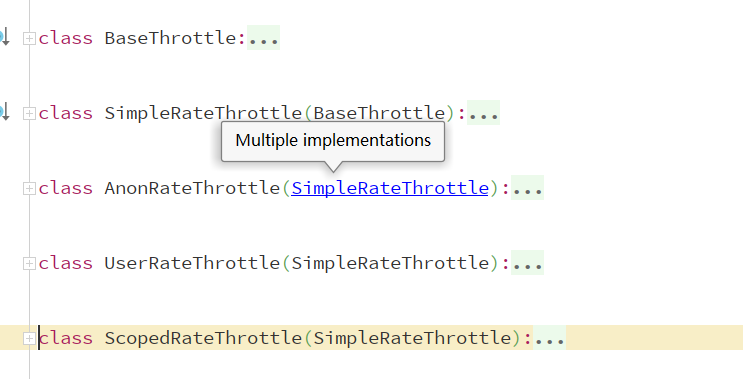
3.5 节流的内置类
或者叫 rest framework基于内置类实现访问频率控制。
我们可以通过from rest_framework.throttling import BaseThrottle来了解关于节流的内置类:
33.5.1 BaseThrottle
先看BaseThrottle类的源码:
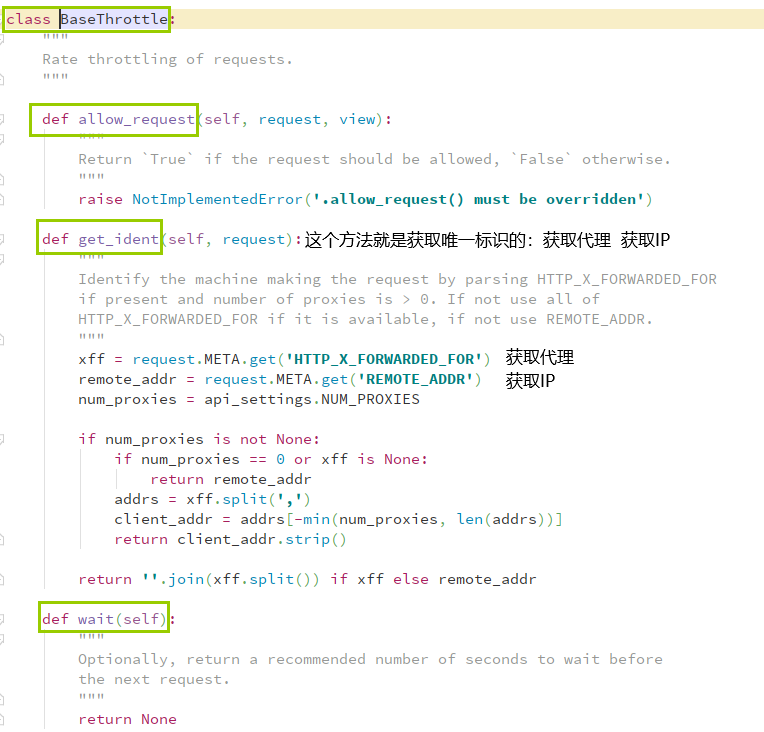
我们可以看到BaseThrottle类中有三个方法:
- allow_request()方法:
- get_ident()方法:
- 就是我们写的获取IP地址的过程,所以如果我们自己写访问频率控制类时继承BaseThrottle类,可以不写获取IP地址的过程;
- wait()方法:
如果我们写的访问频率控制类继承于BaseThrottle类,可以改为:
class VisitThrottle(BaseThrottle):

    def __init__(self):
        history = None

    def allow_request(self, request, view):
        # 获取用户IP
        # remote_addr = request.META.get('REMOTE_ADDR')
        # 因为继承于BaseThrottle类,所以上面的语句可以改为下面这句:
        remote_addr = self.ident(reuqest)

        ctime = time.time()
        if remote_addr not in VISIT_RECORD:
            VISIT_RECORD[remote_addr] = [ctime,]
            return True
        history = VISIT_RECORD.get(remote_addr)
        self.history = history

        while history and history[-1] < ctime -60:
            history.pop()

        if len(history) < 3:
            history.insert(0, ctime)
            return True

        # return True # 表示可以继续访问
        # return False # 表示访问频率太高,被限制

    def wait(self):
        """
        还需要等多少秒才可以继续访问
        :return:
        """
        ctime = time.time()
        return 60 - (ctime-self.history[-1])
3.5.2 SimpleRateTHrottle
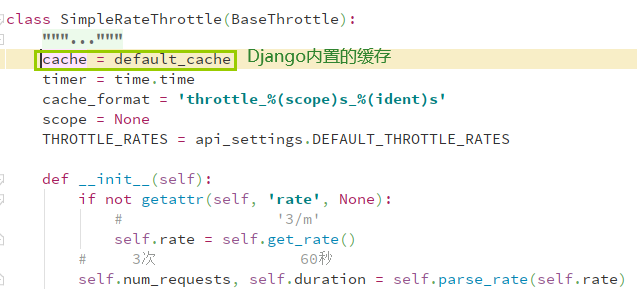
我们还可以看看SimpleRateThrottle类的源码:
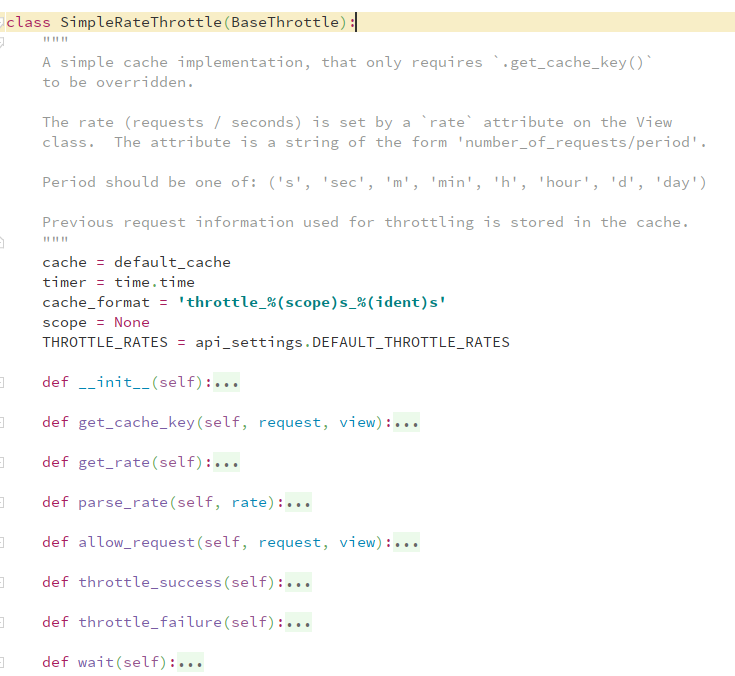
1.1 先看双下init方法:

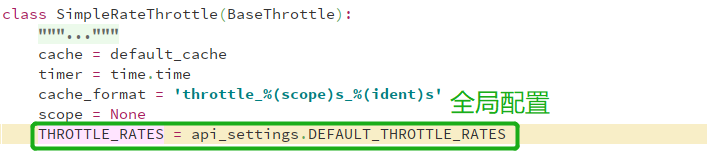
1.2 我们可以看出THROTTLE_RATES是一个配置文件,应该是一个字典,可以通过self.scope取值;
其实THROTTLE_RATE定义的是允许访问者在多少秒内访问多少次。。。
点开self.THROTTLE_RATES的源码:
1.3 这时我们可以在全局配置上THROTTLE_RATES:
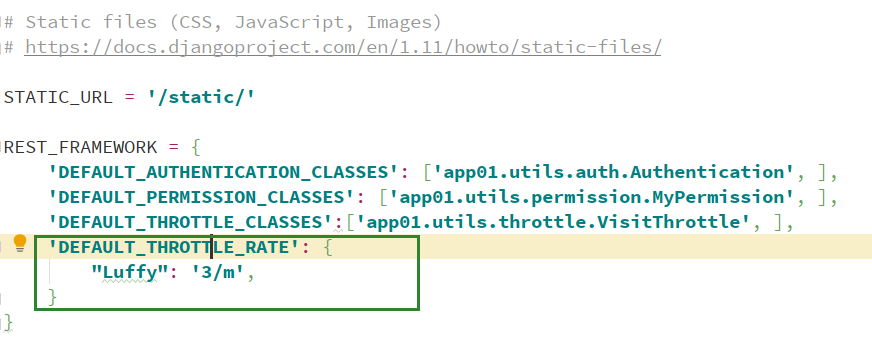
# settings.py
REST_FRAMEWORK = {
    'DEFAULT_AUTHENTICATION_CLASSES': ['app01.utils.auth.Authentication', ],
    'DEFAULT_PERMISSION_CLASSES': ['app01.utils.permission.MyPermission', ],
    'DEFAULT_THROTTLE_CLASSES':['app01.utils.throttle.VisitThrottle', ],
    'DEFAULT_THROTTLE_RATE': {
        "Luffy": '3/m',
    }
}
1.4 继续看1.1的双下init方法,该执行self.parse_rate()方法了,查看其源码:
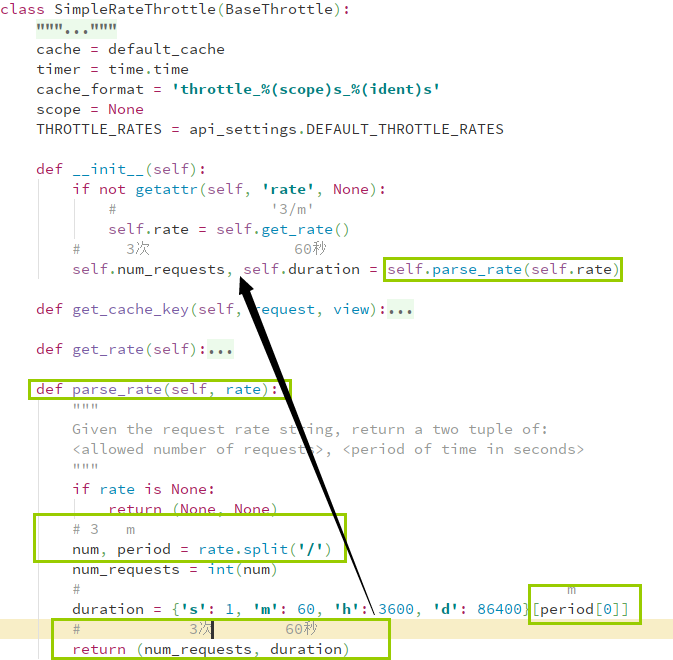
我们可以看出最后就是读取全局配置中的DEFAULT_THROTTLE_RATES中的配置,然后通过self.parse_rate()方法,赋值给self.num_requests和self.duration;
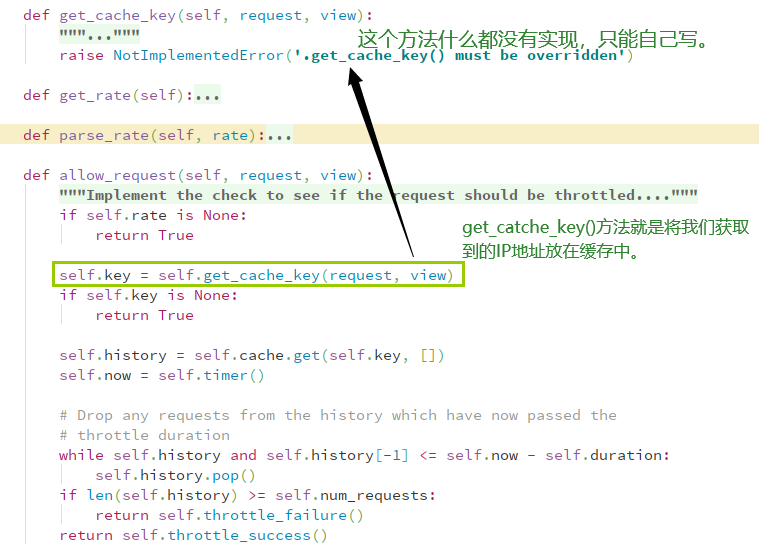
1.5 下面该看allow_request()方法了,查看其源码:
1.6 此时:如果我们改写刚才自己写的访问频率控制类的话,我们除了需要在全局配置上DEFAULT_THROTTLE_RATES,还需要改写代码:
class VisitThrottle(SimpleRateThrottle):

    scope = "luffy"

    def get_cache_key(self, request, view):
        # 该方法返回 我们获取到的 访问者的IP地址
        return self.get_ident(request)
1.7 此时继续向下看,self.catche.get()方法的源码如下:
1.8 剩下的就和我们自己写的一样了,而且wait()方法也不用写了,都为我们写好了;
3.5.3 总结--匿名用户访问频率控制类
综上所述:如果我们需要加入访问频率限制时,需要限制访问者多长时间内只能访问多少次时,其实只需要全局配置DEFAULT_THROTTLE_RATES再写几行代码而已:
全局配置,如下:
# settings.py
REST_FRAMEWORK = {
    'DEFAULT_AUTHENTICATION_CLASSES': ['app01.utils.auth.Authentication', ],
    'DEFAULT_PERMISSION_CLASSES': ['app01.utils.permission.MyPermission', ],
    'DEFAULT_THROTTLE_CLASSES':['app01.utils.throttle.VisitThrottle', ],
    'DEFAULT_THROTTLE_RATE': {
        "Luffy": '3/m',
    }
}
自定义的访问控制类代码,如下:
class VisitThrottle(SimpleRateThrottle):

    scope = "luffy"

    def get_cache_key(self, request, view):
        return self.get_ident(request)
3.5.4 总结
上面只是针对匿名用户的访问频率控制类,下面我们把 对于登录用户的访问频率控制类也一起写出并设置使用:
两种访问频率控制类的代码,如下:
class VisitThrottle(SimpleRateThrottle):
    """对匿名用户的访问频率控制类"""

    scope = "luffy"

    def get_cache_key(self, request, view):
        # 对于匿名用户,我们获取访问者的IP地址
        return self.get_ident(request)

class UserThrottle(SimpleRateThrottle):
    """对登录用户的访问频率控制类"""

    scope = "luffyUser"

    def get_cache_key(self, request, view):
        # 对于登录用户,我们获取访问者的用户名
        return request.user.username
对于全局配置:我们需要用到匿名用户的访问频率控制类的情况少一些,所以全局配置中可以只加入针对登录用户的访问频率控制类,在视图中如果需要使用匿名用户的访问频率控制类时,我们在局部设置:
下图是全局配置:
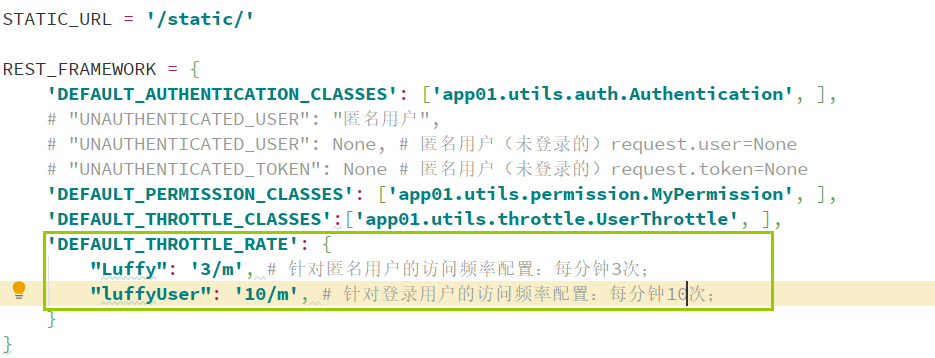
下图是需要使用匿名用户访问频率控制类时的局部设置:
