Spring Security笔记:自定义Login/Logout Filter、AuthenticationProvider、AuthenticationToken
在前面的学习中,配置文件中的<http>...</http>都是采用的auto-config="true"这种自动配置模式,根据Spring Security文档的说明:
------------------
auto-config Automatically registers a login form, BASIC authentication, logout services. If set to "true", all of these capabilities are added (although you can still customize the configuration of each by providing the respective element).
------------------
可以理解为:
<http>
  <form-login />
  <http-basic />
  <logout />
</http>
下面是Spring Security Filter Chain的列表:
| Alias | Filter Class | Namespace Element or Attribute |
|---|---|---|
|
CHANNEL_FILTER |
|
|
|
SECURITY_CONTEXT_FILTER |
|
|
|
CONCURRENT_SESSION_FILTER |
|
|
|
HEADERS_FILTER |
|
|
|
CSRF_FILTER |
|
|
|
LOGOUT_FILTER |
|
|
|
X509_FILTER |
|
|
|
PRE_AUTH_FILTER |
|
N/A |
|
CAS_FILTER |
|
N/A |
|
FORM_LOGIN_FILTER |
|
|
|
BASIC_AUTH_FILTER |
|
|
|
SERVLET_API_SUPPORT_FILTER |
|
|
|
JAAS_API_SUPPORT_FILTER |
|
|
|
REMEMBER_ME_FILTER |
|
|
|
ANONYMOUS_FILTER |
|
|
|
SESSION_MANAGEMENT_FILTER |
|
|
|
EXCEPTION_TRANSLATION_FILTER |
|
|
|
FILTER_SECURITY_INTERCEPTOR |
|
|
|
SWITCH_USER_FILTER |
|
N/A |
其中红色标出的二个Filter对应的是 “注销、登录”,如果不使用auto-config=true,开发人员可以自行“重写”这二个Filter来达到类似的目的,比如:默认情况下,登录表单必须使用post方式提交,在一些安全性相对不那么高的场景中(比如:企业内网应用),如果希望通过类似 http://xxx/login?username=abc&password=123的方式直接登录,可以参考下面的代码:
 View Code
即:从UsernamePasswordAuthenticationFilter继承一个类,然后把关于POST方式判断的代码注释掉即可。默认情况下,Spring Security的用户名是区分大小写,如果觉得没必要,上面的代码同时还演示了如何在Filter中自动将其转换成大写。
默认情况下,登录成功后,Spring Security有自己的handler处理类,如果想在登录成功后,加一点自己的处理逻辑,可参考下面的代码:


 1 package com.cnblogs.yjmyzz;
 2
 3 import java.io.IOException;
 4
 5 import javax.servlet.ServletException;
 6 import javax.servlet.http.HttpServletRequest;
 7 import javax.servlet.http.HttpServletResponse;
 8
 9 import org.springframework.security.core.Authentication;
10 import org.springframework.security.web.authentication.SavedRequestAwareAuthenticationSuccessHandler;
11
12 public class CustomLoginHandler extends
13         SavedRequestAwareAuthenticationSuccessHandler {
14
15     @Override
16     public void onAuthenticationSuccess(HttpServletRequest request,
17             HttpServletResponse response, Authentication authentication)
18             throws ServletException, IOException {
19         super.onAuthenticationSuccess(request, response, authentication);
20
21         //这里可以追加开发人员自己的额外处理
22         System.out
23                 .println("CustomLoginHandler.onAuthenticationSuccess() is called!");
24     }
25
26 }
类似的,要自定义LogoutFilter,可参考下面的代码:
View Code即:从LogoutFilter继承一个类,如果还想在退出后加点自己的逻辑(比如注销后,清空额外的Cookie之类记录退出时间、地点之类),可重写doFilter方法,但不建议这样,有更好的做法,自行定义logoutSuccessHandler,然后在运行时,通过构造函数注入即可。
下面是自定义退出成功处理的handler示例:
View Code这二个Filter弄好后,剩下的就是改配置:
 <beans:beans xmlns="http://www.springframework.org/schema/security"
     xmlns:beans="http://www.springframework.org/schema/beans" xmlns:xsi="http://www.w3.org/2001/XMLSchema-instance"
     xsi:schemaLocation="http://www.springframework.org/schema/beans
     http://www.springframework.org/schema/beans/spring-beans-3.0.xsd
     http://www.springframework.org/schema/security
     http://www.springframework.org/schema/security/spring-security-3.2.xsd">

     <http entry-point-ref="loginEntryPoint">
         <!-- 替换默认的LogoutFilter -->
         <custom-filter ref="customLogoutFilter" position="LOGOUT_FILTER" />
         <!-- 替换默认的LoginFilter -->
         <custom-filter ref="customLoginFilter" position="FORM_LOGIN_FILTER" />
         <intercept-url pattern="/admin" access="ROLE_USER" />
     </http>

     <authentication-manager alias="authenticationManager">
         ...
     </authentication-manager>

     <beans:bean id="loginEntryPoint"
         class="org.springframework.security.web.authentication.LoginUrlAuthenticationEntryPoint">
         <!-- 默认登录页的url -->
         <beans:constructor-arg value="/login" />
     </beans:bean>

     <beans:bean id="customLoginFilter" class="com.cnblogs.yjmyzz.CustomLoginFilter">
         <!-- 校验登录是否有效的虚拟url -->
         <beans:property name="filterProcessesUrl" value="/checklogin" />
         <beans:property name="authenticationManager" ref="authenticationManager" />
         <beans:property name="usernameParameter" value="username" />
         <beans:property name="passwordParameter" value="password" />
         <beans:property name="authenticationSuccessHandler">
             <!-- 自定义登录成功后的处理handler -->
            <beans:bean class="com.cnblogs.yjmyzz.CustomLoginHandler">
                 <!-- 登录成功后的默认url -->
                 <beans:property name="defaultTargetUrl" value="/welcome" />
             </beans:bean>
         </beans:property>
         <beans:property name="authenticationFailureHandler">
             <beans:bean
                 class="org.springframework.security.web.authentication.SimpleUrlAuthenticationFailureHandler">
                 <!-- 登录失败后的默认Url -->
                 <beans:property name="defaultFailureUrl" value="/login?error" />
             </beans:bean>
         </beans:property>
     </beans:bean>

     <beans:bean id="customLogoutFilter" class="com.cnblogs.yjmyzz.CustomLogoutFilter">
         <!-- 处理退出的虚拟url -->
         <beans:property name="filterProcessesUrl" value="/logout" />
         <!-- 退出处理成功后的默认显示url -->
         <beans:constructor-arg index="0" value="/login?logout" />
         <beans:constructor-arg index="1">
             <!-- 退出成功后的handler列表 -->
             <beans:array>
                 <beans:bean id="securityContextLogoutHandler"
                     class="org.springframework.security.web.authentication.logout.SecurityContextLogoutHandler" />
                 <!-- 加入了开发人员自定义的退出成功处理 -->
                 <beans:bean id="customLogoutSuccessHandler" class="com.cnblogs.yjmyzz.CustomLogoutHandler" />
             </beans:array>
         </beans:constructor-arg>
     </beans:bean>

 </beans:beans>
用户输入“用户名、密码”,并点击完登录后,最终实现校验的是AuthenticationProvider,而且一个webApp中可以同时使用多个Provider,下面是一个自定义Provider的示例代码:
View Code这里仅仅只是出于演示目的,人为留了一个后门,只要用户名在白名单之列,不管输入什么密码,都可以通过!(再次提示:只是出于演示目的,千万不要在实际项目中使用)
相关的配置节点修改如下:
     <authentication-manager alias="authenticationManager">
         <authentication-provider>
             <user-service>
                 <user name="yjmyzz" password="123456" authorities="ROLE_USER" />
             </user-service>
         </authentication-provider>
         <!-- 加入开发人员自定义的Provider -->
         <authentication-provider ref="customProvider" />
     </authentication-manager>

     <beans:bean id="customProvider"
         class="com.cnblogs.yjmyzz.CustomAuthenticationProvider" />
运行时,Spring Security将会按照顺序,依次从上向下调用所有Provider,只要任何一个Provider校验通过,整个认证将通过。这也意味着:用户yjmyzz/123456以及白名单中的用户名均可以登录系统。这是一件很有意思的事情,试想一下,如果有二个现成的系统,各有自己的用户名/密码(包括不同的存储机制),想把他们集成在一个登录页面使用,技术上讲,只要实现二个Provider各自对应不同的处理,可以很轻易的实现多个系统的认证集成。(注:当然实际应用中,多个系统的认证集成,更多的是采用SSO来处理,这里只是提供了另一种思路)
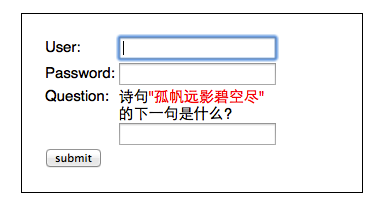
最后来看下如何自定义AuthenticationToken,如果我们想在登录页上加一些额外的输入项(比如:验证码,安全问题之类),
为了能让这些额外添加的输入项,传递到Provider中参与验证,就需要对UsernamePasswordAuthenticationToken进行扩展,参考代码如下:
View Code这里扩展了二个属性:questionId、answer,为了方便后面“诗句问题"的回答进行判断,还得先做点其它准备工作
View Code预定义了几句唐诗,key即为questionId,value为 "题目/答案"格式。此外,如果答错了,为了方便向用户提示错误原因,还要定义一个异常类:(注:Spring Security中,所有验证失败,都是通过直接抛异常来处理的)
View Code原来的CustomLoginFilter也要相应的修改,以接收额外添加的二个参数:
View Code现在,CustomAuthenticationProvider中的additionalAuthenticationChecks方法中,就能拿到用户提交的下一句答案,进行相关验证了:
View Code最后来处理前端的login页面及Action
View Code代码很简单,从预定义的诗句中,随机挑一句,并把questionId及question放到model中,传给view
View Codeok,完工!
不过,有一个小问题要提醒一下:对本文所示案例而言,因为同时应用了二个Provider,一个是默认的,一个是我们后来自定义的,而对"下一句"的答案验证,只在CustomAuthenticationProvider中做了处理,换句话说,如果用户在界面上输入的用户名/密码是yjmyzz/123456,根据前面讲到的规则,默认的Provider会先起作用,认证通过直接忽略”下一句“的验证,只有输入白名单中的用户名时,才会走CustomAuthenticationProvider的验证流程。