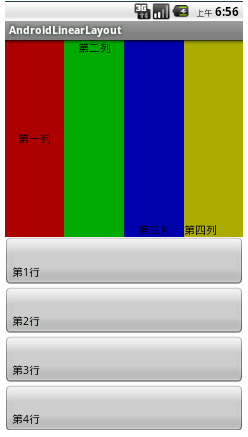
一、LinearLayout:线性布局
用来控制其子View以水平或垂直方式展开显示
重要属性
orientation(方向)
layout_weight(权重)
layout_weight(权重)的值
=0(默认值):指定多大空间就占据多大的空间
>0:将父视图中的可用空间进行分割, 值越大权重就越大, 占据的比例就会越大
Layout_weight的使用场景
将布局的宽度或高度平均分成几个等份
垂直方向上占用中间所有空间 或 水平方向上占用中间所有空间
android:gravity 与 android:layout_gravity的区别
android:gravity是指定本元素的子元素相对它的对齐方式。
android:layout_gravity是指定本元素相对它的父元素的对齐方式
案例参考:http://www.cnblogs.com/zhangs1986/archive/2013/01/17/2864237.html
代码
<LinearLayout xmlns:android="http://schemas.android.com/apk/res/android"
 2     xmlns:tools="http://schemas.android.com/tools"
 3     android:layout_width="match_parent"
 4     android:layout_height="match_parent"
 5     android:orientation="vertical"
 6     tools:context=".LinearLayoutActivity" >
 7
 8     <LinearLayout
 9         android:layout_width="match_parent"
10         android:layout_height="match_parent"
11         android:layout_weight="1"
12         android:orientation="horizontal" >
13
14         <Button
15             android:layout_width="wrap_content"
16             android:layout_height="match_parent"
17             android:layout_weight="1"
18             android:background="#aa0000"
19             android:gravity="center_horizontal|center_vertical"
20             android:text="第一列"
21             android:textSize="15sp" >
22         </Button>
23
24         <Button
25             android:layout_width="wrap_content"
26             android:layout_height="match_parent"
27             android:layout_weight="1"
28             android:background="#00aa00"
29             android:gravity="center_horizontal"
30             android:text="第二列"
31             android:textSize="15sp" >
32         </Button>
33
34         <Button
35             android:layout_width="wrap_content"
36             android:layout_height="match_parent"
37             android:layout_weight="1"
38             android:background="#0000aa"
39             android:gravity="center|bottom"
40             android:text="第三列"
41             android:textSize="15sp" >
42         </Button>
43
44         <Button
45             android:layout_width="wrap_content"
46             android:layout_height="match_parent"
47             android:layout_weight="1"
48             android:background="#aaaa00"
49             android:gravity="bottom"
50             android:text="第四列"
51             android:textSize="15sp" >
52         </Button>
53     </LinearLayout>
54
55     <LinearLayout
56         android:layout_width="match_parent"
57         android:layout_height="match_parent"
58         android:layout_weight="1"
59         android:orientation="vertical" >
60
61         <Button
62             android:layout_width="match_parent"
63             android:layout_height="match_parent"
64             android:layout_weight="1"
65             android:gravity="bottom"
66             android:text="第1行"
67             android:textSize="15sp" >
68         </Button>
69
70         <Button
71             android:layout_width="match_parent"
72             android:layout_height="match_parent"
73             android:layout_weight="1"
74             android:gravity="bottom"
75             android:text="第2行"
76             android:textSize="15sp" >
77         </Button>
78
79         <Button
80             android:layout_width="match_parent"
81             android:layout_height="match_parent"
82             android:layout_weight="1"
83             android:gravity="bottom"
84             android:text="第3行"
85             android:textSize="15sp" >
86         </Button>
87
88         <Button
89             android:layout_width="match_parent"
90             android:layout_height="match_parent"
91             android:layout_weight="1"
92             android:gravity="bottom"
93             android:text="第4行"
94             android:textSize="15sp" >
95         </Button>
96     </LinearLayout>
97
98 </LinearLayout>
二、RelativeLayout:相对布局
相对布局: 用来控制其子View以相对定位的方式进行布局显示
相对布局是最灵活, 最强大,也是学习难度最大的布局
相对布局相关属性比较多:
兄弟视图之间: 同方向对齐, 反方向对齐
与父视图之间: 同方向对齐, 居中
相对兄弟视图定位
同方向对齐属性
android:layout_alignBaseline 该控件的Baseline与给定ID控件的Baseline对齐
android:layout_alignLeft 该控件的左边与给定ID控件的左边对齐
android:layout_alignTop 该控件的顶部与给定ID控件的顶部对齐
android:layout_alignRight 该控件的右边与给定ID控件的右边对齐
android:layout_alignBottom 该控件的底部与给定ID控件的底部对齐
反方向对其属性
android:layout_toLeftOf 将该控件置于给定ID控件的左边
android:layout_toRightOf 将该控件置于给定ID控件的右边
android:layout_above 将该控件置于给定ID控件的上面
android:layout_below 将该控件置于给定ID控件的下面
相对父视图定位
与父视图同方向对齐
android:layout_alignParentLeft 该控件的左边与父控件的左边对齐
android:layout_alignParentTop 该控件的顶部与父控件的顶部对齐
android:layout_alignParentRight 该控件的右边与父控件的右边对齐
android:layout_alignParentBottom 该控件的底部与父控件的底部对齐
相对父视图居中属性
android:layout_centerInParent 垂直水平居中
android:layout_centerVertical 垂直居中
android:layout_centerHorizontal 水平居中
案例:

代码:
<?xml version="1.0" encoding="utf-8"?>
<RelativeLayout xmlns:android="http://schemas.android.com/apk/res/android"
    android:layout_width="match_parent"
    android:layout_height="match_parent" >

    <EditText
        android:id="@+id/ed_relative_msg"
        android:layout_width="wrap_content"
        android:layout_height="wrap_content"
        android:layout_alignParentRight="true"
        android:layout_alignParentLeft="true"
        android:hint="Message">
        <requestFocus />
    </EditText>
    <Button android:id="@+id/btn_relative_ok"
        android:layout_width="wrap_content"
        android:layout_height="wrap_content"
        android:layout_below="@id/ed_relative_msg"
        android:layout_alignRight="@id/ed_relative_msg"
        android:text="Ok"/>
    <Button android:id="@+id/btn_relative_cancle"
        android:layout_width="wrap_content"
        android:layout_height="wrap_content"
        android:layout_alignTop="@id/btn_relative_ok"
        android:layout_toLeftOf="@id/btn_relative_ok"
        android:layout_marginRight="10dp"
        android:text="Cancle"/>
</RelativeLayout>
三、FrameLayout:帧布局
帧布局中的每一个子View都代表一个画面,默认以屏幕左上角作为( 0,0 )坐标
按定义的先后顺序依次逐屏显示 , 后面出现的会覆盖前面的画面
通过子View的android:layout_gravity?属性来指定子视图的位置
| 属性名称 | 对应方法 | 描述 |
| android:foreground | setForeground(Drawable) | 设置绘制在所有子控件之上的内容 |
| android:foregroundGravity | setForegroundGravity(int) | 设置绘制在所有子控件之上内容的gravity属性 |
在FreamLayout中,子控件是通过栈来绘制的,所以后添加的子控件会被控制在上层。
案例:参考:http://www.cnblogs.com/moonsilvering/archive/2011/12/30/2308091.html

代码:
1: <?xml version="1.0" encoding="utf-8"?>
  2: <resources>
  3:     <string name="app_name">FrameExample</string>
  4:     <string name="big">大的</string>
  5:     <string name="middle">中的</string>
  6:     <string name="small">小的</string>
  7: </resources>
3)在项目res/values目录下新建一个colors.xml,在其中输入如下代码。

  1: <?xml version="1.0" encoding="UTF-8"?>
  2: <resources>
  3:     <color name="red">#FF0000</color>
  4:     <color name="green">#00FF00</color>
  5:     <color name="blue">#0000FF</color>
  6:     <color name="white">#FFFFFF</color>
  7: </resources>
4)打开项目res/layout目录下的main.xml文件,将其中已有的代码替换为如下代码。

  1: <?xml version="1.0" encoding="utf-8"?>
  2: <FrameLayout xmlns:android="http://schemas.android.com/apk/res/android"
  3:     android:id="@+id/FrameLayout01"
  4:     android:layout_width="fill_parent"
  5:     android:layout_height="fill_parent"
  6:     android:background="@color/white" >
  7:
  8:     <TextView
  9:         android:id="@+id/TextView01"
 10:         android:layout_width="wrap_content"
 11:         android:layout_height="wrap_content"
 12:         android:text="@string/big"
 13:         android:textColor="@color/green"
 14:         android:textSize="60dp" >
 15:     </TextView>
 16:
 17:     <TextView
 18:         android:id="@+id/TextView02"
 19:         android:layout_width="wrap_content"
 20:         android:layout_height="wrap_content"
 21:         android:text="@string/middle"
 22:         android:textColor="@color/red"
 23:         android:textSize="40dp" >
 24:     </TextView>
 25:
 26:     <TextView
 27:         android:id="@+id/TextView03"
 28:         android:layout_width="wrap_content"
 29:         android:layout_height="wrap_content"
 30:         android:text="@string/small"
 31:         android:textColor="@color/blue"
 32:         android:textSize="20dp" >
 33:     </TextView>
 34:
 35: </FrameLayout>
一下为常用的一些基本属性
常用基本属性四、属性的划分
针对任何View的属性
常用的最基本属性
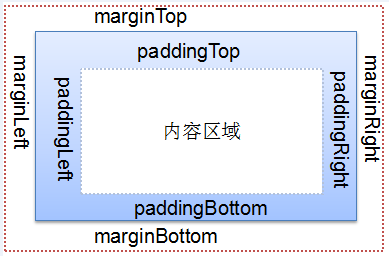
内边距属性 padding
外边距属性 margin
只针对RelativeLayout的属性
反方向对齐属性 to/above/below
同方向对齐属性 align
相对父视图的属性 alignparent/center
只针对LinearLayout的属性
权重属性 weight
方向属性 oritation
id 为控件指定相应的ID
@+id/idname 添加一个ID
layout_width 指定当前视图的宽度
layout_height 指定当前视图的宽度
text 指定控件当中显示的文字
textSize 指定控件当中字体的大小
background 指定该控件所使用的背景(图片|颜色)
layout_gravity 控件本身相对于父视图的位置
grivity 指定控件中的内容的基本位置
内边距与外边距(公共属性)
内边距:
android:padding
android:paddingLeft
android:paddingTop
android:paddingRight
android:paddingBottom
外边距
android:layout_margin
android:layout_marginLeft
android:layout_marginTop
android:layout_marginRight
android:layout_marginBottom