〇、摘要
munin是用于Linux系统(也可以监控windows系统)的监控软件。munin除了可以监控系统的各项数值之外,最大的好处是可以自己编写插件自定义监控需要的数值。整个系统的架构简单明了,操作方便。如果是使用Debian或者Ubuntu安装,安装过程也非常简单。munin除了可以监控结果,也可以设置报警。对于我个人对性能测试的工作来说,是个非常好的工具。
1. 内容
munin整个使用下来,篇幅会有点大,包括展示、自定义插件。这边分成三个部分来说明。本次只讲安装和配置。
-
- munin master和munin-node的安装;
- web服务展示结果和动态查看结果;
- 插件编写与配置(mysql插件与自定义插件)。
2. 架构示意图
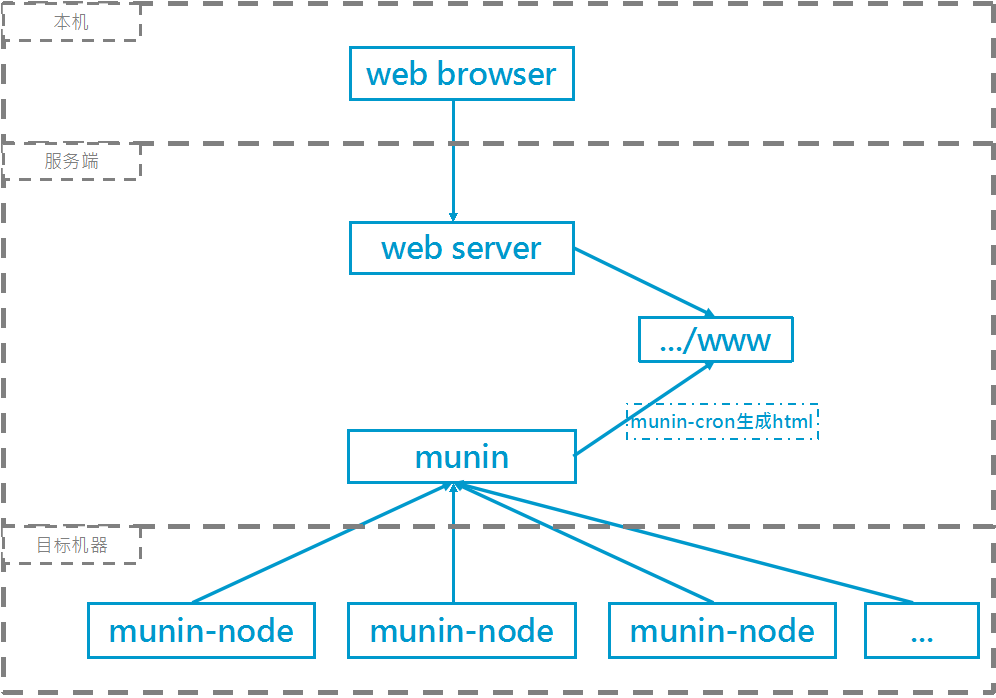
munin的架构非常简单。包含一个服务端munin和一个客户端munin-node。munin-node可以部署在多台机器上面,munin用于定时向一台或者多台机器收集监控的信息。munin收集到数据后会生成静态的html文件。为了展示监控的结果,需要一个web服务器。有了web也可以随时随地访问监控结果。
一、Ubuntu/Debian 下安装
在Ubuntu/Debian下安装非常简单。使用apt-get就可以直接安装好了。安装完了之后,Munin和Munin-node会顺便启动的。
1. Munin node(客户端)
# apt-get install munin-node
2. Munin master(服务端)
# apt-get install munin
二、Redhat下安装
在红帽下安装就略显麻烦了。首先要把rpm的软件包下载下来。但是除了Munin和Munin-node的软件包,另外还涉及到perl的一些库。
另外,Redhat下安装,不同版本的系统包,使用的软件包还不一样。我们使用的是RHEL5版本的,所以下面例子以RHEL5为准(官方给的资料在RHEL5下安装与RHEL4下安装的过程是一样的。只是每个可能软件包根据系统而不一样而已。这个直接替换掉最后的rpm为最新的版本号就好了)。
1. Munin node(客户端)
下载程序包:
Munin-node包:
# wget http://dl.fedoraproject.org/pub/epel/5/i386/munin-node-2.0.20-1.el5.noarch.rpm
下载依赖包:
# wget ftp://195.220.108.108/linux/centos/5.10/os/x86_64/CentOS/sysstat-7.0.2-12.el5.x86_64.rpm
# wget http://dag.wieers.com/rpm/packages/perl-Net-SNMP/perl-Net-SNMP-5.2.0-1.2.el5.rf.noarch.rpm
# wget http://dag.wieers.com/rpm/packages/perl-Crypt-DES/perl-Crypt-DES-2.05-3.2.el5.rf.i386.rpm (perl-Net-SNMP依赖此包)
# wget http://pkgs.repoforge.org/perl-Socket6/perl-Socket6-0.23-1.el5.rfx.x86_64.rpm (perl-Net-SNMP依赖此包)
# wget http://pkgs.repoforge.org/perl-Net-Server/perl-Net-Server-0.99-1.el5.rf.noarch.rpm
可以使用以下顺序安装:
# rpm -Uvh sysstat-7.0.2-12.el5.x86_64.rpm
# rpm -Uvh perl-Net-Server-0.99-1.el5.rf.noarch.rpm
# rpm -Uvh perl-Socket6-0.23-1.el5.rfx.x86_64.rpm
# rpm -Uvh perl-Crypt-DES-2.05-3.2.el5.rf.i386.rpm
# rpm -Uvh perl-Net-SNMP-5.2.0-1.2.el5.rf.noarch.rpm
# rpm -Uvh munin-node-1.2.5-1rhel4.noarch.rpm(最后安装Munin node)
即:
1:sysstat
2:perl-Socket6
3:perl-Crypt-DES
4:perl-Net-SNMP
5:perl-Net-Server
6:munin-node
如果遇到签名验证不通过的问题,可以加上[--force --nodeps] 参数强制安装:
# rpm -Uvh perl-Net-SNMP-5.2.0-1.2.el5.rf.noarch.rpm --force --nodeps
以上顺利的话,munin-node就安装好了。安装完毕后,系统会自动启动munin-node。
2. Munin master(服务端)
下载Munin包:
# wget http://dl.fedoraproject.org/pub/epel/5/i386/munin-2.0.20-1.el5.noarch.rpm
下载依赖包:
# wget http://dag.wieers.com/rpm/packages/perl-HTML-Template/perl-HTML-Template-2.8-1.2.el5.rf.noarch.rpm
# wget http://pkgs.repoforge.org/rrdtool/perl-rrdtool-1.4.7-1.el6.rfx.x86_64.rpm
# wget http://pkgs.repoforge.org/rrdtool/tcl-rrdtool-1.4.7-1.el5.rf.x86_64.rpm
# wget http://dag.wieers.com/rpm/packages/perl-Net-SNMP/perl-Net-SNMP-5.2.0-1.2.el5.rf.noarch.rpm(munin node也用到)
# wget http://dag.wieers.com/rpm/packages/perl-Net-Server/perl-Net-Server-0.99-1.el5.rf.noarch.rpm(munin node也用到)
安装顺序:
1:perl-HTML-Template
2:rrdtool
3:perl-rrdtool
4:perl-Net-SNMP
5:perl-Net-Server
6:munin
以上,munin的客户端和服务端都安装好了。如果安装期间遇到版本不对的地方,请根据自己的系统版本,自行替换为相应的依赖包。
三、配置和启动
无论是Debian下安装,还是RedHat下安装,munin-node和munin master(即munin)都默认安装在路径/etc/munin下。配置文件与插件都是在这里配置的。
1. munin-node.conf(客户端配置)
1.1 配置文件
munin-node.conf是客户端(即munin-node)的配置文件。这边的配置比较简单,只需要配置服务器的IP地址就可以了。在allow新增一个服务器的IP配置。默认是配置了本机了,如果你的munin-node与munin master是在同一台机器上面,默认就可以了。这个配置是用来限制那些IP可以访问的。
allow ^127.0.0.1$
allow ^::1$
allow ^192.168.1.2$
另外还可以修改端口、绑定IP地址等。都比较简单,就不多说了。
1.2 启动、停止和重启
启动程序是/etc/init.d/下的munin-node可执行文件。也可以直接以服务的形式启动。
# service munin-node start        #启动
# service munin-node stop        #停止
# service munin-node restart     #重启
1.3 测试
直接telnet就可以。端口默认是配置为4949的,那么telnet连接,输入help可以查看监控命令。
$ telnet 127.0.0.1 4949
Trying 127.0.0.1...
Connected to 127.0.0.1.
Escape character is '^]'.
# munin node at machinename
help
# Unknown command. Try cap, list, nodes, config, fetch, version or quit
2. munin.conf
2.1 配置
munin.conf是服务端(即munin master)的配置文件。
首先去掉一下路径配置的注释。除了tmpldir,其它可自行配置。但是tmpldir要配置到munin的HTML模板上,默认是在/etc/munin/templates 下。基本上都有说明,还是比较容易看得懂的。
dbdir   /var/lib/munin
htmldir /var/cache/munin/www
logdir /var/log/munin
rundir  /var/run/munin

tmpldir /etc/munin/templates
然后找到localhost.localdomain节点。这个是用于配置需要监控的目标机器的。默认会配置本机127.0.0.1。根据需要,可新增需要监控的机器。可以增加多台机器,只要目标机器安装了munin-node就可以。如:
# a simple host tree
[local.127-0-0-1]
    address 127.0.0.1
    use_node_name yes

[mytest.192-168-1-3]
    address 192.168.1.3
    use_node_name yes

[mysql.192-168-1-4]
    address 192.168.1.4
    use_node_name yes
2.2 启动
munin master安装成功后。会给系统增加一个munin用户。启动服务端(munin master)是无法用root权限启动的,只能使用munin用户启动。当然安装的时候,会默认自己启动的。并且会每隔5分钟,会定时执行munin-cron定时任务。基本上,修改完配置表后可以完全不用理会,等待服务端自己去更新即可。
当然如果你一定要马上更新,可以切换到munin用户,执行munin-cron命令。
# su munin -c /etc/init.d/munin-cron
执行无报错的话,是没有打印信息的。
3 测试
在munin.conf 配置文件里面指定了生成的监控的html监控结果“htmldir /var/cache/munin/www”。只需要配置一个web服务器,可访问到目标路径“/var/cache/munin/www”即可。可以使用nginx、apache、resin等主流web服务器。html都是静态文件,所以任何web服务器都是可以的。
访问web服务器,就可以查看结果了。

四、参考资料
官方安装说明:http://munin-monitoring.org/wiki/MuninInstallationLinux
近期研究独立博客,逐渐会与独立博客同步: