word操作
doc文件转换为docx文件
安装win32com模块:pip3 install pypiwin32
import os
from win32com.client import Dispatch, DispatchEx, constants


def doc_to_docx(f_path):
    w = Dispatch('Word.Application')
    # w = DispatchEx('Word.Application')  # 启动独立进程
    w.Visible = 0   # 后台运行
    w.DisplayAlerts = 0    # 不警告

    # 打开文件
    doc = w.Documents.Open(f_path)

    # 新建docx类型文件
    new_path = os.path.splitext(f_path)[0] + '.docx'

    '''
    word_doc = w.Documents.Add() # 创建新的文档

    # 插入文字
    myRange = doc.Range(0,0)
    myRange.InsertBefore('Hello python!')

    # 使用样式
    wordSel = myRange.Select()
    wordSel.Style = constants.wdStyleHeading1
    '''
    # 保存
    doc.SaveAs(new_path, 16, False, "", True, "", False, False, False, False)  # 参数1、2必须传,如果文档有密码保护则需要传第四个参数,参数2可以是12,或者16,或其他适合的类型,其余参数都是默认值,不传也可以

    # 关闭退出
    doc.Close()
    w.Quit()

    # 删除源文件
    os.remove(f_path)
    return new_path


doc_to_docx(r"C:UsersDesktop新建 Microsoft Word 文档.doc")
安装模块python-docx:pip3 install python-docx
往Word文档中插入图片,并设置宽度
from docx import Document


def insert_img():
    msg = '插入图片'
    image1 = r"C:UsersPicturesCamera Roll1.jpg"
    image2 = r"C:UsersPicturesSaved PicturesIMG_20180214_113145.jpg"  # 保存在本地的图片

    # 实例化对象
    doc = Document()
    doc.add_paragraph(msg)  # 添加文字
    doc.add_picture(image1, width=Inches(3))  # 添加图, 设置宽度
    doc.add_picture(image2, width=Inches(5))

    doc.save(r"C:Users
onggDesktopword_添加图片.docx")  # 保存路径
Excel操作
注:只能操作已经存在的Excel表格,不存在会报错
from win32com.client import Dispatch
def excel_write(f_path, data, pwd=123):
excel_app = Dispatch('Excel.Application')
excel_app.Visible = 0 # 后台运行
excel_app.DisplayAlerts = 0 # 禁止弹窗
# 打开Excel文件, 有密码时前三个参数必须传
xl_handle = excel_app.Workbooks.Open(f_path, UpdateLinks=3, ReadOnly=False, Format=None, Password=pwd)
# 指定sheet页
sheet1 = xl_handle.Worksheets('Sheet1')
for i in range(len(data)):
for j in range(len(data[0])):
sheet1.Cells(i + 1, j + 1).Value = data[i][j]
print('done!')
# 选择单元格
range_obj = sheet1.Range('A2')
range_obj.EntireRow.Insert() # 在选择的单元格前插入行
# 设置边框
'''
5 双点虚线
6 加粗点虚线
7 单实线
8 点虚线
9 双实线
10 单点虚线
'''
range_obj.Borders.LineStyle = 7
# 为单元格赋值
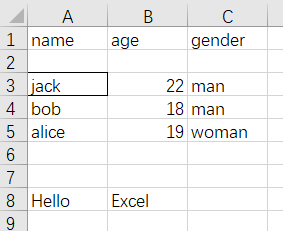
sheet1.Cells(8, 1).Value = 'Hello'
sheet1.Cells(8, 2).Value = 'Excel'
# 关闭退出
xl_handle.Close(True) # True 必须传入,否则不会保存
excel_app.Quit()
excel_write(
r"C:UsersDesktop新建 Microsoft Excel 工作表.xlsx",
[['name', 'age', 'gender'], ['jack', 22, 'man'], ['bob', 18, 'man'], ['alice', 19, 'woman']]
)
执行后的结果如下:
后续更新。。。。