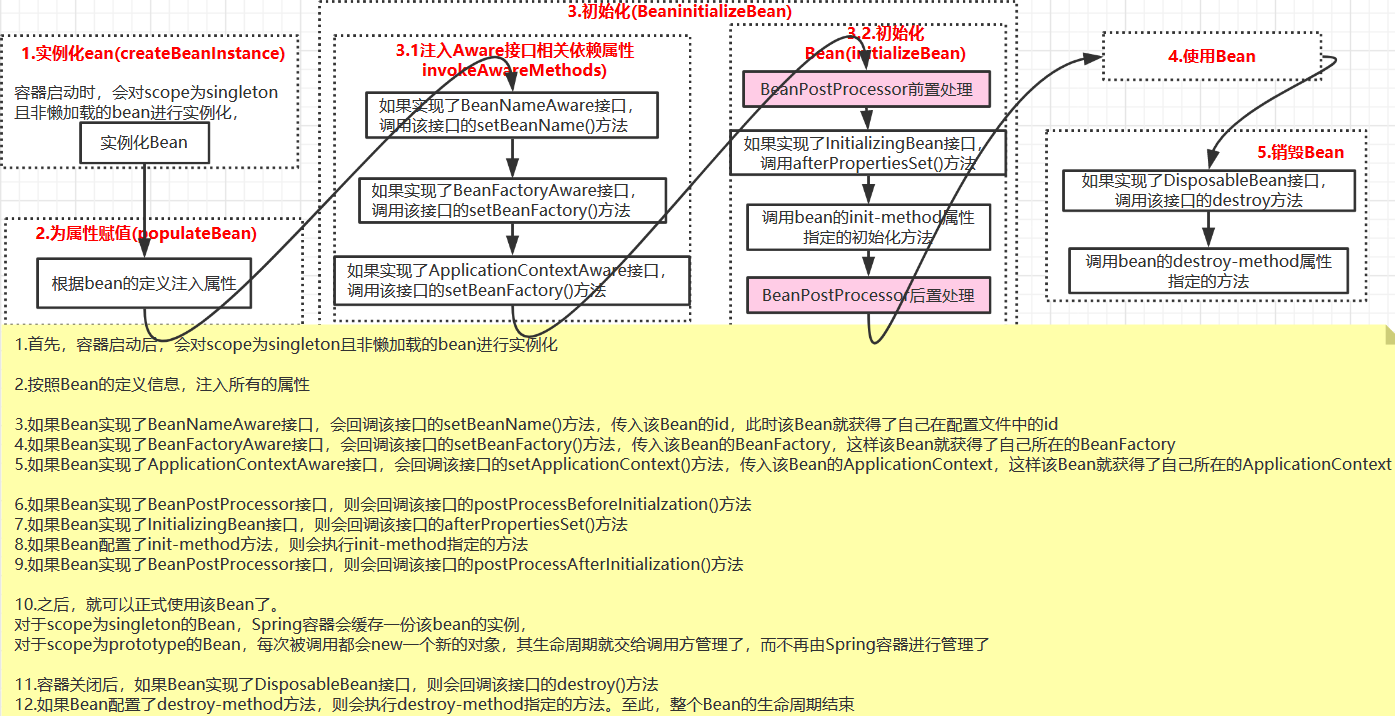
下图展示的是Bean从创建,装载到容器,到最终被销毁的整个生命周期过程。
1.实例化Bean(createBeanInstance)
创建Bean实例。根据指定bean使用相应的策略来创建Bean,如:工厂方法(instantiateUsingFactoryMethod)、构造方法注入(autowireConstructor)、简单初始化(instantiateBean)。
Bean的实例化过程中并未进行属性的注入,仅仅是简单的实例化。实例化的Bean被包装成了BeanWrapper对象,BeanWrapper提供了设置对象属性的接口,从而避免了使用反射机制来设置属性。
AbstractAutowireCapableBeanFactory类中的doCreateBean方法
    protected BeanWrapper createBeanInstance(String beanName, RootBeanDefinition mbd, Object[] args) {
        // Make sure bean class is actually resolved at this point.
        Class<?> beanClass = resolveBeanClass(mbd, beanName);

        //确保Bean的class必须是public
        if (beanClass != null && !Modifier.isPublic(beanClass.getModifiers()) && !mbd.isNonPublicAccessAllowed()) {
            throw new BeanCreationException(mbd.getResourceDescription(), beanName,
                    "Bean class isn't public, and non-public access not allowed: " + beanClass.getName());
        }

        //1.使用工厂方法创建Bean。(有factoryMethodName属性,说明配置文件中配置了factory-method)
        if (mbd.getFactoryMethodName() != null)  {
            return instantiateUsingFactoryMethod(beanName, mbd, args);
        }

        // Shortcut when re-creating the same bean...
        boolean resolved = false;
        boolean autowireNecessary = false;
        if (args == null) {
            synchronized (mbd.constructorArgumentLock) {
                //一个类有多个构造方法,每个构造函数都有不同的参数,所以调用前需要先根据参数锁定构造方法或对应的工厂方法
                if (mbd.resolvedConstructorOrFactoryMethod != null) {
                    resolved = true;
                    autowireNecessary = mbd.constructorArgumentsResolved;
                }
            }
        }
        //如果已经解析过,则直接使用解析好的构造方法,不需要再次锁定
        if (resolved) {
            if (autowireNecessary) {
                //2.使用构造器自动注入
                return autowireConstructor(beanName, mbd, null, null);
            }
            else {
                //3.使用默认构造方法
                return instantiateBean(beanName, mbd);
            }
        }

        // Need to determine the constructor...
        //需要根据参数解析构造方法
        Constructor<?>[] ctors = determineConstructorsFromBeanPostProcessors(beanClass, beanName);
        if (ctors != null ||
                mbd.getResolvedAutowireMode() == RootBeanDefinition.AUTOWIRE_CONSTRUCTOR ||
                mbd.hasConstructorArgumentValues() || !ObjectUtils.isEmpty(args))  {
            //构造方法自动注入
            return autowireConstructor(beanName, mbd, ctors, args);
        }

        // No special handling: simply use no-arg constructor.
        //使用默认构造方法
        return instantiateBean(beanName, mbd);
    }
2.设置Bean属性(populateBean)
实例化后的对象被包装在BeanWrapper对象中,并且此时对象仍然是一个原生的状态,并没有进行依赖注入。 紧接着,Spring根据BeanDefinition中的信息进行依赖注入,并且通过BeanWrapper提供的设置属性的接口完成依赖注入。

如果Bean有依赖,则在为属性赋值时会先通过getBean去获取依赖的Bean。这在Spring源码系列3 - IOC容器的启动过程中分析Bean的循环引用问题时讲述过,这里不再赘述。
    /**
     * Populate the bean instance in the given BeanWrapper with the property values
     * from the bean definition.
     * @param beanName the name of the bean
     * @param mbd the bean definition for the bean
     * @param bw the BeanWrapper with bean instance
     */
    protected void populateBean(String beanName, RootBeanDefinition mbd, BeanWrapper bw) {
        PropertyValues pvs = mbd.getPropertyValues();

        if (bw == null) {
            if (!pvs.isEmpty()) {
                throw new BeanCreationException(
                        mbd.getResourceDescription(), beanName, "Cannot apply property values to null instance");
            }
            else {
                // Skip property population phase for null instance.
                return;
            }
        }

        // Give any InstantiationAwareBeanPostProcessors the opportunity to modify the
        // state of the bean before properties are set. This can be used, for example,
        // to support styles of field injection.
        if (!mbd.isSynthetic() && hasInstantiationAwareBeanPostProcessors()) {
            for (BeanPostProcessor bp : getBeanPostProcessors()) {
                if (bp instanceof InstantiationAwareBeanPostProcessor) {
                    InstantiationAwareBeanPostProcessor ibp = (InstantiationAwareBeanPostProcessor) bp;
                    if (!ibp.postProcessAfterInstantiation(bw.getWrappedInstance(), beanName)) {
                        return;
                    }
                }
            }
        }

        int resolvedAutowireMode = mbd.getResolvedAutowireMode();
        if (resolvedAutowireMode == AUTOWIRE_BY_NAME || resolvedAutowireMode == AUTOWIRE_BY_TYPE) {
            MutablePropertyValues newPvs = new MutablePropertyValues(pvs);
            // Add property values based on autowire by name if applicable.
            if (resolvedAutowireMode == AUTOWIRE_BY_NAME) {
                autowireByName(beanName, mbd, bw, newPvs);
            }
            // Add property values based on autowire by type if applicable.
            if (resolvedAutowireMode == AUTOWIRE_BY_TYPE) {
                autowireByType(beanName, mbd, bw, newPvs);
            }
            pvs = newPvs;
        }

        boolean hasInstAwareBpps = hasInstantiationAwareBeanPostProcessors();
        boolean needsDepCheck = (mbd.getDependencyCheck() != AbstractBeanDefinition.DEPENDENCY_CHECK_NONE);

        if (hasInstAwareBpps || needsDepCheck) {
            PropertyDescriptor[] filteredPds = filterPropertyDescriptorsForDependencyCheck(bw, mbd.allowCaching);
            if (hasInstAwareBpps) {
                for (BeanPostProcessor bp : getBeanPostProcessors()) {
                    if (bp instanceof InstantiationAwareBeanPostProcessor) {
                        InstantiationAwareBeanPostProcessor ibp = (InstantiationAwareBeanPostProcessor) bp;
                        pvs = ibp.postProcessPropertyValues(pvs, filteredPds, bw.getWrappedInstance(), beanName);
                        if (pvs == null) {
                            return;
                        }
                    }
                }
            }
            if (needsDepCheck) {
                checkDependencies(beanName, mbd, filteredPds, pvs);
            }
        }

        applyPropertyValues(beanName, mbd, bw, pvs);
    }
3.初始化Bean
实际上在Spring源码系列3 - IOC容器的启动过程中,我们就已经总结过Bean的创建过程。Bean的创建过程主要经过下面几个过程。
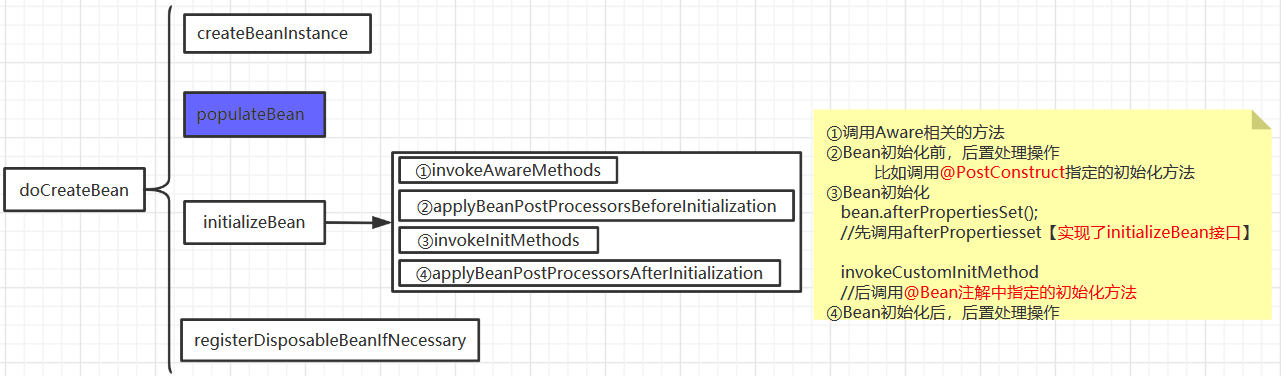
其中的第②步,是在Bean初始化之前做一些后置操作,比如@PostConstruct指定的初始化方法就是在此执行,处理该过程的组件是InitDestroyAnnotationBeanPostProcessor。而第④步,与第②步对应。是在Bean初始化之后做一些后置操作。
下面,我们就来从源码入手分析一下Bean的初始化,也就是initializeBean方法。
    protected Object initializeBean(final String beanName, final Object bean, RootBeanDefinition mbd) {
        if (System.getSecurityManager() != null) {
            AccessController.doPrivileged(new PrivilegedAction<Object>() {
                @Override
                public Object run() {
                    invokeAwareMethods(beanName, bean);
                    return null;
                }
            }, getAccessControlContext());
        }
        else {
            //① 调用Aware相关方法
            invokeAwareMethods(beanName, bean);
        }

        Object wrappedBean = bean;
        if (mbd == null || !mbd.isSynthetic()) {
            //② Bean初始化前调用后置处理方法。【@PostConstruct指定方法在此调用】
            wrappedBean = applyBeanPostProcessorsBeforeInitialization(wrappedBean, beanName);
        }

        try {
            //③ 调用初始化方法(afterPropertiesSet方法,init方法)
            invokeInitMethods(beanName, wrappedBean, mbd);
        }
        catch (Throwable ex) {
            throw new BeanCreationException(
                    (mbd != null ? mbd.getResourceDescription() : null),
                    beanName, "Invocation of init method failed", ex);
        }
        if (mbd == null || !mbd.isSynthetic()) {
            //④ Bean初始化之后调用后置处理方法
            wrappedBean = applyBeanPostProcessorsAfterInitialization(wrappedBean, beanName);
        }
        return wrappedBean;
    }
initializeBean-->invokeInitMethods
    protected void invokeInitMethods(String beanName, final Object bean, RootBeanDefinition mbd)
            throws Throwable {
        //如果实现了InitializingBean接口
        boolean isInitializingBean = (bean instanceof InitializingBean);
        if (isInitializingBean && (mbd == null || !mbd.isExternallyManagedInitMethod("afterPropertiesSet"))) {
            if (logger.isDebugEnabled()) {
                logger.debug("Invoking afterPropertiesSet() on bean with name '" + beanName + "'");
            }
            if (System.getSecurityManager() != null) {
                try {
                    AccessController.doPrivileged(new PrivilegedExceptionAction<Object>() {
                        @Override
                        public Object run() throws Exception {
                            ((InitializingBean) bean).afterPropertiesSet();
                            return null;
                        }
                    }, getAccessControlContext());
                }
                catch (PrivilegedActionException pae) {
                    throw pae.getException();
                }
            }
            else {
                //1.调用afterPropertiesSet方法【若实现了InitializingBean接口,afterPropertiesSet方法在此调用】
                ((InitializingBean) bean).afterPropertiesSet();
            }
        }

        if (mbd != null) {
            String initMethodName = mbd.getInitMethodName();
            if (initMethodName != null && !(isInitializingBean && "afterPropertiesSet".equals(initMethodName)) &&
                    !mbd.isExternallyManagedInitMethod(initMethodName)) {
                //2.调用自定义的init方法【@Bean中指定的初始化方法在此调用】
                invokeCustomInitMethod(beanName, bean, mbd);
            }
        }
    }
如果该Bean实现了InitializingBean接口,则会调用afterPropertiesSet方法。最后执行@Bean中指定的初始化方法。
4.使用Bean
也就是getBean的过程,从容器中获取Bean。
5.销毁Bean
注册DisposableBean和destroy-method
Spring中不但提供了对于初始化方法的扩展入口,同样也提供了销毁方法的扩展入口。对于销毁方法的扩展,除了我们熟知的配置属性destroy-method方法外,用户还可以注册后置处理器(DestructionAwareBeanPostProcessor)来统一处理bean的销毁方法。前面分析了初始化Bean的过程,最后有一个registerDisposableBeanIfNecessary步骤,其正是用于在Bean初始化完成后注册销毁方法的。
    protected void registerDisposableBeanIfNecessary(String beanName, Object bean, RootBeanDefinition mbd) {
        AccessControlContext acc = (System.getSecurityManager() != null ? getAccessControlContext() : null);
        if (!mbd.isPrototype() && requiresDestruction(bean, mbd)) {
            if (mbd.isSingleton()) {
                // Register a DisposableBean implementation that performs all destruction
                // work for the given bean: DestructionAwareBeanPostProcessors,
                // DisposableBean interface, custom destroy method.
                //单例模式下注册需要销毁的Bean,此方法中会处理实现DisposableBean接口的Bean。
                //并且对所有的bean使用DestructionAwareBeanPostProcessors处理
                registerDisposableBean(beanName,
                        new DisposableBeanAdapter(bean, beanName, mbd, getBeanPostProcessors(), acc));
            }
            else {
                // A bean with a custom scope...
                //非单例Bean的处理(scope值为非singleton)
                Scope scope = this.scopes.get(mbd.getScope());
                if (scope == null) {
                    throw new IllegalStateException("No Scope registered for scope name '" + mbd.getScope() + "'");
                }
                scope.registerDestructionCallback(beanName,
                        new DisposableBeanAdapter(bean, beanName, mbd, getBeanPostProcessors(), acc));
            }
        }
    }
销毁Bean
destroy-->close-->doClose-->destroyBeans()
-->DefaultListableBeanFactory#destroySingletons-->
-->DefaultSingletonBeanRegistry#destroySingleton-->destroyBean
-->DisposableBeanAdapter#destroy()
    @Override
    public void destroy() {
        if (!CollectionUtils.isEmpty(this.beanPostProcessors)) {
            for (DestructionAwareBeanPostProcessor processor : this.beanPostProcessors) {
                //1.JSR250:调用@PreDestroy指定的销毁方法
                processor.postProcessBeforeDestruction(this.bean, this.beanName);
            }
        }

        if (this.invokeDisposableBean) {
            if (logger.isDebugEnabled()) {
                logger.debug("Invoking destroy() on bean with name '" + this.beanName + "'");
            }
            try {
                if (System.getSecurityManager() != null) {
                    AccessController.doPrivileged(new PrivilegedExceptionAction<Object>() {
                        @Override
                        public Object run() throws Exception {
                            ((DisposableBean) bean).destroy();
                            return null;
                        }
                    }, acc);
                }
                else {
                    //2.如果Bean实现了DisposableBean接口,则调用Bean自身的destory方法
                    ((DisposableBean) bean).destroy();
                }
            }
            catch (Throwable ex) {
                String msg = "Invocation of destroy method failed on bean with name '" + this.beanName + "'";
                if (logger.isDebugEnabled()) {
                    logger.warn(msg, ex);
                }
                else {
                    logger.warn(msg + ": " + ex);
                }
            }
        }

        if (this.destroyMethod != null) {
            //3.调用@Bean注解中destroyMethod属性执行的销毁方法
            invokeCustomDestroyMethod(this.destroyMethod);
        }
        else if (this.destroyMethodName != null) {
            Method methodToCall = determineDestroyMethod();
            if (methodToCall != null) {
                invokeCustomDestroyMethod(methodToCall);
            }
        }
    }
由上面代码可得知,Bean销毁的几种方式的先后调用顺序如下图。

最后,在Spring源码系列5 - Bean的初始化/销毁的几种方式总结中对Bean的初始化和销毁的几种方式再次进行了总结。
面试题:
1.Bean的生命周期?
2.Bean的作用域?