一、Aop程序
先来回顾一下Aop的基础知识。
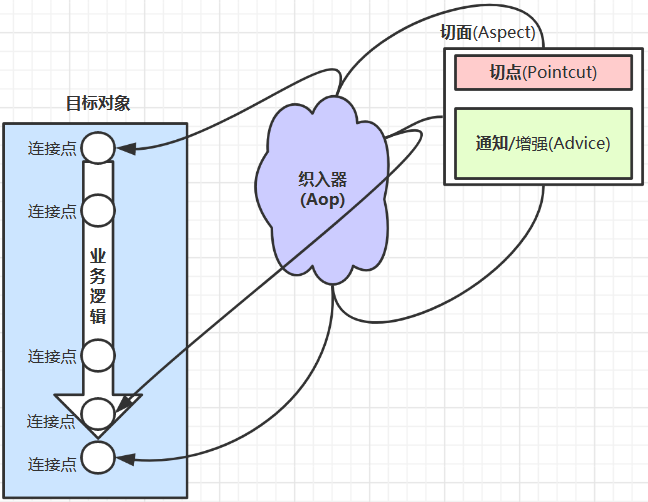
连接点(joint point):表示在程序中明确定义的点,包括类的初始化,构造方法的调用,对类成员的访问,方法执行以及异常处理的执行等。而Spring Aop的实现只支持方法执行类型的连接点。AspectJ则支持的比较全面。
切点(pointcut):表示一组连接点,也就是对连接点的筛选。在程序中的体现主要就是切点表达式。
通知:也叫增强。在特定的切点上执行的增强处理
切面:定义切点和通知的组合。
织入:将增强应用到目标对象具体连接点上的过程。
目标对象:增强所要应用到的对象
代理对象:目标对象的替身,融合了原逻辑和增强逻辑
接下来,我们从一段AOP程序入手来研究aop的原理。程序功能很简单,就是在业务方法执行的前后打印日志。
public interface MyInterface {

    int divive(int i, int j);

}

/**
 * 目标类
 */
//实现接口。演示JDK动态代理方式
public class MathCacalculator implements MyInterface {

    @Override
    public int divive(int i, int j) {
        return i / j;
    }

}

//未实现接口。演示Cglib动态代理方式
/*public class MathCacalculator {

    public int divive(int i, int j) {
        return i / j;
    }

}*/


/**
 * 日志切面类
 */
@Aspect//告诉Spring这是一个切面类
public class LogAspects {

    //抽取公共的切点表达式
    @Pointcut("execution(public int com.lp.test.aop.MathCacalculator.*(..))")
    public void pointCut() {
    }

    //@Before("public int com.lp.test.aop.MathCacalculator.divive(int, int)")
    @Before("pointCut()")
    public void logStart(JoinPoint joinPoint) {//前置增强
        String methodName = joinPoint.getSignature().getName();
        Object[] args = joinPoint.getArgs();
        System.out.println(methodName + "方法运行,参数为" + Arrays.asList(args));
    }

    //@After("public int com.lp.test.aop.MathCacalculator.divive(int, int)")
    @After("pointCut()")
    public void logEnd(JoinPoint joinPoint) {//后置增强
        String methodName = joinPoint.getSignature().getName();
        System.out.println(methodName + "方法结束");
    }

    //@AfterReturning("public int com.lp.test.aop.MathCacalculator.divive(int, int)")
    @AfterReturning(value = "pointCut()", returning = "result")
    public void logReturn(JoinPoint joinPoint, Object result) {//方法返回增强
        String methodName = joinPoint.getSignature().getName();
        System.out.println(methodName + "方法正常返回,返回值为" + result);
    }

    //@AfterThrowing("public int com.lp.test.aop.MathCacalculator.divive(int, int)")
    @AfterThrowing(value = "pointCut()", throwing = "exception")
    public void logException(JoinPoint joinPoint, Exception exception) {//方法异常增强
        String methodName = joinPoint.getSignature().getName();
        System.out.println(methodName + "方法发生异常,异常信息为" + exception);
    }

}

@EnableAspectJAutoProxy//相当于xml形式的<aop:aspectj-autoproxy/>
@Configuration
public class AopDemoConfig {

    @Bean
    public MathCacalculator mathCacalculator() {
        return new MathCacalculator();
    }

    @Bean
    public LogAspects logAspects() {
        return new LogAspects();
    }

}

public class AopMain {

    public static void main(String[] args) {
        ApplicationContext context = new AnnotationConfigApplicationContext(AopDemoConfig.class);

        String[] beanDefinitionNames = context.getBeanDefinitionNames();
        for (String str : beanDefinitionNames) {
            System.out.println(str + "===>" + context.getType(str));
        }

        //【Jdk动态代理】因为getBean返回的是代理类型,用实现类直接接收会因类型不匹配而抛ClassCastException。必须用接口类型来接收
        //MathCacalculator m = (MathCacalculator) context.getBean("mathCacalculator");
        MyInterface m1 = (MyInterface) context.getBean("mathCacalculator");
        m1.divive(10, 5);
        //mathCacalculator.divive(1, 0);

        //【Cglib动态代理】无接口,代理类与目标类是父子关系
        //MathCacalculator m2 = (MathCacalculator) context.getBean("mathCacalculator");
        //m2.divive(10, 5);
    }

}
二、源码分析
AOP功能是通过@EnableAspectjAutoProxy注解来开启的,我们就来研究一下该注解。点击进入该注解,发现该注解又通过@Import注解导入了AspectJAutoProxyRegister组件。
@Import(AspectJAutoProxyRegistrar.class)
public @interface EnableAspectJAutoProxy {
再进入AspectJAutoProxyRegister类查看源代码如下。
class AspectJAutoProxyRegistrar implements ImportBeanDefinitionRegistrar {

    @Override
    public void registerBeanDefinitions(AnnotationMetadata importingClassMetadata, BeanDefinitionRegistry registry) {
        //注册组件AspectJAnnotationAutoProxyCreator
        AopConfigUtils.registerAspectJAnnotationAutoProxyCreatorIfNecessary(registry);
        //获取@EnableAspectJAutoProxy注解中的属性
        AnnotationAttributes enableAspectJAutoProxy =
                AnnotationConfigUtils.attributesFor(importingClassMetadata, EnableAspectJAutoProxy.class);
        //proxyTargetClass属性值。默认为false
        if (enableAspectJAutoProxy.getBoolean("proxyTargetClass")) {
            AopConfigUtils.forceAutoProxyCreatorToUseClassProxying(registry);
        }
        //exposeProxy属性值。默认为false
        if (enableAspectJAutoProxy.getBoolean("exposeProxy")) {
            AopConfigUtils.forceAutoProxyCreatorToExposeProxy(registry);
        }
    }

}
最重要的是第一行代码,注册了一个AspectJAnnotationAutoProxyCreator组件。跟踪一下注册该组件的代码。
    public static BeanDefinition registerAspectJAnnotationAutoProxyCreatorIfNecessary(BeanDefinitionRegistry registry) {
        return registerAspectJAnnotationAutoProxyCreatorIfNecessary(registry, null);
    }

    public static BeanDefinition registerAspectJAnnotationAutoProxyCreatorIfNecessary(BeanDefinitionRegistry registry, Object source) {
        return registerOrEscalateApcAsRequired(AnnotationAwareAspectJAutoProxyCreator.class, registry, source);//传入AnnotationAwareAspectJAutoProxyCreator
    }

    private static BeanDefinition registerOrEscalateApcAsRequired(Class<?> cls, BeanDefinitionRegistry registry, Object source) {
        Assert.notNull(registry, "BeanDefinitionRegistry must not be null");

        if (registry.containsBeanDefinition(AUTO_PROXY_CREATOR_BEAN_NAME)) {
            BeanDefinition apcDefinition = registry.getBeanDefinition(AUTO_PROXY_CREATOR_BEAN_NAME);
            if (!cls.getName().equals(apcDefinition.getBeanClassName())) {
                int currentPriority = findPriorityForClass(apcDefinition.getBeanClassName());
                int requiredPriority = findPriorityForClass(cls);
                if (currentPriority < requiredPriority) {
                    apcDefinition.setBeanClassName(cls.getName());
                }
            }
            return null;
        }

        RootBeanDefinition beanDefinition = new RootBeanDefinition(cls);
        beanDefinition.setSource(source);
        beanDefinition.getPropertyValues().add("order", Ordered.HIGHEST_PRECEDENCE);
        beanDefinition.setRole(BeanDefinition.ROLE_INFRASTRUCTURE);
        //向BeanRegistry中注册AnnotationAwareAspectJAutoProxyCreator
        registry.registerBeanDefinition(AUTO_PROXY_CREATOR_BEAN_NAME, beanDefinition);
        return beanDefinition;
    }
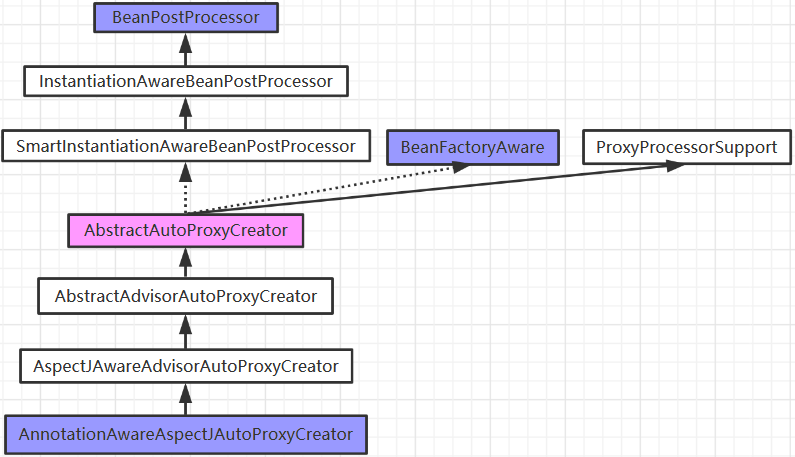
原来,导入的AspectJAutoProxyRegistrar组件最终又会向BeanRegistry中注册另一个组件AnnotationAwareAspectJAutoProxyCreator。下面是该组件类的继承体系。
AnnotationAwareAspectJAutoProxyCreator是由抽象父类AbstractAutoProxyCreator一路继承而来。在后文Spring源码系列8 - 事务管理中分析事务管理时讲到的组件InfrastructureAdvisorAutoProxyCreator也同样由该抽象父类一路继承下来。
1.注册后置处理器AnnotationAwareAspectJAutoProxyCreator
由于AnnotationAwareAspectJAutoProxyCreator是一个后置处理器,在IOC容器的启动过程中我们已经分析过了经典的refresh方法,其中就有一个步骤是registerBeanPostProcessors(beanFactory),它是专门用来注册后置处理器的。所以,我们继续跟踪一下源码,看看BeanPostProcessor是如何创建和注册过程。
refresh()
-->registerBeanPostProcessors(beanFactory);
-->BeanPostProcessor pp = beanFactory.getBean(ppName, BeanPostProcessor.class);
    public static void registerBeanPostProcessors(
            ConfigurableListableBeanFactory beanFactory, AbstractApplicationContext applicationContext) {

        String[] postProcessorNames = beanFactory.getBeanNamesForType(BeanPostProcessor.class, true, false);

        // Register BeanPostProcessorChecker that logs an info message when
        // a bean is created during BeanPostProcessor instantiation, i.e. when
        // a bean is not eligible for getting processed by all BeanPostProcessors.
        int beanProcessorTargetCount = beanFactory.getBeanPostProcessorCount() + 1 + postProcessorNames.length;
        beanFactory.addBeanPostProcessor(new BeanPostProcessorChecker(beanFactory, beanProcessorTargetCount));

        // Separate between BeanPostProcessors that implement PriorityOrdered,Ordered, and the rest.
        //按实现的接口的不同,分类存储BeanPostProcessors
        List<BeanPostProcessor> priorityOrderedPostProcessors = new ArrayList<BeanPostProcessor>();
        List<BeanPostProcessor> internalPostProcessors = new ArrayList<BeanPostProcessor>();

        List<String> orderedPostProcessorNames = new ArrayList<String>();
        List<String> nonOrderedPostProcessorNames = new ArrayList<String>();
        for (String ppName : postProcessorNames) {
            if (beanFactory.isTypeMatch(ppName, PriorityOrdered.class)) {
                BeanPostProcessor pp = beanFactory.getBean(ppName, BeanPostProcessor.class);
                priorityOrderedPostProcessors.add(pp);
                if (pp instanceof MergedBeanDefinitionPostProcessor) {
                    internalPostProcessors.add(pp);
                }
            }
            else if (beanFactory.isTypeMatch(ppName, Ordered.class)) {
                orderedPostProcessorNames.add(ppName);
            }
            else {
                nonOrderedPostProcessorNames.add(ppName);
            }
        }

        //首先,注册实现了PriorityOrdered接口的BeanPostProcessors
        sortPostProcessors(priorityOrderedPostProcessors, beanFactory);
        registerBeanPostProcessors(beanFactory, priorityOrderedPostProcessors);

        //然后,注册实现了Ordered接口的BeanPostProcessor
        List<BeanPostProcessor> orderedPostProcessors = new ArrayList<BeanPostProcessor>();
        for (String ppName : orderedPostProcessorNames) {
            BeanPostProcessor pp = beanFactory.getBean(ppName, BeanPostProcessor.class);
            orderedPostProcessors.add(pp);
            if (pp instanceof MergedBeanDefinitionPostProcessor) {
                internalPostProcessors.add(pp);
            }
        }
        sortPostProcessors(orderedPostProcessors, beanFactory);
        registerBeanPostProcessors(beanFactory, orderedPostProcessors);

        //注册常规的BeanPostProcessor
        List<BeanPostProcessor> nonOrderedPostProcessors = new ArrayList<BeanPostProcessor>();
        for (String ppName : nonOrderedPostProcessorNames) {
            //1.【熟悉的getBean】,创建BeanPostProcessor
            BeanPostProcessor pp = beanFactory.getBean(ppName, BeanPostProcessor.class);
            nonOrderedPostProcessors.add(pp);
            if (pp instanceof MergedBeanDefinitionPostProcessor) {
                internalPostProcessors.add(pp);
            }
        }
        //2.注册BeanPostProcessor
        registerBeanPostProcessors(beanFactory, nonOrderedPostProcessors);

        // Finally, re-register all internal BeanPostProcessors.
        //最后,重新注册内部BeanPostProcessor
        sortPostProcessors(internalPostProcessors, beanFactory);
        registerBeanPostProcessors(beanFactory, internalPostProcessors);

        // Re-register post-processor for detecting inner beans as ApplicationListeners,
        // moving it to the end of the processor chain (for picking up proxies etc).
        //重新注册后置处理器,用于监测内部Bean(例如ApplicationListeners),将其移到处理器链的尾部。
        beanFactory.addBeanPostProcessor(new ApplicationListenerDetector(applicationContext));
    }
注册BeanPostProcessor时,为了便于管理,会进行分类存储和注册。实现了PriorityOrdered接口的BeanPostProcessor存储在一个列表中并进行注册,实现了Ordered接口的BeanPostProcessor存储在另外一个列表中并进行注册,常规的BeanPostProcessor也单独存储在一个列表中并进行注册。而AnnotationAwareAspectJAutoProxyCreator就是一个常规的BeanPostProcessor。
在注册AnnotationAwareAspectJAutoProxyCreator时,会先去容器中getBean查找,如果容器中已存在则直接注册,否则就要经过经典的getBean流程来创建了。获取到了之后完成注册操作
- 通过getBean获取后置处理器
- 注册后置处理器
getBean会经过doGetBean过程,doGetBean又会经过createBeanInstance ,populateBean ,initializeBean过程。
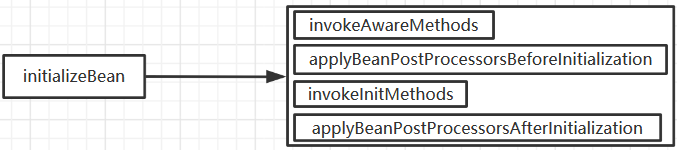
而在initializeBean过程中会存在invokeAwareMethods,代码逻辑如下:
    private void invokeAwareMethods(final String beanName, final Object bean) {
        if (bean instanceof Aware) {
            if (bean instanceof BeanNameAware) {
                ((BeanNameAware) bean).setBeanName(beanName);
            }
            if (bean instanceof BeanClassLoaderAware) {
                ((BeanClassLoaderAware) bean).setBeanClassLoader(getBeanClassLoader());
            }
            //如果实现了BeanFactoryAware接口
            if (bean instanceof BeanFactoryAware) {
                ((BeanFactoryAware) bean).setBeanFactory(AbstractAutowireCapableBeanFactory.this);
            }
        }
    }
由于AnnotationAwareAspectJAutoProxyCreator实现了BeanFactoryAware接口,所以会执行setBeanFactory逻辑。也就是说在创建组件后,且在组件初始化前会先为该组件注入BeanFactory,使得该组件与BeanFactory关联起来,从而能从BeanFactory中获取到容器相关信息。注入BeanFactory时,会对BeanFactory初始化。
    @Override
    public void setBeanFactory(BeanFactory beanFactory) {
        super.setBeanFactory(beanFactory);
        if (!(beanFactory instanceof ConfigurableListableBeanFactory)) {
            throw new IllegalArgumentException(
                    "AdvisorAutoProxyCreator requires a ConfigurableListableBeanFactory: " + beanFactory);
        }
        //初始化BeanFactory
        initBeanFactory((ConfigurableListableBeanFactory) beanFactory);
    }

    @Override
    protected void initBeanFactory(ConfigurableListableBeanFactory beanFactory) {
        super.initBeanFactory(beanFactory);
        if (this.aspectJAdvisorFactory == null) {
            this.aspectJAdvisorFactory = new ReflectiveAspectJAdvisorFactory(beanFactory);
        }
        this.aspectJAdvisorsBuilder =
                new BeanFactoryAspectJAdvisorsBuilderAdapter(beanFactory, this.aspectJAdvisorFactory);
    }
至此,整个AnnotationAwareAspectJAutoProxyCreator就创建完成,也就是getBean工作完成。之后,通过registerBeanPostProcessors()方法就将AnnotationAwareAspectJAutoProxyCreator这个后置处理器注册到了容器中。
2.调用后置处理器AnnotationAwareAspectJAutoProxyCreator,为目标对象创建代理对象
后置处理器的作用是在目标Bean的初始化前后进行额外的(增强/包装)操作,如果不理解可以参考IOC容器的启动过程。既然AnnotationAwareAspectJAutoProxyCreator是一个后置处理器,所以在MathCacalculator实例(目标对象)创建后,接下来进行初始化的前后,AnnotationAwareAspectJAutoProxyCreator会对其进行包装操作。实际上只在初始化后进行了处理。
    @Override
    public Object postProcessBeforeInitialization(Object bean, String beanName) {
        return bean;//初始化前,不做处理
    }

    @Override
    public Object postProcessAfterInitialization(Object bean, String beanName) throws BeansException {
        if (bean != null) {
            Object cacheKey = getCacheKey(bean.getClass(), beanName);
            if (this.earlyProxyReferences.remove(cacheKey) != bean) {
                return wrapIfNecessary(bean, beanName, cacheKey);//初始化后,对Bean进行包装(增强)
            }
        }
        return bean;
    }
那么,包装操作具体干了些什么事情呢?我们继续跟踪代码。
    protected Object wrapIfNecessary(Object bean, String beanName, Object cacheKey) {
        if (beanName != null && this.targetSourcedBeans.contains(beanName)) {
            return bean;
        }
        if (Boolean.FALSE.equals(this.advisedBeans.get(cacheKey))) {
            return bean;
        }
        if (isInfrastructureClass(bean.getClass()) || shouldSkip(bean.getClass(), beanName)) {
            this.advisedBeans.put(cacheKey, Boolean.FALSE);
            return bean;
        }

        // Create proxy if we have advice.

        // 获取当前Bean匹配的advice
        Object[] specificInterceptors = getAdvicesAndAdvisorsForBean(bean.getClass(), beanName, null);
        if (specificInterceptors != DO_NOT_PROXY) {
            this.advisedBeans.put(cacheKey, Boolean.TRUE);
            //创建代理对象
            Object proxy = createProxy(
                    bean.getClass(), beanName, specificInterceptors, new SingletonTargetSource(bean));
            this.proxyTypes.put(cacheKey, proxy.getClass());
            return proxy;
        }

        this.advisedBeans.put(cacheKey, Boolean.FALSE);
        return bean;
    }
原来,包装操作就是创建了一个代理对象。也就是AnnotationAwareAspectJAutoProxyCreator作为一个后置处理器,在目标对象Bean创建完并初始化后,为目标对象创建的一个代理对象,目标对象在执行时实际上执行的是这个代理对象。
2.1 getAdvicesAndAdvisorsForBean
创建代理对象之前,需要查找目标对象匹配的Advice和Advisor,因为创建代理对象时需要用到这些信息。
    @Override
    protected Object[] getAdvicesAndAdvisorsForBean(Class<?> beanClass, String beanName, TargetSource targetSource) {
        //查找合适的advisor
        List<Advisor> advisors = findEligibleAdvisors(beanClass, beanName);
        if (advisors.isEmpty()) {
            return DO_NOT_PROXY;
        }
        return advisors.toArray();
    }

    protected List<Advisor> findEligibleAdvisors(Class<?> beanClass, String beanName) {
        //查找所有增强器。也就是@Aspect注解标注的的Bean
        List<Advisor> candidateAdvisors = findCandidateAdvisors();
        //找所有匹配的增强器。也就是根据@Before,@After等注解上的表达式与当前Bean进行匹配
        List<Advisor> eligibleAdvisors = findAdvisorsThatCanApply(candidateAdvisors, beanClass, beanName);
        //扩展
        extendAdvisors(eligibleAdvisors);
        //排序(按优先级)
        if (!eligibleAdvisors.isEmpty()) {
            eligibleAdvisors = sortAdvisors(eligibleAdvisors);
        }
        return eligibleAdvisors;
    }
主要做的事情就是
- 查找所有增强器,也就是所有使用@Aspect注解标注的Bean
- 查找匹配的增强器,也就是根据@Before,@After等注解上的表达式,与当前bean进行匹配。
- 对匹配的增强器进行扩展和排序
对于文章开头的程序来说,我们在切面LogAspects定义了4个增强,且它们的切点表达式都能匹配到目标对象MathCacalculator,所以这4个增强都是与目标对象匹配的增强。


2.2.创建代理对象
我们知道Spring AOP动态代理分为JDK动态代理和Cglib动态代理,接下来我们来看看创建代理的源码。
    protected Object createProxy(Class<?> beanClass, String beanName, Object[] specificInterceptors, TargetSource targetSource) {
        if (this.beanFactory instanceof ConfigurableListableBeanFactory) {
            //暴露目标类
            AutoProxyUtils.exposeTargetClass((ConfigurableListableBeanFactory) this.beanFactory, beanName, beanClass);
        }

        //创建代理工厂
        ProxyFactory proxyFactory = new ProxyFactory();
        proxyFactory.copyFrom(this);

        //检查proxyTargetClass属性值,默认为false
        if (!proxyFactory.isProxyTargetClass()) {
            // 是否需要代理当前类而不是代理接口,根据perserveTargetClass属性判断
            if (shouldProxyTargetClass(beanClass, beanName)) {
                //如果代理的是类,则代理工厂中设置proxyTargetClass为true
                proxyFactory.setProxyTargetClass(true);
            }
            else {
                // 如果代理的是接口,则添加代理接口 【【【即使我们配置了proxyTargetClass=false,经过这里的一些判断还是可能会将其设为true】】】
                evaluateProxyInterfaces(beanClass, proxyFactory);
            }
        }
        // [拦截器、增强器、增强方法都会对逻辑进行增强,有必要统一封装成Advisor,并设置到proxyFactory中
        Advisor[] advisors = buildAdvisors(beanName, specificInterceptors);
        //添加Advisor
        proxyFactory.addAdvisors(advisors);
        //设置要代理的目标类
        proxyFactory.setTargetSource(targetSource);
        //供子类进一步定制proxyFactory,默认为空实现
        customizeProxyFactory(proxyFactory);
        //设置代理工厂配置好后,是否允许再修改通知,默认为false
        proxyFactory.setFrozen(this.freezeProxy);
        if (advisorsPreFiltered()) {
            proxyFactory.setPreFiltered(true);
        }

        //从代理工厂中获取代理
        return proxyFactory.getProxy(getProxyClassLoader());
    }

    //ProxyFactory
    public Object getProxy(ClassLoader classLoader) {
        return createAopProxy().getProxy(classLoader);//【分两步】先createAopProxy,后getProxy
    }

    protected final synchronized AopProxy createAopProxy() {
        if (!this.active) {
            activate();
        }
        return getAopProxyFactory().createAopProxy(this);
    }

    //DefaultAopProxyFactory
    @Override
    public AopProxy createAopProxy(AdvisedSupport config) throws AopConfigException {
        //检查是否代理应该进行积极优化,optimize默认为false。
        //检查是否代理目标类,而非代理接口,proxyTargetClass默认为false
        //检查是否不存在用户提供的代理接口,
        if (config.isOptimize() || config.isProxyTargetClass() || hasNoUserSuppliedProxyInterfaces(config)) {
            Class<?> targetClass = config.getTargetClass();
            if (targetClass == null) {
                throw new AopConfigException("TargetSource cannot determine target class: " +
                        "Either an interface or a target is required for proxy creation.");
            }
            //【JDK动态代理】如果目标类是接口
            if (targetClass.isInterface() || Proxy.isProxyClass(targetClass)) {
                return new JdkDynamicAopProxy(config);
            }
            //【Cglib动态代理】否则,目标对象不是接口
            return new ObjenesisCglibAopProxy(config);
        }
        else {//[不进行积极优化]且[proxyTargetClass==fase]且[存在用户提供的代理接口],则使用JDK动态代理
            return new JdkDynamicAopProxy(config);
        }
    }
对于代理的创建,Spring委托给了ProxyFactory去处理。首先会对代理工厂进行初始化,为之后真正的创建代理做准备,主要有以下操作:
- 获取当前类中的属性
- 添加代理接口
- 封装Advisor,并添加到代理工厂中 【这部分源码不再追踪,我们主要是搞清楚整个AOP流程】
- 设置要代理的类
- 提供子类定制代理工厂的机会
- 进行获取代理操作(选择哪种代理方式,然后再创建)
之后,就是真正的创建代理了。Spring会根据条件选择JDKProxy方式或CglibProxy方式。从if的条件看,有3个判断条件可以影响spring的判断。
- optimize:用来控制通过Cglib创建的代理是否使用激进的优化策略。除非完全了解AOP代理如何处理优化,否则一般不推荐使用这个配置。目前这个属性仅用于Cglib代理,对JDK动态代理(默认代理)无效
- proxyTargetClass:为ture时,目标类本身被代理,而不是目标类的接口被代理。如果为true,将会使用Cglib创建代理。设置方法就是@EnableAspectJAutoProxy(proxyTargetClass = true),或者<aop:aspectj-autoproxy proxy-target-class="true">,这两者是等价的,前者是注解形式,而后者是声明形式。
- hasNoUserSuppliedProxyInterfaces:是否存在代理接口
下面JDK动态代理和Cglib动态代理的总结:
①如果目标对象实现了接口,默认情况下会采用JDK动态代理实现AOP,但可以强制使用Cglib实现AOP
②如果目标对象没有实现接口,必须采用Cglib库,Spring会自动在JDK动态代理和Cglib间转换

如何强制使用Cglib实现AOP:
①添加cglib库,
②配置proxyTargetClass = true
@EnableAspectJAutoProxy(proxyTargetClass = true),或者<aop:aspectj-autoproxy proxy-target-class="true">

JDK动态代理与Cglib动态代理的区别?
①JDK动态代理只能对实现了接口的类生成代理,而不能针对类。
②Cglib是针对类实现代理,主要是为指定的类生成一个子类,覆盖其中的方法,因为是继承,所以该类或方法不能声明为final。
DefaultAopProxyFactory.createProxy()
-->JdkDynamicAopProxy.getProxy()
DefaultAopProxyFactory.createProxy()
-->CglibAopProxy.getProxy()
确定了使用哪种代理方式后,便可以进行代理的创建了。JDK动态代理和Cglib动态代理分别对应的是JdkDynamicAopProxy和CglibAopProxy两个类,它们是AopProxy接口的两种实现。

(1)【Jdk动态代理】对应JdkDynamicAopProxy类
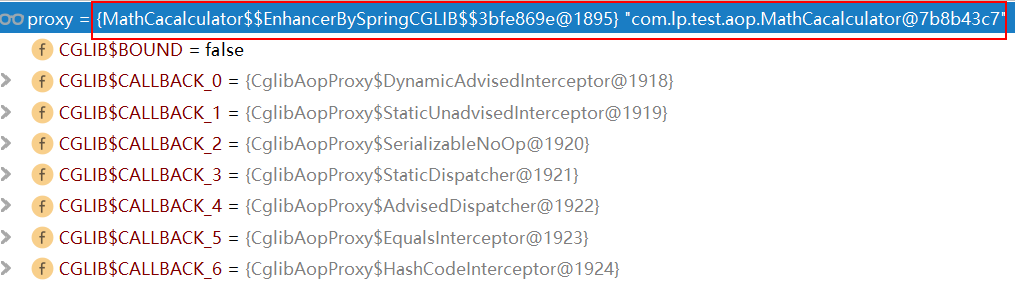
当我们使用实现了自定义接口的MathCacalculator时,发现程序走的是JDK代理方式,创建的代理如下图所示。
![]()
下面就来研究源码,从JdkDynamicAopProxy入手。
    @Override
    public Object getProxy() {
        return getProxy(ClassUtils.getDefaultClassLoader());
    }

    @Override
    public Object getProxy(ClassLoader classLoader) {
        if (logger.isDebugEnabled()) {
            logger.debug("Creating JDK dynamic proxy: target source is " + this.advised.getTargetSource());
        }
        Class<?>[] proxiedInterfaces = AopProxyUtils.completeProxiedInterfaces(this.advised, true);
        findDefinedEqualsAndHashCodeMethods(proxiedInterfaces);
        //【jdk动态代理】创建代理对象。需要三个参数:传入类加载,要代理的接口,InvocationHandler实例
        return Proxy.newProxyInstance(classLoader, proxiedInterfaces, this);
    }

    @CallerSensitive
    public static Object newProxyInstance(ClassLoader loader,
                                          Class<?>[] interfaces,
                                          InvocationHandler h)
        throws IllegalArgumentException
    {
        Objects.requireNonNull(h);

        final Class<?>[] intfs = interfaces.clone();
        final SecurityManager sm = System.getSecurityManager();
        if (sm != null) {
            checkProxyAccess(Reflection.getCallerClass(), loader, intfs);
        }

        /*
         * Look up or generate the designated proxy class.
         * 查找代理类
         */
        Class<?> cl = getProxyClass0(loader, intfs);

        /*
         * Invoke its constructor with the designated invocation handler.
         */
        try {
            if (sm != null) {
                checkNewProxyPermission(Reflection.getCallerClass(), cl);
            }

            final Constructor<?> cons = cl.getConstructor(constructorParams);
            final InvocationHandler ih = h;
            if (!Modifier.isPublic(cl.getModifiers())) {
                AccessController.doPrivileged(new PrivilegedAction<Void>() {
                    public Void run() {
                        cons.setAccessible(true);
                        return null;
                    }
                });
            }
            //使用反射方式来创建代理对象
            return cons.newInstance(new Object[]{h});
        } catch (IllegalAccessException|InstantiationException e) {
            throw new InternalError(e.toString(), e);
        } catch (InvocationTargetException e) {
            Throwable t = e.getCause();
            if (t instanceof RuntimeException) {
                throw (RuntimeException) t;
            } else {
                throw new InternalError(t.toString(), t);
            }
        } catch (NoSuchMethodException e) {
            throw new InternalError(e.toString(), e);
        }
    }
其实JDK的动态代理最核心的一段代码就是Proxy.newProxyInstance(classLoader, proxiedInterfaces, this),该方法要传入三个参数:类加载器,目标对象实现的接口,InvocationHandler接口实现类实例(该接口实现类实现了增强逻辑)。这部分基础知识可以参考代理模式-Proxy。
既然InvocationHandler接口实现类中实现了增强逻辑,那么这个InvocationHandler接口实现类是谁呢?显然就是传入this,自然指的就是JdkDynamicAopProxy本身了。
//JdkDynamicAopProxy实现了InvocationHandler接口
final class JdkDynamicAopProxy implements AopProxy, InvocationHandler, Serializable {
所以,在之后的目标方法调用时,JdkDynamicAopProxy类中的invoke方法就会执行。
(2)【Cglib动态代理】对应的类为CglibAopProxy
当我们使用未实现接口的MathCacalculator类时,发现程序走的是Cglib动态代理方式,创建的代理如下图所示。
下面来研究源码,从CglibAopProxy类入手。
    @Override
    public Object getProxy(ClassLoader classLoader) {
        if (logger.isDebugEnabled()) {
            logger.debug("Creating CGLIB proxy: target source is " + this.advised.getTargetSource());
        }

        try {
            Class<?> rootClass = this.advised.getTargetClass();
            Assert.state(rootClass != null, "Target class must be available for creating a CGLIB proxy");

            Class<?> proxySuperClass = rootClass;
            if (ClassUtils.isCglibProxyClass(rootClass)) {
                proxySuperClass = rootClass.getSuperclass();
                Class<?>[] additionalInterfaces = rootClass.getInterfaces();
                for (Class<?> additionalInterface : additionalInterfaces) {
                    this.advised.addInterface(additionalInterface);
                }
            }

            // Validate the class, writing log messages as necessary.
            //验证class
            validateClassIfNecessary(proxySuperClass, classLoader);

            // Configure CGLIB Enhancer...
            //创建及配置Enhancer
            Enhancer enhancer = createEnhancer();
            if (classLoader != null) {
                enhancer.setClassLoader(classLoader);
                if (classLoader instanceof SmartClassLoader &&
                        ((SmartClassLoader) classLoader).isClassReloadable(proxySuperClass)) {
                    enhancer.setUseCache(false);
                }
            }
            enhancer.setSuperclass(proxySuperClass);
            enhancer.setInterfaces(AopProxyUtils.completeProxiedInterfaces(this.advised));
            enhancer.setNamingPolicy(SpringNamingPolicy.INSTANCE);
            enhancer.setStrategy(new ClassLoaderAwareUndeclaredThrowableStrategy(classLoader));

            //【设置拦截器】
            Callback[] callbacks = getCallbacks(rootClass);
            Class<?>[] types = new Class<?>[callbacks.length];
            for (int x = 0; x < types.length; x++) {
                types[x] = callbacks[x].getClass();
            }
            // fixedInterceptorMap only populated at this point, after getCallbacks call above
            enhancer.setCallbackFilter(new ProxyCallbackFilter(
                    this.advised.getConfigurationOnlyCopy(), this.fixedInterceptorMap, this.fixedInterceptorOffset));
            enhancer.setCallbackTypes(types);

            // Generate the proxy class and create a proxy instance.
            //生成代理类,以及创建代理对象
            return createProxyClassAndInstance(enhancer, callbacks);
        }
        catch (CodeGenerationException ex) {
            throw new AopConfigException("Could not generate CGLIB subclass of " + this.advised.getTargetClass() +
                    ": Common causes of this problem include using a final class or a non-visible class",
                    ex);
        }
        catch (IllegalArgumentException ex) {
            throw new AopConfigException("Could not generate CGLIB subclass of " + this.advised.getTargetClass() +
                    ": Common causes of this problem include using a final class or a non-visible class",
                    ex);
        }
        catch (Throwable ex) {
            // TargetSource.getTarget() failed
            throw new AopConfigException("Unexpected AOP exception", ex);
        }
    }

    protected Object createProxyClassAndInstance(Enhancer enhancer, Callback[] callbacks) {
        enhancer.setInterceptDuringConstruction(false);
        enhancer.setCallbacks(callbacks);
        return (this.constructorArgs != null ?
                enhancer.create(this.constructorArgTypes, this.constructorArgs) :
                enhancer.create());
    }
上面是借助Enhancer来创建代理的过程,在代理模式-Proxy中对Cglib进行过介绍,它是基于ASM的,其核心类就是Enhancer。上面过程中最重要的就是通过getCallbacks设置拦截器链方法。
    private Callback[] getCallbacks(Class<?> rootClass) throws Exception {
        // Parameters used for optimization choices...
        boolean exposeProxy = this.advised.isExposeProxy();
        boolean isFrozen = this.advised.isFrozen();
        boolean isStatic = this.advised.getTargetSource().isStatic();

        // Choose an "aop" interceptor (used for AOP calls).
        Callback aopInterceptor = new DynamicAdvisedInterceptor(this.advised);//将advised属性封装进aop拦截器

        // Choose a "straight to target" interceptor. (used for calls that are
        // unadvised but can return this). May be required to expose the proxy.
        Callback targetInterceptor;
        if (exposeProxy) {
            targetInterceptor = (isStatic ?
                    new StaticUnadvisedExposedInterceptor(this.advised.getTargetSource().getTarget()) :
                    new DynamicUnadvisedExposedInterceptor(this.advised.getTargetSource()));
        }
        else {
            targetInterceptor = (isStatic ?
                    new StaticUnadvisedInterceptor(this.advised.getTargetSource().getTarget()) :
                    new DynamicUnadvisedInterceptor(this.advised.getTargetSource()));
        }

        // Choose a "direct to target" dispatcher (used for
        // unadvised calls to static targets that cannot return this).
        Callback targetDispatcher = (isStatic ?
                new StaticDispatcher(this.advised.getTargetSource().getTarget()) : new SerializableNoOp());

        Callback[] mainCallbacks = new Callback[] {
                //将拦截器链加入到Callback中
                aopInterceptor,  // for normal advice
                targetInterceptor,  // invoke target without considering advice, if optimized
                new SerializableNoOp(),  // no override for methods mapped to this
                targetDispatcher, this.advisedDispatcher,
                new EqualsInterceptor(this.advised),
                new HashCodeInterceptor(this.advised)
        };

        Callback[] callbacks;

        // If the target is a static one and the advice chain is frozen,
        // then we can make some optimizations by sending the AOP calls
        // direct to the target using the fixed chain for that method.
        if (isStatic && isFrozen) {
            Method[] methods = rootClass.getMethods();
            Callback[] fixedCallbacks = new Callback[methods.length];
            this.fixedInterceptorMap = new HashMap<String, Integer>(methods.length);

            // TODO: small memory optimization here (can skip creation for methods with no advice)
            for (int x = 0; x < methods.length; x++) {
                Method method = methods[x];
                List<Object> chain = this.advised.getInterceptorsAndDynamicInterceptionAdvice(method, rootClass);
                fixedCallbacks[x] = new FixedChainStaticTargetInterceptor(
                        chain, this.advised.getTargetSource().getTarget(), this.advised.getTargetClass());
                this.fixedInterceptorMap.put(methods.toString(), x);
            }

            // Now copy both the callbacks from mainCallbacks
            // and fixedCallbacks into the callbacks array.
            callbacks = new Callback[mainCallbacks.length + fixedCallbacks.length];
            System.arraycopy(mainCallbacks, 0, callbacks, 0, mainCallbacks.length);
            System.arraycopy(fixedCallbacks, 0, callbacks, mainCallbacks.length, fixedCallbacks.length);
            this.fixedInterceptorOffset = mainCallbacks.length;
        }
        else {
            callbacks = mainCallbacks;
        }
        return callbacks;
    }
Cglib中对于方法的拦截是通过自定义拦截器(需实现MethodInterceptor接口),然后将拦截器加入到Callback中,在调用代理对象时会执行拦截方法。所以上面的getCallback方法正是这样做的,在将adviced属性封装进DynamicAdvisedInterceptor后将该拦截器加入到了Callback,当再调用目标对象时DynamicAdvisedInterceptor就会起作用了。
3.目标方法执行时,拦截器进行拦截,执行增强逻辑
当目标方法执行时,也就是我们的程序中mathCacalculator.divive(10, 5)执行时,拦截器将会起作用了。
(1)【Jdk代理方式】封装拦截器链
mathCacalculator.divive()方法被执行时,会执行之前介绍的JdkDynamicAopProxy中的invoke方法。我们来看看执行逻辑。
    /**
     * Implementation of {@code InvocationHandler.invoke}.
     * <p>Callers will see exactly the exception thrown by the target,
     * unless a hook method throws an exception.
     */
    @Override
    public Object invoke(Object proxy, Method method, Object[] args) throws Throwable {
        MethodInvocation invocation;
        Object oldProxy = null;
        boolean setProxyContext = false;

        TargetSource targetSource = this.advised.targetSource;
        Class<?> targetClass = null;
        Object target = null;

        try {
            // 如果接口没有定义 equals 方法且当前方法是 equals 方法,则不会增强,直接返回
            if (!this.equalsDefined && AopUtils.isEqualsMethod(method)) {
                // The target does not implement the equals(Object) method itself.
                return equals(args[0]);
            }
            // 如果接口没有定义 hashCode方法且当前方法是 hashCode方法,则不会增强,直接返回
            else if (!this.hashCodeDefined && AopUtils.isHashCodeMethod(method)) {
                // The target does not implement the hashCode() method itself.
                return hashCode();
            }
            else if (method.getDeclaringClass() == DecoratingProxy.class) {
                // There is only getDecoratedClass() declared -> dispatch to proxy config.
                return AopProxyUtils.ultimateTargetClass(this.advised);
            }
            // 如果方法所在的类为Advised或者是父类子类关系,则直接执行
            else if (!this.advised.opaque && method.getDeclaringClass().isInterface() &&
                    method.getDeclaringClass().isAssignableFrom(Advised.class)) {
                // Service invocations on ProxyConfig with the proxy config...
                return AopUtils.invokeJoinpointUsingReflection(this.advised, method, args);
            }

            Object retVal;

            //目标方法内部的自我调用无法使用切面中的增强,需要把代理暴露出去
            if (this.advised.exposeProxy) {
                // Make invocation available if necessary.
                oldProxy = AopContext.setCurrentProxy(proxy);
                setProxyContext = true;
            }

            // May be null. Get as late as possible to minimize the time we "own" the target,
            // in case it comes from a pool.
            target = targetSource.getTarget();
            if (target != null) {
                targetClass = target.getClass();
            }

            // Get the interception chain for this method.
            //获取当前方法的拦截器链
            List<Object> chain = this.advised.getInterceptorsAndDynamicInterceptionAdvice(method, targetClass);

            // Check whether we have any advice. If we don't, we can fallback on direct
            // reflective invocation of the target, and avoid creating a MethodInvocation.
            //如果拦截器为空,直接调用目标方法
            if (chain.isEmpty()) {
                // We can skip creating a MethodInvocation: just invoke the target directly
                // Note that the final invoker must be an InvokerInterceptor so we know it does
                // nothing but a reflective operation on the target, and no hot swapping or fancy proxying.
                Object[] argsToUse = AopProxyUtils.adaptArgumentsIfNecessary(method, args);
                retVal = AopUtils.invokeJoinpointUsingReflection(target, method, argsToUse);
            }
            else {
                // We need to create a method invocation...
                // 将拦截器封装进ReflectiveMethodInvocation
                invocation = new ReflectiveMethodInvocation(proxy, target, method, args, targetClass, chain);
                // Proceed to the joinpoint through the interceptor chain.
                // 执行拦截器链
                retVal = invocation.proceed();
            }

            // Massage return value if necessary.
            Class<?> returnType = method.getReturnType();
            if (retVal != null && retVal == target &&
                    returnType != Object.class && returnType.isInstance(proxy) &&
                    !RawTargetAccess.class.isAssignableFrom(method.getDeclaringClass())) {
                // Special case: it returned "this" and the return type of the method
                // is type-compatible. Note that we can't help if the target sets
                // a reference to itself in another returned object.
                retVal = proxy;
            }
            else if (retVal == null && returnType != Void.TYPE && returnType.isPrimitive()) {
                throw new AopInvocationException(
                        "Null return value from advice does not match primitive return type for: " + method);
            }
            return retVal;
        }
        finally {
            if (target != null && !targetSource.isStatic()) {
                // Must have come from TargetSource.
                targetSource.releaseTarget(target);
            }
            if (setProxyContext) {
                // Restore old proxy.
                AopContext.setCurrentProxy(oldProxy);
            }
        }
    }
上面代码最重要的工作就是创建一个拦截器链,然后将其封装到ReflectiveMethodInvocation中,ReflectiveMethodInvocation类的proceed方法实现了对拦截器的依次调用。我们看看拦截器链中都有哪些拦截器。

JdkDynamicAopProxy.invoke()
-->ReflectiveMethodInvocation.proceed();
然后,就是执行拦截器链的操作,由于在Jdk和Cglib两种方式下其处理方式完全相同,所以将在后面统一讲解。
(2)【Cglib代理方式】封装拦截器链
mathCacalculator.divive()方法被执行时,会被之前介绍的DynamicAdvisedInterceptor拦截器拦截,DynamicAdvisedInterceptor是CglibAopproxy类的内部类。我们来看看该拦截器的intercept逻辑。
    private static class DynamicAdvisedInterceptor implements MethodInterceptor, Serializable {

        ……

        @Override
        public Object intercept(Object proxy, Method method, Object[] args, MethodProxy methodProxy) throws Throwable {
            Object oldProxy = null;
            boolean setProxyContext = false;
            Class<?> targetClass = null;
            Object target = null;
            try {
                if (this.advised.exposeProxy) {
                    // Make invocation available if necessary.
                    oldProxy = AopContext.setCurrentProxy(proxy);
                    setProxyContext = true;
                }
                // May be null. Get as late as possible to minimize the time we
                // "own" the target, in case it comes from a pool...
                target = getTarget();
                if (target != null) {
                    targetClass = target.getClass();
                }
                //获取拦截器链
                List<Object> chain = this.advised.getInterceptorsAndDynamicInterceptionAdvice(method, targetClass);
                Object retVal;
                // Check whether we only have one InvokerInterceptor: that is,
                // no real advice, but just reflective invocation of the target.
                if (chain.isEmpty() && Modifier.isPublic(method.getModifiers())) {
                    // We can skip creating a MethodInvocation: just invoke the target directly.
                    // Note that the final invoker must be an InvokerInterceptor, so we know
                    // it does nothing but a reflective operation on the target, and no hot
                    // swapping or fancy proxying.
                    Object[] argsToUse = AopProxyUtils.adaptArgumentsIfNecessary(method, args);
                    //如果拦截器链为空,则直接调用原方法
                    retVal = methodProxy.invoke(target, argsToUse);
                }
                else {
                    // We need to create a method invocation...
                    //将拦截器链封装进CglibMethodInvocation,并执行拦截器链
                    retVal = new CglibMethodInvocation(proxy, target, method, args, targetClass, chain, methodProxy).proceed();//后面这个proceed方法别漏看了
                }
                retVal = processReturnType(proxy, target, method, retVal);
                return retVal;
            }
            finally {
                if (target != null) {
                    releaseTarget(target);
                }
                if (setProxyContext) {
                    // Restore old proxy.
                    AopContext.setCurrentProxy(oldProxy);
                }
            }
        }

        ……

    }
上面Cglib处理方式与上面Jdk处理方式是类似的,同样会创建一个拦截器链,然后将拦截器链封装进CglibMethodInvocation中,之后CglibMethodInvocation的父类ReflectiveMethodInvocation类中的proceed方法实现了对拦截器的依次调用。
两者稍有区别的是,Jdk方式封装拦截器链的类是ReflectiveMethodInvocation,而Cglib方式封装拦截器链的类是CglibMethodInvocation,查看类声明可以发现其继承了ReflectiveMethodInvocation,但是并未重写其中的proceed()方法,所以两者最终调用的都是ReflectiveMethodInvocation中的proceed()方法。
private static class CglibMethodInvocation extends ReflectiveMethodInvocation {
我们看看拦截器链中都有哪些拦截器。可以与Jdk代理方式的拦截器比较一下,实际上都是一样的。

(3)执行拦截器链
无论Jdk代理方式还是Cglib代理方式,在完成拦截器链的封装后,之后的操作就完全相同了,委托ReflectiveMethodInvocation的proceed()方法来执行拦截器链。
JdkDynamicAopProxy.invoke()
-->ReflectiveMethodInvocation.proceed();
CglibAopproxy.DynamicAdvisedInterceptor.invoke()
-->ReflectiveMethodInvocation#proceed();
    /**
     * ReflectiveMethodInvocation#proceed()
     * 【会多次的执行该方法】
     */
    @Override
    public Object proceed() throws Throwable {
        // We start with an index of -1 and increment early.
        // 当拦截器链执行完时,【从此处退出】
        if (this.currentInterceptorIndex == this.interceptorsAndDynamicMethodMatchers.size() - 1) {
            return invokeJoinpoint();//调用目标方法
        }

        //递归时,每次取出一个拦截器(这些拦截器可能是Interceptor或Advice)
        Object interceptorOrInterceptionAdvice =
                this.interceptorsAndDynamicMethodMatchers.get(++this.currentInterceptorIndex);
        if (interceptorOrInterceptionAdvice instanceof InterceptorAndDynamicMethodMatcher) {
            // Evaluate dynamic method matcher here: static part will already have
            // been evaluated and found to match.
            InterceptorAndDynamicMethodMatcher dm =
                    (InterceptorAndDynamicMethodMatcher) interceptorOrInterceptionAdvice;
            if (dm.methodMatcher.matches(this.method, this.targetClass, this.arguments)) {
                return dm.interceptor.invoke(this);
            }
            else {
                // Dynamic matching failed.
                // Skip this interceptor and invoke the next in the chain.
                return proceed();
            }
        }
        else {
            // It's an interceptor, so we just invoke it: The pointcut will have
            // been evaluated statically before this object was constructed.
            //执行拦截器
            return ((MethodInterceptor) interceptorOrInterceptionAdvice).invoke(this);
        }
    }
ReflectiveMethodInvocation中的proceed方法在执行时,会执行由一系列拦截器组成的拦截器链,拦截器链中包含了以下几个拦截器:
- ExposeInvocationInceptor:用于将当前的方法调用信息暴露到ThreadLocal中,供之后执行时使用。
- MethodBeforeAdviceInterceptor:方法前置拦截器。在方法执行前拦截,进行增强操作。
- AspectAfterAdvice:方法后置拦截器。在方法执行后拦截,进行增强操作。
- AfterReturningAdviceInterceptor:方法返回拦截器。在方法返回时拦截,进行增强操作。
- AspectJAfterThrowingAdvice:方法异常拦截器。在方法发生议程时拦截,进行增强操作。
这些拦截器中,有几个根据命名就知道它们是拦截器,还有两个是Advice(增强),但它们实现了MethodInterceptor接口,所以也是拦截器。这里与createProxy步骤中将增强和拦截器统一封装成Advisor相对应了。
下面是我画的整个拦截器链的执行流程图。
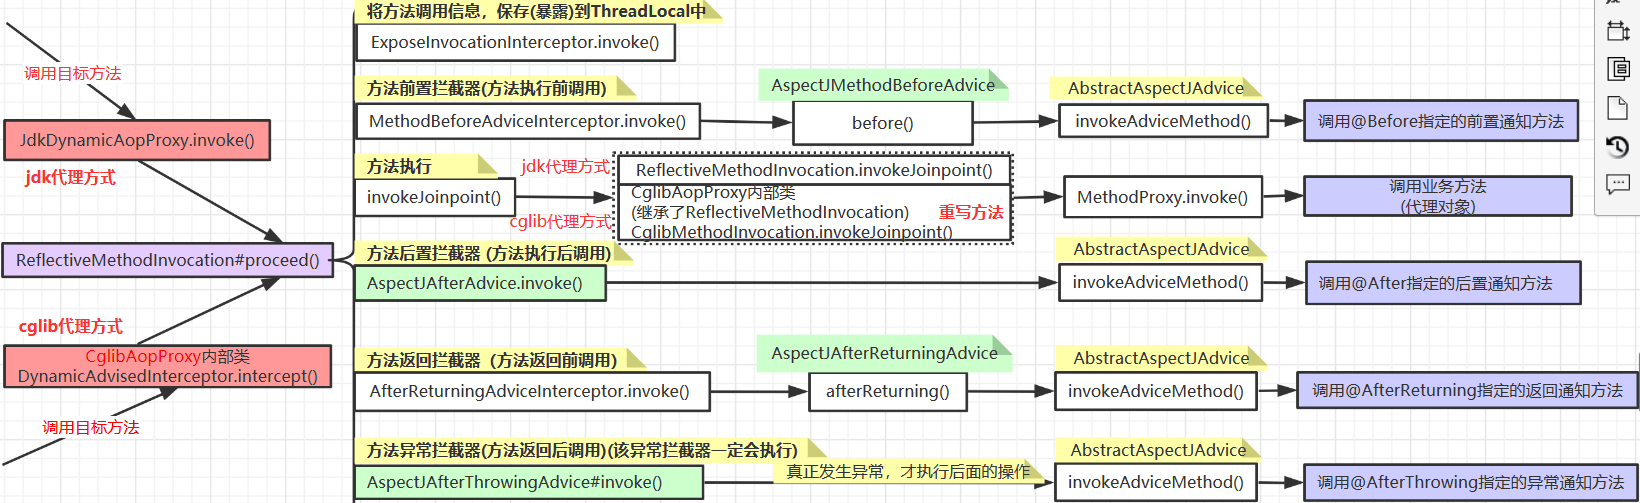
图中绿色部分是四个Advice(增强):
- AspectJMethodBeforeAdvice:方法前置增强
- AspectJAfterAdvice:方法后置增强
- AspectJAfterReturningAdvice:方法返回增强
- AspectJAfterThrowingAdvice:方法异常增强
拦截器链中的几个拦截器就是分别在目标方法执行前,执行后,方法返回,方法抛异常这几个时间点,执行对应增强(Advice或Interceptor)中的增强方法。最后再来看看这几个增强的逻辑。
    //【MethodBeforeAdviceInterceptor】方法执行前调用
    @Override
    public Object invoke(MethodInvocation mi) throws Throwable {
        //执行前置增强逻辑
        this.advice.before(mi.getMethod(), mi.getArguments(), mi.getThis());
        return mi.proceed();
    }

    //【AspectJAfterAdvice】方法执行后调用
    @Override
    public Object invoke(MethodInvocation mi) throws Throwable {
        try {
            return mi.proceed();
        }
        finally {
            //执行后置增强逻辑
            invokeAdviceMethod(getJoinPointMatch(), null, null);
        }
    }

    //【AfterReturningAdviceInterceptor】方法返回时调用
    @Override
    public Object invoke(MethodInvocation mi) throws Throwable {
        Object retVal = mi.proceed();
        //执行方法返回增强逻辑
        this.advice.afterReturning(retVal, mi.getMethod(), mi.getArguments(), mi.getThis());
        return retVal;
    }

    //【AspectJAfterThrowingAdvice】方法异常时调用
    @Override
    public Object invoke(MethodInvocation mi) throws Throwable {
        try {
            return mi.proceed();
        }
        catch (Throwable ex) {
            //如果异常,执行方法异常增强逻辑
            if (shouldInvokeOnThrowing(ex)) {
                invokeAdviceMethod(getJoinPointMatch(), null, ex);
            }
            throw ex;
        }
    }
实际上拦截器链中拦截器的执行顺序并不是严格按照图中的拦截器从上到下的顺序依次执行的,通过代码是可以出来的,就像在对一棵树进行遍历时并不是完全访问完了一个树节点才会再访问下一个树节点,而是来回访问。虽然如此,但拦截器链的整体执行流程与图中画的是一致的。
三、输出产生的代理类字节码
可以通过以下设置将生成的代理类输出到磁盘。
/******需要在main方法开始处添加*******/

    //【JDK动态代理】。会输出到项目根目录下
    System.getProperties().put("sun.misc.ProxyGenerator.saveGeneratedFiles", "true");

    //【Cglib动态代理】。会输出到指定目录下
    System.setProperty(DebuggingClassWriter.DEBUG_LOCATION_PROPERTY, "D:\class");

/******JDK动态代理也可以通过设置jvm参数来配置*******/
    -Dsun.misc.ProxyGenerator.saveGeneratedFiles=true
Jdk代理方式产生的代理类字节码
public final class $Proxy17
    extends Proxy
    //产生代理类与目标类实现了共同的接口MyInterface
    implements MyInterface, SpringProxy, Advised, DecoratingProxy {

    ……

    public final int divive(int var1, int var2) throws  {
        try {
            //委托xxHandler.invoke()方法
            return (Integer)super.h.invoke(this, m3, new Object[]{var1, var2});
        } catch (RuntimeException | Error var4) {
            throw var4;
        } catch (Throwable var5) {
            throw new UndeclaredThrowableException(var5);
        }
    }

    ……

}
Cglib代理方式产生的代理类字节码
public class MathCacalculator$$EnhancerBySpringCGLIB$$961ed809
    extends MathCacalculator //产生的代理类是目标类的子类
    implements SpringProxy, Advised, Factory {

    ……

    public final int divive(int paramInt1, int paramInt2) {
        try {
            if (this.CGLIB$CALLBACK_0 == null)
                CGLIB$BIND_CALLBACKS(this);
            if (this.CGLIB$CALLBACK_0 != null) {
                this.CGLIB$CALLBACK_0.intercept(
                        this, CGLIB$divive$0$Method,
                        new Object[]{new Integer(paramInt1), new Integer(paramInt2)}, CGLIB$divive$0$Proxy);
                return (this.CGLIB$CALLBACK_0.intercept(
                        this, CGLIB$divive$0$Method,
                        new Object[]{new Integer(paramInt1), new Integer(paramInt2)}, CGLIB$divive$0$Proxy) == null)
                        ? 0 : ((Number) this.CGLIB$CALLBACK_0.intercept(
                                        this, CGLIB$divive$0$Method,
                                        new Object[]{new Integer(paramInt1),
                                                new Integer(paramInt2)},
                                                CGLIB$divive$0$Proxy)).intValue();
            }
            //执行目标方法
            return super.divive(paramInt1, paramInt2);
        } catch (RuntimeException | Error runtimeException) {
            throw null;
        } catch (Throwable throwable) {
            throw new UndeclaredThrowableException(null);
        }
    }

    ……

}
总结
1.Jdk动态代理和Cglib动态代理的原理?
通过@EnableAspectjAutoProxy注解来开启AOP功能,该注解会向容器中导入一个AspectJAutoProxyRegister组件。该组件的作用是为容器中注册另一个AspectJAnnotationAutoProxyCreator组件,因为其实现了BeanPostProcessor接口,所以它是一个后置处理器。
①注册后置处理器
在容器启动(refresh)过程中有个步骤是registerBeanPostProcessors(beanFactory),该步骤会对这个后置处理器进行注册。
②后置处理器在目标对象初始化后创建代理对象
在目标对象实例化并完成初始化之后,该后置处理器会目标对象执行增强操作,也就是为目标对象创建一个代理对象(先创建代理类,再创建代理对象)。对于代理的创建,Spring委托给了ProxyFactory去处理。
- 首先,会对该ProxyFactory进行一些初始化操作,比如封装Advisor并添加到代理工厂中。
- 然后,决定选择使用哪种代理方式。
- 最后,真正的创建代理过程。(JDK动态代理使用的是JdkDynamicAopProxy类, 而Cglib动态代理使用的是CglibAopProxy类)
③目标方法被调用时,拦截器进行拦截,创建拦截器链并进行封装。最后委托ReflectiveMethodInvocation执行拦截器链,链中的拦截器执行增强逻辑
在目标方法被调用时,实际上调用的是代理对象的方法,会被相应的拦截器拦截(这个拦截器在JDK代理方式中指的是JdkDynamicAopProxy,将其称为拦截器不知道是否合适。而在Cglib代理方式中指的是DynamicAdvisedInterceptor,它是CglibAopproxy的内部类)。
拦截器所做的操作就是创建拦截器链(由增强和拦截器组成),然后进行封装。JDK代理方式是将拦截器链封装进ReflectiveMethodInvocation,而Cglib方式是将拦截器链封装进CglibMethodInvocation。(实际上CglibMethodInvocation是ReflectiveMethodInvocation的子类,但并未重写其中的proceed()方法。)
之后就都是委托ReflectiveMethodInvocation中的proceed()方法来执行拦截器链了,拦截器中的拦截器得以执行增强逻辑。
JdkDynamicAopProxy.invoke()
  -->ReflectiveMethodInvocation.proceed();

CglibAopproxy.DynamicAdvisedInterceptor.invoke()
  -->ReflectiveMethodInvocation#proceed();
拦截器链中的拦截器,除了ExposeInvocationInceptor是用来保存方法调用信息的,其它四个拦截器都是对目标方法进行增强的。
- ExposeInvocationInceptor:使用ThreadLocal用来保存方法调用信息。
- MethodBeforeAdviceInterceptor:方法前置拦截器。在方法执行前拦截,进行增强操作。
- AspectAfterAdvice:方法后置拦截器。在方法执行后拦截,进行增强操作。
- AfterReturningAdviceInterceptor:方法返回拦截器。在方法返回时拦截,进行增强操作。
- AspectJAfterThrowingAdvice:方法异常拦截器。在方法发生议程时拦截,进行增强操作。
拦截器链中的这几个拦截器分别在目标方法执行前,执行后,方法返回,方法抛异常这几个时间点执行增强操作。
2.Jdk动态代理和Cglib动态代理的区别?
①使用场景
Jdk动态代理适用于目标对象实现了接口的场景,而Cglib动态代理适用于目标对象未实现接口的场景。
②创建代理对象的原理不同
Jdk动态代理为目标对象动态生成一个代理类,该代理类与目标对象实现了共同的接口。然后通过反射的方式创建代理对象。
Cglib动态代理通过ASM工具动态修改目标类的字节码产生一个代理类,该代理类是目标类的子类(因为是继承,所以目标方法不能为final或private)。然后通过反射的方式创建代理对象。
3.如何强制使用Cglib实现AOP?
①添加cglib库
②配置proxyTargetClass = true
注解形式使用@EnableAspectJAutoProxy(proxyTargetClass = true),xml声明式使用<aop:aspectj-autoproxy proxy-target-class="true">