一. 基本配置
1 项目图标
将图片直接拖入Assets-AppIcon
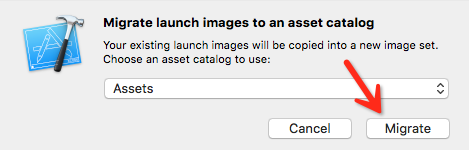
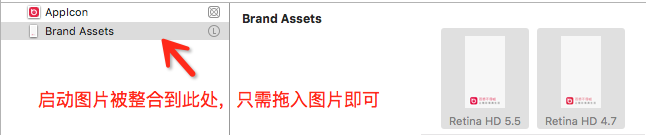
2 启动图片
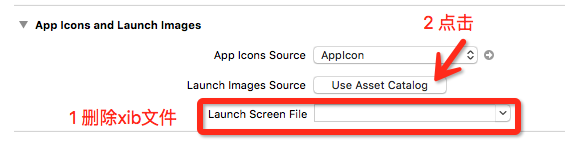
3 软件名称

4 删除Main.stroryboard
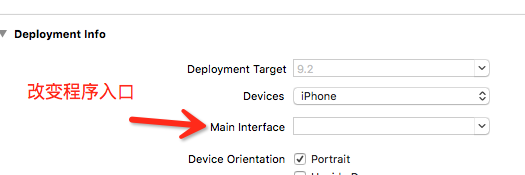
5 设置窗口的根控制器
- (BOOL)application:(UIApplication *)application didFinishLaunchingWithOptions:(NSDictionary *)launchOptions {

    //创建一个窗口
    self.window = [[UIWindow alloc] init];
    self.window.frame = [UIScreen mainScreen].bounds;

    //设置窗口的根控制器
    self.window.rootViewController = [[ViewController alloc] init];

    //显示窗口
    [self.window makeKeyAndVisible];

    return YES;
}
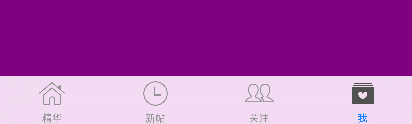
二 配置TabBar切换控制器
先把项目的骨架搭起来,即底部的TabBar控制器
1 基本UITabBarController设置(将tabBar的基本设置封装到自己的tabBar中)
    UITabBarController *tabBarController = [[UITabBarController alloc] init];

    UIViewController *vc1 = [[UIViewController alloc] init];
    vc1.view.backgroundColor = [UIColor redColor];
    vc1.tabBarItem.title = @"精华";
    vc1.tabBarItem.image = [UIImage imageNamed:@"tabBar_essence_icon"];
    vc1.tabBarItem.selectedImage = [UIImage imageNamed:@"tabBar_essence_click_icon"];
    [tabBarController addChildViewController:vc1];

    UIViewController *vc2 = [[UIViewController alloc] init];
    vc2.view.backgroundColor = [UIColor grayColor];
    vc2.tabBarItem.title = @"新帖";
    vc2.tabBarItem.image = [UIImage imageNamed:@"tabBar_new_icon"];
    vc2.tabBarItem.selectedImage = [UIImage imageNamed:@"tabBar_new_click_icon"];
    [tabBarController addChildViewController:vc2];

    UIViewController *vc3 = [[UIViewController alloc] init];
    vc3.view.backgroundColor = [UIColor blueColor];
    vc3.tabBarItem.title = @"关注";
    vc3.tabBarItem.image = [UIImage imageNamed:@"tabBar_friendTrends_icon"];
    vc3.tabBarItem.selectedImage = [UIImage imageNamed:@"tabBar_friendTrends_click_icon"];
    [tabBarController addChildViewController:vc3];

    UIViewController *vc4 = [[UIViewController alloc] init];
    vc4.view.backgroundColor = [UIColor purpleColor];
    vc4.tabBarItem.title = @"我";
    vc4.tabBarItem.image = [UIImage imageNamed:@"tabBar_me_icon"];
    vc4.tabBarItem.selectedImage = [UIImage imageNamed:@"tabBar_me_click_icon"];
    [tabBarController addChildViewController:vc4];

    //设置窗口的根控制器
    self.window.rootViewController = tabBarController;
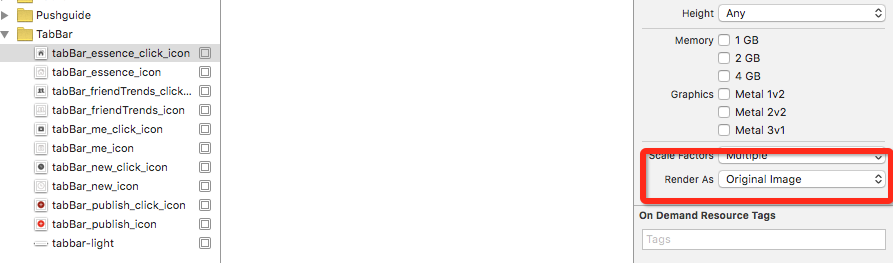
2 选中图片会默认做一个自动渲染
UIImage *image = [UIImage imageNamed:@"tabBar_essence_click_icon"];
//设置图片不会被渲染
image = [image imageWithRenderingMode:UIImageRenderingModeAlwaysOriginal];
3 设置字体
    NSMutableDictionary *attrs = [NSMutableDictionary dictionary];
    attrs[NSFontAttributeName] = [UIFont systemFontOfSize:16];
    attrs[NSForegroundColorAttributeName] = [UIColor lightGrayColor];
    [vc1.tabBarItem setTitleTextAttributes:attrs forState:UIControlStateNormal];

    NSMutableDictionary *selectedAttrs = [NSMutableDictionary dictionary];
    selectedAttrs[NSFontAttributeName] = [UIFont systemFontOfSize:16];
    selectedAttrs[NSForegroundColorAttributeName] = [UIColor darkGrayColor];
    [vc1.tabBarItem setTitleTextAttributes:selectedAttrs forState:UIControlStateSelected];


三 appearance的使用
通过appearance统一设置所有UITabBarItem的属性,后面带有UI_APPEARANCE_SELECTOR的方法,都可以通过appearance对象来统一设置
    NSMutableDictionary *attrs = [NSMutableDictionary dictionary];
    attrs[NSFontAttributeName] = [UIFont systemFontOfSize:16];
    attrs[NSForegroundColorAttributeName] = [UIColor lightGrayColor];

    NSMutableDictionary *selectedAttrs = [NSMutableDictionary dictionary];
    selectedAttrs[NSFontAttributeName] = [UIFont systemFontOfSize:16];
    selectedAttrs[NSForegroundColorAttributeName] = [UIColor darkGrayColor];

    UITabBarItem *item = [UITabBarItem appearance];
    [item setTitleTextAttributes:attrs forState:UIControlStateNormal];
    [item setTitleTextAttributes:selectedAttrs forState:UIControlStateSelected];
四 自定义子控制器
将需要修改的属性作为变量,将代码的相同部分提取出来,可提高代码的可读性
在修改某些模块的时候,只需要在相应的子控制器中设置即可
/**
 * 初始化子控制器
 */

- (void)setupChildVC:(UIViewController *)vc title:(NSString *)title image:(NSString *)image selectedImage:(NSString *)selectedImage
{
    //设置文字和图片
    vc.view.backgroundColor = [UIColor colorWithRed:arc4random_uniform(100)/100.0 green:arc4random_uniform(100)/100.0 blue:arc4random_uniform(100)/100.0 alpha:1];
    vc.tabBarItem.title = title;
    vc.tabBarItem.image = [UIImage imageNamed:image];
    vc.tabBarItem.selectedImage = [UIImage imageNamed:selectedImage];
    //添加子控制器
    [self addChildViewController:vc];
}
[self setupChildVC:[[UIViewController alloc] init] title:@"精华" image:@"tabBar_essence_icon" selectedImage:@"tabBar_essence_click_icon"];
五 自定义tabbar
1 直接在tabbar中添加项
    UIButton *publishButton = [UIButton buttonWithType:UIButtonTypeCustom];
    [publishButton setBackgroundImage:[UIImage imageNamed:@"tabBar_publish_icon"] forState:UIControlStateNormal];
    [publishButton setBackgroundImage:[UIImage imageNamed:@"tabBar_publish_click_icon"] forState:UIControlStateHighlighted];
    publishButton.frame = CGRectMake(0, 0, publishButton.currentBackgroundImage.size.width, publishButton.currentBackgroundImage.size.height);
    publishButton.center = CGPointMake(self.tabBar.frame.size.width / 2, self.tabBar.frame.size.height / 2);
    [self.tabBar addSubview:publishButton];
2 拿到tabbar的子控件
    for (UIView * button in self.tabBar.subviews){

        button.frame = CGRectMake(0, 0, 20, 20);
    }

3 当控制器的view布局完之后再布局一次
- (void)viewDidLayoutSubviews{

    for (UIView * button in self.tabBar.subviews){

        button.frame = CGRectMake(0, 0, 20, 20);
    }
}

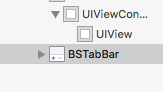
4 当把子控件拿出来也无法改变属性时,需要自定义tabbar
tabbar是只读属性,可以通过KVC,可以直接访问成员变量,自动赋值
    //更换tabbar
    [self setValue:[[BSTabBar alloc] init] forKey:@"tabBar"];
已替换成功:
5 重新布局子控件 - (void)layoutSubviews{
    [super layoutSubviews];

    //设置发布按钮的frame
     self.publishButton.frame = CGRectMake(0, 0, self.publishButton.currentBackgroundImage.size.width, self.publishButton.currentBackgroundImage.size.height);
     self.publishButton.center = CGPointMake(self.frame.size.width / 2, self.frame.size.height / 2);

    //设置其他UITabBarButton的frame

    CGFloat buttonY = 0;
    CGFloat buttonW = self.frame.size.width / 5;
    CGFloat buttonH = self.frame.size.height;
    NSInteger index = 0;


    for (UIView * button in self.subviews) {

        if (![button isKindOfClass:NSClassFromString(@"UITabBarButton")]) continue;

        CGFloat buttonX = buttonW * ((index > 1) ? (index + 1) : index);
        button.frame = CGRectMake(buttonX, buttonY, buttonW, buttonH);

        index ++;
    }
}

六 封装frame的修改
1 使用分类
在分类中声明@propery,只会生成方法的声明,不会生成方法的实现和带有_的成员变量
@interface UIView (BSExtension)

@property (nonatomic, assign) CGFloat width;
@property (nonatomic, assign) CGFloat height;
@property (nonatomic, assign) CGFloat x;
@property (nonatomic, assign) CGFloat y;

@end
@implementation UIView (BSExtension)

- (void)setWidth:(CGFloat)width{

    CGRect frame = self.frame;
    frame.size.width = width;
    self.frame = frame;
}

- (void)setHeight:(CGFloat)height{

    CGRect frame = self.frame;
    frame.size.height = height;
    self.frame = frame;
}

- (void)setX:(CGFloat)x{

    CGRect frame = self.frame;
    frame.origin.x = x;
    self.frame = frame;
}

- (void)setY:(CGFloat)y{

    CGRect frame = self.frame;
    frame.origin.y = y;
    self.frame = frame;
}

- (CGFloat)width
{
    return self.frame.size.width;
}

- (CGFloat)height
{
    return self.frame.size.height;
}

- (CGFloat)x
{
    return self.frame.origin.x;
}

- (CGFloat)y
{
    return self.frame.origin.y;
}
@end
2 使用pch文件

七 设置导航栏
1 包装一个导航栏控制器,添加导航栏控制器为tabbarcontroller的子控制器
    UINavigationController *nav = [[UINavigationController alloc] initWithRootViewController:vc];
    [self addChildViewController:nav];
2 设置导航栏内容
    //设置导航栏内容
    self.navigationItem.titleView = [[UIImageView alloc] initWithImage:[UIImage imageNamed:@"MainTitle"]];

    UIButton *tagButton = [UIButton buttonWithType:UIButtonTypeCustom];
    [tagButton setBackgroundImage:[UIImage imageNamed:@"MainTagSubIcon"] forState:UIControlStateNormal];
    [tagButton setBackgroundImage:[UIImage imageNamed:@"MainTagSubIconClick"] forState:UIControlStateHighlighted];
    tagButton.size = tagButton.currentBackgroundImage.size;
    self.navigationItem.leftBarButtonItem = [[UIBarButtonItem alloc] initWithCustomView:tagButton];

3 使用自定义的NSLog,在调试的时候自动隐藏
#ifdef DEBUG
#define BSLog(...) NSLog(__VA_ARGS__)

#else
#define BSLog(...)
#endif
4 打印当前调用的函数
#define BSLogFun BSLog(@"%s",__func__)
八 封装UIBarButtonItem
1 使用扩展类给UIBarButtonItem添加一个方法
@interface UIBarButtonItem (BSExtension)

+ (instancetype)itemWithImage:(NSString *)image highImage:(NSString *)highImage target:(id)target action:(SEL)action;

@end
@implementation UIBarButtonItem (BSExtension)

+ (instancetype)itemWithImage:(NSString *)image highImage:(NSString *)highImage target:(id)target action:(SEL)action{

    UIButton *button = [UIButton buttonWithType:UIButtonTypeCustom];
    [button setBackgroundImage:[UIImage imageNamed:image] forState:UIControlStateNormal];
    [button setBackgroundImage:[UIImage imageNamed:highImage] forState:UIControlStateHighlighted];
    button.size = button.currentBackgroundImage.size;
    [button addTarget:target action:action forControlEvents:UIControlEventTouchUpInside];

    return [[self alloc] initWithCustomView:button];
}

@end
self.navigationItem.leftBarButtonItem = [UIBarButtonItem itemWithImage:@"MainTagSubIcon" highImage:@"MainTagSubIconClick" target:self action:@selector(tagClick)];
九 调整项目文件结构
设置全局背景色
#define BSRGBColor(r, g, b) [UIColor colorWithRed:(r)/255.0  green:(g)/255.0 blue:(b)/255.0 alpha:1.0];
#define BSGlobalBg BSRGBColor(223, 223, 223)
十 自定义导航栏控制器
1 可以重写push方法来拦截所有push进来的控制器
/**
 * 可以在这个方法中拦截所有push进来的控制器
 */
- (void)pushViewController:(UIViewController *)viewController animated:(BOOL)animated
{
    [super pushViewController:viewController animated:animated];
    viewController.navigationItem.backBarButtonItem = [[UIBarButtonItem alloc] initWithTitle:@"返回" style:UIBarButtonItemStyleDone target:nil action:nil];
    NSLog(@"%@",viewController);
}
2 改变导航栏的返回按钮的颜色(默认为黑, 点击为红)和位置
- (void)pushViewController:(UIViewController *)viewController animated:(BOOL)animated
{

    if (self.childViewControllers.count > 0) {//如果push进来的不是第一个控制器

        UIButton *button = [UIButton buttonWithType:UIButtonTypeCustom];
        [button setTitle:@"返回" forState:UIControlStateNormal];
        [button setTitleColor:[UIColor blackColor] forState:UIControlStateNormal];
        [button setTitleColor:[UIColor redColor] forState:UIControlStateHighlighted];
        [button setImage:[UIImage imageNamed:@"navigationButtonReturn"] forState:UIControlStateNormal];
        [button setImage:[UIImage imageNamed:@"navigationButtonReturnClick"] forState:UIControlStateHighlighted];
        button.size = CGSizeMake(70, 30);
        //让按钮内部的所有内容左对齐
        button.contentHorizontalAlignment = UIControlContentHorizontalAlignmentLeft;
        //按钮的外边距
        button.contentEdgeInsets = UIEdgeInsetsMake(0, -10, 0, 0);
        [button addTarget:self action:@selector(back) forControlEvents:UIControlEventTouchUpInside];
        viewController.navigationItem.leftBarButtonItem = [[UIBarButtonItem alloc] initWithCustomView:button];
    }

    //让viewController可以覆盖上面设置的leftBarButtonItem
    [super pushViewController:viewController animated:animated];

}
3 设置tabbar隐藏
        //隐藏tabbar
        viewController.hidesBottomBarWhenPushed = YES;
十一 调整初始化代码
当第一次使用某个类时调用一次,在使用appearance时可以放入
/**
 * 当第一次使用这个类时调用一次
 */
+ (void)initialize
{
    //当导航栏用在BSNavigationController中,appearence设置才会生效
    UINavigationBar *bar = [UINavigationBar appearance];
    [bar setBackgroundImage:[UIImage imageNamed:@"navigationbarBackgroundWhite"] forBarMetrics:UIBarMetricsDefault];
}
十二 颜色说明
1 24bit颜色: R G B
ff0000: 红色
00ff00: 绿色
0000ff: 蓝色
000000: 黑色
ffffff: 白色
灰色特点:RGB一样
2 32bit颜色: R G B A
ff0000ff
十三 关注模块
1 自动换行
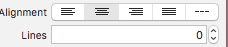
2 label文字换行
alt+enter
十四 显示推荐关注
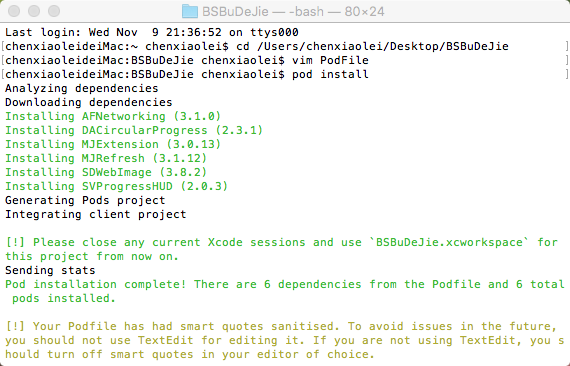
1 添加第三方框架
cd + 项目路径
vim PodFile
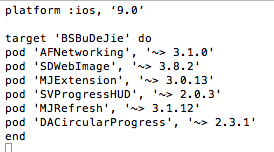
pod install
2 发送请求 <AFNetworking>
    //发送请求

    NSMutableDictionary *params = [NSMutableDictionary dictionary];
    params[@"a"] = @"category";
    params[@"c"] = @"subscribe";

    [[AFHTTPSessionManager manager] GET:@"http://api.budejie.com/api/api_open.php" parameters:params progress:nil success:^(NSURLSessionDataTask * _Nonnull task, id  _Nullable responseObject) {

        NSLog(@"%@",responseObject);

    } failure:^(NSURLSessionDataTask * _Nullable task, NSError * _Nonnull error) {

    }];
3 显示指示器 <SVProgressHUD>
/** 简单的等待提示

    开始: [SVProgressHUD show];
    结束: [SVProgressHUD dismiss];
    提示内容: [SVProgressHUD showSuccessWithStatus:@"加载中..."];

*/

/** 显示HUD以及指示任务的状态

     + (void)show;
     + (void)showWithStatus:(NSString*)string;

*/

/** 在HUD指示任务的进度

     + (void)showProgress:(CGFloat)progress;
     + (void)showProgress:(CGFloat)progress status:(NSString*)status;

*/

/** 隐藏HUD

     + (void)dismiss;
     + (void)dismissWithDelay:(NSTimeInterval)delay;

*/


/** 显示多个HUD 该HUD将自动消失,popActivity将与显示的次数匹配

     + (void)popActivity;

*/