上篇文章使用maven搭建了web环境,这篇来记录下如何使用spring整合springmvc和hibernate,亦即spring+springmvc+hibernate框架整合。
第一步:首先配置spring
- 配置spring配置文件applicationContext.xmls
 View Code
 1 <?xml version="1.0" encoding="UTF-8"?>
 2 <beans xmlns="http://www.springframework.org/schema/beans"
 3     xmlns:xsi="http://www.w3.org/2001/XMLSchema-instance" xmlns:p="http://www.springframework.org/schema/p"
 4     xmlns:context="http://www.springframework.org/schema/context"
 5     xmlns:aop="http://www.springframework.org/schema/aop" xmlns:tx="http://www.springframework.org/schema/tx"
 6     xmlns:mvc="http://www.springframework.org/schema/mvc"
 7     xsi:schemaLocation="http://www.springframework.org/schema/beans
 8        http://www.springframework.org/schema/beans/spring-beans-3.0.xsd
 9        http://www.springframework.org/schema/context
10        http://www.springframework.org/schema/context/spring-context-3.0.xsd
11        http://www.springframework.org/schema/tx
12        http://www.springframework.org/schema/tx/spring-tx-3.0.xsd
13        http://www.springframework.org/schema/aop
14        http://www.springframework.org/schema/aop/spring-aop-3.0.xsd">
15     <!-- 自动扫描 -->
16     <context:component-scan base-package="com.mvn" />
17     <!-- 配置自动aop -->
18     <aop:aspectj-autoproxy />
19
20 </beans>
- 配置web.xml文件
View Code
<!-- 配置spring context需要读取的配置文件 -->
    <context-param>
        <param-name>contextConfigLocation</param-name>
        <param-value>classpath:applicationContext.xml</param-value>
    </context-param>
    <!-- 配置spring listener 以便在web容器启动的时候能自动初始化spring -->
    <listener>
        <listener-class>org.springframework.web.context.ContextLoaderListener</listener-class>
    </listener>

第二步:配置spring mvc
- 配置spring mvc配置文件spring-web.xmls
View Code
 1 <?xml version="1.0" encoding="UTF-8"?>
 2 <beans xmlns="http://www.springframework.org/schema/beans"
 3     xmlns:xsi="http://www.w3.org/2001/XMLSchema-instance" xmlns:p="http://www.springframework.org/schema/p"
 4     xmlns:context="http://www.springframework.org/schema/context"
 5     xmlns:aop="http://www.springframework.org/schema/aop" xmlns:tx="http://www.springframework.org/schema/tx"
 6     xmlns:mvc="http://www.springframework.org/schema/mvc"
 7     xsi:schemaLocation="http://www.springframework.org/schema/beans
 8        http://www.springframework.org/schema/beans/spring-beans-3.0.xsd
 9        http://www.springframework.org/schema/context
10        http://www.springframework.org/schema/context/spring-context-3.0.xsd
11        http://www.springframework.org/schema/tx
12        http://www.springframework.org/schema/tx/spring-tx-3.0.xsd
13        http://www.springframework.org/schema/aop
14        http://www.springframework.org/schema/aop/spring-aop-3.0.xsd
15        http://www.springframework.org/schema/mvc
16        http://www.springframework.org/schema/mvc/spring-mvc-3.0.xsd">
17     <!-- 自动扫描 com.mvn.controller的文件,初始化处理器-->
18     <context:component-scan base-package="com.mvn.controller" />
19
20     <!-- 配置试图解析器(渲染器) -->
21     <bean id="viewResolver"
22         class="org.springframework.web.servlet.view.UrlBasedViewResolver">
23         <property name="viewClass"
24             value="org.springframework.web.servlet.view.JstlView" />
25         <property name="prefix" value="WEB-INF/jsp/" />
26         <property name="suffix" value=".jsp" />
27     </bean>
28
29 </beans>
- 配置web.xml文件
View Code
 1 <!-- 配置spring mvc 分发器 -->
 2     <servlet>
 3         <servlet-name>springmvc</servlet-name>
 4         <servlet-class>org.springframework.web.servlet.DispatcherServlet</servlet-class>
 5         <!-- 初始化spring mvc 配置文件的位置 -->
 6         <init-param>
 7             <param-name>contextConfigLocation</param-name>
 8             <param-value>classpath:spring-web.xml</param-value>
 9         </init-param>
10         <!-- web容器启动的时候就加载springmvc -->
11         <load-on-startup>1</load-on-startup>
12     </servlet>
13
14     <servlet-mapping>
15         <servlet-name>springmvc</servlet-name>
16         <url-pattern>*.do</url-pattern>
17     </servlet-mapping>
第三步:配置hibernate
- 将hibernate的相关配置放到spring配置文件applicationContext.xml里面
View Code
<!-- 自动读取配置文件 -->
    <context:property-placeholder location="classpath:spring.properties" />
    <!-- 配置数据源 -->
    <bean id="dataSource" class="org.apache.commons.dbcp2.BasicDataSource"
        destroy-method="close">

        <property name="driverClassName" value="${jdbc.driverClassName}" />
        <property name="url" value="${jdbc.url}" />
        <property name="username" value="${jdbc.username}" />
        <property name="password" value="${jdbc.password}" />
    </bean>
    <!-- 配置sessionFactory-->
    <bean id="sessionFactory"
        class="org.springframework.orm.hibernate3.annotation.AnnotationSessionFactoryBean">
        <property name="dataSource" ref="dataSource"></property>
        <!-- hibernate自动扫描 实体类-->
        <property name="packagesToScan">
            <list>
                <value>com.mvn.entity</value>
            </list>
        </property>
        <!-- hibernate属性 -->
        <property name="hibernateProperties">
            <value>
                hibernate.hbm2ddl.auto=${jdbc.hibernate.hbm2ddl.auto}
                hibernate.dialect=${jdbc.hibernate.dialect}
                hibernate.show_sql=${jdbc.hibernate.show_sql}

            </value>
        </property>

    </bean>
    <!-- 事务管理器 -->
    <bean id="transactionManager"
        class="org.springframework.orm.hibernate3.HibernateTransactionManager">
        <property name="sessionFactory" ref="sessionFactory" />
    </bean>
    <tx:annotation-driven transaction-manager="transactionManager" />
- 由于用到了需要读取propertie文件,因此要新增
View Code
1 jdbc.driverClassName=com.mysql.jdbc.Driver
2 jdbc.url=jdbc:mysql://localhost:3306/mvn
3 jdbc.username=root
4 jdbc.password=root
5
6 jdbc.hibernate.dialect=org.hibernate.dialect.MySQL5Dialect
7 jdbc.hibernate.show_sql=true
8 jdbc.hibernate.hbm2ddl.auto=update
第四步:编写对应的java和jsp代码
- 创建entity类
View Code
 1 package com.mvn.entity;
 2
 3 import javax.persistence.Entity;
 4 import javax.persistence.GeneratedValue;
 5 import javax.persistence.Id;
 6 import javax.persistence.Table;
 7
 8 @Entity
 9 @Table(name="t_user")
10 public class User {
11
12     private Integer id;
13     private String name;
14     private String password;
15
16     @Id
17     @GeneratedValue
18     public Integer getId() {
19         return id;
20     }
21     public void setId(Integer id) {
22         this.id = id;
23     }
24     public String getName() {
25         return name;
26     }
27     public void setName(String name) {
28         this.name = name;
29     }
30     public String getPassword() {
31         return password;
32     }
33     public void setPassword(String password) {
34         this.password = password;
35     }
36
37 }
- 创建dao类
View Code
 1 package com.mvn.dao;
 2
 3 import javax.annotation.Resource;
 4
 5 import org.hibernate.SessionFactory;
 6 import org.hibernate.classic.Session;
 7 import org.springframework.stereotype.Repository;
 8
 9 import com.mvn.entity.User;
10
11 @Repository
12 public class UserDao {
13
14     @Resource
15     SessionFactory sessionFactory;
16
17     public void save(User user){
18         Session session = sessionFactory.openSession();
19         session.save(user);
20
21     }
22 }
- 创建service类
View Code
 1 package com.mvn.service;
 2
 3 import javax.annotation.Resource;
 4
 5 import org.springframework.stereotype.Service;
 6 import org.springframework.transaction.annotation.Transactional;
 7
 8 import com.mvn.dao.UserDao;
 9 import com.mvn.entity.User;
10
11 @Service
12 public class UserService {
13     @Resource
14     UserDao userDao;
15
16     @Transactional
17     public void save(User user){
18         userDao.save(user);
19     }
20
21 }
- 创建控制器
View Code
 1 package com.mvn.controller;
 2
 3 import javax.annotation.Resource;
 4
 5 import org.springframework.stereotype.Controller;
 6 import org.springframework.web.bind.annotation.RequestMapping;
 7
 8 import com.mvn.entity.User;
 9 import com.mvn.service.UserService;
10
11 @Controller
12 public class SaveUser {
13
14     @Resource
15     UserService userService;
16
17     @RequestMapping(value="/saveUser")
18     public String saveUser(User user){
19         userService.save(user);
20         return "saveSucess";
21     }
22 }
- 创建jsp文件:WEB-INFjspsaveSucess.jsp
View Code
 1 <%@ page language="java" contentType="text/html; charset=UTF-8"
 2     pageEncoding="UTF-8"%>
 3 <!DOCTYPE html PUBLIC "-//W3C//DTD HTML 4.01 Transitional//EN" "http://www.w3.org/TR/html4/loose.dtd">
 4 <html>
 5 <head>
 6 <meta http-equiv="Content-Type" content="text/html; charset=UTF-8">
 7 <title>Insert title here</title>
 8 </head>
 9 <body>
10 Hello
11 恭喜!
12 整合成功
13 </body>
14 </html>
至此代码写完了,完整的目录结构为:

第五步:进行测试
- 创建数据库

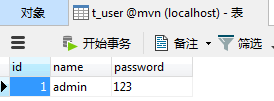
- 启动tomcat,由于我们配置了hibernate属性hibernate.hbm2ddl.auto=update,因此会在tomcat启动完成后自动生成表t_user
- 通过页面访问

4.数据库生成数据
至此,整合工作完成。