概述
Security Context(安全上下文)用来限制容器对宿主节点的可访问范围,以避免容器非法操作宿主节点的系统级别的内容,使得节点的系统或者节点上其他容器组受到影响。
Security Context可以按照如下几种方式设定:
- 访问权限控制:是否可以访问某个对象(例如文件)是基于 userID(UID)和 groupID(GID)的
- Security Enhanced Linux (SELinux):为对象分配Security标签
- 以 privileged(特权)模式运行
- Linux Capabilities:为容器组(或容器)分配一部分特权,而不是 root 用户的所有特权
- AppArmor:自 Kubernetes v1.4 以来,一直处于 beta 状态
- Seccomp:过滤容器中进程的系统调用(system call)
- AllowPrivilegeEscalation(允许特权扩大):此项配置是一个布尔值,定义了一个进程是否可以比其父进程获得更多的特权,直接效果是,容器的进程上是否被设置 no_new_privs标记。当出现如下情况时,AllowPrivilegeEscalation 的值始终为 true:
- 容器以 privileged 模式运行
- 容器拥有 CAP_SYS_ADMIN 的 Linux Capability
为Pod设置Security Context
在 Pod 的定义中增加 securityContext 字段,即可为 Pod 指定 Security 相关的设定。 securityContext 字段是一个 PodSecurityContext 对象。通过该字段指定的内容将对该 Pod 中所有的容器生效
Pod示例
apiVersion: v1
kind: Pod
metadata:
  name: security-context-demo
spec:
  securityContext:
    runAsUser: 1000
    runAsGroup: 3000
    fsGroup: 2000
  volumes:
  - name: sec-ctx-vol
    emptyDir: {}
  containers:
  - name: sec-ctx-demo
    image: busybox
    command: [ "sh", "-c", "sleep 1h" ]
    volumeMounts:
    - name: sec-ctx-vol
      mountPath: /data/demo
    securityContext:
      allowPrivilegeEscalation: false
- spec.securityContext.runAsUser 字段指定了该 Pod 中所有容器的进程都以UserID 1000 的身份运行,spec.securityContext.runAsGroup 字段指定了该 Pod 中所有容器的进程都以GroupID 3000 的身份运行
- 如果该字段被省略,容器进程的GroupID为 root(0)
- 容器中创建的文件,其所有者为 userID 1000,groupID 3000
- spec.securityContext.fsGroup 字段指定了该 Pod 的 fsGroup 为 2000
- 数据卷 (本例中,对应挂载点 /data/demo 的数据卷为 sec-ctx-demo) 的所有者以及在该数据卷下创建的任何文件,其 GroupID 为 2000
为容器设置Security Context
容器的定义中包含 securityContext 字段,该字段接受 SecurityContext对象。通过指定该字段,可以为容器设定安全相关的配置,当该字段的配置与 Pod 级别的 securityContext 配置相冲突时,容器级别的配置将覆盖 Pod 级别的配置。容器级别的 securityContext 不影响 Pod 中的数据卷。
下面的示例中的 Pod 包含一个 Container,且 Pod 和 Container 都有定义 securityContext 字段:
apiVersion: v1
kind: Pod
metadata:
  name: security-context-demo-2
spec:
  securityContext:
    runAsUser: 1000
  containers:
  - name: sec-ctx-demo-2
    image: busybox
    command: [ "sh", "-c", "sleep 1h" ]
    securityContext:
      runAsUser: 2000
      allowPrivilegeEscalation: false
请注意,容器的进程以 userID 2000 的身份运行。该取值由 spec.containers[*].securityContext.runAsUser 容器组中的字段定义。Pod 中定义的 spec.securityContext.runAsUser 取值 1000 被覆盖。
为容器设置Linux Capabilities
使用 Linux Capabilities 可以为容器内的进程授予某些特定的权限(而不是 root 用户的所有权限)。在容器定义的 securityContext 中添加 capabilities 字段,可以向容器添加或删除 Linux Capability。
先运行一个不包含 capabilities 字段的容器,观察容器内进程的 linux capabilities 位图的情况;然后在运行一个包含 capabilities 字段的容器,比较其 linux capabilities 位图与前者的不同。
无capabilities字段时
先确认在没有 capabilities 字段时,容器的行为是怎样的。下面的例子中包含一个容器,我们没有为其添加或删除任何 Linux capability。
apiVersion: v1
kind: Pod
metadata:
  name: security-context-demo-3
spec:
  containers:
  - name: sec-ctx-demo-3
    image: busybox
    command: [ "sh", "-c", "sleep 1h" ]
在容器的命令行界面中查看 process 1 的状态
# cat /proc/1/status
CapPrm: 00000000a80425fb
CapEff: 00000000a80425fb
有capabilities字段时
运行同样的一个容器,不同的是,这次为其设置了 capabilities 字段。下面是 yaml 配置文件,该配置中为进程添加了两个 Linux Capability: CAP_NET_ADMIN 和 CAP_SYS_TIME:
apiVersion: v1
kind: Pod
metadata:
  name: security-context-demo-4
spec:
  containers:
  - name: sec-ctx-demo-4
    image: busybox
    command: [ "sh", "-c", "sleep 1h" ]
    securityContext:
      capabilities:
        add: ["NET_ADMIN", "SYS_TIME"]
在容器的命令行界面中查看 process 1 的状态
# cat /proc/1/status
CapPrm: 00000000aa0435fb
CapEff: 00000000aa0435fb
比较两次运行,进程的 Linux Capabilities 位图的差异:
第一次运行:00000000a80425fb
第二次运行:00000000aa0435fb
第一次运行时,位图的 12 位和 25 为是 0。第二次运行时,12 位和 25 位是 1.查看 Linux Capabilities 的常量定义文件 capability.h 可知:12 位代表 CAP_NET_ADMIN,25 位代表 CAP_SYS_TIME。
LinuxCapability常量
Linux Capabilities 常量格式为 CAP_XXX。然而,在容器定义中添加或删除 Linux Capabilities 时,必须去除常量的前缀 CAP_。例如:向容器中添加 CAP_SYS_TIME 时,只需要填写 SYS_TIME。
为容器设置SELinux标签
Pod 或容器定义的 securityContext 中 seLinuxOptions 字段是一个 SELinuxOptions 对象,该字段可用于为容器指定 SELinux 标签。
securityContext:
  seLinuxOptions:
    level: "s0:c123,c456"
为容器指定 SELinux 标签时,宿主节点的 SELinux 模块必须加载。
Kuboard中Pod的Security Context
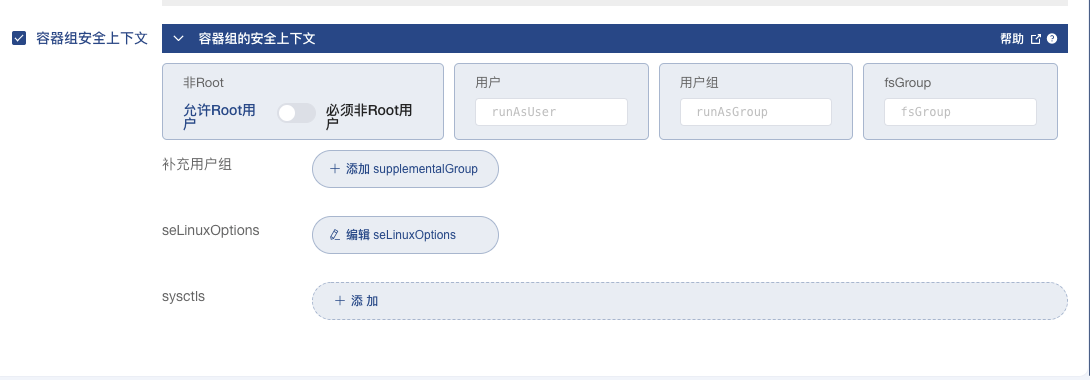
通过 Kuboard,可以直接设定 Deployment、StatefulSet、DaemonSet 等中 Pod 模板的 securityContext 的内容。在 Kuboard 工作负载编辑器界面中切换到 高级设置 标签页,并勾选 容器组安全上下文 ,可查看到 Pod 的 Security Context 设置界面,如下图所示:

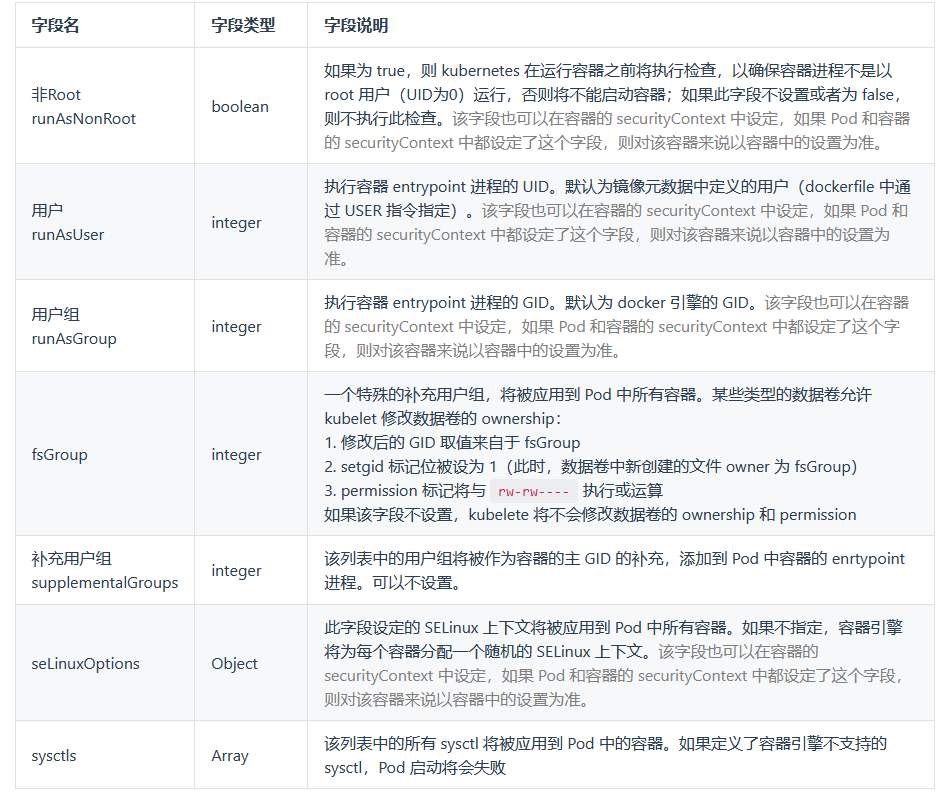
各个字段的含义逐个解释如下:

Kuboard中容器的Security Context
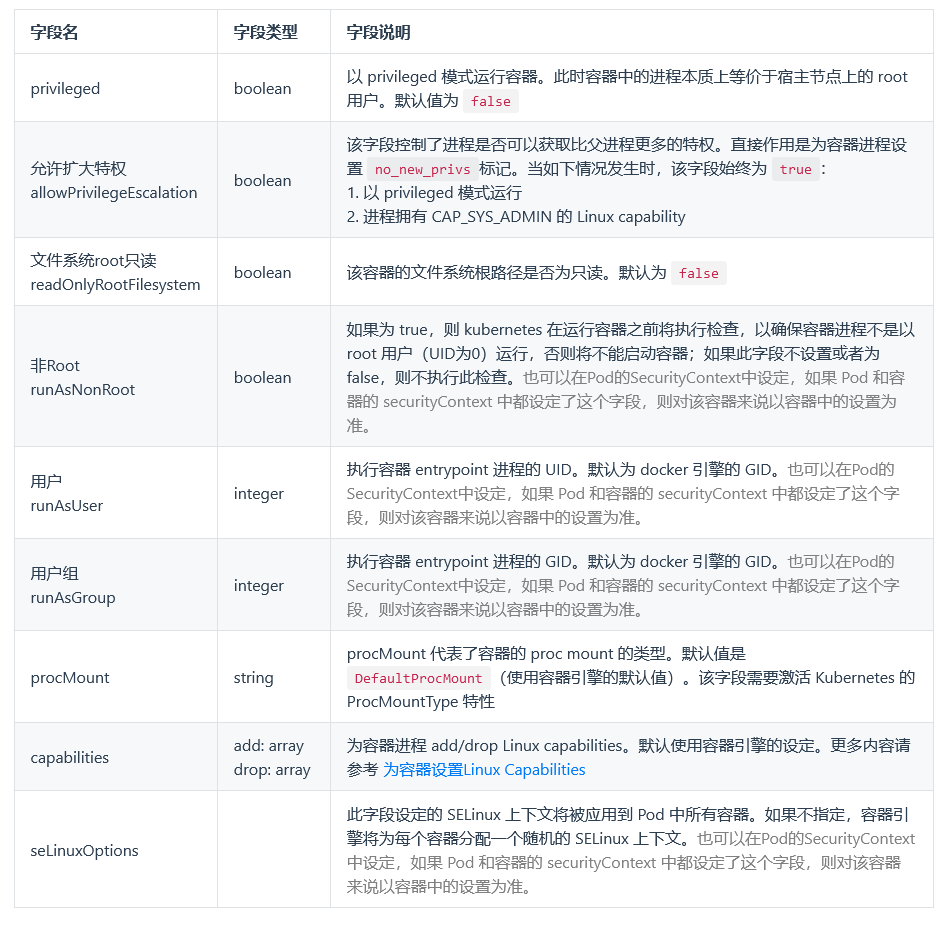
在 Kuboard 工作负载编辑器界面中切换到 容器信息 标签页,并勾选 容器安全上下文 ,可查看到容器的 Security Context 设置界面,如下图所示:

各个字段的含义逐个解释如下:
