一、是什么
1、进程:正在运行中的程序
2、线程:进程中的最小执行单元
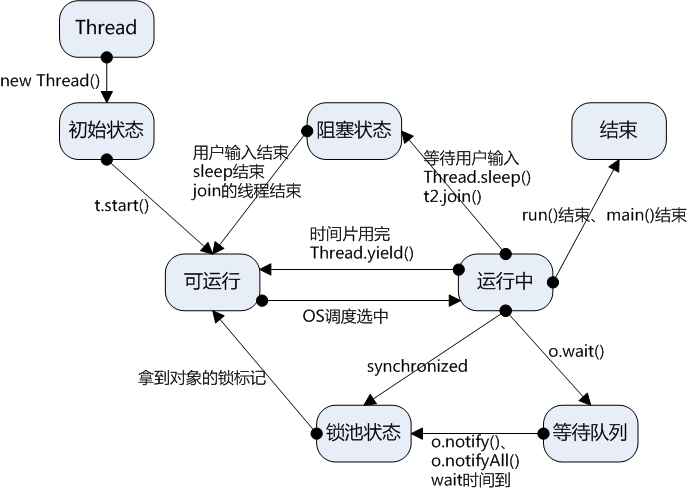
3、线程状态:
1、新建状态(New):新创建了一个线程对象。
2、就绪状态(Runnable):线程对象创建后,其他线程调用了该对象的start()方法。该状态的线程位于可运行线程池中,变得可运行,等待获取CPU的使用权。
3、运行状态(Running):就绪状态的线程获取了CPU,执行程序代码。
4、阻塞状态(Blocked):阻塞状态是线程因为某种原因放弃CPU使用权,暂时停止运行。直到线程进入就绪状态,才有机会转到运行状态。阻塞的情况分三种:
(一)、等待阻塞:运行的线程执行wait()方法,JVM会把该线程放入等待池中。(wait会释放持有的锁)
(二)、同步阻塞:运行的线程在获取对象的同步锁时,若该同步锁被别的线程占用,则JVM会把该线程放入锁池中。
(三)、其他阻塞:运行的线程执行sleep()或join()方法,或者发出了I/O请求时,JVM会把该线程置为阻塞状态。当sleep()状态超时、join()等待线程终止或者超时、或者I/O处理完毕时,线程重新转入就绪状态。(注意,sleep是不会释放持有的锁)
5、死亡状态(Dead):线程执行完了或者因异常退出了run()方法,该线程结束生命周期。
————————————————
版权声明:本文为CSDN博主「Evankaka」的原创文章,遵循 CC 4.0 BY-SA 版权协议,转载请附上原文出处链接及本声明。
原文链接:https://blog.csdn.net/evankaka/article/details/44153709
4、创建线程的三种方式
- 自定义类继承 Thread 类
- 实现Runnable 接口 (基本上都用这个)
- 实现Callable 接口 (要考虑线程执行体的返回值时用)
5、线程运行方法,最终都是调用各自实现的run方法
- new Thread().start();
- executor.execute(thread1);
- executor.submit(thread1);
二、怎么用
1、直接用Thread
package com.jc.thread.impl;

public class ThreadTest extends Thread {

	private String index;

	public ThreadTest() {
		super();
	}

	public ThreadTest(String index) {
		super();
		this.index = index;
	}

	public void run() {
		System.out.println(Thread.currentThread().getName() + " --- " + index
				+ "开始执行,循环输出5次index");
		for (int i = 0; i < 5; i++) {
			System.out.println(index + " -- 第" + i + "次执行");
		}
		System.out.println(Thread.currentThread().getName() + "执行完毕");
	}

	public String getIndex() {
		return index;
	}

	public void setIndex(String index) {
		this.index = index;
	}

}
运行
public static void testThread() {
		ThreadTest thread1 = new ThreadTest();
		thread1.setIndex("A");

		ThreadTest thread2 = new ThreadTest("B");

		thread1.start();
		thread2.start();

	}
结果

2、实现Runnable 接口
package com.jc.thread.impl;

public class RunableTest implements Runnable {

	private String index;

	public RunableTest() {
		super();
	}

	public RunableTest(String index) {
		super();
		this.index = index;
	}

	@Override
	public void run() {
		System.out.println(Thread.currentThread().getName() + " --- " + index
				+ "开始执行,循环输出5次index");
		for (int i = 0; i < 5; i++) {
			System.out.println(index + " -- 第" + i + "次执行");
		}
		System.out.println(Thread.currentThread().getName() + "执行完毕");
	}

	public String getIndex() {
		return index;
	}

	public void setIndex(String index) {
		this.index = index;
	}

}
运行
public static void testRunable() {
		RunableTest thread1 = new RunableTest();
		thread1.setIndex("A");

		RunableTest thread2 = new RunableTest("B");

		new Thread(thread1).start();
		new Thread(thread2).start();

		/**
		 * 可以给即将启动的线程命名
		 */
		// new Thread(thread1,"1st_thread").start();
		// new Thread(thread2,"2nd_thread").start();

		/**
		 * 实现runable接口的实现类中的run()方法被当做普通方法调用,不会启动别的线程,而是在main线程中顺序执行
		 * 也就是没达到多线程的目的
		 */
		// thread1.run();
		// thread2.run();

		/**
		 * Thread对象的start()方法,最终执行的还是thread 对象的run方法
		 * 如果Thread对象重写了run,而且重写的run里面没有要执行Thread对象属性中的
		 * Runnable对象的run方法,那就不会执行runable里实现的run方法
		 *
		 * Thread 也是实现了runable接口的实现类 Thread 的 run方法
		 *
		 * @Override public void run() { if (target != null) { target.run(); } }
		 *
		 */
		/*
		 * new Thread(new Runnable(){
		 *
		 * @Override public void run() {
		 * System.out.println("runable 的线程执行体执行了");//不打印 }
		 *
		 * }){ public void run() {
		 * System.out.println("Thread 的线程执行体执行了");//只输出这条 //调用父类Thread 的
		 * run方法,会执行 runable 实现类实现的方法 super.run(); } }.start();
		 */

	}
3、实现Callable 接口
package com.jc.thread.impl;

import java.util.concurrent.Callable;

public class CallableTest implements Callable<String> {

	private String index;

	public CallableTest() {
		super();
	}

	public CallableTest(String index) {
		super();
		this.index = index;
	}

	@Override
	public String call() throws Exception {
		System.out.println(Thread.currentThread().getName() + " --- " + index
				+ "开始执行,循环输出5次index");
		for (int i = 0; i < 5; i++) {
			System.out.println(index + " -- 第" + i + "次执行");
		}
		System.out.println(Thread.currentThread().getName() + "执行完毕");
		Thread.sleep(5000);
		System.out.println(index + " - 等待5秒再返回结果");
		return index + "执行成功!";
	}

	public String getIndex() {
		return index;
	}

	public void setIndex(String index) {
		this.index = index;
	}

}
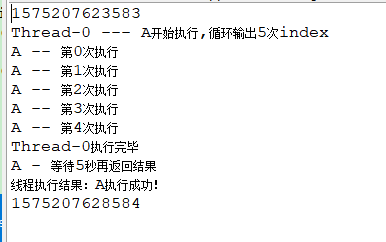
运行
public static void testCallable() {
		CallableTest thread1 = new CallableTest();
		thread1.setIndex("A");
		FutureTask<String> ft = new FutureTask<String>(thread1);
		new Thread(ft).start();
		try {
			/**
			 * ft.get() 执行这条时,如果一直没有结果,会一直等待结果返回再继续执行下面的
			 */
			System.out.println(System.currentTimeMillis());
			System.out.println("线程执行结果:" + ft.get());
			System.out.println(System.currentTimeMillis());
		} catch (Exception e) {
			e.printStackTrace();
		}
	}
结果
4、使用线程池
定义一个线程池
package com.jc.thread.impl;

import java.util.concurrent.ExecutorService;
import java.util.concurrent.Executors;
import java.util.concurrent.ThreadFactory;
import java.util.concurrent.atomic.AtomicInteger;

public class ExecutorUtil {

public static ExecutorService fixedThreadPool = null;

    static{
        int cpuNums = Runtime.getRuntime().availableProcessors();
        fixedThreadPool = Executors.newFixedThreadPool(cpuNums * 2,new ThreadFactory(){
        	//给这个线程池里的预备线程起个名
            private final AtomicInteger mCount = new AtomicInteger(1);
            @Override
            public Thread newThread(Runnable r){
                return new Thread(r,"jc-thread-" + mCount.getAndIncrement());
            }
        });
    }

}
Runnable 方式使用
public static void testExecRun() {
		ExecutorService executor = ExecutorUtil.fixedThreadPool;
		RunableTest thread1 = new RunableTest();
		thread1.setIndex("A");
		RunableTest thread2 = new RunableTest("B");
		executor.execute(thread1);
		executor.execute(thread2);

		executor.shutdown();
	}
Callable 方式使用
public static void testExecCall() {
		ExecutorService executor = ExecutorUtil.fixedThreadPool;
		List<Future<String>> results = new ArrayList<Future<String>>();
		CallableTest thread1 = new CallableTest();
		thread1.setIndex("A");
		CallableTest thread2 = new CallableTest("B");
		results.add(executor.submit(thread1));
		results.add(executor.submit(thread2));

		for (Future<String> future : results) {
			try {
				/**
				 * future.get() 执行这条时,如果一直没有结果,会一直等待结果返回再继续执行下面的
				 */
				System.out.println("线程执行结果:" + future.get());
			} catch (Exception e) {
				e.printStackTrace();
			}
		}
		executor.shutdown();
	}
结果

参考文章:
https://www.jianshu.com/p/210eab345423
https://blog.csdn.net/evankaka/article/details/44153709
https://www.cnblogs.com/echo-cheng/p/6814909.html
https://blog.csdn.net/weixin_42606135/article/details/81282736