在说正文之前我们先介绍一下redis:
redis是当今比较热门的非关系型数据库之一,他使用的是key-value的键值对来进行存储,是一个存在于内存之中的数据库,我们一般用于做数据缓存。当我们需要大量的数据查询时,如果我们都直接访问数据库时,会严重影响数据库性能。所以我们一般的操作就是在db层之上的各级使用多级的no-sql来为db提供缓冲。
因为redis是存在于内存之中,那么问题来了当我们断电时或者宕机时就会产生数据丢失,所以redis为我们提供了rdb和aof的两种持久化保存的方式,这也是为什么同样是缓存数据库我们选择redis而不选择memcache的原因。而且为了在大流量下提供稳定业务,redis还提供了redis-cluster,twemproxy,codis等集群化方案,为我们搭建分布式系统提供了可能。废话说了这么多下面开始正文。
一.添加redis对应的依赖
  <!-- reids缓存-->
    <!-- https://mvnrepository.com/artifact/org.springframework.data/spring-data-redis -->
    <dependency>
      <groupId>org.springframework.data</groupId>
      <artifactId>spring-data-redis</artifactId>
      <version>${redis.data.version}</version>
    </dependency>

    <!-- https://mvnrepository.com/artifact/redis.clients/jedis -->
    <dependency>
      <groupId>redis.clients</groupId>
      <artifactId>jedis</artifactId>
      <version>${redis.clients.version}</version>
    </dependency>
依赖版本大家可以下用的最多的比较稳定。
二.添加相应的spring配置
<?xml version="1.0" encoding="UTF-8"?>
<beans xmlns="http://www.springframework.org/schema/beans"
       xmlns:xsi="http://www.w3.org/2001/XMLSchema-instance"
       xmlns:context="http://www.springframework.org/schema/context"
       xmlns:aop="http://www.springframework.org/schema/aop" xmlns:tx="http://www.springframework.org/schema/tx"
       xsi:schemaLocation="http://www.springframework.org/schema/beans http://www.springframework.org/schema/beans/spring-beans.xsd http://www.springframework.org/schema/context http://www.springframework.org/schema/context/spring-context.xsd http://www.springframework.org/schema/aop http://www.springframework.org/schema/aop/spring-aop.xsd http://www.springframework.org/schema/tx http://www.springframework.org/schema/tx/spring-tx.xsd">
    <!--开启aop代理-->
    <aop:aspectj-autoproxy expose-proxy="true"/>
    <!--spring添加注解扫描-->
    <context:annotation-config></context:annotation-config>
    <!--spring 注解扫描但是要排除spring mvc的控制器-->
    <context:component-scan base-package="com">
        <context:exclude-filter type="annotation"
                                expression="org.springframework.stereotype.Controller"></context:exclude-filter>
    </context:component-scan>

    <!--加载资源文件,该标签全文只能有一个-->
    <context:property-placeholder location="classpath:jdbc.properties,classpath:redisconfig.properties"/>

    <!--配置数据源,阿里数据连接池-->
    <bean id="dataSource" class="${jdbc.dataType}" destroy-method="close">
        <property name="driverClassName" value="${jdbc.driver}"/>
        <property name="url" value="${jdbc.url}"/>
        <property name="username" value="${jdbc.usename}"/>
        <property name="password" value="${jdbc.password}"/>

        <!-- 数据库连接池配置 -->
        <property name="initialSize" value="20"/><!-- 初始化连接数量 -->
        <property name="minIdle" value="5"/>   <!-- 最小空闲连接数量 -->
        <property name="maxActive" value="1500"/> <!-- 最大连接数量 -->
        <property name="maxWait" value="60000"/>  <!-- 最大建立连接等待时间(毫秒)。如果超过此时间将接到异常。设为-1表示无限制-->
        <property name="timeBetweenEvictionRunsMillis" value="60000"/>  <!--  配置间隔多久才进行一次检测,检测需要关闭的空闲连接,单位是毫秒   -->
        <property name="minEvictableIdleTimeMillis" value="300000"/>   <!-- 配置一个连接在池中最小生存的时间,单位是毫秒   -->
        <property name="validationQuery" value="SELECT 'x'"/>
        <property name="testWhileIdle" value="true"/>  <!--空闲时是否进行验证,检查对象是否有效 -->
        <property name="testOnBorrow" value="false"/>  <!--取得对象时是否进行验证,检查对象是否有效 -->
        <property name="testOnReturn" value="false"/>  <!--返回对象时是否进行验证 -->
        <!--  打开PSCache,并且指定每个连接上PSCache的大小   -->
        <property name="poolPreparedStatements" value="true"/>  <!-- 表明是否开启statement cache,默认为false,也就是不开启 -->
        <property name="maxPoolPreparedStatementPerConnectionSize"
                  value="20"/>  <!-- statement cache的大小,默认为-1,也就是不限制 -->

        <!-- 配置监控统计拦截的filters,去掉后监控界面sql无法统计   -->
        <property name="filters" value="stat"/>
    </bean>


    <bean id="sqlSessionFactory" class="org.mybatis.spring.SqlSessionFactoryBean">
        <property name="configLocation" value="classpath:mybatis-config.xml"/>
        <property name="dataSource" ref="dataSource"/>
        <!-- 扫描entity包 使用别名 -->
        <property name="typeAliasesPackage" value="com.lwc.pojo"/>
        <!-- 扫描sql配置文件:mapper需要的xml文件 -->
        <property name="mapperLocations" value="classpath*:com/lwc/dao/mapper/*.xml"/>
    </bean>
    <!--根据接口名生成对应的代理类-->
    <bean class="org.mybatis.spring.mapper.MapperScannerConfigurer">
        <property name="basePackage" value="com.lwc.dao"/>
        <property name="sqlSessionFactoryBeanName" value="sqlSessionFactory"/>
    </bean>


    <!-- 配置事务管理器 -->
    <bean id="transactionManager"
          class="org.springframework.jdbc.datasource.DataSourceTransactionManager">
        <!-- 注入数据库连接池 -->
        <property name="dataSource" ref="dataSource"/>
    </bean>

    <!--配置事务切面-->
    <aop:config>
        <aop:advisor advice-ref="txAdvice" pointcut="execution(* com.lwc.service.*.*(..))"></aop:advisor>
    </aop:config>
    <!-- 2 事务详情(事务通知)  , 在aop筛选基础上,比如对ABC三个确定使用什么样的事务。例如:AC读写、B只读 等
       <tx:attributes> 用于配置事务详情(属性属性)
           <tx:method name=""/> 详情具体配置
               propagation 传播行为 , REQUIRED:必须;REQUIRES_NEW:必须是新的
               isolation 隔离级别
   -->
    <tx:advice id="txAdvice" transaction-manager="transactionManager">
        <tx:attributes>
            <tx:method name="*" propagation="REQUIRED"/>
        </tx:attributes>
    </tx:advice>
    <!--配置redis缓存-->
    <!--redis配置-->
    <bean id="jedisPoolConfig" class="redis.clients.jedis.JedisPoolConfig">

        <!--控制一个pool最多有多少个状态为空闲的jedis实例-->
        <property name="maxIdle" value="${redis.maxIdle}"></property>
        <!--当borrow(引入)一个实例时,最大的等待时间,如果超过则抛出jedisConnectionException-->
        <property name="maxWaitMillis" value="${redis.maxWaitMillis}"></property>
        <property name="maxTotal" value="${redis.maxTotal}"></property>
        <!-- 在在borrow一个jedis实例时,是否提前进行validate操作;如果为true,则得到的jedis实例均是可用的-->
        <property name="testOnBorrow" value="${redis.testOnBorrow}"></property>

    </bean>

    <!--redis连接池-->
    <bean id="jedisPool" class="redis.clients.jedis.JedisPool">
        <constructor-arg index="0" ref="jedisPoolConfig"></constructor-arg>
        <constructor-arg index="1" value="${redis.host}"></constructor-arg>
        <constructor-arg index="2" value="${redis.port}"></constructor-arg>
        <constructor-arg index="3" value="${redis.timeout}"></constructor-arg>

    </bean>
    <!-- redis连接工厂 -->
    <bean id="JedisConnectionFactory" class="org.springframework.data.redis.connection.jedis.JedisConnectionFactory">
        <property name="hostName" value="${redis.host}" ></property>
        <property name="port" value="${redis.port}"></property>
        <property name="poolConfig" ref="jedisPoolConfig"></property>
    </bean>
    <!-- redis操作模板,这里采用尽量面向对象的模板 -->
    <bean id="redisTemplate" class="org.springframework.data.redis.core.RedisTemplate">
        <property name="connectionFactory" ref="JedisConnectionFactory"/>
        <property name="keySerializer" ref="stringReadisSerializer"/>
        <property name="valueSerializer" ref="stringReadisSerializer"/>
        <property name="hashKeySerializer">
            <bean class="org.springframework.data.redis.serializer.StringRedisSerializer"/>
        </property>
        <property name="hashValueSerializer">
            <bean class="org.springframework.data.redis.serializer.GenericJackson2JsonRedisSerializer"/>
        </property>
        <!--开启事务-->
        <property name="enableTransactionSupport" value="true"/>
     </bean>


    <!--使用字符串进行序列化-->
    <bean id="stringReadisSerializer" class="org.springframework.data.redis.serializer.StringRedisSerializer"/>
    <!--使用JDK的序列化器进行转化-->
    <bean id="jdkSerializationRedisSerializer" class="org.springframework.data.redis.serializer.JdkSerializationRedisSerializer"/>

    <bean id="getCache" class="com.lwc.redis.aspectj.GetCachAop">
        <property name="redisTemplate" ref="redisTemplate"/>
    </bean>
</beans>
这里是spring的基本配置,这里我没有分开来,反正都有注释
三.redis的一些基本资源文件
redis.host=localhost
redis.port=6379
redis.maxIdle=50
redis.maxTotal=100
redis.maxWaitMillis=3000
redis.testOnBorrow=true
redis.timeout=5000
这里我没有配置密码,所以就没有写pass,但是如果有需要的话可以找到redis的配置文件加上如下语句
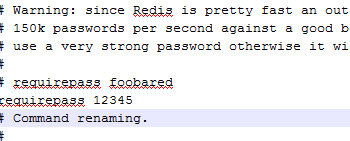
这样就可以了,如果没有配置密码而配置了<property name="password" value="${redis.password}" />将会报错
四.利用aop和自定义注解来进行实现环绕
下面是自定义注解,并且配上了一些注解的解释,还没有学过自定注解的小伙伴可以看看
package com.lwc.redis.annotation;

import java.lang.annotation.*;

/**自定义注解
 *   2.1.1 Target:表示注解的作用目标
 *
 *                @Target(ElementType.TYPE)   //接口、类、枚举、注解
 *
 *     @Target(ElementType.FIELD) //字段、枚举的常量
 *
 *     @Target(ElementType.METHOD) //方法
 *
 *     @Target(ElementType.PARAMETER) //方法参数
 *
 *     @Target(ElementType.CONSTRUCTOR)  //构造函数
 *
 *     @Target(ElementType.LOCAL_VARIABLE)//局部变量
 *
 *     @Target(ElementType.ANNOTATION_TYPE)//注解
 *
 *     @Target(ElementType.PACKAGE) ///包
 *
 *   2.1.2 @Documented:说明该注解将被包含在javadoc中;
 *
 *   2.1.3 @Inherited:说明子类可以继承父类中的该注解 ;
 *
 *   2.1.4 @Retention:注解的保留位置;
 *
 *                @Retention(RetentionPolicy.SOURCE)   //注解仅存在于源码中,在class字节码文件中不包含
 *
 *        @Retention(RetentionPolicy.CLASS)     // 默认的保留策略,注解会在class字节码文件中存在,但运行时无法获得,
 *
 *     @Retention(RetentionPolicy.RUNTIME)  // 注解会在class字节码文件中存在,在运行时可以通过反射获取到
 */
@Target(ElementType.METHOD)//目标为方法
@Retention(RetentionPolicy.RUNTIME)//注解在类中存在,运行时通过反射获取
@Documented
@Inherited
public @interface GetCache {
    String name() default "";
    String value() default "";
}
定义这个注解是为了让aop可以直接根据注解来进行切面环绕,而不需要根据传统的方法来进行切点,这样会方便很多,否则的话就需要
定义接口然后对接口需要的方法进行定义切点,在实现该接口,这样也可以做到切面环绕,但是会更麻烦点,有兴趣的小伙伴可以自己试试
通知类:
package com.lwc.redis.aspectj;

import com.lwc.redis.annotation.GetCache;
import com.lwc.util.RedisCache;
import org.aspectj.lang.ProceedingJoinPoint;
import org.aspectj.lang.annotation.Around;
import org.aspectj.lang.annotation.Aspect;
import org.aspectj.lang.annotation.Pointcut;
import org.aspectj.lang.reflect.MethodSignature;
import org.springframework.beans.factory.annotation.Autowired;
import org.springframework.data.redis.core.RedisTemplate;
import org.springframework.stereotype.Component;

import java.io.Serializable;
import java.lang.reflect.Method;

@Component
@Aspect
public class GetCachAop {
    @Autowired
    private RedisTemplate<Serializable,Object> redisTemplate;
   private RedisCache redisCache=new RedisCache();
   //定义切点
   @Pointcut("@annotation(com.lwc.redis.annotation.GetCache)")
    public void getCache(){
       System.out.println("获取内存数据切入点");
   }
   /*在所有标注了GetCache的地方切入*/
   @Around("getCache()")
    public Object beforeExec(ProceedingJoinPoint joinPoint){
       //生成redis中的id,根据自己指定的格式
       String redisKey=getCacheKey(joinPoint);

       //获取从redis中查询得到的对象
       Object object=redisCache.getDataFromRedis(redisKey);

       //如果查询到了
       if(null!=object){
           System.out.println("从redis中获取到了数据");
           return object;
       }else{
           System.out.println("从数据库中查询数据");
           //如果没有查询到,则在数据库中进行查询
           try {
               object=joinPoint.proceed();
           } catch (Throwable throwable) {
               throwable.printStackTrace();
           }
       }

       //在目标方法执行完之后:将查到的数据放入到redis中
       redisCache.setDataToRedis(redisKey,object);
       return object;
   }

    /**
     * 根据方法名参数名类名获取唯一的一个键值
     * 格式为yourpackage.classname.methodname(int).argsvalue123
     * @param joinPoint
     * @return
     */
    //变量没有用到时不让警告
   @SuppressWarnings("unused")
   private String getCacheKey(ProceedingJoinPoint joinPoint){
       //获取切入方法的一些相关的信息
       MethodSignature ms=(MethodSignature) joinPoint.getSignature();

       Method method=ms.getMethod();
       //获取注解中设置的对应参数
       String ActionName=method.getAnnotation(GetCache.class).value();
       String fieldList=method.getAnnotation(GetCache.class).name();
       for(String field:fieldList.split("."))
           ActionName+="."+field;

       //获取切点方法的参数
       String id=null;
       Object[] args=joinPoint.getArgs();
       if(args!=null && args.length>0)
           id=String.valueOf(args[0]);
       ActionName+="="+id;
       String redisKey=ms+"."+ActionName;
       return redisKey;
   }

   public void setRedisTemplate( RedisTemplate<Serializable, Object> redisTemplate){
       this.redisTemplate = redisTemplate;
   }
}
上面代码都有详细注释这里就不重复了
下面是序列化的工具类:
package com.lwc.util;

import java.io.*;

public class SerializableUtil {

    //将字节数组反序列化为对象
    public static  Object toObject(byte[] bytes){
        Object obj=null;
        try{
            ByteArrayInputStream bis=new ByteArrayInputStream(bytes);
            ObjectInputStream ois=new ObjectInputStream(bis);
            obj=ois.read();
            ois.close();
            bis.close();
        } catch (IOException e) {
            e.printStackTrace();
        }
        return obj;
    }
    //将对象序列化为字节数组
    public static byte[] toByteArray(Object obj){
        byte[] bytes =null;
        ByteArrayOutputStream bos =new ByteArrayOutputStream();
        try{
            ObjectOutputStream oos=new ObjectOutputStream(bos);
            oos.writeObject(obj);
            oos.flush();
            bytes=bos.toByteArray();
            oos.close();
            bos.close();
        } catch (IOException e) {
            e.printStackTrace();
        }
        return bytes;
    }
}
下面是缓存工具类:
package com.lwc.util;

import org.springframework.beans.factory.annotation.Autowired;
import org.springframework.context.support.ClassPathXmlApplicationContext;
import org.springframework.stereotype.Component;
import redis.clients.jedis.Jedis;
import redis.clients.jedis.JedisPool;
/**
 * redis缓存工具类
 */

public class RedisCache  {

    private static JedisPool jedisPool;
    //静态类进行参数的初始化
    static {
         ClassPathXmlApplicationContext cxac=new ClassPathXmlApplicationContext("applicationContext.xml");
        jedisPool=(JedisPool) cxac.getBean("jedisPool");
    }
    //从缓存中读取数据,进行反序列化
    public Object getDataFromRedis(String redisKey){
        Jedis jedis=jedisPool.getResource();
        byte[] result=jedis.get(redisKey.getBytes());
       //如果没有查询到,就返回空
        if(null==result)
            return null;
        return SerializableUtil.toObject(result);
    }

    //将数据库中查到的数据放入redis中
    public void setDataToRedis(String redisKey,Object obj){
        byte[] bytes =SerializableUtil.toByteArray(obj);
        Jedis jedis=jedisPool.getResource();
        String sucess=jedis.set(redisKey.getBytes(),bytes);
        if("OK".equals(sucess)){
            System.out.println("数据保存成功");
        }
    }
}
当然我也看到有人继承cach类来使用redis缓存,下面贴出别人的代码并进行解释:
package com.ssm.redis;

import java.util.concurrent.locks.ReadWriteLock;
import java.util.concurrent.locks.ReentrantReadWriteLock;

import org.apache.ibatis.cache.Cache;
import org.springframework.beans.factory.annotation.Autowired;

import redis.clients.jedis.Jedis;
import redis.clients.jedis.JedisPool;
import redis.clients.jedis.JedisPoolConfig;

public class RedisCache implements Cache {

    private final ReadWriteLock readWriteLock = new ReentrantReadWriteLock();
    /**
     * Jedis客户端
     */

    @Autowired
    private Jedis redisClient = createClient();

    private String id;

    public RedisCache(final String id) {
        if (id == null) {
            throw new IllegalArgumentException("必须传入ID");
        }
        System.out.println("MybatisRedisCache:id=" + id);
        this.id = id;
    }

    @Override
    public void clear() {
        redisClient.flushDB();
    }

    @Override
    public String getId() {
        return this.id;
    }

    @Override
    public Object getObject(Object key) {
        byte[] ob = redisClient.get(SerializeUtil.serialize(key.toString()));
        if (ob == null) {
            return null;
        }
        Object value = SerializeUtil.unSerialize(ob);
        return value;
    }

    @Override
    public ReadWriteLock getReadWriteLock() {
        return readWriteLock;
    }

    @Override
    public int getSize() {
        return Integer.valueOf(redisClient.dbSize().toString());
    }

    @Override
    public void putObject(Object key, Object value) {
        redisClient.set(SerializeUtil.serialize(key.toString()), SerializeUtil.serialize(value));
    }

    @Override
    public Object removeObject(Object key) {
        return redisClient.expire(SerializeUtil.serialize(key.toString()), 0);
    }

    protected static Jedis createClient() {

        try {
            @SuppressWarnings("resource")
            JedisPool pool = new JedisPool(new JedisPoolConfig(), "127.0.0.1", 6379);
            return pool.getResource();
        } catch (Exception e) {
            e.printStackTrace();
        }
        throw new RuntimeException("初始化连接池错误");
    }

}
这个其实是使用mybatis自带的二级缓存,从写mybatis中的缓存类来进行实现使用这种方法就不需要额外的添加aop之类的只需要在映射的dao文件中添加<cache type="packagename.RedisCache" />这样便可以直接使用redis而不需要aop配置
言归正传,我们接着使用aop来实现redis整合,下面是service使用注解来进行实现redis存取
package com.lwc.service;

import com.lwc.dao.UserDao;
import com.lwc.pojo.User;
import com.lwc.redis.annotation.GetCache;
import org.springframework.beans.factory.annotation.Autowired;
import org.springframework.stereotype.Service;

@Service
public class UserService {
    @Autowired
    private UserDao userDao;
    @GetCache(name = "user" ,value = "id")
    public User getUser(Integer id){
        return userDao.selectUser(id);
    }
}
这样我们每次调用service的这个方法就可以实现从redis存取数据了。其他的UserDao和对应的映射文件我这里就不贴出来了
值得一说的是这里的实体类要继承Serializable 接口,不然会报错,因为他时间实例化对象进行序列化存入内存之中。
以上就完成了基本的redis的使用,下篇博文将会介绍redis的持久化