理论
我们大多时候玩的爬虫
都是运行在自己的机子
之前
我们为了提高爬虫的效率
说过多进程相关的
什么是分布式?
你开发一个网站想要给别人访问就需要把网站部署到服务器
当网站用户增多的时候一个服务器就不满足需求了于是就会把网站部署到多个服务器上
这种情况通常叫集群
就是把整个网站的所有功能
都同时部署到不同的服务器上一般会使用 ngnix 作负载均衡
不过
有些功能并发量并不是很高比如一些后台的管理
所以就有人想要不然把这个网站的功能都拆分出来
让每一个模块只负责具体的功能
比如登录模块,内容管理模块等
然后在部署的时候
把一些并发量大的模块部署到多个服务器就行了耦合度大大的降低了
并发量小的模块也不会浪费那么多资源了
当然
这时需要让模块与模块之间产生联系
也就是调度好它们
一般会用到消息队列
这就是所谓的分布式
对于一些数据不大的数据我们的爬虫一般是直接在电脑运行了
也就是所谓的单机爬虫
而分布式爬虫
说白了就是把爬虫的关键功能以我们刚说的分布式形式部署到多台机器上然后一起盘(爬)它
那么如何将爬虫之间联系起来呢我们可以使用 Redis 的消息队列进行调度(schedule)
之前我们也有说过 redis
它是一个读写速度快的
缓存数据库
还提供了类似 Python 的list、set 等数据结构
而且它还可以将内存的数据写到磁盘性能杠杠的
在 scrapy 框架里面
就有一个scrapy-redis专门用它来调度爬虫的
它可以将请求的 url 放到redis 的消息队列里面
然后用 spider 模块将数据给结构化抽出来放到 redis 数据库里面去
当然,分布式爬虫有时候还会结合数据库集群爬取数据
scrapy-redis架构

• 调度器(Scheduler)
scrapy-redis调度器通过redis的set不重复的特性,实现了Duplication Filter去重(DupeFilter set存放爬取过的request)。
Spider新生成的request,将request的指纹到redis的DupeFilter set检查是否重复,并将不重复的request push写入redis的request队列。
调度器每次从redis的request队列里根据优先级pop出一个request, 将此request发给spider处理。
• Item Pipeline
将Spider爬取到的Item给scrapy-redis的Item Pipeline,将爬取到的Item存入redis的items队列。可以很方便的从items队列中提取item,从而实现items processes 集群
scrapy - redis安装与使用
安装scrapy-redis
之前已经装过scrapy了,这里直接装scrapy-redis
pip install scrapy-redis
使用scrapy-redis的example来修改
先从github上拿到scrapy-redis的example,然后将里面的example-project目录移到指定的地址
git clone https://github.com/rolando/scrapy-redis.git
cp -r scrapy-redis/example-project ./scrapy-youyuan
或者将整个项目下载回来scrapy-redis-master.zip解压后
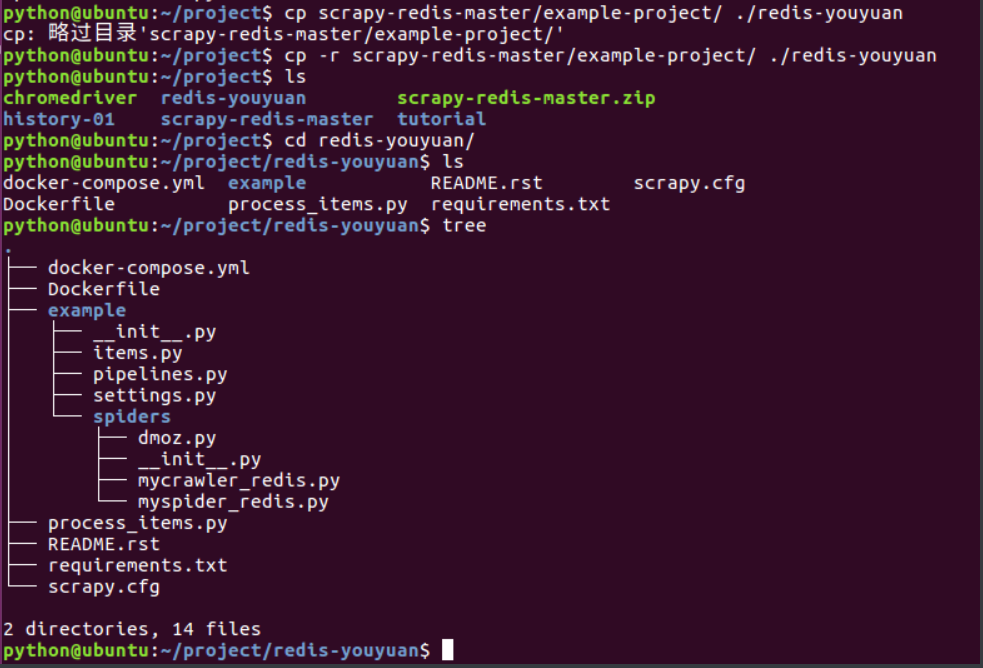
cp -r scrapy-redis-master/example-project/ ./redis-youyuan
cd redis-youyuan/
tree查看项目目录
修改settings.py
注意:settings里面的中文注释会报错,换成英文
# 指定使用scrapy-redis的Scheduler
SCHEDULER = "scrapy_redis.scheduler.Scheduler"

# 在redis中保持scrapy-redis用到的各个队列,从而允许暂停和暂停后恢复
SCHEDULER_PERSIST = True

# 指定排序爬取地址时使用的队列,默认是按照优先级排序
SCHEDULER_QUEUE_CLASS = 'scrapy_redis.queue.SpiderPriorityQueue'
# 可选的先进先出排序
# SCHEDULER_QUEUE_CLASS = 'scrapy_redis.queue.SpiderQueue'
# 可选的后进先出排序
# SCHEDULER_QUEUE_CLASS = 'scrapy_redis.queue.SpiderStack'

# 只在使用SpiderQueue或者SpiderStack是有效的参数,,指定爬虫关闭的最大空闲时间
SCHEDULER_IDLE_BEFORE_CLOSE = 10

# 指定RedisPipeline用以在redis中保存item
ITEM_PIPELINES = {
    'example.pipelines.ExamplePipeline': 300,
    'scrapy_redis.pipelines.RedisPipeline': 400
}

# 指定redis的连接参数
# REDIS_PASS是我自己加上的redis连接密码,需要简单修改scrapy-redis的源代码以支持使用密码连接redis
REDIS_HOST = '127.0.0.1'
REDIS_PORT = 6379
# Custom redis client parameters (i.e.: socket timeout, etc.)
REDIS_PARAMS  = {}
#REDIS_URL = 'redis://user:pass@hostname:9001'
#REDIS_PARAMS['password'] = 'itcast.cn'
LOG_LEVEL = 'DEBUG'

DUPEFILTER_CLASS = 'scrapy.dupefilters.RFPDupeFilter'

#The class used to detect and filter duplicate requests.

#The default (RFPDupeFilter) filters based on request fingerprint using the scrapy.utils.request.request_fingerprint function. In order to change the way duplicates are checked you could subclass RFPDupeFilter and override its request_fingerprint method. This method should accept scrapy Request object and return its fingerprint (a string).

#By default, RFPDupeFilter only logs the first duplicate request. Setting DUPEFILTER_DEBUG to True will make it log all duplicate requests.
DUPEFILTER_DEBUG =True

# Override the default request headers:
DEFAULT_REQUEST_HEADERS = {
    'Accept': 'text/html,application/xhtml+xml,application/xml;q=0.9,image/webp,*/*;q=0.8',
    'Accept-Language': 'zh-CN,zh;q=0.8',
    'Connection': 'keep-alive',
    'Accept-Encoding': 'gzip, deflate, sdch',
}
查看pipeline.py
from datetime import datetime

class ExamplePipeline(object):
    def process_item(self, item, spider):
        item["crawled"] = datetime.utcnow()
        item["spider"] = spider.name
        return item
流程
    - 概念:可以使用多台电脑组件一个分布式机群,让其执行同一组程序,对同一组网络资源进行联合爬取。
    - 原生的scrapy是无法实现分布式
        - 调度器无法被共享
        - 管道无法被共享
    - 基于scrapy+redis(scrapy&scrapy-redis组件)实现分布式
    - scrapy-redis组件作用:
        - 提供可被共享的管道和调度器
    - 环境安装:
        - pip install scrapy-redis
    - 编码流程:
        1.创建工程
        2.cd proName
        3.创建crawlspider的爬虫文件
        4.修改一下爬虫类:
            - 导包:from scrapy_redis.spiders import RedisCrawlSpider
            - 修改当前爬虫类的父类:RedisCrawlSpider
            - allowed_domains和start_urls删除
            - 添加一个新属性:redis_key = 'xxxx'可以被共享的调度器队列的名称
        5.修改配置settings.py
            - 指定管道
                ITEM_PIPELINES = {
                        'scrapy_redis.pipelines.RedisPipeline': 400
                    }
            - 指定调度器
                # 增加了一个去重容器类的配置, 作用使用Redis的set集合来存储请求的指纹数据, 从而实现请求去重的持久化
                DUPEFILTER_CLASS = "scrapy_redis.dupefilter.RFPDupeFilter"
                # 使用scrapy-redis组件自己的调度器
                SCHEDULER = "scrapy_redis.scheduler.Scheduler"
                # 配置调度器是否要持久化, 也就是当爬虫结束了, 要不要清空Redis中请求队列和去重指纹的set。如果是True, 就表示要持久化存储, 就不清空数据, 否则清空数据
                SCHEDULER_PERSIST = True
            - 指定redis数据库
                REDIS_HOST = 'redis服务的ip地址'
                REDIS_PORT = 6379
         6.配置redis数据库(redis.windows.conf)
            - 关闭默认绑定
                - 56Line:#bind 127.0.0.1
            - 关闭保护模式
                - 75line:protected-mode no
         7.启动redis服务(携带配置文件)和客户端
            - redis-server.exe redis.windows.conf
            - redis-cli
         8.执行工程
            - scrapy runspider spider.py
         9.将起始的url仍入到可以被共享的调度器的队列(sun)中
            - 在redis-cli中操作:lpush sun www.xxx.com
         10.redis:
            - xxx:items:存储的就是爬取到的数据
分布式爬取案例
爬虫程序
# -*- coding: utf-8 -*-
import scrapy
from scrapy.linkextractors import LinkExtractor
from scrapy.spiders import CrawlSpider, Rule
from scrapy_redis.spiders import RedisCrawlSpider
from fbs.items import FbsproItem

class FbsSpider(RedisCrawlSpider):
    name = 'fbs_obj'
    # allowed_domains = ['www.xxx.com']
    # start_urls = ['http://www.xxx.com/']
    redis_key = 'sun'#可以被共享的调度器队列的名称
    link = LinkExtractor(allow=r'type=4&page=d+')
    rules = (
        Rule(link, callback='parse_item', follow=True),
    )
    print(123)
    def parse_item(self, response):
        tr_list = response.xpath('//*[@id="morelist"]/div/table[2]//tr/td/table//tr')
        for tr in tr_list:
            title = tr.xpath('./td[2]/a[2]/@title').extract_first()
            status = tr.xpath('./td[3]/span/text()').extract_first()

            item = FbsproItem()
            item['title'] = title
            item['status'] = status
            print(title)
            yield item
settings.py
# -*- coding: utf-8 -*-

# Scrapy settings for fbsPro project
#
# For simplicity, this file contains only settings considered important or
# commonly used. You can find more settings consulting the documentation:
#
#     https://docs.scrapy.org/en/latest/topics/settings.html
#     https://docs.scrapy.org/en/latest/topics/downloader-middleware.html
#     https://docs.scrapy.org/en/latest/topics/spider-middleware.html

BOT_NAME = 'fbs_obj'

SPIDER_MODULES = ['fbs_obj.spiders']
NEWSPIDER_MODULE = 'fbs_obj.spiders'


# Crawl responsibly by identifying yourself (and your website) on the user-agent
#USER_AGENT = 'fbsPro (+http://www.yourdomain.com)'
USER_AGENT = 'Mozilla/5.0 (Windows NT 10.0; Win64; x64) AppleWebKit/537.36 (KHTML, like Gecko) Chrome/78.0.3904.97 Safari/537.36'

# Obey robots.txt rules
ROBOTSTXT_OBEY = False

# Configure maximum concurrent requests performed by Scrapy (default: 16)
CONCURRENT_REQUESTS = 2

# Configure a delay for requests for the same website (default: 0)
# See https://docs.scrapy.org/en/latest/topics/settings.html#download-delay
# See also autothrottle settings and docs
#DOWNLOAD_DELAY = 3
# The download delay setting will honor only one of:
#CONCURRENT_REQUESTS_PER_DOMAIN = 16
#CONCURRENT_REQUESTS_PER_IP = 16

# Disable cookies (enabled by default)
#COOKIES_ENABLED = False

# Disable Telnet Console (enabled by default)
#TELNETCONSOLE_ENABLED = False

# Override the default request headers:
#DEFAULT_REQUEST_HEADERS = {
#   'Accept': 'text/html,application/xhtml+xml,application/xml;q=0.9,*/*;q=0.8',
#   'Accept-Language': 'en',
#}

# Enable or disable spider middlewares
# See https://docs.scrapy.org/en/latest/topics/spider-middleware.html
#SPIDER_MIDDLEWARES = {
#    'fbsPro.middlewares.FbsproSpiderMiddleware': 543,
#}

# Enable or disable downloader middlewares
# See https://docs.scrapy.org/en/latest/topics/downloader-middleware.html
#DOWNLOADER_MIDDLEWARES = {
#    'fbsPro.middlewares.FbsproDownloaderMiddleware': 543,
#}

# Enable or disable extensions
# See https://docs.scrapy.org/en/latest/topics/extensions.html
#EXTENSIONS = {
#    'scrapy.extensions.telnet.TelnetConsole': None,
#}

# Configure item pipelines
# See https://docs.scrapy.org/en/latest/topics/item-pipeline.html
#ITEM_PIPELINES = {
#    'fbsPro.pipelines.FbsproPipeline': 300,
#}

# Enable and configure the AutoThrottle extension (disabled by default)
# See https://docs.scrapy.org/en/latest/topics/autothrottle.html
#AUTOTHROTTLE_ENABLED = True
# The initial download delay
#AUTOTHROTTLE_START_DELAY = 5
# The maximum download delay to be set in case of high latencies
#AUTOTHROTTLE_MAX_DELAY = 60
# The average number of requests Scrapy should be sending in parallel to
# each remote server
#AUTOTHROTTLE_TARGET_CONCURRENCY = 1.0
# Enable showing throttling stats for every response received:
#AUTOTHROTTLE_DEBUG = False

# Enable and configure HTTP caching (disabled by default)
# See https://docs.scrapy.org/en/latest/topics/downloader-middleware.html#httpcache-middleware-settings
#HTTPCACHE_ENABLED = True
#HTTPCACHE_EXPIRATION_SECS = 0
#HTTPCACHE_DIR = 'httpcache'
#HTTPCACHE_IGNORE_HTTP_CODES = []
#HTTPCACHE_STORAGE = 'scrapy.extensions.httpcache.FilesystemCacheStorage'

#指定管道
ITEM_PIPELINES = {
    'scrapy_redis.pipelines.RedisPipeline': 400
}
#指定调度器
# 增加了一个去重容器类的配置, 作用使用Redis的set集合来存储请求的指纹数据, 从而实现请求去重的持久化
DUPEFILTER_CLASS = "scrapy_redis.dupefilter.RFPDupeFilter"
# 使用scrapy-redis组件自己的调度器
SCHEDULER = "scrapy_redis.scheduler.Scheduler"
# 配置调度器是否要持久化, 也就是当爬虫结束了, 要不要清空Redis中请求队列和去重指纹的set。如果是True, 就表示要持久化存储, 就不清空数据, 否则清空数据
SCHEDULER_PERSIST = True

#指定redis
REDIS_HOST = '192.168.16.119'
REDIS_PORT = 6379
item.py
import scrapy

class FbsproItem(scrapy.Item):
    # define the fields for your item here like:
    title = scrapy.Field()
    status = scrapy.Field()