首先了解一个方法:
使用docker exec进入Docker容器
docker在1.3.X版本之后还提供了一个新的命令exec用于进入容器,这种方式相对更简单一些,下面我们来看一下该命令的使用:
sudo docker exec --help

接下来我们使用该命令进入一个已经在运行的容器
$ sudo docker ps
$ sudo docker exec -it 775c7c9ee1e1 /bin/bash
一. 配置nginx
查找 Docker Hub 上的 nginx 镜像
runoob@runoob:~/nginx$ docker search nginx
NAME                      DESCRIPTION                                     STARS     OFFICIAL   AUTOMATED
nginx                     Official build of Nginx.                        3260      [OK]
jwilder/nginx-proxy       Automated Nginx reverse proxy for docker c...   674                  [OK]
richarvey/nginx-php-fpm   Container running Nginx + PHP-FPM capable ...   207                  [OK]
million12/nginx-php       Nginx + PHP-FPM 5.5, 5.6, 7.0 (NG), CentOS...   67                   [OK]
maxexcloo/nginx-php       Docker framework container with Nginx and ...   57                   [OK]
webdevops/php-nginx       Nginx with PHP-FPM                              39                   [OK]
h3nrik/nginx-ldap         NGINX web server with LDAP/AD, SSL and pro...   27                   [OK]
bitnami/nginx             Bitnami nginx Docker Image                      19                   [OK]
maxexcloo/nginx           Docker framework container with Nginx inst...   7                    [OK]
...
这里我们拉取官方的镜像
runoob@runoob:~/nginx$ docker pull nginx
等待下载完成后,我们就可以在本地镜像列表里查到 REPOSITORY 为 nginx 的镜像。
runoob@runoob:~/nginx$ docker images nginx
REPOSITORY          TAG                 IMAGE ID            CREATED             SIZE
nginx               latest              555bbd91e13c        3 days ago          182.8 MB

创建并运行容器:
docker run --name mynginx -p 80:80 -v /var/www:/var/www -v /usr/local/nginx/conf/conf.d:/etc/nginx/conf.d -d nginx
注意:
-v 添加文件映射关系,这样在宿主机上更改的文件可以直接映射到容器中。这里的目录根据自己实际情况进行映射。
创建并运行容器后,docker内的nginx即启动成功,无需进入docker内部再次启动nginx, 否则会提示80等端口被占用,因为nginx已经启动。
这时候便可以访问nginx配置的域名验证了。
我这里映射的conf.d主要包含nginx的配置文件,php的配置信息为:
# php
server {
    charset utf-8;
    client_max_body_size 128M;

    listen 80; ## listen for ipv4
    #listen [::]:80 default_server ipv6only=on; ## listen for ipv6

    server_name www.baidu.com;
    root        /var/www;
    index       index.php;

    location / {
        #-e表示只要filename存在,则为真
        if (!-e $request_filename){
            rewrite  ^(.*)$  /index.php?s=$1  last;
            break;
        }
        # Redirect everything that isn't a real file to index.php
        try_files $uri $uri/ /index.php$is_args$args;
    }

    # uncomment to avoid processing of calls to non-existing static files by Yii
    #location ~ .(js|css|png|jpg|gif|swf|ico|pdf|mov|fla|zip|rar)$ {
    #    try_files $uri =404;
    #}
    #error_page 404 /404.html;

    # deny accessing php files for the /assets directory
    location ~ ^/assets/.*.php$ {
        deny all;
    }

    location ~ .php$ {
        include fastcgi_params;
        fastcgi_param SCRIPT_FILENAME $document_root$fastcgi_script_name;
        fastcgi_pass 172.17.0.3:9000;
        #fastcgi_pass unix:/var/run/php5-fpm.sock;
        try_files $uri =404;
    }

    location ~* /. {
        deny all;
    }
}
注意最后面的fastcgi_pass的ip地址,在php配置常见问题有详细介绍。
二. php配置
查找Docker Hub上的php镜像
runoob@runoob:~/php-fpm$ docker search php
NAME                      DESCRIPTION                                     STARS     OFFICIAL   AUTOMATED
php                       While designed for web development, the PH...   1232      [OK]
richarvey/nginx-php-fpm   Container running Nginx + PHP-FPM capable ...   207                  [OK]
phpmyadmin/phpmyadmin     A web interface for MySQL and MariaDB.          123                  [OK]
eboraas/apache-php        PHP5 on Apache (with SSL support), built o...   69                   [OK]
php-zendserver            Zend Server - the integrated PHP applicati...   69        [OK]
million12/nginx-php       Nginx + PHP-FPM 5.5, 5.6, 7.0 (NG), CentOS...   67                   [OK]
webdevops/php-nginx       Nginx with PHP-FPM                              39                   [OK]
webdevops/php-apache      Apache with PHP-FPM (based on webdevops/php)    14                   [OK]
phpunit/phpunit           PHPUnit is a programmer-oriented testing f...   14                   [OK]
tetraweb/php              PHP 5.3, 5.4, 5.5, 5.6, 7.0 for CI and run...   12                   [OK]
webdevops/php             PHP (FPM and CLI) service container             10                   [OK]
...
这里我们拉取官方的镜像,标签为5.6-fpm
runoob@runoob:~/php-fpm$ docker pull php:5.6-fpm
等待下载完成后,我们就可以在本地镜像列表里查到REPOSITORY为php,标签为5.6-fpm的镜像。
runoob@runoob:~/php-fpm$ docker images
REPOSITORY          TAG                 IMAGE ID            CREATED             SIZE
php                 5.6-fpm             025041cd3aa5        6 days ago          456.3 MB
创建并运行php容器:
docker run -p 9000:9000 --name phpfpm -v /var/www:/var/www -d php:5.6-fpm
注意这里一定要创建文件映射,或者php容器内有对应的php代码。上一步nginx的文件映射,在这里是找不到的。所以如果没有文件映射,127.0.0.1:9000 在此容器内就找不到文件 。
常见问题:
启动php容器后,如果访问nginx为:502 Bad Gateway
尝试以下方法:
查看php镜像的ip地址
docker inspect --format='{{.NetworkSettings.IPAddress}}' phpfpm
如:192.168.4.202
那么修改nginx的conf配置文件,使fastcgi_pass的值为 192.168.4.202:9000
vim /docker/nginx/conf.d/default.conf
fastcgi_pass 192.168.4.202:9000;
重启nginx容器后,就可以正常访问。
三. mysql配置
查找Docker Hub上的mysql镜像
runoob@runoob:/mysql$ docker search mysql
NAME                     DESCRIPTION                                     STARS     OFFICIAL   AUTOMATED
mysql                    MySQL is a widely used, open-source relati...   2529      [OK]
mysql/mysql-server       Optimized MySQL Server Docker images. Crea...   161                  [OK]
centurylink/mysql        Image containing mysql. Optimized to be li...   45                   [OK]
sameersbn/mysql                                                          36                   [OK]
google/mysql             MySQL server for Google Compute Engine          16                   [OK]
appcontainers/mysql      Centos/Debian Based Customizable MySQL Con...   8                    [OK]
marvambass/mysql         MySQL Server based on Ubuntu 14.04              6                    [OK]
drupaldocker/mysql       MySQL for Drupal                                2                    [OK]
azukiapp/mysql           Docker image to run MySQL by Azuki - http:...   2                    [OK]
...
这里我们拉取官方的镜像,标签为5.6
runoob@runoob:~/mysql$ docker pull mysql:5.6
等待下载完成后,我们就可以在本地镜像列表里查到REPOSITORY为mysql,标签为5.6的镜像。
runoob@runoob:~/mysql$ docker images |grep mysql
mysql               5.6                 2c0964ec182a        3 weeks ago         329 MB
创建并运行MySQL容器:
docker run -p 3306:3306 --name mysql -v /usr/local/mysql:/etc/mysql/sqlinit -e MYSQL_ROOT_PASSWORD=123456 -d mysql:5.6
这里的文件映射主要目的是把宿主机的sql数据库数据文件映射到docker mysql容器,方便导入,注意这里mysql容器的目录不能是已有的目录,否则会覆盖。
注意:
这里创建容易已经有了my.cnf,无需自己添加。
拓展
使用外部工具navicat连接docker 内mysql
mysql的host 填写docker内的IP,获取方式为:
1 docker inspect --format='{{.NetworkSettings.IPAddress}}' mysql
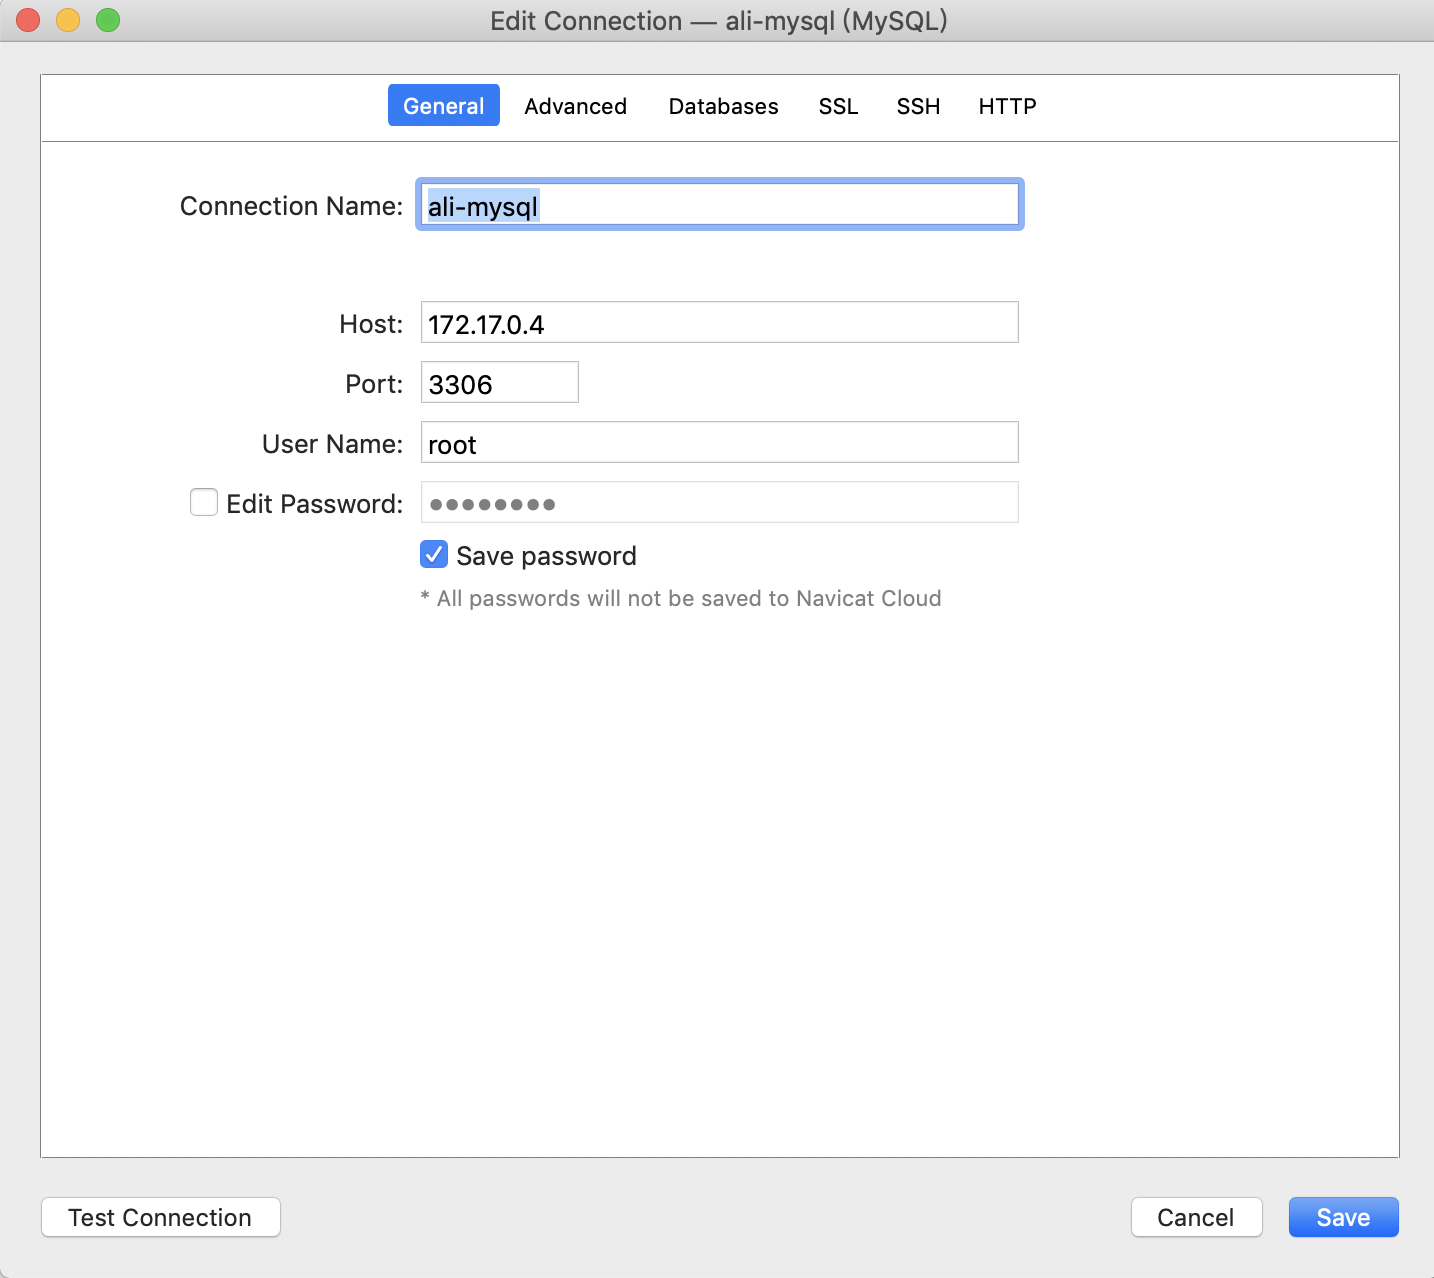
填写ssh连接信息:
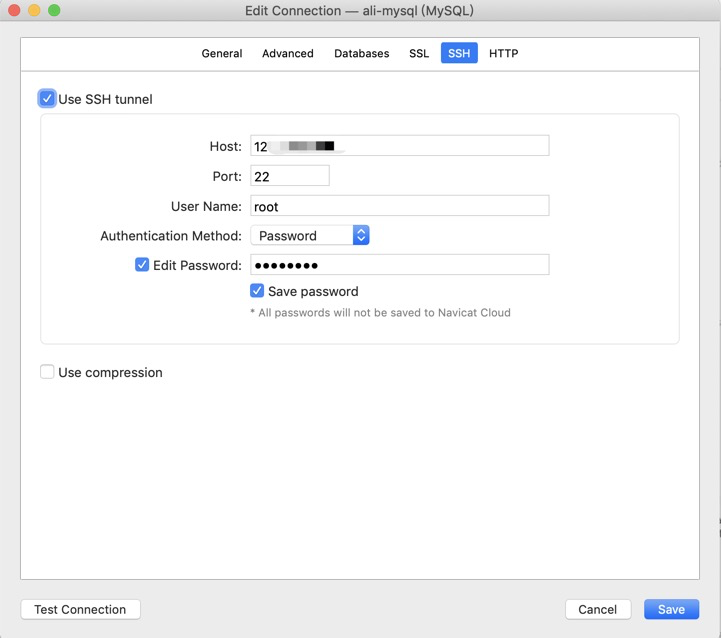
即可连接成功!
注意:
docker的容器启动顺序问题会导致容器的IP地址不一致,如果在连接数据库和fastcgi处有用到容器的IP,要注意容器的启动顺序。
重启容器:docker restart 容器名/容器ID
关闭容器:docker stop xxx
开启容器:docker start xxx
查看正在运行的容器:docker ps
查看所有容器(包括未运行的容器): docker ps -a
创建并运行容器: docker run
---------------------------------------
常见报错:
1. thinkphp报错 Undefined class constant 'MYSQL_ATTR_INIT_COMMAND'
缺少pdo_mysql扩展,链接数据库失败
找到php.ini,docker中在/usr/local/etc/php中,复制一份php.ini,增加 extension=pdo_mysql.so ,重启phpfpm。
如果还不行,访问phpinfo页面,查看是否有pdo_mysql
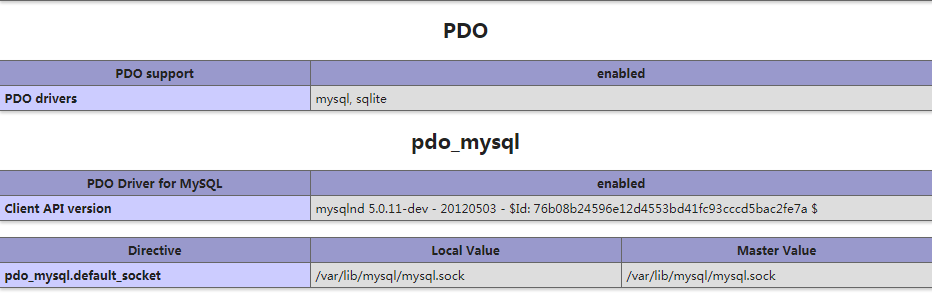
如果没有,说名扩展不存在,需要编译。
编译方法如下:
可以通过两种方式实现
方式一(未验证):
pecl pdo_msql
方式二(已验证可行):
到docker的php容器中,在php文件夹下:
docker-php-ext-install pdo pdo_mysql
如果报 /usr/local/bin/docker-php-ext-enable: cannot create /usr/local/etc/php/conf.d/docker-php-ext-pdo_mysql.ini: Directory nonexistent
解决方案:
直接在/usr/local/etc/php目录下面新建 conf.d目录和对应的docker-php-ext-pdo_msql.ini文件
其中docker-php-ext-pdo_msql.ini的内容为:
extension=pdo_mysql.so
2. thinkphp 报错 _STORAGE_WRITE_ERROR_:./Application/Runtime/Cache/Home/4e64ea6a2012f26b832b14cbc2152b28.php
是因为服务器缓存文件夹的操作权限不够,即Runtime没有权限,把缓存文件全部删除,再给Runtime777权限就行了
sudo chmod 777 Runtime 或者直接对代码库最外层设置777权限
3. thinkphp验证码图片显示不出来

缺少gd扩展,安装:
docker-php-ext-install gd
可能以下报错:
If configure fails try --with-webp-dir=<DIR>
If configure fails try --with-jpeg-dir=<DIR>
configure: error: png.h not found.
安装:
apt-get install libpng-dev libjpeg-dev
再次执行:
// 增加freetype配置
docker-php-ext-configure gd --enable-gd-native-ttf --with-freetype-dir=/usr/include/freetype2 --with-png-dir=/usr/include --with-jpeg-dir=/usr/include

// 安装
docker-php-ext-install gd
php.ini增加php_gd2.so
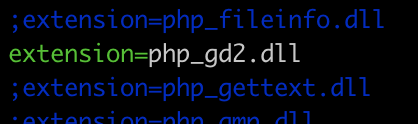
phpinfo中显示gd库
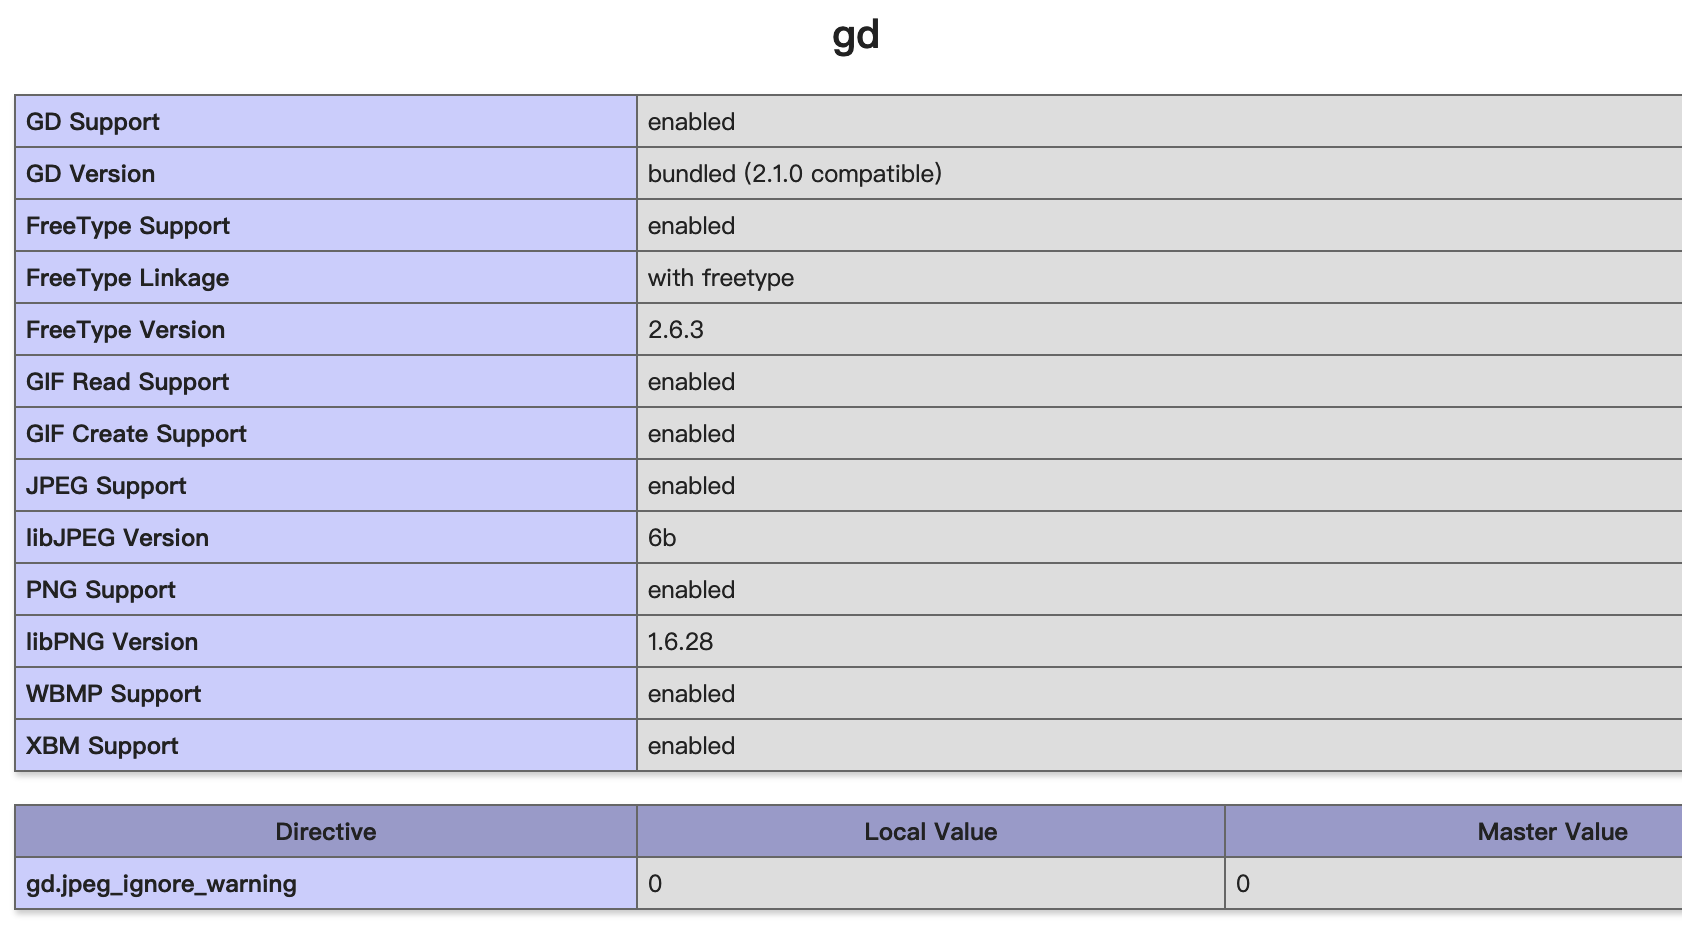
注意如果phpinfo的gd库中没有freetype的支持,验证码依然显示不出来, 会报错:
Call to undefined function Thinkimagettftext()
如果gd库中没有freeType,则按照以下步骤进行:
docker-php-ext-configure gd --enable-gd-native-ttf --with-freetype-dir=/usr/include/freetype2 --with-png-dir=/usr/include

重新编译:
docker-php-ext-install gd
如果报错:
configure: error: freetype-config not found.
运行: apt-get -y install libfreetype6-dev ,然后再继续运行上面的命令。
gd库中有了freetype,则验证码显示正常了:
