view组--ViewGroup(组视图)
ViewGroup的作用:在view中添加子控件。ViewGroup的5个子类,就是五大布局:
(1) LinearLayout 线性布局(常用)
(2) RelativeLayout 相对布局(常用)
(3) FrameLayout 帧布局
(4) AbsoluteLayout 绝对布局
(5) TableLayout 表格布局
1 LinearLayout 线性布局:在该布局下包含的子布局列表为 横向 或 纵向 排布
1.1 LinearLayout 默认是横向布局,即:从左到右 布局控件
指定布局方向: android:orientation=“ ”
 1 <!-- 指定布局方向的属  性:orientation,
 2                  属性值:horizontal(横向)
 3                         vertical(纵向)
 4  -->
 5
 6 <!--横向布局-->
 7 <LinearLayout xmlns:android="http://schemas.android.com/apk/res/android"
 8     android:layout_width="match_parent"
 9     android:layout_height="match_parent"
10     android:orientation="horizontal" >
11
12 <!--纵向布局-->
13 <LinearLayout xmlns:android="http://schemas.android.com/apk/res/android"
14     android:layout_width="match_parent"
15     android:layout_height="match_parent"
16     android:orientation="vertical" >
1.2 权重(只有在子控件中才有的属性)
android:layout_weight=" "
例1:没添加权重属性之前:
 1 <?xml version="1.0" encoding="utf-8"?>
 2
 3 <!-- 指定布局方向的属相为:orientation,属性值:horizontal(横向)或vertical(纵向) -->
 4 <LinearLayout xmlns:android="http://schemas.android.com/apk/res/android"
 5     android:layout_width="match_parent"
 6     android:layout_height="match_parent"
 7     android:orientation="horizontal" >
 8
 9     <TextView
10         android:id="@+id/textView1"
11         android:layout_width="wrap_content"
12         android:layout_height="wrap_content"
13         android:text="TextView" />
14
15     <TextView
16         android:id="@+id/textView2"
17         android:layout_width="wrap_content"
18         android:layout_height="wrap_content"
19         android:text="TextView" />
20
21     <TextView
22         android:id="@+id/textView3"
23         android:layout_width="wrap_content"
24         android:layout_height="wrap_content"
25         android:text="TextView" />
26
27 </LinearLayout>

添加权重属性 android:layout_weight=" " 之后
 1 <?xml version="1.0" encoding="utf-8"?>
 2
 3 <!-- 指定布局方向的属相为:orientation,属性值:horizontal(横向)或vertical(纵向) -->
 4 <LinearLayout xmlns:android="http://schemas.android.com/apk/res/android"
 5     android:layout_width="match_parent"
 6     android:layout_height="match_parent"
 7     android:orientation="horizontal" >
 8
 9     <TextView
10         android:id="@+id/textView1"
11         android:layout_width="wrap_content"
12         android:layout_height="wrap_content"
13         android:layout_weight="1"
14         android:text="TextView" />
15
16     <TextView
17         android:id="@+id/textView2"
18         android:layout_width="wrap_content"
19         android:layout_height="wrap_content"
20         android:layout_weight="1"
21         android:text="TextView" />
22
23     <TextView
24         android:id="@+id/textView3"
25         android:layout_width="wrap_content"
26         android:layout_height="wrap_content"
27         android:layout_weight="1"
28         android:text="TextView" />
29
30 </LinearLayout>
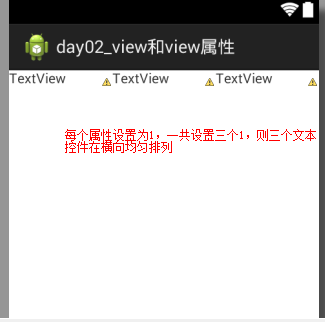
纵向布局同理。
例2:实现下面布局
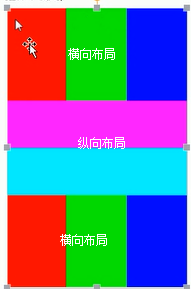
颜色值忽略


 1 <?xml version="1.0" encoding="utf-8"?>
 2 <LinearLayout xmlns:android="http://schemas.android.com/apk/res/android"
 3     android:layout_width="match_parent"
 4     android:layout_height="match_parent"
 5     android:orientation="vertical" >
 6     <LinearLayout
 7         android:layout_width="match_parent"
 8         android:layout_height="0dp"
 9         android:layout_weight="1"
10         android:background="#F00">
11
12         <View
13             android:layout_width="0dp"
14             android:layout_height="match_parent"
15             android:layout_weight="1"
16             android:background="#F00"
17             />
18         <View
19             android:layout_width="0dp"
20             android:layout_height="match_parent"
21             android:layout_weight="1"
22             android:background="#0F0"
23             />
24         <View
25             android:layout_width="0dp"
26             android:layout_height="match_parent"
27             android:layout_weight="1"
28             android:background="#00F"
29             />
30     </LinearLayout>
31     <LinearLayout
32         android:layout_width="match_parent"
33         android:layout_height="0dp"
34         android:layout_weight="1"
35         android:orientation="vertical"  >
36         <View
37             android:layout_width="match_parent"
38             android:layout_height="0dp"
39             android:layout_weight="1"
40             android:background="#F00"
41             />
42         <View
43             android:layout_width="match_parent"
44             android:layout_height="0dp"
45             android:layout_weight="1"
46             android:background="#0F0"
47             />
48     </LinearLayout>
49     <LinearLayout
50         android:layout_width="match_parent"
51         android:layout_height="0dp"
52         android:layout_weight="1"
53         android:background="#00F">
54         <View
55             android:layout_width="0dp"
56             android:layout_height="match_parent"
57             android:layout_weight="1"
58             android:background="#F00"
59             />
60         <View
61             android:layout_width="0dp"
62             android:layout_height="match_parent"
63             android:layout_weight="1"
64             android:background="#0F0"
65             />
66         <View
67             android:layout_width="0dp"
68             android:layout_height="match_parent"
69             android:layout_weight="1"
70             android:background="#00F"
71             />
72         </LinearLayout>
73
74 </LinearLayout>
2 RelativeLayout 相对布局:
2.1相对父控件布局
(1) android:layout_centerHorizontal 横向居中
(2) android:layout_centerVertical 纵向居中
(3) android:layout_centerInParent 横向纵向居中
跟父控件最左边/最右边/顶部/底部对齐
(1) android:layout_alignParentLeft
(2) android:layout_alignParentRight
(3) android:layout_alignParentTop
(4) android:layout_alignParentBottom
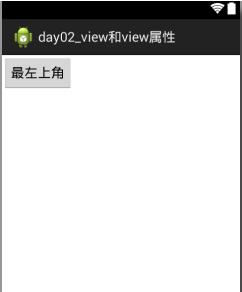
2.1.1位置默认在左上角
 1 <?xml version="1.0" encoding="utf-8"?>
 2 <RelativeLayout xmlns:android="http://schemas.android.com/apk/res/android"
 3     android:layout_width="match_parent"
 4     android:layout_height="match_parent" >
 5      <!--如果没有位置属性,按钮在左上角  -->
 6
 7     <Button
 8         android:id="@+id/button1"
 9         android:layout_width="wrap_content"
10         android:layout_height="wrap_content"
11         android:text="最左上角" />
12 </RelativeLayout>
2.1.2属性:android:layout_centerHorizontal="true" 横向中间
android:layout_centerVertical="true" 纵向中间
 1 <?xml version="1.0" encoding="utf-8"?>
 2 <RelativeLayout xmlns:android="http://schemas.android.com/apk/res/android"
 3     android:layout_width="match_parent"
 4     android:layout_height="match_parent" >
 5
 6   <Button
 7         android:id="@+id/button1"
 8         android:layout_width="wrap_content"
 9         android:layout_height="wrap_content"
10         android:layout_centerHorizontal="true"
11         android:layout_centerVertical="true"
12         android:text="两种属性定位到中间" />
13
14 </RelativeLayout>

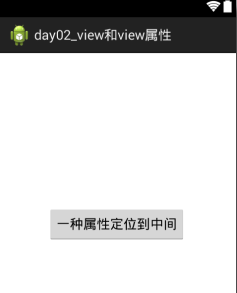
2.1.3属性:android:layout_centerInParent="true" 父窗体中间
 1 <?xml version="1.0" encoding="utf-8"?>
 2 <RelativeLayout xmlns:android="http://schemas.android.com/apk/res/android"
 3     android:layout_width="match_parent"
 4     android:layout_height="match_parent" >
 5     <Button
 6         android:id="@+id/button1"
 7         android:layout_width="wrap_content"
 8         android:layout_height="wrap_content"
 9         android:layout_centerInParent="true"
10         android:text="一种属性定位到中间" />
11 </RelativeLayout>
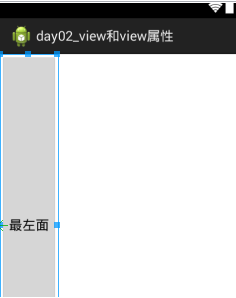
2.1.4属性:android:layout_alignParentLeft="true" 对齐到父窗口的左面,其中align是“对齐”的意思
 1 <?xml version="1.0" encoding="utf-8"?>
 2 <RelativeLayout xmlns:android="http://schemas.android.com/apk/res/android"
 3     android:layout_width="match_parent"
 4     android:layout_height="match_parent" >
 5     <Button
 6         android:layout_width="wrap_content"
 7         android:layout_height="match_parent"
 8         android:layout_alignParentLeft="true"
 9         android:text="最左面" />
10
11 </RelativeLayout>
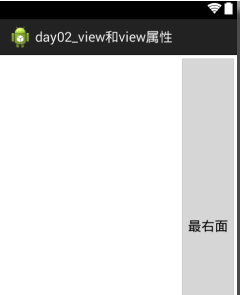
2.1.5属性:android:layout_alignParentRight="true" 对齐到父窗口的右面,其中align是“对齐”的意思
 1  1 <?xml version="1.0" encoding="utf-8"?>
 2  2 <RelativeLayout xmlns:android="http://schemas.android.com/apk/res/android"
 3  3     android:layout_width="match_parent"
 4  4     android:layout_height="match_parent" >
 5  5     <Button
 6  6         android:layout_width="wrap_content"
 7  7         android:layout_height="match_parent"
 8  8         android:layout_alignParentRight ="true"
 9  9         android:text="最右面" />
10 10
11 11 </RelativeLayout>
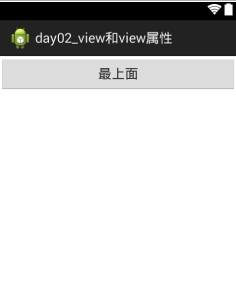
2.1.6属性:android:layout_alignParentTop="true" 对齐到父窗口的右面,其中align是“对齐”的意思
 1 <?xml version="1.0" encoding="utf-8"?>
 2  <RelativeLayout xmlns:android="http://schemas.android.com/apk/res/android"
 3     android:layout_width="match_parent"
 4     android:layout_height="match_parent" >
 5     <Button
 6         android:layout_width="match_parent"
 7         android:layout_height="wrap_content"
 8         android:layout_alignParentTop="true"
 9         android:text="最上面" />
10 </RelativeLayout>
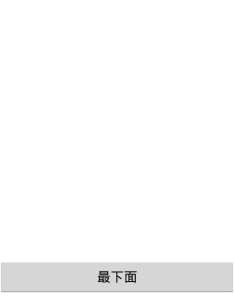
2.1.7属性:android:layout_alignParentBottom="true" 对齐到父窗口的右面,其中align是“对齐”的意思
 1 <?xml version="1.0" encoding="utf-8"?>
 2  <RelativeLayout xmlns:android="http://schemas.android.com/apk/res/android"
 3     android:layout_width="match_parent"
 4     android:layout_height="match_parent" >
 5     <Button
 6         android:layout_width="match_parent"
 7         android:layout_height="wrap_content"
 8         android:layout_alignParentBottom="true"
 9         android:text="最下面" />
10
11 </RelativeLayout>
2.2相对于同等级的控件进行布局
针对已存在的兄弟控件(在某个控件的左边/右边/上面/下面)
(1)android:layout_toLeftOf
(2)android:layout_toRightOf
(3)android:layout_above
(4)android:layout_below
相对于兄弟控件的边对齐
(1)android:layout_alignTop
(2)android:layout_alignBottom
(3) android:layout_alignLeft
(4)android:layout_alignRight
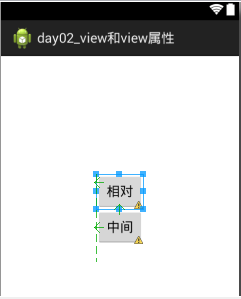
上述属性的值为@id/相对控件的id。如:android:layout_above="@id/center_btn"
 1 <?xml version="1.0" encoding="utf-8"?>
 2  <RelativeLayout xmlns:android="http://schemas.android.com/apk/res/android"
 3     android:layout_width="match_parent"
 4     android:layout_height="match_parent" >
 5 <Button
 6     android:id="@+id/center_btn"
 7     android:layout_width="wrap_content"
 8     android:layout_height="wrap_content"
 9     android:layout_centerInParent="true"
10     android:text="中间"/>
11 <Button
12     android:layout_width="wrap_content"
13     android:layout_height="wrap_content"
14     android:layout_above="@id/center_btn"
15     android:layout_alignLeft="@id/center_btn"
16     android:text="相对"/>
17     />
18
19 </RelativeLayout>
3 FrameLayout 帧布局:越写在后面的控件,越展示最前面(最上层)
4 AbsoluteLayout 绝对布局:

5 TableLayout 表格布局:就是一个表格(应用场景:银行表格)
<TableLayout><TableLayout/>表格标签
<TableRow><TableRow/> 行标签

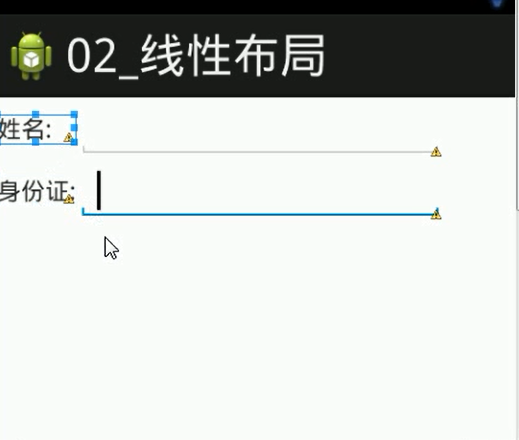
上面代码只给出了身份证那一行的代码