如何设置 QEMU 输出到控制台并使用 Shell 脚本自动化
原文:How to Setup QEMU Output to Console and Automate Using Shell Script
Preface
While struggling to automate QEMU guest (communicate and control with the shell scripts), I faced with a lot of incomplete, partially working solutions around the internet. Now I've got a pretty decent collection of working recipes to tune up a QEMU guest, so I decided to organize all that stuff here, and it could be definitely useful for anyone else. Each scenario has been tested on the binaries, links on which I put below in the annex: Binaries used in examples, so you could check it out on your own.
Contents
- Input/output to the host terminal
- Early boot messages in the host terminal
- Input/output through a
named pipe(file) - Automate QEMU guest using
expecttool - Automate QEMU guest using
ssh - Binaries used in examples
1. Input/output to the host terminal
-serial stdio
qemu-system-x86_64 -serial stdio wheezy.qcow2
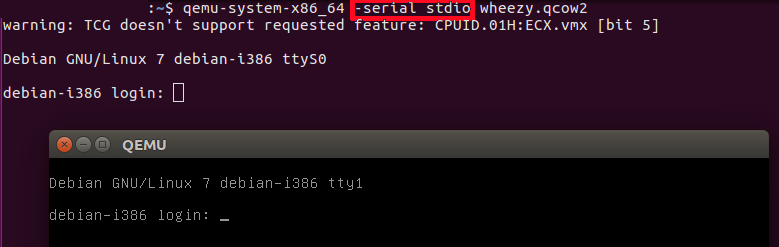
-serial stdio redirects the virtual serial port to the host's terminal input/output. You will see a welcome string after a successful boot.
-nographic
qemu-system-x86_64 -nographic wheezy.qcow2
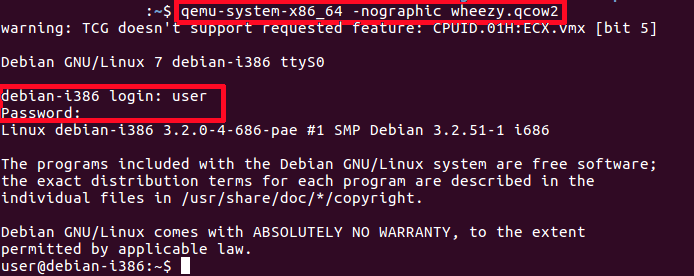
-nographic does the same as "-serial stdio" and also hides a QEMU's graphical window.
Cautions:
-
You will not see any early boot logs in the host's console. To get them, see Early boot messages in the host terminal below.
-
To exit the guest system without GUI, using stdio redirected to the terminal, login as a root (user:
root
, password:
root
) and shutdown the system (wait after that for a while):
# Guest
shutdown -h now
2. Early boot messages in the host terminal
console=ttyS0
If you want to see early boot logs, you should pass console=ttyS0 parameter to a Linux kernel command line:
qemu-system-x86_64 -nographic -kernel vmlinuz -hda wheezy.img -append "root=/dev/sda console=ttyS0"
or
qemu-system-x86_64 -serial stdio -kernel vmlinuz -hda wheezy.img -append "root=/dev/sda console=ttyS0"
or
qemu-system-x86_64 -serial stdio wheezy.qcow2
 # 1. Wait for a GRUB menu to show.
 # 2. Press `e`.
 # 3. Find the line starting with "linux".
 # 4. Add "console=ttyS0".
*qemu-system-x86_64 -serial stdio -kernel vmlinuz -hda wheezy.img -append "root=/dev/sda console=ttyS0"*:
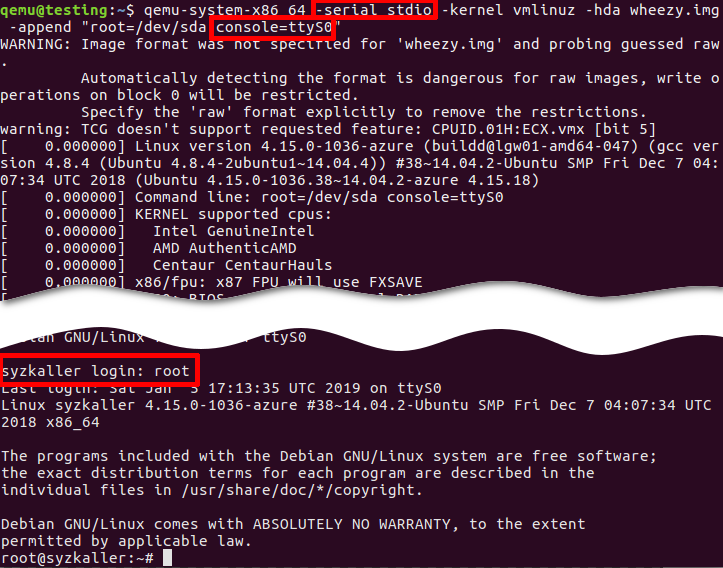
- -serial stdio or -nographic redirects input/output to the current terminal.
- -append "root=/dev/sda console=ttyS0":
console=ttyS0forces the guest kernel to send output to the first UART serial port ttyS0, which is redirected to the host by the-serial stdiooption, androot=/dev/sdapoints the kernel to use a /dev/sda device to load the wheezy.img.
Other options:
- -kernel vmlinuz loads the kernel from the local "./vmlinuz" file.
- -hda wheezy.img is a raw image which is suitable for booting with vmlinuz binary (wheezy.qcow2 won't be recognized in the block device).
3. Input/output through a named pipe (file)
Create a named pipe
mkfifo /tmp/guest.in /tmp/guest.out
Start QEMU
qemu-system-x86_64 -serial pipe:/tmp/guest -kernel vmlinuz -hda wheezy.img -append "root=/dev/sda console=ttyS0"
-serial pipe:/tmp/guest redirects a guest's output to a /tmp/guest.out and allows to send input from host to guest via /tmp/guest.in.
Take an output from the guest
cat /tmp/guest.out
Send a command to the guest
When login screen appears, send a login string:
printf "root
" > /tmp/guest.in
Wait until some string
Wait until SSH Daemon starts.
while read line; do
  echo "${line}"
  if [[ ${line} == *"Secure Shell server: sshd"* ]]; then
    break;
  fi
done < /tmp/quest.out
4. Automate QEMU guest using expect tool
Install "expect" tool
sudo apt install expect
Create an expect script
example.exp:
#!/usr/bin/expect -f

# Wait enough (forever) until a long-time boot
set timeout -1

# Start the guest VM
spawn qemu-system-x86_64 -serial stdio wheezy.qcow2

expect "login: "
send "root
"

expect "Password: "
send "root
"

expect "# "
send "shutdown -h now"
Original script is found there: https://stacoverflow.com/questions/314613/qemu-guest-automation, but be careful, symbol of quotes “ (which is not a ") in the original stackoverflow answer cannot be recognized by the expect utility (send "root
").
Execute "expect" script
chmod +x example.exp
./example.exp
5. Automate QEMU guest using ssh
Set up port forwarding
qemu-system-x86_64 -netdev user,id=net0,hostfwd=tcp::10022-:22 -device e1000,netdev=net0 wheezy.qcow2
Connect via ssh
ssh root@localhost -p 10022 'uptime; ls; echo Test;'
-
To apply server's public key automatically use
-o "StrictHostKeyChecking no":
ssh root@localhost -p 10022 -o "StrictHostKeyChecking no" 'uptime; ls; echo Test;'
Troubleshooting
-
QEMU guest has to be able to recognize a network card device (NIC, Network Interface Card):
-netdev user,id=net0 -device e1000,netdev=net0.
# Without port forwarding qemu-system-x86_64 -netdev user,id=net0 -device e1000,netdev=net0 wheezy.qcow2 -
Boot and check that the new interface has appeared on the guest system:
# Guest
ifconfig -a
Linux kernel on the guest must support a network card emulated by QEMU. In the opposite case the guest won't get a new Ethernet interface. After booting you should find "eth0" (running broadcast device, not loopback) on the guest. It depends solely on the guest Linux kernel and on the kernel modules.
-
Check the
10022port on the host:
# Host netstat -tanp | grep 10022 tcp 0 0 0.0.0.0:10022 0.0.0.0:* LISTEN 16589/qemu-system-x -
Check the
22port on the guest:
# Guest netstat -tanp | grep 22 tcp 0 0 0.0.0.0:22 0.0.0.0:* LISTEN 2430/sshd -
You can forward
telnet
port
23and verify the connection:
qemu-system-x86_64 -netdev user,id=net0,hostfwd=tcp::10023-:23 -device e1000,netdev=net0 wheezy.qcow2-
Guest (server):
# Guest nc -v -l -p 23 Listening on [0.0.0.0] (family 0, port 23) -
Host (client):
# Host
echo asdf | nc localhost 10023
-
Establish passwordless login via ssh
-
Generate host SSH keys:
# Host ssh-keygen -b 2048 -t rsa -q -N "" -f ./qemukey -
Set up a public key to the guest as a trusted (authorized) key.
-
Via
ssh-copy-id-
You need a root with password. You the guest root is passwordless, go to the guest system and set up the password:
# Guest sudo passwd -
Send the generated public key:
# Host ssh-copy-id -p 10022 -i ~/.ssh/qemukey root@localhost -
Reset the password in the guest system:
# Guest
sudo passwd -l root
-
-
Manually
-
Send a public key via
scp:
# Host scp -P 10022 ./qemukey.pub root@localhost:/root/.ssh/ -
Login to the guest and set up new authorized key:
# Guest cat /root/.ssh/qemukey.pub >> /root/.ssh/authorized_keys /etc/init.d/ssh restart -
Or mount device locally, put the public key to the .ssh directory, and concatenate to authorized_keys.
-
-
-
Fix the
/etc/ssh/sshd_configon the guest:
PasswordAuthentication no PermitRootLogin without-password -
Restart SSH daemon on the guest:
# Guest /etc/init.d/ssh restart -
Connect via ssh:
# Host
ssh root@localhost -p 10022 -i ./qemukey
Viola! You don't need the password and you can automate the remote QEMU guest.
Binaries used in the examples
-
- wheezy.qcow2 (i386)
- bootable Debian "Wheezy" image a QEMU copy-on-write format. Login/password: "root"/"root", and "user"/"user".
wget https://people.debian.org/~aurel32/qemu/i386/debian_wheezy_i386_standard.qcow2 -O wheezy.qcow2 -
- wheezy.img (i386)
- non-bootable Debian "Wheezy" image (without kernel) to use with own kernel (
-kernel vmlinuz
).
wget https://storage.googleapis.com/syzkaller/wheezy.img -
- vmlinuz (i386)
- compressed bootable Linux kernel. Options:
-
Build from the scratch: Build Android Kernel and Run on QEMU with Minimal Environment: Step by Step.
-
Download from Ubuntu repository (
WARNING!
Port forwarding will NOT work):
wget http://security.ubuntu.com/ubuntu/pool/main/l/linux-signed-azure/linux-image-4.15.0-1036-azure_4.15.0-1036.38~14.04.2_amd64.deb ar x linux-image-4.15.0-1036-azure_4.15.0-1036.38~14.04.2_amd64.deb tar xf data.tar.xz ./boot/vmlinuz-4.15.0-1036-azure cp ./boot/vmlinuz-4.15.0-1036-azure ./vmlinuz -
You can try your host's linux kernel passing one to the QEMU guest (
WARNING!
You could have problems either with port forwarding, or with a block device):
sudo cp /boot/vmlinuz-$(uname -r) ./
WARNING!
Ubuntu's
vmlinuz
doesn't contain drivers for QEMU emulated network card devices (NIC). Debian's
vmlinuz
doesn't have prebuilt drivers to load a raw image from
/dev/sda
device.