Linux驱动:输入子系统 分析
参考:
- https://www.cnblogs.com/lifexy/p/7542989.html
- https://blog.csdn.net/myselfzhangji/article/details/102313094
- https://www.cnblogs.com/linux-37ge/articles/10212377.html
- http://blog.chinaunix.net/uid-31087949-id-5788752.html
- https://www.jianshu.com/p/e9cfae59e3df
- https://www.cnblogs.com/lcw/p/3294356.html
- https://www.cnblogs.com/lknlfy/p/3275875.html
介绍
设计背景
以前我们写一些输入设备(键盘、鼠标等)的驱动都是采用字符设备、混杂设备处理的。问题由此而来,Linux开源社区的大神们看到了这大量输入设备如此分散不堪,实现了一种机制,可以对分散的、不同类别的输入设备进行统一的驱动,这也就是输入子系统。
Linux内核为了能够处理各种不同类型的输入设备,(比如 触摸屏 ,鼠标 , 键盘 , 操纵杆 ),设计并实现了为驱动层程序的实现提供统一接口函数;为上层应用提供试图统一的抽象层 , 即是Linux 输入子系统 。
例如,在终端系统中,我们不需要去管有多少个键盘,多少个鼠标。应用程序只要从输入子系统中去取对应的事件(按键,鼠标移位等)就可以了。而底层设备也不需要直接对接应用程序,只要处理并处理对应的事件即可。
引入输入子系统的好处:
- 统一了物理形态各异的相似的输入设备的处理功能。例如,各种鼠标,不论PS/2、USB、还是蓝牙,都被同样处理。
- 提供了用于分发输入报告给用户应用程序的简单的事件(event)接口。你的驱动不必创建、管理/dev节点以及相关的访问方法。因此它能够很方便的调用输入API以发送鼠标移动、键盘按键,或触摸事件给用户空间。X windows这样的应用程序能够无缝地运行于输入子系统提供的event接口之上。
- 抽取出了输入驱动的通用部分,简化了驱动,并提供了一致性。例如,输入子系统提供了一个底层驱动(成为serio)的集合,支持对串口和键盘控制器等硬件输入的访问。
一句话概括,输入子系统是所有I/O设备驱动与应用程序之间的中间层。
框架
linux输入子系统(linux input subsystem)由三层实现,分别为:
- 输入子系统 设备驱动层(Driver):
对于输入子系统设备驱动层而言,主要实现对硬件设备的读写访问,中断设置,并把硬件产生的事件转换为核心层定义的规范提交给事件处理层。
将底层的硬件输入转化为统一事件形式,向输入核心(Input Core)汇报。
- 输入子系统 核心层(Input Core):
对于核心层而言,为设备驱动层提供了规范和接口。设备驱动层只要关心如何驱动硬件并获得硬件数据(例如按下的按键数据),然后调用核心层提供的接口,核心层会自动把数据提交给事件处理层。
它承上启下:
- 为驱动层提供输入设备注册与操作接口,如:input_register_device;
- 通知事件处理层对事件进行处理;在/proc下产生相应的设备信息。
- 输入子系统 事件处理层(Event Handler)。
对于事件处理层而言,则是用户编程的接口(设备节点),并处理驱动层提交的数据处理。
主要是和用户空间交互(Linux中在用户空间将所有的设备都当作文件来处理,由于在一般的驱动程序中都有提供fops接口,以及在/dev下生成相应的设备文件nod,这些操作在输入子系统中由事件处理层完成)。
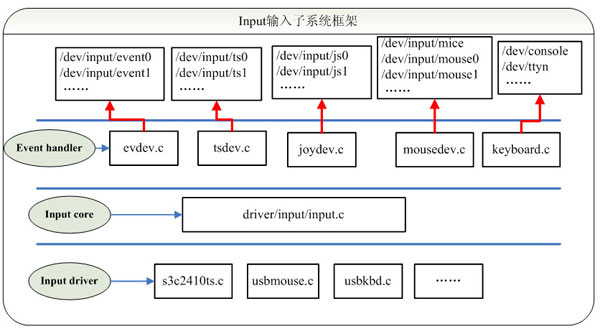
/dev/input/下显示的是已经注册在内核中的设备编程接口,用户通过open这些设备文件来打开不同的输入设备进行硬件操作。
事件处理层为不同硬件类型提供了用户访问及处理接口。例如当我们打开设备/dev/input/mice时,会调用到事件处理层的Mouse Handler来处理输入事件,这也使得设备驱动层无需关心设备文件的操作,因为Mouse Handler已经有了对应事件处理的方法。
输入子系统由内核代码drivers/input/input.c构成,它的存在屏蔽了用户到设备驱动的交互细节,为设备驱动层和事件处理层提供了相互通信的统一界面。
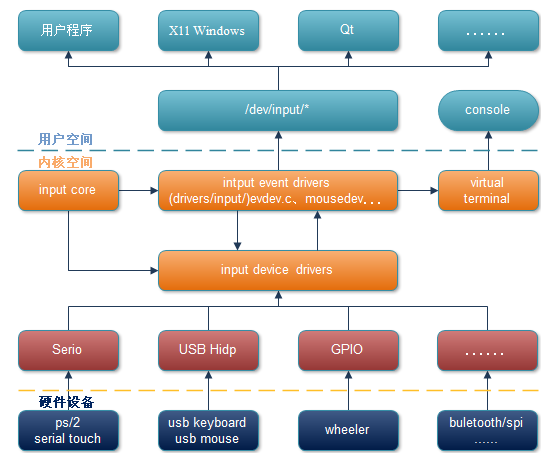
由上图可知输入子系统核心层提供的支持以及如何上报事件到input event drivers。
内核:v3.10
核心层Input Core
路径:deivers/input/input.c
核心层 实现了:
- 在入口函数中申请主设备号,注册进内核
- 提供
input_register_device用于注册device;input_register_handler函数注册handler处理器; - 提供
input_register_handle函数用于注册一个事件处理,代表一个成功配对的input_dev和input_handler;
入口函数
申请主设备号的事情就是input_init完成的;毕竟,输入子系统是作为一个驱动模块存在。
// include/uapi/linux/major.h:29:#define INPUT_MAJOR		13

static int __init input_init(void)
{
    int err;

    err = class_register(&input_class); //(1)注册类,放在/sys/class
    if (err) {
        pr_err("unable to register input_dev class
");
        return err;
    }

    err = input_proc_init(); //在/proc下面建立相关的文件
    if (err)
        goto fail1;

    err = register_chrdev_region(MKDEV(INPUT_MAJOR, 0),
                     INPUT_MAX_CHAR_DEVICES, "input"); // //(2)注册驱动,主设备号为13
    if (err) {
        pr_err("unable to register char major %d", INPUT_MAJOR);
        goto fail2;
    }

    return 0;

fail2: input_proc_exit();
fail1: class_unregister(&input_class);
    return err;
}

// ... ...

subsys_initcall(input_init);
module_exit(input_exit);
注册class
class_register时用到了这个类,最终会在/sys/class/input中出现。
struct class input_class = {
    .name       = "input",
    .devnode    = input_devnode,
};
至于input core只注册了一个类,而没有继续注册对应的设备;是因为:
核心层作为一个中转层存在,不涉及具体硬件设备的注册,倒是更符合他存在的逻辑。
设备的注册到底会在Input driver 还是Event hanlder呢?
注册proc
这里用到了proc注册的接口
static const struct file_operations input_handlers_fileops = {
    .owner      = THIS_MODULE,
    .open       = input_proc_handlers_open,
    .read       = seq_read,
    .llseek     = seq_lseek,
    .release    = seq_release,
};

static int __init input_proc_init(void)
{
    struct proc_dir_entry *entry;

    proc_bus_input_dir = proc_mkdir("bus/input", NULL);
    if (!proc_bus_input_dir)
        return -ENOMEM;

    entry = proc_create("devices", 0, proc_bus_input_dir,
                &input_devices_fileops);
    if (!entry)
        goto fail1;

    entry = proc_create("handlers", 0, proc_bus_input_dir,
                &input_handlers_fileops);
    if (!entry)
        goto fail2;

    return 0;

 fail2: remove_proc_entry("devices", proc_bus_input_dir);
 fail1: remove_proc_entry("bus/input", NULL);
    return -ENOMEM;
}
只是纯粹的打印信息,之前的一些操作已经没有在proc子系统中进行处理了。
接口函数
| 层 | 功能 | 接口 |
|---|---|---|
| 设备驱动层 | 向核心层注册一个输入设备input device | input_register_device |
| 事件处理层 | 注册一个输入事件处理器 input handler | input_register_handler |
| 事件处理层 | 向内核注册一个handle结构 | input_register_handle |
device与handler匹配
input core 层在中间,承上启下完成了 device 与 handler的匹配。
我们看看是怎么实现的。
驱动层注册device
input_dev对象
struct input_dev {

    void *private;          //输入设备私有指针,一般指向用于描述设备驱动层的设备结构
    const char *name;  // 提供给用户的输入设备的名称
    const char *phys;  // 提供给编程者的设备节点的名称  文件路径,比如 input/buttons
    const char *uniq;  // 指定唯一的ID号,就像MAC地址一样
    struct input_id id;//输入设备标识ID,用于和事件处理层进行匹配

    unsigned long evbit[NBITS(EV_MAX)];      //位图,记录设备支持的事件类型(可以多选)
    /*
         *  #define EV_SYN          0x00    //同步事件
         *  #define EV_KEY          0x01    //按键事件
         *  #define EV_REL          0x02    //相对坐标
         *  #define EV_ABS          0x03    //绝对坐标
         *  #define EV_MSC          0x04    //其它
         *  #define EV_SW           0x05    //开关事件
         *  #define EV_LED          0x11    //LED事件
         *  #define EV_SND          0x12
         *  #define EV_REP          0x14    //重复上报
         *  #define EV_FF           0x15
         *  #define EV_PWR          0x16
         *  #define EV_FF_STATUS    0x17
         *  #define EV_MAX          0x1f
         */

    unsigned long keybit[NBITS(KEY_MAX)];    //位图,记录设备支持的按键类型
    unsigned long relbit[NBITS(REL_MAX)];    //位图,记录设备支持的相对坐标
    unsigned long absbit[NBITS(ABS_MAX)];    //位图,记录设备支持的绝对坐标
    unsigned long mscbit[NBITS(MSC_MAX)];    //位图,记录设备支持的其他功能
    unsigned long ledbit[NBITS(LED_MAX)];    //位图,记录设备支持的指示灯
    unsigned long sndbit[NBITS(SND_MAX)];    //位图,记录设备支持的声音或警报
    unsigned long ffbit[NBITS(FF_MAX)];      //位图,记录设备支持的作用力功能
    unsigned long swbit[NBITS(SW_MAX)];      //位图,记录设备支持的开关功能

    unsigned int keycodemax;                //设备支持的最大按键值个数
    unsigned int keycodesize;               //每个按键的字节大小
    void *keycode;                          //指向按键池,即指向按键值数组首地址
    int (*setkeycode)(struct input_dev *dev, int scancode, int keycode);        //修改按键值
    int (*getkeycode)(struct input_dev *dev, int scancode, int *keycode);       //获取按键值

    struct ff_device *ff;

    unsigned int repeat_key;                //支持重复按键
    struct timer_list timer;                //设置当有连击时的延时定时器

    int state;

    int sync;       //同步事件完成标识,为1说明事件同步完成

    int abs[ABS_MAX + 1];                //记录坐标的值
    int rep[REP_MAX + 1];                //记录重复按键的参数值

    unsigned long key[NBITS(KEY_MAX)];   //位图,按键的状态
    unsigned long led[NBITS(LED_MAX)];   //位图,led的状态
    unsigned long snd[NBITS(SND_MAX)];   //位图,声音的状态
    unsigned long sw[NBITS(SW_MAX)];     //位图,开关的状态

    int absmax[ABS_MAX + 1];             //位图,记录坐标的最大值
    int absmin[ABS_MAX + 1];             //位图,记录坐标的最小值
    int absfuzz[ABS_MAX + 1];            //位图,记录坐标的分辨率
    int absflat[ABS_MAX + 1];            //位图,记录坐标的基准值

    int (*open)(struct input_dev *dev);                         //输入设备打开函数
    void (*close)(struct input_dev *dev);                       //输入设备关闭函数
    int (*flush)(struct input_dev *dev, struct file *file);     //输入设备断开后刷新函数
    int (*event)(struct input_dev *dev, unsigned int type, unsigned int code, int value);        //事件处理

    struct input_handle *grab;

    struct mutex mutex;                     //用于open、close函数的连续访问互斥
    unsigned int users;

    struct class_device cdev;               //输入设备的类信息
    union {                                 //设备结构体
        struct device *parent;
    } dev;

    struct list_head        h_list;         //handle链表
    struct list_head        node;           //input_dev链表
};
input_register_device
还记得之前提到过的:在Linux驱动中使用input子系统,一般的驱动使用输入子系统只需要使用以下的接口。
struct input_dev *input_allocate_device(void);
// 分配输入设备函数

int input_register_device(struct input_dev *dev);
// 注册输入设备函数

void input_unregister_device(struct input_dev *dev);
// 注销输入设备函数

void __set_bit();
// 事件支持(初始化),告诉input输入子系统支持哪些事件,哪些按键


void input_event(struct input_dev *dev, unsigned int type, unsigned int code, int value);
// 在发生输入事件时,向子系统报告事件。

void input_sync();
// 同步用于告诉input core子系统报告结束
其中,涉及到匹配的有关函数就是input_register_device。
/**
 * input_register_device - register device with input core
 * @dev: device to be registered
 *
 * This function registers device with input core. The device must be
 * allocated with input_allocate_device() and all it's capabilities
 * set up before registering.
 * If function fails the device must be freed with input_free_device().
 * Once device has been successfully registered it can be unregistered
 * with input_unregister_device(); input_free_device() should not be
 * called in this case.
 *
 * Note that this function is also used to register managed input devices
 * (ones allocated with devm_input_allocate_device()). Such managed input
 * devices need not be explicitly unregistered or freed, their tear down
 * is controlled by the devres infrastructure. It is also worth noting
 * that tear down of managed input devices is internally a 2-step process:
 * registered managed input device is first unregistered, but stays in
 * memory and can still handle input_event() calls (although events will
 * not be delivered anywhere). The freeing of managed input device will
 * happen later, when devres stack is unwound to the point where device
 * allocation was made.
 */
int input_register_device(struct input_dev *dev)
{
    static atomic_t input_no = ATOMIC_INIT(0);
    struct input_devres *devres = NULL;
    struct input_handler *handler;
    unsigned int packet_size;
    const char *path;
    int error;

    if (dev->devres_managed) {
        devres = devres_alloc(devm_input_device_unregister,
                      sizeof(struct input_devres), GFP_KERNEL);
        if (!devres)
            return -ENOMEM;

        devres->input = dev;
    }

    /* 默认所有的输入设备都支持EV_SYN同步事件 */
    __set_bit(EV_SYN, dev->evbit);

    /* 阻止 KEY_RESERVED 事件传递到用户空间 */
    __clear_bit(KEY_RESERVED, dev->keybit);

    /* 确保 没有用到的掩码 是空的 */
    input_cleanse_bitmasks(dev);

    packet_size = input_estimate_events_per_packet(dev);
    if (dev->hint_events_per_packet < packet_size)
        dev->hint_events_per_packet = packet_size;

    dev->max_vals = max(dev->hint_events_per_packet, packet_size) + 2;
    dev->vals = kcalloc(dev->max_vals, sizeof(*dev->vals), GFP_KERNEL);
    if (!dev->vals) {
        error = -ENOMEM;
        goto err_devres_free;
    }

    /*
     * If delay and period are pre-set by the driver, then autorepeating
     * is handled by the driver itself and we don't do it in input.c.
     */
    init_timer(&dev->timer);
    if (!dev->rep[REP_DELAY] && !dev->rep[REP_PERIOD]) {
        dev->timer.data = (long) dev;
        dev->timer.function = input_repeat_key;
        dev->rep[REP_DELAY] = 250;
        dev->rep[REP_PERIOD] = 33;
    }

    /* 没有定义设备的getkeycode函数,则使用默认的获取键值函数 */
    if (!dev->getkeycode)
        dev->getkeycode = input_default_getkeycode;
    /*没有定义设备的setkeycode函数,则使用默认的设定键值函数*/
    if (!dev->setkeycode)
        dev->setkeycode = input_default_setkeycode;

    dev_set_name(&dev->dev, "input%ld",
             (unsigned long) atomic_inc_return(&input_no) - 1);

	/* 重点1:添加设备 */
    error = device_add(&dev->dev);
    if (error)
        goto err_free_vals;

    /* 获取并打印设备的绝对路径名称 */
    path = kobject_get_path(&dev->dev.kobj, GFP_KERNEL);
    pr_info("%s as %s
",
        dev->name ? dev->name : "Unspecified device",
        path ? path : "N/A");
    kfree(path);

    error = mutex_lock_interruptible(&input_mutex);
    if (error)
        goto err_device_del;

    /* 重点2: 把设备挂到全局的input子系统设备链表 input_dev_list 上 */
    list_add_tail(&dev->node, &input_dev_list);

   /*  重点3: nput设备在增加到input_dev_list链表上之后,会查找
    * input_handler_list事件处理链表上的handler进行匹配,这里的匹配
    * 方式与设备模型的device和driver匹配过程很相似,所有的input devicel
    * 都挂在input_dev_list上,所有类型的事件都挂在input_handler_list
    * 上,进行“匹配相亲”
    */
    list_for_each_entry(handler, &input_handler_list, node)
        input_attach_handler(dev, handler);

    input_wakeup_procfs_readers();

    mutex_unlock(&input_mutex);

    if (dev->devres_managed) {
        dev_dbg(dev->dev.parent, "%s: registering %s with devres.
",
            __func__, dev_name(&dev->dev));
        devres_add(dev->dev.parent, devres);
    }
    return 0;

err_device_del:
    device_del(&dev->dev);
err_free_vals:
    kfree(dev->vals);
    dev->vals = NULL;
err_devres_free:
    devres_free(devres);
    return error;
}
EXPORT_SYMBOL(input_register_device);
上面的函数实现了:
- 添加设备
- 把输入设备挂到输入设备链表
input_dev_list中 - 遍历
input_handler_list链表,查找并匹配输入设备对应的事件处理层,如果匹配上了,就调用handler的connnect函数进行连接。
设备就是在此时注册的,下面分析handler就清晰了。 (input_attach_handler放到分析handler时再做讲解,更容易理解。)
事件层注册handler
事件层通过input_register_handler来完成注册。
不同的事件处理层主要是用来支持输入设备并与用户空间交互,这部分代码一般由供应商编写,不需要我们自己去编写。
因为Linux内核已经自带有一些事件处理器,可以支持大部分输入设备,比如Evdev.c、mousedev.c、joydev.c等。
对于Event handler:根据事件注册一个handler,将handler挂到链表input_handler_list下,然后遍历input_dev_list链表。查找并匹配输入设备对应的事件处理层,如果匹配上了,就调用connect函数进行连接,并创建input_handle结构。
Linux中默认的事件层不多;默认地,有evdev.c(事件设备),tsdev.c(触摸屏设备),joydev.c(joystick操作杆设备),keyboard.c(键盘设备),mousedev.c(鼠标设备) 这5个内核自带的设备处理函数注册(input_register_handler)到input子系统中。
$ cd drivers/input
$ grep -w -nR  "input_register_handler"
misc/keychord.c:301:	ret = input_register_handler(&kdev->input_handler);
keycombo.c:225:	ret = input_register_handler(&state->input_handler);
apm-power.c:113:	return input_register_handler(&apmpower_handler);
evbug.c:110:	return input_register_handler(&evbug_handler);
evdev.c:1117:	return input_register_handler(&evdev_handler);
joydev.c:947:	return input_register_handler(&joydev_handler);
input.c:2155: * input_register_handler - register a new input handler
input.c:2162:int input_register_handler(struct input_handler *handler)
input.c:2183:EXPORT_SYMBOL(input_register_handler);
mousedev.c:1107:	error = input_register_handler(&mousedev_handler);
下面,我们以evdev.c(事件驱动)为例子进行讲解。
evdev.c实现了对evdev的管理,根据Docuentation/input/input.txt的描述,evdev is the generic input event interface. It passes the events generated in the kernel straight to the program, with timestamps.
因此,evdev只是对输入设备这一类设备的管理,并不涉及具体如鼠标、键盘以及游戏摇杆等设备的管理,但是驱动中完全可以使用关于evdev的API直接给用户空间程序上报事件。
input_handler对象
// include/linux/input.h
struct input_handler {

    void *private;

    void (*event)(struct input_handle *handle, unsigned int type, unsigned int code, int value);
    void (*events)(struct input_handle *handle,
               const struct input_value *vals, unsigned int count);
    bool (*filter)(struct input_handle *handle, unsigned int type, unsigned int code, int value);
    bool (*match)(struct input_handler *handler, struct input_dev *dev);
    int (*connect)(struct input_handler *handler, struct input_dev *dev, const struct input_device_id *id);
    void (*disconnect)(struct input_handle *handle);
    void (*start)(struct input_handle *handle);

    bool legacy_minors;
    int minor;
    const char *name;

    const struct input_device_id *id_table;

    struct list_head    h_list;
    struct list_head    node;
};
input_register_handler
事件处理层的处理器会调用input_register_handler来注册。
// drivers/input/evdev.c
static struct input_handler evdev_handler = {
    .event      = evdev_event,
    .events     = evdev_events,
    .connect    = evdev_connect,
    .disconnect = evdev_disconnect,
    .legacy_minors  = true,
    .minor      = EVDEV_MINOR_BASE,
    .name       = "evdev",
    .id_table   = evdev_ids,
};

static int __init evdev_init(void)
{
    return input_register_handler(&evdev_handler);
}

static void __exit evdev_exit(void)
{
    input_unregister_handler(&evdev_handler);
}

module_init(evdev_init);
module_exit(evdev_exit);
evdev_init直接调用input_register_handler 注册一个evdev_handler的input_handler对象。
/**
 * input_register_handler - register a new input handler
 * @handler: handler to be registered
 *
 * This function registers a new input handler (interface) for input
 * devices in the system and attaches it to all input devices that
 * are compatible with the handler.
 */
int input_register_handler(struct input_handler *handler)
{
    struct input_dev *dev;
    int error;

    error = mutex_lock_interruptible(&input_mutex);
    if (error)
        return error;

    INIT_LIST_HEAD(&handler->h_list);

    /* 重点1 : 把设备处理器挂到全局的input子系统设备链表input_handler_list上 */
    list_add_tail(&handler->node, &input_handler_list);

    /* 重点2 : 遍历input_dev_list,试图与每一个input_dev进行匹配 */
    list_for_each_entry(dev, &input_dev_list, node)
        input_attach_handler(dev, handler);

    input_wakeup_procfs_readers();

    mutex_unlock(&input_mutex);
    return 0;
}
EXPORT_SYMBOL(input_register_handler);
这个注册过程和上面驱动层注册device(input_register_device)的过程非常相识。
注册过程中的匹配判断
你注意到了吗,无论是驱动层还是事件层,它们各自在向core注册的时候,都会调用到一个input_attach_handler。
我们看看input_attach_handler是如何匹配dev与handler的。
全局变量
在device与handler注册的时候,都用到了下面的两个链表,其实这两个链表是用来俩俩匹配的。
static LIST_HEAD(input_dev_list);
static LIST_HEAD(input_handler_list);
对于handler和device,分别用链表input_handler_list和input_dev_list进行维护。当handler或者device增加或减少的时候,分别往这两链表增加或删除节点,这两条都是全局链表。
input_attach_handler
实际上就做2个事情,先match(匹配),再connect(连接)
static int input_attach_handler(struct input_dev *dev, struct input_handler *handler)
{
    const struct input_device_id *id;
    int error;

    /* 利用handler->id_table和dev进行匹配 */
    id = input_match_device(handler, dev);
    if (!id)
        return -ENODEV;

    /*匹配成功,则调用handler->connect函数进行连接*/
    error = handler->connect(handler, dev, id);
    if (error && error != -ENODEV)
        pr_err("failed to attach handler %s to device %s, error: %d
",
               handler->name, kobject_name(&dev->dev.kobj), error);

    return error;
}
input_match_device
还记得吗,struct input_dev中也有一个struct input_id id。只是我们当时没有提到。 id用于匹配条件中,对于属性的要求。
设备和handler的匹配条件:只要handler的id中evbit、keybit等等中的某一位设置了,input设备也得具备这个条件。
简单来说,必须具有相同ID属性的devive和handler才能匹配在一起。
//kernel/include/linux/mod_devicetable.h
struct input_device_id {

    kernel_ulong_t flags;

    __u16 bustype;
    // ...
    __u16 version;

    kernel_ulong_t evbit[INPUT_DEVICE_ID_EV_MAX / BITS_PER_LONG + 1];
    kernel_ulong_t keybit[INPUT_DEVICE_ID_KEY_MAX / BITS_PER_LONG + 1];
    // ...
    kernel_ulong_t swbit[INPUT_DEVICE_ID_SW_MAX / BITS_PER_LONG + 1];

    kernel_ulong_t driver_info;
}; // 与设备匹配的要求。

static const struct input_device_id *input_match_device(struct input_handler *handler,
                            struct input_dev *dev)
{
    const struct input_device_id *id;

    for (id = handler->id_table; id->flags || id->driver_info; id++) {

        if (id->flags & INPUT_DEVICE_ID_MATCH_BUS)
            if (id->bustype != dev->id.bustype)
                continue;
        // ...

        if (id->flags & INPUT_DEVICE_ID_MATCH_VERSION)
            if (id->version != dev->id.version)
                continue;

        if (!bitmap_subset(id->evbit, dev->evbit, EV_MAX))
            continue;

        if (!bitmap_subset(id->keybit, dev->keybit, KEY_MAX))
            continue;

        // ...

        if (!handler->match || handler->match(handler, dev))
            return id;
    }

    return NULL;
}
evdev_ids
由于 evdev.c 中的evdev_ids只有一个成员初始化,其他都为0(NULL):
// drivers/input/evdev.c
static const struct input_device_id evdev_ids[] = {
    { .driver_info = 1 },   /* Matches all devices */
    { },            /* Terminating zero entry */
};
因此,上面的if中,只有最后一个if满足条件,所以最后会以!handler->match而返回这个id。
这也就是为什么注释中说的,evdev.c 中的 handler 可以适用于任何的 devices(Matches all devices);因为evdev对device的要求很低。
handler->connect
对于evdev.c中的handler所对应的connect接口是evdev_connect。
evdev_connect()主要是创建一个新的event设备,相应的设备节点文件是/dev/input/eventX。
1、要注册一个新的evdev设备,首先要获取一个次设备号(之前说过,主设备号是13),失败便不再往下执行。
成功以后,这个次设备号还会作为一个相对值dev_no,用于决定
/dev/input/eventX中的X的值。
2、一个evdev可以有多个client,所以初始化client_list。
3、而操作client的时候需要互斥,所以初始化client_lock,等待队列用于实现用户空间读取时的阻塞等待,exist成员置为true表示新的evdev已经存在,minor是新的evdev在evdev_table中的索引,而设备节点文件/dev/input/eventx中的x就是这里minor决定的。
4、另外一项重要工作就是用handle绑定一组匹配成功的input_dev和input_handler。
只要是input_dev和input_handler匹配了,handle中的handler成员指向了配对成功的handler:dev成员指向了配对成功的device,而private成员则指向了evdev设备本身。
struct input_handle {

    void *private;

    int open;
    const char *name;

    struct input_dev *dev;         // 匹配成功的 一对 dev-handler中的 dev
    struct input_handler *handler; // 匹配成功的 一对 dev-handler中的 handler

    struct list_head    d_node;
    struct list_head    h_node;
};
通过上文我们知道,链表input_handler_list和input_dev_list保存了handler与device,这两条链表都是全局链表。
那么input_hande 保存在哪里?实际上,而input_hande 没有一个全局的链表。它注册的时候将自己分别挂在了input_dev_list和 input_handler_list的h_list上了;
从此,建立好了三者的铁三角关系,通过input_handler_list和input_dev_list以及input_hande 中任何一方,都可以找到彼此。
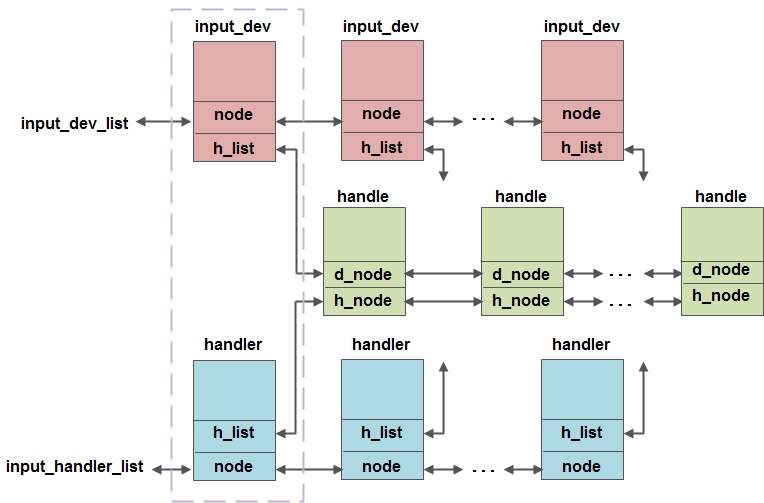
最终:设备(/dev/input/eventX)被创建,我们最终就能够通过基于struct file_operations的open、read等方式在应用层获取数据。
evdev_connect
对于connect函数,每种事件处理器的实现都有差异,但原理都相同。
我们结合evdev.c中的connect看看是不是这样子的:
static struct input_handler evdev_handler = {
    // ...
    .connect    = evdev_connect,
    // ...
};

/*
 * Create new evdev device. Note that input core serializes calls
 * to connect and disconnect.
 */
static int evdev_connect(struct input_handler *handler, struct input_dev *dev,
                         const struct input_device_id *id)
{
    struct evdev *evdev;
    int minor;
    int dev_no;
    int error;

    /* 申请一个新的次设备号 */
    minor = input_get_new_minor(EVDEV_MINOR_BASE, EVDEV_MINORS, true);

    evdev = kzalloc(sizeof(struct evdev), GFP_KERNEL);

    /* 初始化client_list列表和evdev_wait队列 */
    INIT_LIST_HEAD(&evdev->client_list);
    spin_lock_init(&evdev->client_lock);
    mutex_init(&evdev->mutex);
    init_waitqueue_head(&evdev->wait);
    evdev->exist = true;

    dev_no = minor;
    /* Normalize device number if it falls into legacy range */
    if (dev_no < EVDEV_MINOR_BASE + EVDEV_MINORS)
        dev_no -= EVDEV_MINOR_BASE;

    /*设置设备节点名称,eventX 就是在此时设置 */
    dev_set_name(&evdev->dev, "event%d", dev_no);

    /* 重点:初始化evdev结构体,其中handle为输入设备和事件处理的关联接口 */
    evdev->handle.dev = input_get_device(dev);
    evdev->handle.name = dev_name(&evdev->dev);
    evdev->handle.handler = handler;
    evdev->handle.private = evdev;

    /*设置设备号,应用层就是通过设备号,找到该设备的*/
    evdev->dev.devt = MKDEV(INPUT_MAJOR, minor);
    evdev->dev.class = &input_class;
    evdev->dev.parent = &dev->dev;
    evdev->dev.release = evdev_free;
    device_initialize(&evdev->dev);

    /* input_dev设备驱动和handler事件处理层的关联,就在这时由handle完成 */
    error = input_register_handle(&evdev->handle);

    cdev_init(&evdev->cdev, &evdev_fops);
    evdev->cdev.kobj.parent = &evdev->dev.kobj;
    error = cdev_add(&evdev->cdev, evdev->dev.devt, 1);

    /* 将设备加入到Linux设备模型,它的内部将找到它的bus,然后让它的bus
    给它找到它的driver,在驱动或者总线的probe函数中,一般会在/dev/目录
    先创建相应的设备节点,这样应用程序就可以通过该设备节点来使用设备了,
    /dev/eventX 设备节点就是在此时生成
    */
    error = device_add(&evdev->dev);

    return 0;
}
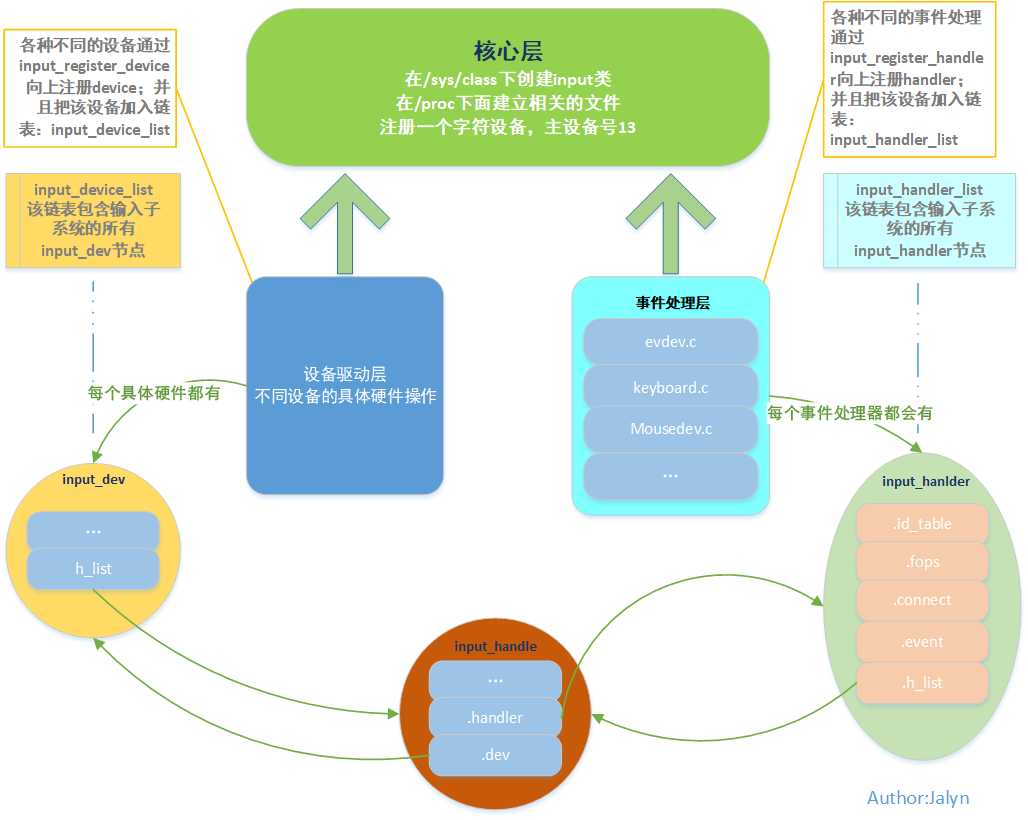
事件层fops代码解析
fops接口在输入子系统中由事件处理层完成。
当应用程序执行open("/dev/input/eventX", O_RDWR)时等调用的时候,系统调用经过文件系统一系列操作后就会执行file_operations中的成员函数。
这些函数会从事件处理层到input core层再到驱动程序的input_dev对应的方法(例如open)依次执行下去。
以evdev.c为例:
static const struct file_operations evdev_fops = {
    .owner      = THIS_MODULE,
    .read       = evdev_read,
    .write      = evdev_write,
    .poll       = evdev_poll,
    .open       = evdev_open,
    .release    = evdev_release,
    .unlocked_ioctl = evdev_ioctl,
#ifdef CONFIG_COMPAT
    .compat_ioctl   = evdev_ioctl_compat,
#endif
    .fasync     = evdev_fasync,
    .flush      = evdev_flush,
    .llseek     = no_llseek,
};
这些file_operations对于子系统都比较重要。
evdev_open
evdev_open函数代表注册一个client,此后准备接收数据。
static int evdev_open(struct inode *inode, struct file *file)
{
    // 首先,是找到 evdev设备
    struct evdev *evdev = container_of(inode->i_cdev, struct evdev, cdev);
    unsigned int bufsize = evdev_compute_buffer_size(evdev->handle.dev);
    unsigned int size = sizeof(struct evdev_client) +
                    bufsize * sizeof(struct input_event);
    struct evdev_client *client;
    int error;

    // 第二,给evdev_client结构分配内存空间。
    client = kzalloc(size, GFP_KERNEL | __GFP_NOWARN);
    if (!client)
        client = vzalloc(size);

    client->clkid = CLOCK_MONOTONIC;
    client->bufsize = bufsize;
    spin_lock_init(&client->buffer_lock);
    snprintf(client->name, sizeof(client->name), "%s-%d",
            dev_name(&evdev->dev), task_tgid_vnr(current));

    // 第三,将client的evdev指向当前evdev,并且将client挂接到evdev的链表上
    client->evdev = evdev;
    evdev_attach_client(evdev, client);

    // 第四,调用evdev_open_device()
    error = evdev_open_device(evdev);

    file->private_data = client;
    // 第五,设置文件的模式
    nonseekable_open(inode, file);

    return 0;
}
找到edev
第一件事,是找到 evdev设备,获取的方式很kernel:
struct evdev *evdev = container_of(inode->i_cdev, struct evdev, cdev);
还记得吗,前面evdev_connect中申请了一个evdev对象。并通过cdev_add(&evdev->cdev, evdev->dev.devt, 1);加入到了字符设备中。
因此,在这里能够通过container_of将其取出。取出以后是为了继续操作。
evdev的原型是这样子的:
struct evdev {
    int open;  // open,当用户open此设备时,open的值加1。
    struct input_handle handle; // 包括了匹配的 dev 与 handler
    wait_queue_head_t wait; // 等待队列
    struct evdev_client __rcu *grab; // 可以为evdev实例指定一个struct evdev_client实例,这样在传递Input消息时就只会传递给这一个struct evdev_client实例,而不会传递给所有的struct evdev_client实例。每open一次就会生成一个struct evdev_client实例。
    struct list_head client_list; // 用来把所有的struct client_list实例连接在一起
    spinlock_t client_lock; /* protects client_list */
    struct mutex mutex; // 同步相关的锁
    struct device dev; // dev,用来嵌入到设备模型中。
    struct cdev cdev; //
    bool exist;  // struct evdev被成功实例化后,exist的值就为true
};
新建evdev_client对象
    client = kzalloc(size, GFP_KERNEL | __GFP_NOWARN);
    if (!client)
        client = vzalloc(size);

    client->clkid = CLOCK_MONOTONIC;
    client->bufsize = bufsize;
    spin_lock_init(&client->buffer_lock);
    snprintf(client->name, sizeof(client->name), "%s-%d",
            dev_name(&evdev->dev), task_tgid_vnr(current));
evdev_client原型
这里非常有必要说一下evdev_client结构,此结构定义如下:
struct evdev_client {
    unsigned int head;
    unsigned int tail;
    unsigned int packet_head; /* [future] position of the first element of next packet */
    spinlock_t buffer_lock; /* protects access to buffer, head and tail */
    struct wake_lock wake_lock;
    bool use_wake_lock;
    char name[28];
    struct fasync_struct *fasync;
    struct evdev *evdev;
    struct list_head node;
    int clkid;
    unsigned int bufsize;
    struct input_event buffer[];
};
可以看到这个结构中多数成员都是关于buffer的。
这完全可以理解,一个输入设备要上报输入事件,从代码上来说,肯定有存储事件的缓冲区,而且有时候一个设备会上报多个事件,那么我们需要能够存储多个事件的缓冲区。
bufsize
    unsigned int bufsize = evdev_compute_buffer_size(evdev->handle.dev);
    unsigned int size = sizeof(struct evdev_client) +
                    bufsize * sizeof(struct input_event);

// ---------------------
static unsigned int evdev_compute_buffer_size(struct input_dev *dev)
{
    unsigned int n_events =
        max(dev->hint_events_per_packet * EVDEV_BUF_PACKETS,
            EVDEV_MIN_BUFFER_SIZE);

    return roundup_pow_of_two(n_events);
}
bufsize成员:表示当前输入设备的输入事件缓冲区最多可以存放事件的个数。
值得注意的是,输入事件缓冲区的大小不是静态的,这里采用的是基于柔型数组进行动态申请;
在计算bufsize的时候,进行向上对齐2的幂。这样子在判断的时候可以做一个小的优化,例如:
client->head &= client->bufsize - 1; // 相当于 取模%,但比%快。
将client挂接到evdev的链表上
第三步,将client的evdev指向当前evdev,并且将client挂接到evdev的链表上。
    client->evdev = evdev;
    evdev_attach_client(evdev, client);
-----------------------------
static void evdev_attach_client(struct evdev *evdev,
                struct evdev_client *client)
{
    spin_lock(&evdev->client_lock);
    list_add_tail_rcu(&client->node, &evdev->client_list);
    spin_unlock(&evdev->client_lock);
}
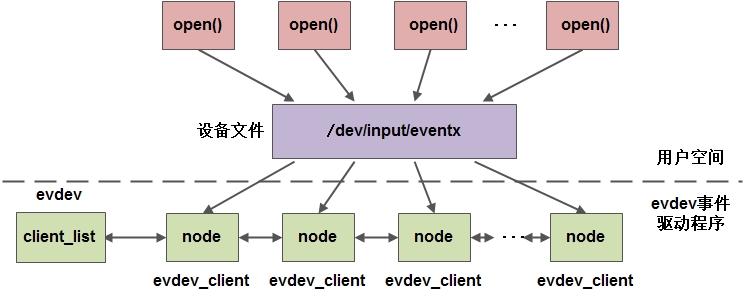
既然这里有挂接链表的操作,说明一个evdev可以对应着多个client,这一点在evdev_disconnect()中已经体现:evdev需要遍历自己的client_list,给所有的client发信号。
static void evdev_disconnect(struct input_handle *handle)
{
    struct evdev *evdev = handle->private;

    device_del(&evdev->dev);
    evdev_cleanup(evdev);
    input_free_minor(MINOR(evdev->dev.devt));
    input_unregister_handle(handle);
    put_device(&evdev->dev);
}

void input_unregister_handle(struct input_handle *handle)
{
    struct input_dev *dev = handle->dev;

    list_del_rcu(&handle->h_node);

    /*
     * Take dev->mutex to prevent race with input_release_device().
     */
    mutex_lock(&dev->mutex);
    list_del_rcu(&handle->d_node);
    mutex_unlock(&dev->mutex);

    synchronize_rcu();
}
一张简单的描述evdev是怎么把client连接起来的图:
调用evdev_open_device()
第四步,调用evdev_open_device(),并且将file的private_data初始化为client。
    error = evdev_open_device(evdev);

    file->private_data = client;
evdev_open_device()代码如下:
static int evdev_open_device(struct evdev *evdev)
{
    int retval;

    retval = mutex_lock_interruptible(&evdev->mutex);

    if (!evdev->exist)
        retval = -ENODEV;
    else if (!evdev->open++) {
        retval = input_open_device(&evdev->handle);
        if (retval)
            evdev->open--;
    }

    mutex_unlock(&evdev->mutex);
    return retval;
}
此函数比较简单,上锁、检查参数后调用input_open_device(),代码如下:
int input_open_device(struct input_handle *handle)
{
    struct input_dev *dev = handle->dev; // 找到 对应的dev,还记得吗,3者可以互相找到对方
    int retval;

    retval = mutex_lock_interruptible(&dev->mutex);

    if (dev->going_away) {
        retval = -ENODEV;
        goto out;
    }

    handle->open++;

    if (!dev->users++ && dev->open)
        retval = dev->open(dev);

    if (retval) {
        dev->users--;
        if (!--handle->open) {
            /*
             * Make sure we are not delivering any more events
             * through this handle
             */
            synchronize_rcu();
        }
    }

 out:
    mutex_unlock(&dev->mutex);
    return retval;
}
input_open_device()的核心是对handle->open和dev->users成员自增,调用dev->open()。
将handle的open计数加1,表示此handle已经打开。
但是我没搞懂这里的逻辑,为什么只有dev->users为零的时候才会调用dev->open()?还有,dev->open是在哪里操作的?dev->open就是我们使用input_register_device()之前自己赋值操作的方法。
到这里就分析完了evdev_open(),evdev_poll()就是调用poll_wait(),evdev_fasync()就是调用fasync_helper(),这里不多说了,这两个函数就说明我们可以在应用层使用poll()或者select()实现输入设备的异步阻塞IO以及异步非阻塞IO操作。
设置文件的模式
nonseekable_open函数不说了,就是设置文件的模式。
    nonseekable_open(inode, file);
//-------------------
int nonseekable_open(struct inode *inode, struct file *filp)
{
    filp->f_mode &= ~(FMODE_LSEEK | FMODE_PREAD | FMODE_PWRITE);
    return 0;
}
evdev_read
首先思考个问题,在应用层调用read函数,是如何读取到实际硬件的按键值的?
接下来分析evdev_read(),它的作用是从已经打开的evdev中读取输入事件,如果缓冲区中有事件则传递给用户空间,否则阻塞等待:
1、从file->private_data中获取evdev_client结构,接着根据client获取当前的evdev设备。
2、判断读取长度是否合法。如果用户空间要读取的长度小于一个事件的长度,那么直接返回;如果当前事件缓冲区为空,并且设备存在,同时当前文件的操作为非阻塞IO方式,那么直接返回-EAGAIN即可。
3、将数据拷贝给应用空间。我们在下面再介绍这个。
4、判断当前是否读到了数据,退出或者等待。
- 等待:调用
wait_event_interruptible(),条件为:“输入事件缓冲区非空 或 evdev设备不存在了”,如果是因为设备不存在了,那么直接返回-ENODEV即可,否则读取缓冲区中的事件,传递给用户空间即可。 - 停止:如果已经传递给用户空间的数据长度已经不小于count或者输入事件缓冲区已经空了,就退出。
static ssize_t evdev_read(struct file *file, char __user *buffer,
              size_t count, loff_t *ppos)
{
    // 1、获取对应的实例,准备操作。
    struct evdev_client *client = file->private_data;
    struct evdev *evdev = client->evdev;
    struct input_event event;
    size_t read = 0;
    int error;

    // 2、判断读取长度是否合法
    if (count != 0 && count < input_event_size())
        return -EINVAL;

    for (;;) {
        // 设备不存在
        if (!evdev->exist || client->revoked)
            return -ENODEV;

        // 不允许非阻塞读取
        if (client->packet_head == client->tail &&
            (file->f_flags & O_NONBLOCK))
            return -EAGAIN;

        /*
         * count == 0 is special - no IO is done but we check
         * for error conditions (see above).
         */
        if (count == 0)
            break;

        // 3、将数据拷贝给应用空间。
        while (read + input_event_size() <= count &&
               evdev_fetch_next_event(client, &event)) {

            // 相当于 copy_to_user(),把取出来的事件拷贝给用户空间。
            if (input_event_to_user(buffer + read, &event))
                return -EFAULT;

            read += input_event_size();
        }

        // 4、判断当前是否读到了数据,读到数据则结束,不能读则等待。
        if (read)
            break;
        if (!(file->f_flags & O_NONBLOCK)) {
            error = wait_event_interruptible(evdev->wait,
                    client->packet_head != client->tail ||
                    !evdev->exist || client->revoked);
            if (error)
                return error;
        }
    }

    return read;
}
evdev_fetch_next_event
此函数就是从输入事件缓冲区中取出一个事件。
static int evdev_fetch_next_event(struct evdev_client *client,
                  struct input_event *event)
{
    int have_event;

    // 1、加锁
    spin_lock_irq(&client->buffer_lock);

    // 2、取出事件
    have_event = client->packet_head != client->tail;
    if (have_event) {
        *event = client->buffer[client->tail++];
        client->tail &= client->bufsize - 1;
        if (client->use_wake_lock &&
            client->packet_head == client->tail)
            wake_unlock(&client->wake_lock);
    }

    spin_unlock_irq(&client->buffer_lock);

    return have_event;
}
1、对client加锁
2、根据client->head与client->tail判断缓冲区是否有事件,若两者不相等那么有,否则没有。
3、取出事件。由于tail指向将要处理的事件,若要取事件,那么就根据tail就可以得到之。
evdev_event
evdev_read()是读取事件,我们知道read的时候是不能 非阻塞读取的,如果读取时没有数据呢,那么是在哪里来唤醒?换句话说,如果读取操作阻塞在了wait队列上,那么我们在哪里将其唤醒呢?
读取时使用
wait_event_interruptible()实现阻塞IO。
答案在本节揭晓。
当产生了一个输入事件以后,evdev_event会被调用。
谁在调用wake_up_interruptible?
搜索这个evdev->wait这个等待队列变量,找到evdev_event函数里唤醒:
static void evdev_event(struct input_handle *handle,
            unsigned int type, unsigned int code, int value)
{
    struct input_value vals[] = { { type, code, value } };

    evdev_events(handle, vals, 1);
         ---> evdev_pass_values(client, vals, count, ev_time);
                 ---> wake_up_interruptible(&evdev->wait);
}
其中evdev_event()是evdev.c(事件处理层) 的evdev_handler->event成员,,
static struct input_handler evdev_handler = {
    .event      = evdev_event,
    .events     = evdev_events,
    // ...
};
调用关系统计
那么是谁调用了evdev_event()(即evdev_handler->event())?
答案:设备中使用input_event进行了事件上报。
input.c中试搜下handler->event 或 handler.event下函数调用:
/*
input_event;
-->input_handle_event;
---->input_pass_values
------>input_to_handler
-------->handler->events(handle, vals, count);
*/

void input_event(struct input_dev *dev,
         unsigned int type, unsigned int code, int value)
{
    unsigned long flags;

    if (is_event_supported(type, dev->evbit, EV_MAX)) {

        spin_lock_irqsave(&dev->event_lock, flags);
        // 这里
        input_handle_event(dev, type, code, value);
        spin_unlock_irqrestore(&dev->event_lock, flags);
    }
}

static void input_handle_event(struct input_dev *dev,
                   unsigned int type, unsigned int code, int value)
{
    int disposition;

    disposition = input_get_disposition(dev, type, code, value);

    if ((disposition & INPUT_PASS_TO_DEVICE) && dev->event)
        dev->event(dev, type, code, value);

    if (!dev->vals)
        return;

    if (disposition & INPUT_PASS_TO_HANDLERS) {
        struct input_value *v;

        if (disposition & INPUT_SLOT) {
            v = &dev->vals[dev->num_vals++];
            v->type = EV_ABS;
            v->code = ABS_MT_SLOT;
            v->value = dev->mt->slot;
        }

        v = &dev->vals[dev->num_vals++];
        v->type = type;
        v->code = code;
        v->value = value;
    }

    if (disposition & INPUT_FLUSH) {
        if (dev->num_vals >= 2)
            // 这里
            input_pass_values(dev, dev->vals, dev->num_vals);
        dev->num_vals = 0;
    } else if (dev->num_vals >= dev->max_vals - 2) {
        dev->vals[dev->num_vals++] = input_value_sync;
        // 这里
        input_pass_values(dev, dev->vals, dev->num_vals);
        dev->num_vals = 0;
    }

}

static void input_pass_values(struct input_dev *dev,
                  struct input_value *vals, unsigned int count)
{
    struct input_handle *handle;
    struct input_value *v;

    if (!count)
        return;

    rcu_read_lock();

    handle = rcu_dereference(dev->grab);
    if (handle) {
        count = input_to_handler(handle, vals, count);
    } else {
        // 遍历client_list链表,每找到一个client就调用evdev_pass_event函数
        list_for_each_entry_rcu(handle, &dev->h_list, d_node)
            if (handle->open)
                // 这里,注意,这里开始准备使用handle找到对应的handler。
                count = input_to_handler(handle, vals, count);
    }

    rcu_read_unlock();

    add_input_randomness(vals->type, vals->code, vals->value);

    /* trigger auto repeat for key events */
    for (v = vals; v != vals + count; v++) {
        if (v->type == EV_KEY && v->value != 2) {
            if (v->value)
                input_start_autorepeat(dev, v->code);
            else
                input_stop_autorepeat(dev);
        }
    }
}

static unsigned int input_to_handler(struct input_handle *handle,
            struct input_value *vals, unsigned int count)
{
    struct input_handler *handler = handle->handler;
    struct input_value *end = vals;
    struct input_value *v;

    for (v = vals; v != vals + count; v++) {
        if (handler->filter &&
            handler->filter(handle, v->type, v->code, v->value))
            continue;
        if (end != v)
            *end = *v;
        end++;
    }

    count = end - vals;
    if (!count)
        return 0;

    if (handler->events)
        // 这里
        handler->events(handle, vals, count);
    else if (handler->event)
        for (v = vals; v != end; v++)
            // 这里
            handler->event(handle, v->type, v->code, v->value);

    return count;
}
显然,就是input_dev通过输入核心为驱动层提供统一的接口input_event,来向事件处理层上报数据并唤醒。
分析
现在我们已经知道了通讯的流程,具体看看整个流程都做了什么事情。
传递事件
// linux/input.h
struct input_value {
    __u16 type;
    __u16 code;
    __s32 value;
};

/*
 * Pass incoming events to all connected clients.
 */
static void evdev_events(struct input_handle *handle,
             const struct input_value *vals, unsigned int count)
{
    struct evdev *evdev = handle->private;
    struct evdev_client *client;
    ktime_t time_mono, time_real;

    time_mono = ktime_get();
    time_real = ktime_sub(time_mono, ktime_get_monotonic_offset());

    rcu_read_lock();

    // evdev的grab成员,这个成员代表exclusice  access的含义
    client = rcu_dereference(evdev->grab);

    if (client) // 如果grab不是NULL,那么这个evdev只能被一个client访问使用
        evdev_pass_values(client, vals, count, time_mono, time_real);
    else  // 如果没有grab成员,那么此事件就需要给evdev->client_list上所有成员发消息,发消息的函数是evdev_pass_event(),
    {
        list_for_each_entry_rcu(client, &evdev->client_list, node)
            evdev_pass_values(client, vals, count,
                      time_mono, time_real);
    }

    rcu_read_unlock();
}

static void evdev_event(struct input_handle *handle,
            unsigned int type, unsigned int code, int value)
{
    struct input_value vals[] = { { type, code, value } };

    evdev_events(handle, vals, 1);
}
在新的版本中,evdev_event是对evdev_events的简单封装。
evdev_events的作用:把type、code以及value封装进input_value类型的vals中(相当于封装了一个代表的事件),每一个发送给当前evdev对应的client。
准备删除。最后,如果type是EV_SYN且code是SYN_REPORT,那么我们将调用wake_up_interruptible(),实现读取操作的同步,这也意味着,驱动程序中要显式调用report相关的函数才能解锁读取操作。
保存事件
这里重点看evdev_pass_values
// include/uapi/linux/input.h
struct input_event {
    struct timeval time;
    __u16 type;
    __u16 code;
    __s32 value;
};

static void evdev_pass_values(struct evdev_client *client,
            const struct input_value *vals, unsigned int count,
            ktime_t *ev_time)
{
    struct evdev *evdev = client->evdev;
    const struct input_value *v; // 迭代器
    struct input_event event;
    bool wakeup = false;

    if (client->revoked)
        return;

    event.time = ktime_to_timeval(ev_time[client->clk_type]);

    /* Interrupts are disabled, just acquire the lock. */
    spin_lock(&client->buffer_lock);

    // 对每一个事件进行处理,并发送到cline
    for (v = vals; v != vals + count; v++) {
        if (__evdev_is_filtered(client, v->type, v->code))
            continue;

        if (v->type == EV_SYN && v->code == SYN_REPORT) {
            /* drop empty SYN_REPORT */
            if (client->packet_head == client->head)
                continue;

            wakeup = true;
        }

        event.type = v->type;
        event.code = v->code;
        event.value = v->value;
        // 保存事件
        __pass_event(client, &event);
    }

    spin_unlock(&client->buffer_lock);
	// 唤醒
    if (wakeup)
        wake_up_interruptible(&evdev->wait);
}
保存
struct evdev_client {
    unsigned int head;
    unsigned int tail;
    unsigned int packet_head; /* [future] position of the first element of next packet */
    spinlock_t buffer_lock; /* protects access to buffer, head and tail */
    struct fasync_struct *fasync;
    struct evdev *evdev;
    struct list_head node;
    unsigned int clk_type;
    bool revoked;
    unsigned long *evmasks[EV_CNT];
    unsigned int bufsize;
    struct input_event buffer[];
};

static void __pass_event(struct evdev_client *client,
             const struct input_event *event)
{
    // 1、保存事件
    client->buffer[client->head++] = *event;
    client->head &= client->bufsize - 1;

    // 2、 如果缓冲区满了
    if (unlikely(client->head == client->tail)) {
        /*
         * This effectively "drops" all unconsumed events, leaving
         * EV_SYN/SYN_DROPPED plus the newest event in the queue.
         */
        client->tail = (client->head - 2) & (client->bufsize - 1);

        client->buffer[client->tail].time = event->time;
        client->buffer[client->tail].type = EV_SYN;
        client->buffer[client->tail].code = SYN_DROPPED;
        client->buffer[client->tail].value = 0;

        client->packet_head = client->tail;
    }

    // 3、异步通知。
    if (event->type == EV_SYN && event->code == SYN_REPORT) {
        client->packet_head = client->head;
        kill_fasync(&client->fasync, SIGIO, POLL_IN);
    }
}
1、既然每次产生一个输入事件,那么这个函数肯定要将产生的事件存储到事件队列环形缓冲区中。
上面代码对于client->head的操作为:存储了事件队列以后,还要确保head没超过bufsize。如果超过了bufsize,那么应该从零开始。
由于在
evdev_open中,申请buffsize时对2的幂向上取整,因此只需要进行位与就可以完成相当于%的操作(小优化)。
2、如果存储了当前事件后,事件队列缓冲区满了怎么办?内核只留下两个事件:
- 最新的一个事件其实不是事件,它的code为SYN_DROPPED;
- 而另一个就是newest事件,接着把packet_head成员更新为tail,代表一系列事件的头部。
3、如果我们的事件type=EV_SYN,code=SYN_REPORT,那么通过kill_fasync()发送SIGIO。因此,如果我们的输入设备文件支持异步IO操作的话,应用层应该能通过异步通知的方式接收SIGIO,从而在信号回调函数中读取到输入事件。
通常,用
input_sync来完成对输入事件的上报。