spring boot拦截器、过滤器、servlet和健康检查机制
spring boot拦截器
spring boot配置拦截器与原来大致相同,只是需要在拦截器的配置类上添加@Configuration注解,让spirng boot将拦截器加入spring容器中。
1、首先这里我们像之前一样创建一个普通的拦截器
package com.scm.mybatis.Interceptor;
import org.springframework.web.servlet.HandlerInterceptor;
import org.springframework.web.servlet.ModelAndView;

import javax.servlet.http.HttpServletRequest;
import javax.servlet.http.HttpServletResponse;

public class MyInterceptor implements HandlerInterceptor {
    @Override
    public boolean preHandle(HttpServletRequest request, HttpServletResponse response, Object handler) throws Exception {
        System.out.println("拦截器的preHandle()方法");
        return true;
    }

    @Override
    public void postHandle(HttpServletRequest request, HttpServletResponse response, Object handler, ModelAndView modelAndView) throws Exception {
        System.out.println("拦截器的postHandle()方法");
    }

    @Override
    public void afterCompletion(HttpServletRequest request, HttpServletResponse response, Object handler, Exception ex) throws Exception {
        System.out.println("拦截器的afterCompletion()方法");
    }

}
2、创建一个拦截器配置类
package com.scm.mybatis.Interceptor;

import org.springframework.context.annotation.Configuration;
import org.springframework.web.servlet.config.annotation.InterceptorRegistration;
import org.springframework.web.servlet.config.annotation.InterceptorRegistry;
import org.springframework.web.servlet.config.annotation.WebMvcConfigurer;
@Configuration
public class InterceptorConfig implements WebMvcConfigurer {
    @Override
    public void addInterceptors(InterceptorRegistry registry) {
        InterceptorRegistration r = registry.addInterceptor(new MyInterceptor());
        r.addPathPatterns("/*");
        r.excludePathPatterns("/myInterceptor");
    }
}
这里需要注意的一点就是要加入@Configuration注解,表示该类会被加入到spring容器中。addPathPatterns()表示要拦截的请求,excludePathPatterns()表示不拦截的请求。当然我们可以创建多个拦截器,在拦截器的配置类上加上@Configuration注解即可。
3、创建一个controller
package com.scm.mybatis.controller;
import org.springframework.web.bind.annotation.GetMapping;
import org.springframework.web.bind.annotation.RestController;

@RestController
public class InController {
    @GetMapping("/Interceptor")
    public String Interceptor1(){
        return "The request is intercepted";//被拦截的请求
    }
    @GetMapping("/myInterceptor")
    public String Interceptor2(){
        return "The request is not intercepted";//不被拦截的请求
    }
}
之后在浏览器中输入相应的url进行测试。"Interceptor" 请求会输出 "The request is intercepted", "myInterceptor"请求输出" The request is not intercepted"。
spring boot过滤器(两种方式)
方式一:创建普通的filter
1、首先创建一个普通的过滤器,过滤器中我们过滤掉有请求,我们在自定义的过滤器上加上一个@WebFilter注解。
package com.scm.mybatis.Filter;


import javax.servlet.*;
import javax.servlet.annotation.WebFilter;
import java.io.IOException;
@WebFilter("/*")
public class MyFilter implements Filter {
    @Override
    public void init(FilterConfig filterConfig) throws ServletException {
        System.out.println("过滤器init()方法");
    }

    @Override
    public void doFilter(ServletRequest servletRequest, ServletResponse servletResponse, FilterChain filterChain) throws IOException, ServletException {
        System.out.println("过滤器doFilter()方法");
    }

    @Override
    public void destroy() {
        System.out.println("过滤器destroy()方法");
    }
}
2、接着我们在主函数启动入口上加入一个@ServletComponentScan注解,加上该注解之后spring boot会扫描servlet相关的所有注解。比如@WebServlet、@WebFilter、@WebListener,注解中的参数就是我们自定义过滤器的所在包。
package com.scm.mybatis;

import org.springframework.boot.SpringApplication;
import org.springframework.boot.autoconfigure.SpringBootApplication;
import org.springframework.boot.web.servlet.ServletComponentScan;

@SpringBootApplication
@ServletComponentScan("com.scm.mybatis.Filter")
public class Application {

    public static void main(String[] args) {
        SpringApplication.run(Application.class, args);
    }

}
3、创建Filter的controller
package com.scm.mybatis.controller;

import org.springframework.web.bind.annotation.GetMapping;
import org.springframework.web.bind.annotation.RestController;

@RestController
public class filterController {
    @GetMapping("/myFilter")
    public String filterTest(){
        return "This is a Filter";
    }
}
当然我们还可根据需求过滤掉我们所需要的请求,只需要修改@WebFilter()中的参数就可以了,这里就不在展示了。
方式二:创建一个过滤器的配置类,这里MyFilter上不需要@WebFilter注解,启动类上也不需要@ServletComponentScan注解了,不同的就是需要添加一个过滤器配置类。
package com.scm.mybatis.Filter;

import org.springframework.boot.web.servlet.FilterRegistrationBean;
import org.springframework.context.annotation.Bean;
import org.springframework.context.annotation.Configuration;

@Configuration
public class FilterConfig {
    @Bean
    public FilterRegistrationBean myFilterRegistration() {
        FilterRegistrationBean registration = new FilterRegistrationBean(new MyFilter());
        registration.addUrlPatterns("/*");
        return registration;
    }
}
@Bean标签就相当于以前spring配置文件中的bean标签。第二种方式中只需要将第一种方式的MyFilter类中的@WebFilter注解删除其他内容一样,启动类上的@ServletComponentScan也要删除,controller与第一种方式相同。
spring boot配置servlet
spring boot配置servlet与配置过滤器相同,同样有两种方式。
方式一:通过@WebServlet和@ServletComponentScan注解
1、首先创建一个servlet,这里同样是在MyServlet类上加上@WebServlet注解。
package com.scm.mybatis.servlet;

import javax.servlet.ServletException;
import javax.servlet.annotation.WebServlet;
import javax.servlet.http.HttpServlet;
import javax.servlet.http.HttpServletRequest;
import javax.servlet.http.HttpServletResponse;
import java.io.IOException;

@WebServlet("/myServlet")
public class MyServlet extends HttpServlet {
    private static final long serialVersionUID = -4134217146900871026L;

    @Override
    protected void doGet(HttpServletRequest req, HttpServletResponse resp) throws ServletException, IOException {
        resp.getWriter().print("This is my servlet");
    }

    @Override
    protected void doPost(HttpServletRequest req, HttpServletResponse resp) throws ServletException, IOException {
        this.doGet(req, resp);
    }
}
2、在主函数启动入口加上@ServletComponentScan注解,之前我们说过该注解可以扫描到@WebServlet注解。
package com.scm.mybatis;

import org.springframework.boot.SpringApplication;
import org.springframework.boot.autoconfigure.SpringBootApplication;
import org.springframework.boot.web.servlet.ServletComponentScan;

@SpringBootApplication
@ServletComponentScan("com.scm.mybatis.servlet")
public class Application {
    public static void main(String[] args) {
        SpringApplication.run(Application.class, args);
    }
}
方式二:创建一个servlet配置类
这里我们将servlet请求参数写在ServletRegistrationBean()方法内。
package com.scm.mybatis.servlet;

import org.springframework.boot.web.servlet.ServletRegistrationBean;
import org.springframework.context.annotation.Bean;
import org.springframework.context.annotation.Configuration;

@Configuration
public class ServletConfig {
    @Bean
    public ServletRegistrationBean myServletRegistrationBean(){
        ServletRegistrationBean registration = new ServletRegistrationBean(new MyServlet(), "/myServlet");
        return registration;
    }
}
将方式一中@WebServlet和@ServletComponentScan注解删除之后,其他均相同。
spring boot健康检查机制
健康检查机制在我们开发阶段用处并不大,但是将项目部署到生产环境之后就要对项目进行运维,这时就会用到健康检查机制,通过该机制我们可以实时监控项目的状态。在生产环境中,需要实时监控程序的可用性,出现问题之后我们需要快速定位,spring-boot 的 actuator 功能提供了很多监控所需的接口。actuator是spring boot提供的对应用系统的自省和监控的集成功能,可以对应用系统进行配置查看、健康检查、相关功能统计等;方便运维人员查看spring boot的运行状况。
使用actuator(client端)
spring boot为actuator提供了起步依赖starter,我们需要在pom中添加下面starter。
<!--web依赖-->
<dependency>
    <groupId>org.springframework.boot</groupId>
    <artifactId>spring-boot-starter-web</artifactId>
</dependency>
<!--添加actuator依赖-->
<dependency>
    <groupId>org.springframework.boot</groupId>
    <artifactId>spring-boot-starter-actuator</artifactId>
</dependency>
<!--spring boot admin依赖 该依赖是集成的,而不是spring官方的-->
<dependency>
    <groupId>de.codecentric</groupId>
    <artifactId>spring-boot-admin-starter-client</artifactId>
</dependency>
如果不想手动添加,我们在创建模块时将以上依赖勾选即可,勾选后pom.xml中会自动生成相关依赖。
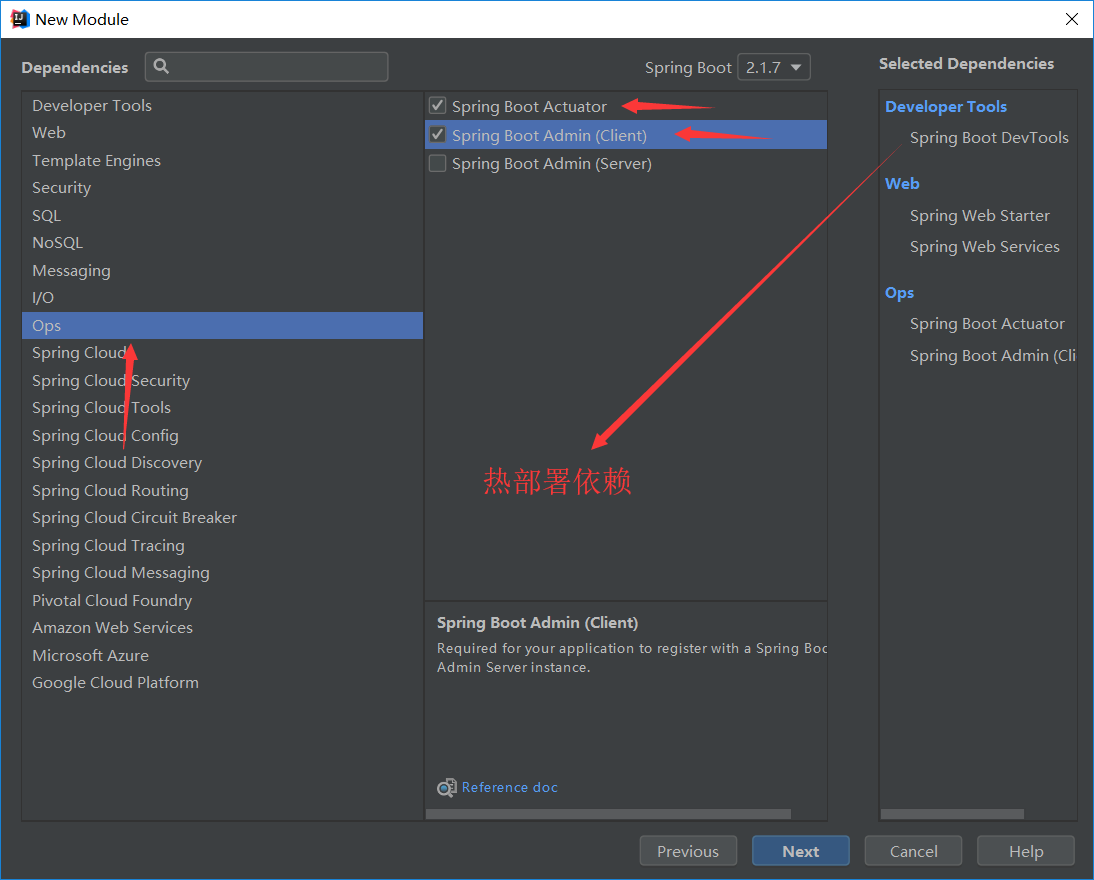
我们先创建一个actuator-client,在client端中添加完相关依赖之后我们只需要在application.properties添加相关配置项即可。
#设置actuator监控端口
management.server.port=8088

#开启所有监控,默认只开启health和info
management.endpoints.web.exposure.include=*

#添加info信息
info.author=scm
info.url=www.baidu.com
上述代码分析:
1、般程序运行默认端口为8080,这里我们将actuator-client端口设置为8088。
2、management.endpoints.web.exposure.include作用是开启所有的监控,里边有项目的一些信息,默认只开启了health和info,还有其他如bean可以查看spring容器中有哪些bean对象。如果想要具体了解可以查看spring官网文档,地址如下。从文档部分截图看出health和info是默认开启的。
https://docs.spring.io/spring-boot/docs/2.1.7.RELEASE/reference/html/production-ready-endpoints.html

3、上边说到了info,那么在actuator中info到底是什么呢?Info其实就是开发者自定义的一些信息。例如我们在上述代码中写入了info.author和info.url(info.后的参数可以是任意的),启动spring boot之后,我们可以在浏览器中输入如下代码查看相关信息。注意输入时端口号要与配置文件中端口号一致,端口号之后要加上actuator。也可以将info改为health和bean查看其他相关信息。如果我们在配置文件中没有开启所有监控那么除了info和health之外其他是无法查看的。
http://localhost:8088/actuator/info
在actuator中提供了很多接口,通过这些接口可以监控一些信息,这里列举一部分:
-
-
beans
展示了bean的别名、类型、是否单例、类的地址、依赖等信息。
-
env
展示了系统环境变量的配置信息,包括使用的环境变量、JVM 属性等。
-
health
描述了应用程序的整体健康状态,UP 表明应用程序是健康的。
-
mappings
URl路径和控制器的映射关系。
-
spring boot admin图形化界面(server端)
上面通过actuator提供的rest接口,返回的数据都是json格式,这个对于不懂json格式的人来说不太方便,因此就产生了spring boot admin,它提供了图形化界面,通过界面来展示这些数据。在actuator-client客户端一般放入一些业务逻辑,通常会再创建一个actuator-server服务端来专用于监控。
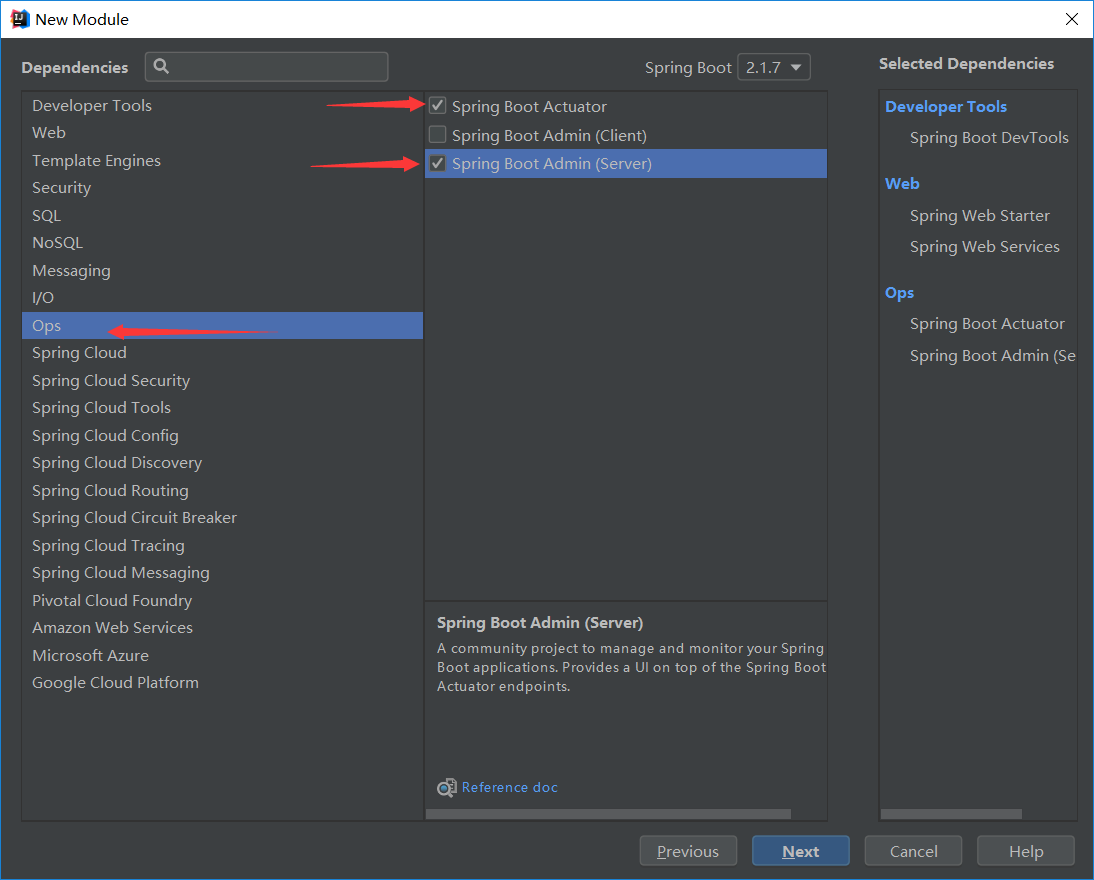
以下是需要添加的相关依赖,或在创建模块时直接勾选,无需手动添加。
        <dependency>
            <groupId>org.springframework.boot</groupId>
            <artifactId>spring-boot-starter-actuator</artifactId>
        </dependency>
        <dependency>
            <groupId>org.springframework.boot</groupId>
            <artifactId>spring-boot-starter-web</artifactId>
        </dependency>
        <dependency>
            <groupId>org.springframework.boot</groupId>
            <artifactId>spring-boot-starter-web-services</artifactId>
        </dependency>
        <dependency>
            <groupId>de.codecentric</groupId>
            <artifactId>spring-boot-admin-starter-server</artifactId>
        </dependency>

        <dependency>
            <groupId>org.springframework.boot</groupId>
            <artifactId>spring-boot-devtools</artifactId>
            <scope>runtime</scope>
            <optional>true</optional>
        </dependency>
与之前不一样的是这里我们需要勾选Server,之前我们勾选的是Client。
1、创建完actuator-server之后需要在application.properties配置文件中配置服务端端口
#server端端口号
server.port=8089
2、在actuator-server的主函数启动入口上需要加上@EnableAdminServer注解用于开启SBA服务。
package com.monkey.server;

import de.codecentric.boot.admin.server.config.EnableAdminServer;
import org.springframework.boot.SpringApplication;
import org.springframework.boot.autoconfigure.SpringBootApplication;

@SpringBootApplication
@EnableAdminServer//开启SBA服务
public class ApplicationServer {

    public static void main(String[] args) {
        SpringApplication.run(ApplicationServer.class, args);
    }
}
上面的项目是作为server端,将之前的spring boot项目作为client端,由server端统一监控client端。client的模块中,在配置文件里面添加下面内容:
3、在actuator-client端的application.properties配置文件中我们还需要指定服务端的主机地址,添加如下代码:
#配置actuator admin主机地址
spring.boot.admin.client.url=http://localhost:8089
全部完成之后,启动server和client,访问server端,http://localhost:8089 就可以看到spring boot admin的页面了。访问的地址为actuator-server端的端口号。
健康检查机制总结:
1、需要创建actuator-clietn和actuator-server两个模块(client端可以创建多个,如果创建多个在server端都可以看到),两个模块所添加的依赖不完全相同,具体参考上述。
2、client需要配置client端端口号、开启所有监控服务、可以使用info添加自定义信息、还要指定server端的地址。
3、server需要配置server端端口号、在主函数启动入口添加@EnableAdminServer注解用于开启SBA服务。
4、通过地址栏访问client端时要在端口号之后加上actuator,之后加上rest接口名。要想访问server端直接输入server端口号即可,但要将client和server端两个启动入口同时开启。