最近项目有一个非解决不可的问题,我们的项目中的用户表是用的自己库的数据,但是这些数据都是从一个已有库中迁过来的,所以用户信息都是在那个项目里面维护,自然而然我们项目不提供用户注册功能,这就有个问题,如何解决数据迁移的问题,总不能我每次都手动导数据吧,所以我决心写一个接口把那个库中的用户信息同步我们的库中去。
这又涉及到一个问题,如何在一个服务中连接两个库,在网上搜索了一番,算是把问题解决了,现将多数据源demo代码贴出来,先看一下我的目录结构
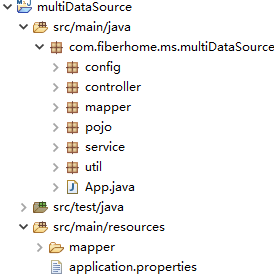
controller、mapper、pojo、service这几个常见的业务逻辑包我们放到最后看,先看一下util包里面的类
DatabaseType
/**
 * 采用枚举的方法列出所有的数据源key(常用数据库名称来命名)
 * 数据源个数和数据库个数保持一致
 */
public enum DatabaseType {
    mytestdb,mytestdb2
}
这里就是列出所有的数据源,相当于定义了两个常量,便于统一维护
DynamicDataSource
import org.springframework.jdbc.datasource.lookup.AbstractRoutingDataSource;
/**
 * 动态数据源(需要继承AbstractRoutingDataSource)
 */
public class DynamicDataSource extends AbstractRoutingDataSource {

    //定义一个线程安全的DatabaseType容器
    private static final ThreadLocal<DatabaseType> contextHolder = new ThreadLocal<DatabaseType>();

    public static DatabaseType getDatabaseType(){
        return contextHolder.get();
    }

    public static void setDatabaseType(DatabaseType type) {
        contextHolder.set(type);
    }
    //获取当前线程的DatabaseType
    protected Object determineCurrentLookupKey() {
      return getDatabaseType();
  }
}
在这里创建一个动态数据源的类,定义了DatabaseType的get和set方法,用getDatabaseType()获得一个当前线程的DatabaseType来重写determineCurrentLookupKey()方法。
最后来看一下config包下面的类
MybatisConfig
import java.util.HashMap;
import java.util.Map;
import java.util.Properties;

import javax.sql.DataSource;


import org.apache.ibatis.session.SqlSessionFactory;
import org.mybatis.spring.SqlSessionFactoryBean;

import org.springframework.beans.factory.annotation.Qualifier;
import org.springframework.context.EnvironmentAware;
import org.springframework.context.annotation.Bean;
import org.springframework.context.annotation.Configuration;
import org.springframework.context.annotation.Primary;
import org.springframework.core.env.Environment;
import org.springframework.core.io.support.PathMatchingResourcePatternResolver;
import org.springframework.jdbc.datasource.DataSourceTransactionManager;

import com.alibaba.druid.pool.DruidDataSourceFactory;
import com.fiberhome.ms.multiDataSource.util.DatabaseType;
import com.fiberhome.ms.multiDataSource.util.DynamicDataSource;

/**
 * springboot集成mybatis的基本入口
 * 1) 获取数据源
 * 2)创建数据源
 * 3)创建SqlSessionFactory
 * 4)配置事务管理器,除非需要使用事务,否则不用配置
 */
@Configuration
public class MybatisConfig implements EnvironmentAware {

    private Environment environment;

    public void setEnvironment(final Environment environment) {
        this.environment = environment;
    }

    /**
     * 创建数据源,从配置文件中获取数据源信息
     */
    @Bean
    public DataSource testDataSource() throws Exception {
        Properties props = new Properties();
        props.put("driverClassName", environment.getProperty("jdbc.driverClassName"));
        props.put("url", environment.getProperty("jdbc.url"));
        props.put("username", environment.getProperty("jdbc.username"));
        props.put("password", environment.getProperty("jdbc.password"));
        return DruidDataSourceFactory.createDataSource(props);
    }

    @Bean
    public DataSource test1DataSource() throws Exception {
        Properties props = new Properties();
        props.put("driverClassName", environment.getProperty("jdbc2.driverClassName"));
        props.put("url", environment.getProperty("jdbc2.url"));
        props.put("username", environment.getProperty("jdbc2.username"));
        props.put("password", environment.getProperty("jdbc2.password"));
        return DruidDataSourceFactory.createDataSource(props);
    }

    /**注入数据源
     */
    @Bean
    public DynamicDataSource dataSource(@Qualifier("testDataSource")DataSource testDataSource, @Qualifier("test1DataSource")DataSource test1DataSource) {
        Map<Object, Object> targetDataSources = new HashMap<Object, Object>();
        targetDataSources.put(DatabaseType.mytestdb, testDataSource);
        targetDataSources.put(DatabaseType.mytestdb2, test1DataSource);

        DynamicDataSource dataSource = new DynamicDataSource();
        dataSource.setTargetDataSources(targetDataSources);// 该方法是AbstractRoutingDataSource的方法
        dataSource.setDefaultTargetDataSource(testDataSource);// 默认的datasource设置为myTestDbDataSource

        return dataSource;
    }

    /**
     * 根据数据源创建SqlSessionFactory
     */
    @Bean
    public SqlSessionFactory sqlSessionFactory(@Qualifier("testDataSource") DataSource testDataSource,
                                               @Qualifier("test1DataSource") DataSource test1DataSource) throws Exception{
      PathMatchingResourcePatternResolver resolver = new PathMatchingResourcePatternResolver();
      SqlSessionFactoryBean fb = new SqlSessionFactoryBean();
        fb.setDataSource(this.dataSource(testDataSource, test1DataSource));
        fb.setTypeAliasesPackage("com.fiberhome.ms.multiDataSource");// 指定基包
        fb.setMapperLocations(resolver.getResources("classpath:mapper/*.xml"));//
        return fb.getObject();
    }


    /**
     * 配置事务管理器
     */
    @Bean
    public DataSourceTransactionManager testTransactionManager(DynamicDataSource dataSource) throws Exception {
        return new DataSourceTransactionManager(dataSource);
    }


}
上面这段代码在创建数据源DataSource实例时采用的是@bean注解注入的方式,使其成为受spring管理的bean。在后面的方法把两个DataSource作为参数传入,可以看到用了@Qualifier注解,加这个注解是为了解决多个实例无法直接装配的问题,在这里有两个DataSource类型的实例,需要指定名称装配。
还有数据源配置文件
application.properties
#the first datasource
jdbc.driverClassName = com.mysql.jdbc.Driver
jdbc.url = jdbc:mysql://localhost:3306/test?useUnicode=true&characterEncoding=UTF-8
jdbc.username = root
jdbc.password = 123456

#the second datasource
jdbc2.driverClassName = com.mysql.jdbc.Driver
jdbc2.url = jdbc:mysql://localhost:3306/test1?useUnicode=true&characterEncoding=UTF-8
jdbc2.username = root
jdbc2.password = 123456
说完了关键的通用代码,再来看看如何在业务代码中使用
UserServiceImpl
import com.fiberhome.ms.multiDataSource.mapper.UserMapper;
import com.fiberhome.ms.multiDataSource.pojo.User;
import com.fiberhome.ms.multiDataSource.service.UserService;
import com.fiberhome.ms.multiDataSource.util.DatabaseType;
import com.fiberhome.ms.multiDataSource.util.DynamicDataSource;
@Service
public class UserServiceImpl implements UserService {

  @Autowired
  private UserMapper userMapper;

  @Override
  public List<User> getTestUser() {
    //设置数据源
    DynamicDataSource.setDatabaseType(DatabaseType.mytestdb);
    return userMapper.findUser();
  }

  @Override
  public List<User> getTest1User() {
    //设置数据源
    DynamicDataSource.setDatabaseType(DatabaseType.mytestdb2);
    return userMapper.findUser();
  }

}
在service层的实现类中设置数据源即可指定哪个mapper接口使用哪个数据源,这样就OK了。剩下的业务代码很简单就不贴了。。。