本文意在讲解CGLIB的基础使用及基本原理。
一、CGLIB的基本原理:
依赖ASM字节码工具,通过动态生成实现接口或继承类的类字节码,实现动态代理。
针对接口,生成实现接口的类,即implements方式;针对类,生成继承父类的类,即extends方式。
二、为什么使用CGLIB?
JDK的动态代理只能基于接口,有时候我们想基于类生成动态代理,这个时候CGLIB是一个选择。
没什么场景下是必须使用CGLIB生成类代理的(个人观点),如果有,可能是代码简洁,某些情况下性能较好。
CGLIB基于类生成动态代理需要注意?(CGLIB生成的代理是继承类的)
1. final声明的类是不能被代理的;
2. 类中的private,final方法不能被代理,static方法不生成代理方法。
二、使用方法:
基础示例代码:
public interface UserInterface {
    boolean login(int userid);
}
public class UserInterfaceImpl implements UserInterface {
    public boolean login(int userid) {
        System.out.println("do Login!");
        return false;
    }
}
1. 代理接口:
public class CGlibProxy implements net.sf.cglib.proxy.InvocationHandler{ //这里的InvocationHandler是cglib包中的
    private UserInterface ref;
    public CGlibProxy(UserInterface ref){
        this.ref = ref;
    }
    public Object invoke(Object proxy, Method method, Object[] args) throws Throwable {
        System.out.println("before");
        method.invoke(ref, args);
        System.out.println("after");
        return null;
    }
}
public class Test {
    public static void main(String[] args) throws IOException {
        Enhancer en = new Enhancer();
        en.setSuperclass(UserInterface.class);
        en.setCallback(new CGlibProxy(new UserInterfaceImpl()));
        UserInterface interfaced = (UserInterface) en.create();
        interfaced.login(1);
    }
}
代理接口和JDK的使用方法基本没啥区别,传入被代理实例对象,调用实例的对象的method方法。
所以如果是代理接口,完全没必要使用CGLIB。
2. 代理类:
public class CGlibProxy implements MethodInterceptor{
    public Object intercept(Object obj, Method method, Object[] args, MethodProxy proxy) throws Throwable {
        System.out.println("before");
        Object o = proxy.invokeSuper(obj, args);
        System.out.println("after");
        return o;
    }
}
public class Test {
    public static void main(String[] args) throws IOException {
        Enhancer en = new Enhancer();
        en.setSuperclass(UserInterfaceImpl.class);
        en.setCallback(new CGlibProxy());
        UserInterface interfaced = (UserInterface) en.create();
        interfaced.login(1);
    }
}
3. Callback接口
Callback即代理方法,上述示例中MethodInterceptor就是Callback的子接口。Callback定义一个空接口,可以方便扩展。
Enhancer中有两个设置Callback的方法: setCallback(Callback callback), setCallbacks(Callback[] callbacks)。
你可能定义多个Callback,然后定义不同的代理行为,如下:
public class LoginProxy implements MethodInterceptor{
    public Object intercept(Object obj, Method method, Object[] args, MethodProxy proxy) throws Throwable {
        System.out.println("before login");
        proxy.invokeSuper(obj, args);
        System.out.println("after loign");
        return null;
    }
}
public class OtherProxy implements MethodInterceptor{
    public Object intercept(Object obj, Method method, Object[] args, MethodProxy proxy) throws Throwable {
        System.out.println("before");
        proxy.invokeSuper(obj, args);
        System.out.println("after");
        return null;
    }
}
cglib代理只能调用一个代理方法,所以当设置多个Callback时,你还需要指定一个CallbackFilter,通过Method条件指定Callback,
CallbackFilter接口:
public interface CallbackFilter {
    int accept(Method method); //返回值为指定的Callback数组的下标索引
}
示例:
public class Test {
    public static void main(String[] args) throws IOException {
        Enhancer en = new Enhancer();
        en.setSuperclass(UserInterfaceImpl.class);
        en.setCallbacks(new Callback[]{new LoginProxy(),new OtherProxy()}); //callback数组
        en.setCallbackFilter(new CallbackFilter() {
            public int accept(Method method) {
                if(method.getName().equals("login")){
                    return 0;  //索引为0 , 即  LoginProxy
                }
                return 1; // 索引为1, 即 OtherProxy
            }
        });
        UserInterfaceImpl interfaced = (UserInterfaceImpl) en.create();
        interfaced.login(1);
        interfaced.other();
    }
}
4. MethodInterceptor:MethodInterceptor接口是Callback的子接口,最常用。
public interface MethodInterceptorextends Callback {
  //obj: 代理对象本身,即cglib生成的代理实例
   //method: 被代理对象中的方法
  //args:方法的参数
  //proxy: 存储了代理类,也就是obj
    public Object intercept(Object obj, Method method, Object[] args, MethodProxy proxy) throws Throwable;
}
如何调用被代理的目标方法?
MethodProxy的 invokeSuper(obj,args) 方法;obj就是 代理对象本身 ,args是对象参数;
MethodProxy还有一个invoke(obj,args)方法;obj参数是被代理对象,没搞懂这个方法的意图,个人觉得没什么必要。
5. NamingPolicy,自定义代理类名称,默认实现是DefaultNamingPolicy
public interface NamingPolicy {
    String getClassName(String prefix, String source, Object key, Predicate names);
}
6. GeneratorStrategy,字节码生成策略,默认实现是DefaultGeneratorStrategy
public interface GeneratorStrategy {
    byte[] generate(ClassGenerator cg) throws Exception;
}
你可以重写DefaultGeneratorStrategy中的方法来替换字节码生成器,也可以访问或修改生成的字节码,如下:
Enhancer en = new Enhancer();
en.setStrategy(new DefaultGeneratorStrategy(){
       protected byte[] transform(byte[] b) throws Exception {
           return b; //b 是生成的字节码
       }
       protected ClassGenerator transform(ClassGenerator cg) throws Exception {
           return cg; //cg 是字节码生成器
       }
});
7. interceptDuringConstruction,设置构造函数中的方法调用是否使用代理方法,默认为true。
示例:
public class UserInterfaceImpl implements UserInterface {
    public UserInterfaceImpl(){
        login(1);  //构造函数中调用方法
    }
    public boolean login(int userid) {
        System.out.println("do Login!");
        return false;
    }
}
public class Test {
    public static void main(String[] args) throws IOException {
        Enhancer en = new Enhancer();
        en.setInterceptDuringConstruction(true);
        en.setSuperclass(UserInterfaceImpl.class);
        en.setCallback(new LoginProxy());
        UserInterfaceImpl interfaced = (UserInterfaceImpl) en.create();
        interfaced.login(1);
    }
}
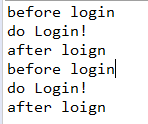
运行测试代码,结果如下,即login方法被代理了两次。

en.setInterceptDuringConstruction(false) 时,运行结果如下,即login方法被代理了一次

8. 没有默认构造函数时创建代理的方法:
public class UserInterfaceImpl implements UserInterface {
    public UserInterfaceImpl(String param){
    }
    public boolean login(int userid) {
        System.out.println("do Login!");
        return false;
    }
}
public class Test {
    public static void main(String[] args) throws IOException {
        Enhancer en = new Enhancer();
        en.setSuperclass(UserInterfaceImpl.class);
        en.setCallback(new LoginProxy());
        UserInterfaceImpl interfaced = (UserInterfaceImpl) en.create(new Class[]{String.class}, new Object[]{"name"}); //创建方法中指定构造函数的参数类型及对应的参数值
        interfaced.login(1);
    }
}
三、cglib创建类代理的基本原理
如果让你实现类代理? ---- 难点在哪里?
1. 创建代理的过程:
根据各种参数生成缓存的key --> 生成代理类(先缓存获取,缓存没有则用ClassGenerator生成代理类存入缓存) --> 根据代理类构造器生成代理对象实例。
2. 代理类对象:
可以设置系统参数cglib.debugLocation,开启代理类存入文件,该参数为文件存储路径。
示例代码:
public class UserInterfaceImpl implements UserInterface {
    public boolean login(int userid) {
        return false;
    }
}
public class Test {
    public static void main(String[] args) throws IOException {
        System.setProperty("cglib.debugLocation", "E://test");
        Enhancer en = new Enhancer();
        en.setSuperclass(UserInterfaceImpl.class);
        en.setCallback(new LoginProxy());
        en.create();
    }
}
运行后,test目录下会生成一些class文件,找到同包(自己的package)目录,反编译打开(用的luyten,比jdgui好用)
为了方便看,删除了一些不必要的代码;
package cglibproxy;
import java.lang.reflect.*;
import net.sf.cglib.proxy.*;
import net.sf.cglib.core.*;
public class UserInterfaceImpl$$EnhancerByCGLIB$$f2d3e293 extends UserInterfaceImpl implements Factory
{private MethodInterceptor CGLIB$CALLBACK_0;
    private static Object CGLIB$CALLBACK_FILTER;

    private static final Method CGLIB$login$0$Method;
    private static final MethodProxy CGLIB$login$0$Proxy;
private static final Method CGLIB$equals$1$Method;
    private static final MethodProxy CGLIB$equals$1$Proxy;

    private static final Method CGLIB$toString$2$Method;
    private static final MethodProxy CGLIB$toString$2$Proxy;

    private static final Method CGLIB$hashCode$3$Method;
    private static final MethodProxy CGLIB$hashCode$3$Proxy;

    private static final Method CGLIB$clone$4$Method;
    private static final MethodProxy CGLIB$clone$4$Proxy;
   final boolean CGLIB$login$0(final int n) {
        return super.login(n);
    }

    public final boolean login(final int n) {
        MethodInterceptor cglib$CALLBACK_2;
        MethodInterceptor cglib$CALLBACK_0;
        if ((cglib$CALLBACK_0 = (cglib$CALLBACK_2 = this.CGLIB$CALLBACK_0)) == null) {
            CGLIB$BIND_CALLBACKS(this);
            cglib$CALLBACK_2 = (cglib$CALLBACK_0 = this.CGLIB$CALLBACK_0);
        }
        if (cglib$CALLBACK_0 != null) {
            final Object intercept = cglib$CALLBACK_2.intercept((Object)this, UserInterfaceImpl$$EnhancerByCGLIB$$f2d3e293.CGLIB$login$0$Method, new Object[] { new Integer(n) }, UserInterfaceImpl$$EnhancerByCGLIB$$f2d3e293.CGLIB$login$0$Proxy);
            return intercept != null && (boolean)intercept;
        }
        return super.login(n);
    }
}
可以从反编译的代理类中看到:
代理类继承了被代理类,Factory接口是cglib的内部接口,有兴趣的可以去看一下;
代理类代理了两种方法,一种是被代理类(即我们自定义的方法),一种是Object中的4个方法(toString, equals, hashCode, clone);
代理类针对每个方法,生成了两个方法(一个代理方法,一个原方法) (为什么这么做?想想MethodProxy.invokeSuper(),这里是一个关键点);
代理类中的目标方法都使用了final声明,禁止继续被代理;
以上就是个人总结的cglib的一些基础,水平有限,有问题欢迎评论中指正,谢谢!
原创文章,转载请注明出处。